
1. Important Safety Information
Please read and understand all safety instructions before operating the VIPARSPECTRA XS2500 LED Grow Light. Failure to follow these instructions may result in electric shock, fire, or serious injury.
- Do not look directly at the LED lights when the fixture is on. This can cause eye damage.
- Ensure the power supply is disconnected before installation, cleaning, or maintenance.
- This product is designed for indoor use only. Do not expose to water or high humidity.
- Ensure proper ventilation around the fixture to prevent overheating.
- Do not modify the light fixture or its components. Unauthorized modifications may void the warranty and create safety hazards.
- Keep out of reach of children and pets.
2. Package Contents
Verify that all components are present in the package:
- 1 x VIPARSPECTRA XS2500 LED Grow Light Fixture
- 1 x Power Cord (5.9 ft / 180 cm)
- 1 x Dimming Cable (4.9 ft / 150 cm)
- 2 x Stainless Steel Hooks
- 2 x Rope Hangers
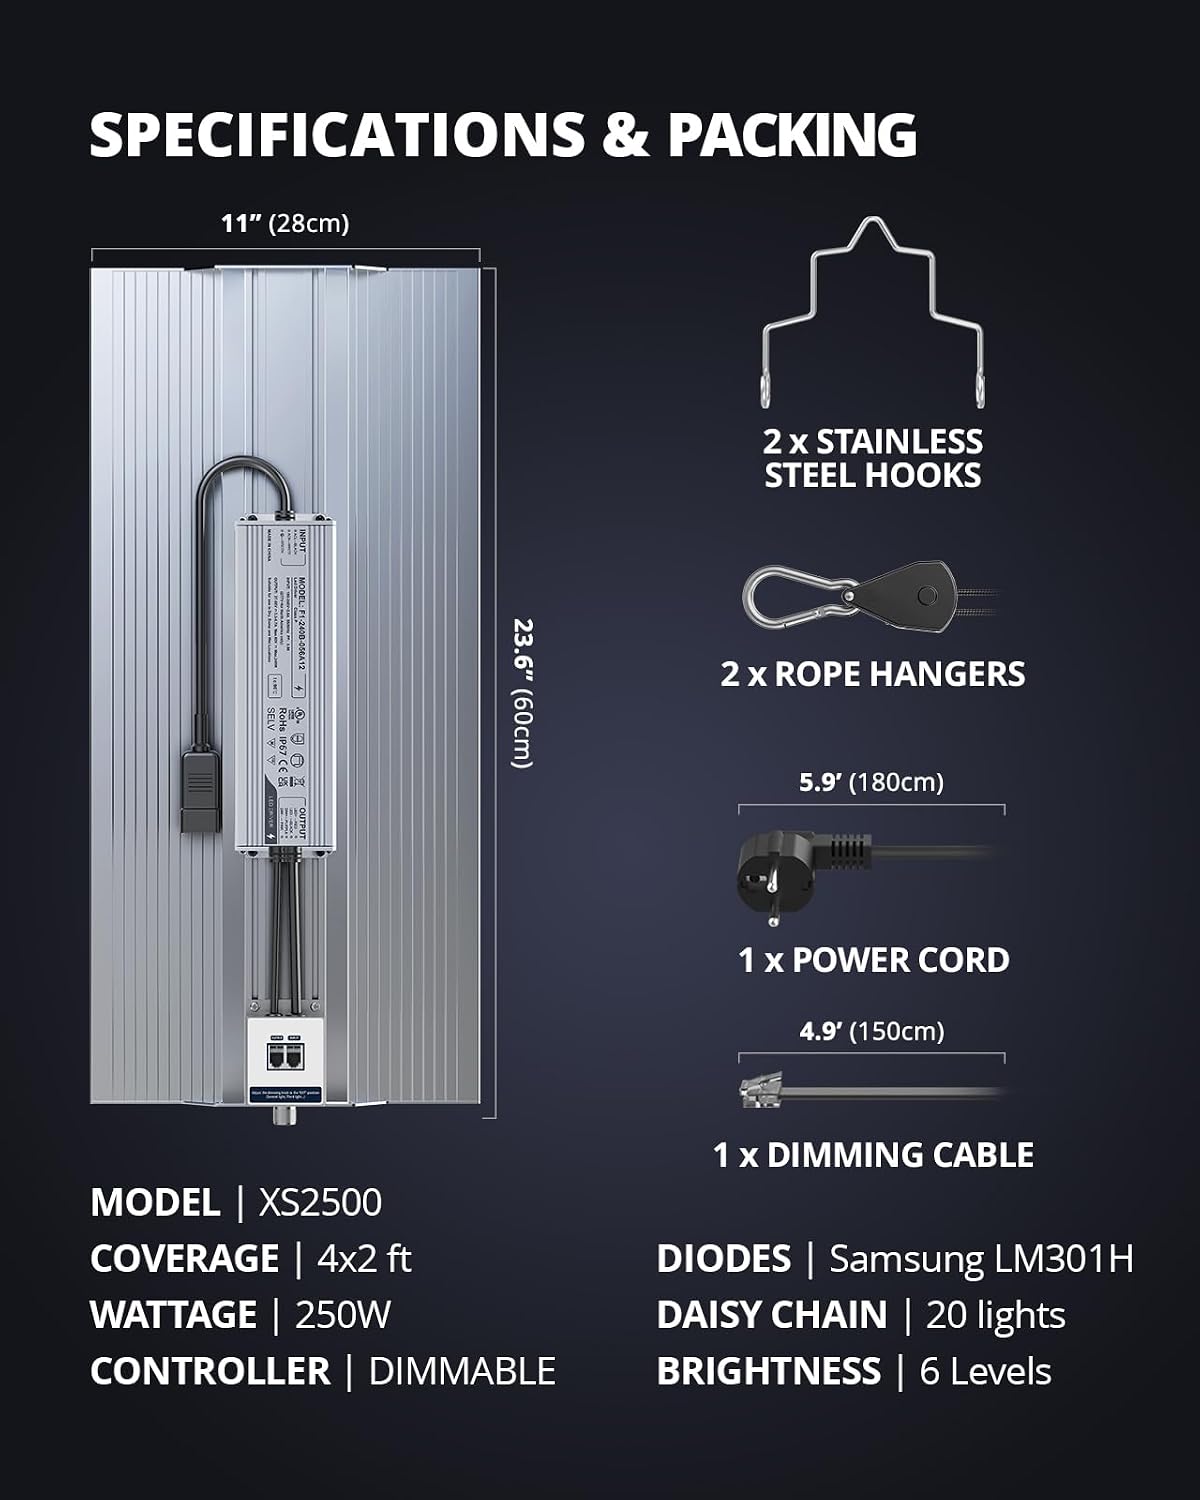
Image: Included components and dimensions of the XS2500 grow light.
3. Setup and Installation
The VIPARSPECTRA XS2500 grow light is designed for easy setup. Follow these steps for installation:
- Unpack the Fixture: Carefully remove the grow light and all accessories from the packaging. Inspect for any damage.
- Attach Hanging Hardware: Connect the stainless steel hooks to the designated points on the top of the grow light fixture. Then, attach the rope hangers to the stainless steel hooks.
- Mount the Light: Hang the grow light in your desired location (e.g., grow tent, grow room) using the rope hangers. Ensure the mounting point is secure and can support the weight of the fixture. Adjust the height using the rope hangers as needed for your plant's growth stage.
- Connect Power: Plug the power cord into the power input on the grow light fixture, then plug the other end into a standard electrical outlet (120V).
- Connect Dimming Cable (Optional for Daisy Chain): If connecting multiple XS2500 lights in a daisy chain, use the provided dimming cable to link the lights. Connect one end of the dimming cable to the 'OUT' port of the first light and the other end to the 'IN' port of the next light. Repeat for additional lights. The dimmer on the first light will control all connected lights.

Image: The XS2500 grow light installed within a grow tent environment.

Image: Illustration of multiple XS2500 lights connected via daisy chain for synchronized dimming.
4. Operating Instructions
4.1 Dimming Control
The XS2500 features a dimmable controller to adjust light intensity. The dimmer knob allows for 6 levels of brightness adjustment from 0% to 100%. Rotate the knob clockwise to increase brightness and counter-clockwise to decrease it.
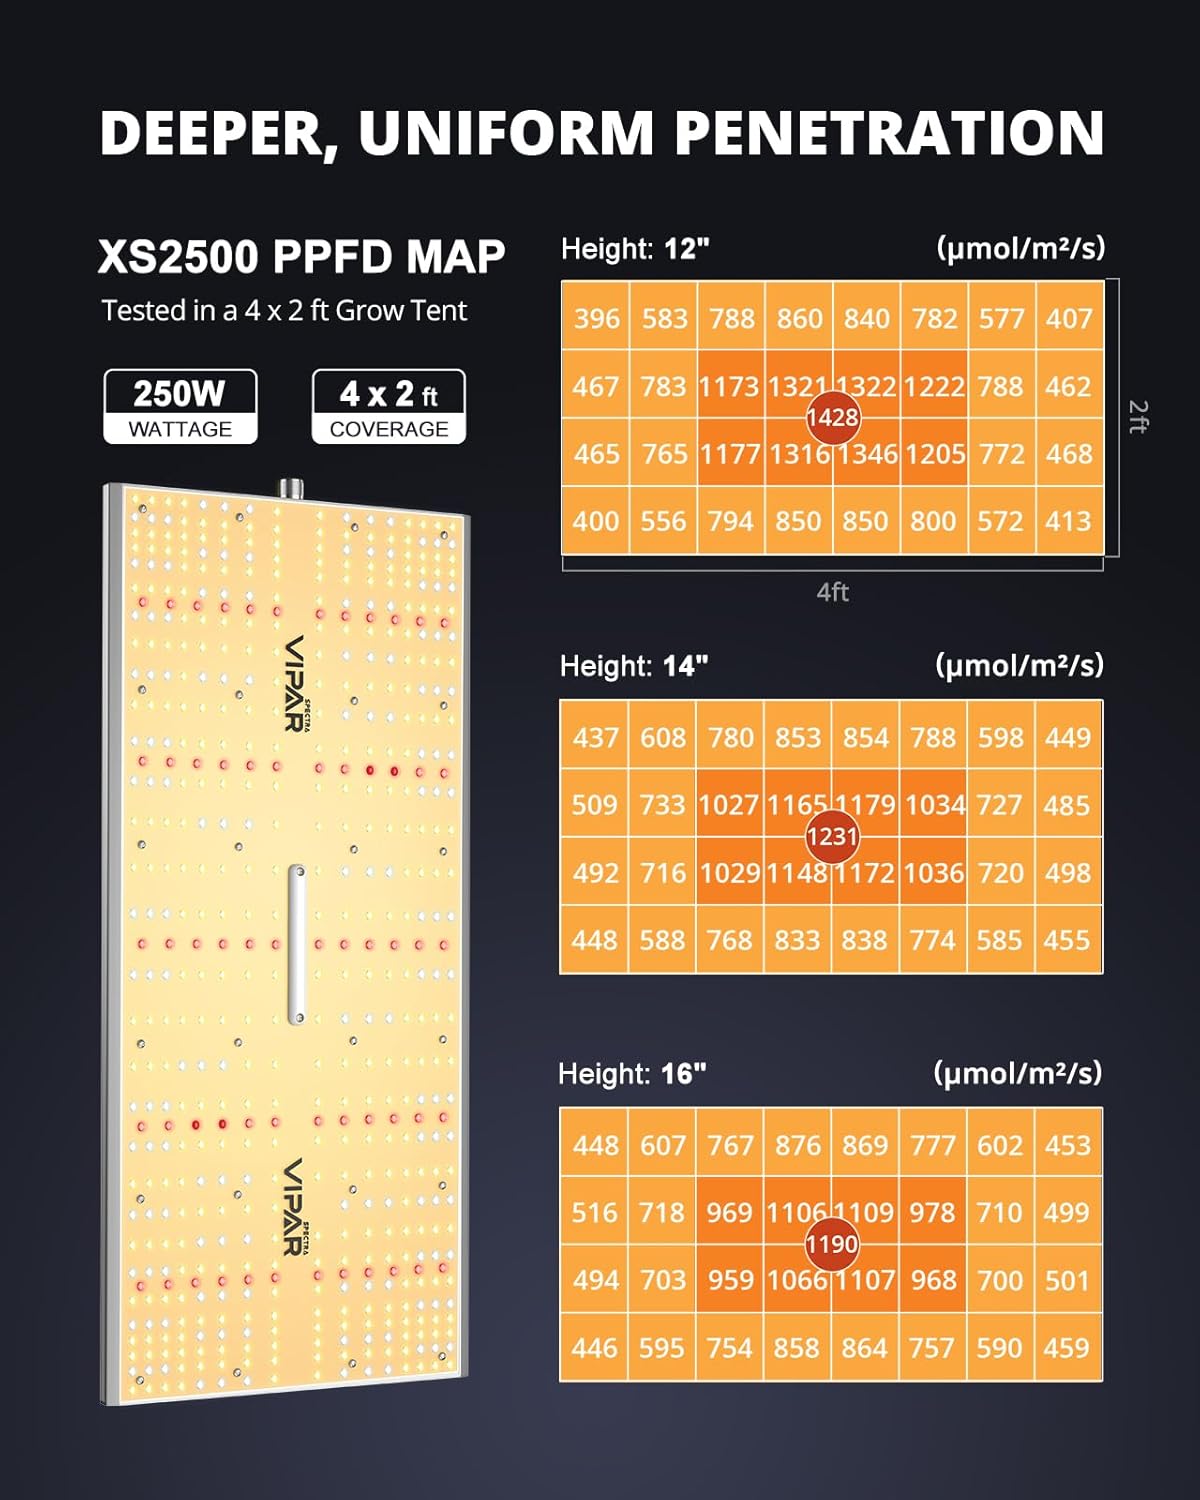
Image: The dimmable controller with 6 brightness levels.
4.2 Full Spectrum LED Technology
The XS2500 utilizes Samsung LM301H diodes with an algorithmically designed ratio of white, red, and IR LEDs to optimize plant growth across all stages. The specific wavelengths provided are:
- 5000K: Promotes plant germination.
- 3000K: Boosts plant flowering.
- 660nm (Red): Promotes plant flowering.
- 730nm (IR): Enhances blooming and increases yields.

Image: Details of the full spectrum LEDs and their photo parameters.
4.3 Recommended Growth Settings
Adjust the light's height and dimming level according to the plant's growth stage for optimal results. The following table provides general guidelines:
| Growth Stage | Distance (inches) | Dimming | Light Cycle |
|---|---|---|---|
| Germination | 24" - 30" | 50% | 18h ON / 6h OFF |
| Seedling | 24" | 50% - 75% | 18h ON / 6h OFF |
| Vegetative | 18" - 24" | 75% - 100% | 18h ON / 6h OFF |
| Flowering | 12" - 18" | 100% | 12h ON / 12h OFF |

Image: Recommended light settings for various plant growth stages.
5. Maintenance
Regular maintenance ensures optimal performance and longevity of your grow light.
- Cleaning: Periodically clean the light fixture with a soft, dry cloth to remove dust and debris. Ensure the light is unplugged and cool before cleaning. Do not use harsh chemicals or abrasive cleaners.
- Inspection: Regularly inspect the power cord, dimming cable, and hanging hardware for any signs of wear or damage. Replace any damaged components immediately.
- Ventilation: Ensure that the grow light's heat sinks are not obstructed to allow for proper heat dissipation.
6. Troubleshooting
If you encounter issues with your VIPARSPECTRA XS2500 grow light, consider the following common troubleshooting steps:
- Light Not Turning On:
- Check if the power cord is securely plugged into both the fixture and the electrical outlet.
- Verify that the electrical outlet is functioning correctly by plugging in another device.
- Ensure the dimmer knob is not set to 0%.
- Dimming Malfunction:
- If using a daisy chain, ensure all dimming cables are securely connected.
- Test the dimmer knob's functionality by rotating it through its full range.
- Overheating:
- Ensure there is adequate airflow around the fixture and that the heat sinks are not blocked.
- Verify that the ambient temperature of the grow space is within acceptable limits.
If these steps do not resolve the issue, please contact VIPARSPECTRA customer support for further assistance.
7. Product Specifications
Detailed specifications for the VIPARSPECTRA XS2500 LED Grow Light:
| Specification | Detail |
|---|---|
| Model | XS2500 |
| Brand | VIPARSPECTRA |
| Wattage | 250W |
| Light Source Type | LED (Samsung LM301H Diodes) |
| Spectrum | Full Spectrum (3000K, 5000K, 660nm, 730nm IR) |
| Brightness | 37457 Lumen |
| Coverage Area | 4x3 ft (Veg), 4x2 ft (Flowering) |
| Dimming | Yes, 6 Levels |
| Daisy Chain | Up to 20 lights |
| Voltage | 120 Volts |
| Amperage | 2.31 Amps |
| Product Dimensions | 23.6"L x 11"W x 2.6"H |
| Item Weight | 7.92 pounds (3.6 Kilograms) |
| Material | Aluminum |
| Certifications | Energy Star, UL |

Image: PPFD (Photosynthetic Photon Flux Density) map for XS2500 at various heights.

Image: Detail of the Samsung LM301H LED diode used in the fixture.
8. Warranty and Support
VIPARSPECTRA is committed to providing quality products and customer satisfaction.
- Warranty: For specific warranty terms and conditions, please refer to the warranty card included with your product or visit the official VIPARSPECTRA website.
- Customer Service: For professional guidance, technical support, or after-sales service, please contact VIPARSPECTRA customer support. US-based after-sales service is available to assist you.
You can find more information and contact details on the official VIPARSPECTRA Store.


