Introduction
This manual provides detailed instructions for the installation, operation, and maintenance of your Bileeko RV Backup Camera System. Please read this manual thoroughly before using the product to ensure proper function and safety.
The system includes a 7-inch monitor and a waterproof rear view camera designed for various vehicles such as RVs, trucks, trailers, vans, jeeps, and SUVs, offering enhanced visibility and safety during reversing maneuvers.
Package Contents
Verify that all items listed below are present in your package:
- 1 x 7-inch Monitor
- 1 x Backup Camera
- 1 x 33Ft (10m) 4Pin Video Cable
- 1 x Remote Control
- 1 x Cigarette Lighter Switch
- 1 x Power Cable
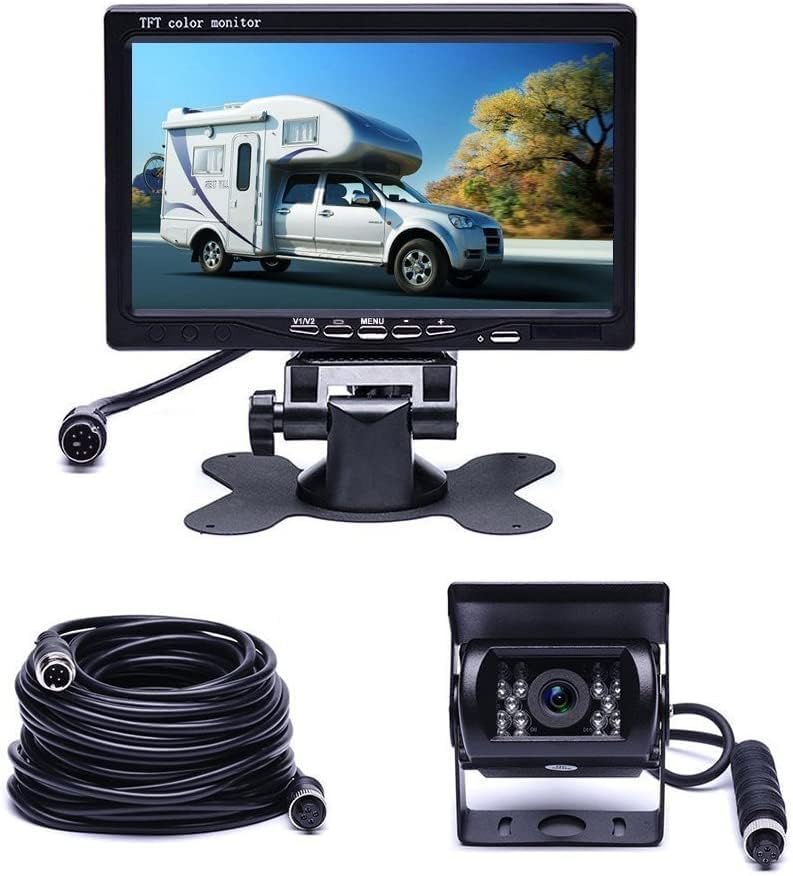
Image: Overview of the Bileeko RV Backup Camera System components, including the 7-inch monitor, the waterproof backup camera, and the 33-foot 4-pin video cable.
Product Features
- 7-inch TFT LCD Monitor: Features a high-definition 800x480 resolution display with adjustable brightness, contrast, and color. Supports two video inputs and offers screen rotation for mirror or normal viewing.
- IP68 Waterproof Camera: Constructed with a hard metal casing, ensuring durability and resistance to water and mud.
- Enhanced Night Vision: Equipped with 18 IR LEDs for clear visibility in low-light conditions, aiding in safe reversing at night.
- Wide Viewing Angle: Provides a 120° horizontal wide view angle and 180° vertical adjustable angle to minimize blind spots.
- Stable Wired Transmission: Utilizes a 33Ft (10m) 4-pin cable for a reliable and stable video signal, preventing signal loss common with wireless systems.
- Automatic Reverse Display: The monitor automatically displays rear images and parking guidelines when the reverse gear is engaged.
- Remote Control Operation: Includes a remote control for convenient adjustment of monitor settings without direct interaction.

Image: Detail of the backup camera highlighting its built-in IR-CUT feature, which improves color accuracy during the day and enhances night vision. A visual comparison shows the difference in image quality.

Image: Demonstration of the camera's 18 IR LED lights for night vision. The top panel shows a clear view with IR LEDs in darkness, while the bottom panel shows a significantly darker view without them, illustrating the effectiveness of the night vision feature.
Setup and Installation
The system is designed for straightforward installation. Follow these general steps:
- Mount the Monitor: Choose a suitable location on your dashboard or windshield that does not obstruct your driving view. Secure the monitor using the provided mounting bracket.
- Install the Camera: Mount the backup camera at the rear of your vehicle, ensuring a clear view of the area behind. The camera's adjustable angle allows for optimal positioning.
- Connect the Video Cable: Run the 33-foot 4-pin video cable from the camera to the monitor. Ensure connections are secure and routed safely away from moving parts or heat sources.
- Power Connection:
- Connect the monitor's power cable to the cigarette lighter switch for easy power on/off.
- For automatic reverse activation, connect the camera's power wire to your vehicle's reverse light circuit (professional installation recommended for this step). The system supports DC 12V-24V power input.
- Test the System: After all connections are made, turn on your vehicle and engage reverse gear to test the camera and monitor functionality. Adjust the camera angle and monitor settings as needed.
Note: For detailed wiring diagrams specific to your vehicle, consult your vehicle's service manual or a qualified automotive technician.
Operating Instructions
The monitor and remote control provide various functions for optimal viewing and system management.
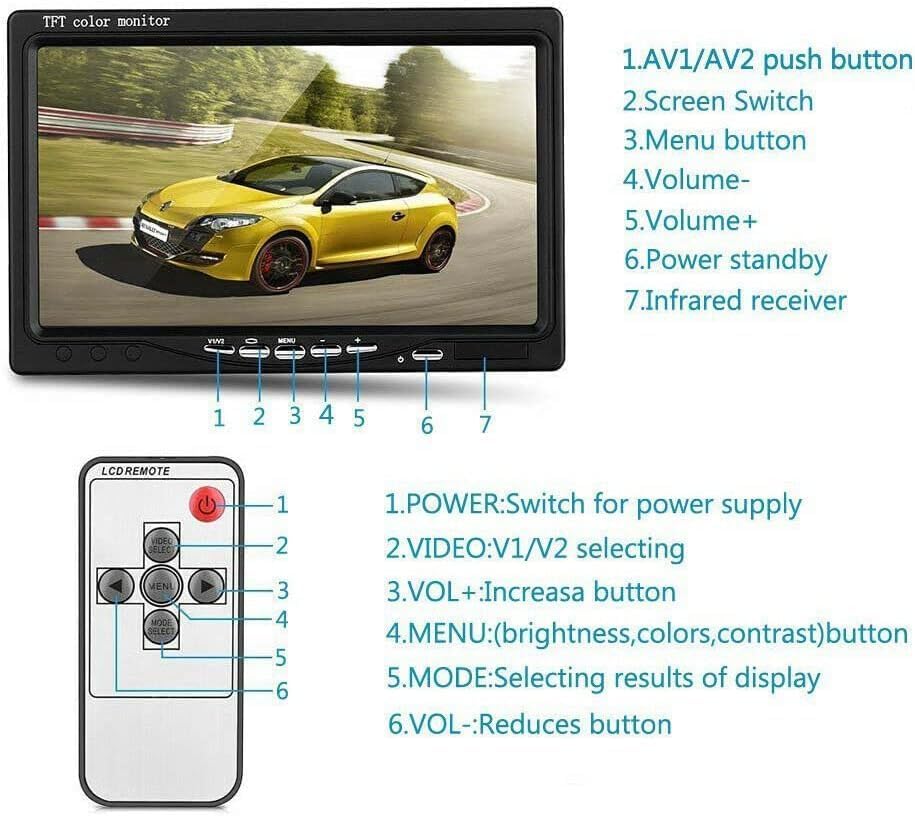
Image: This diagram illustrates the control interface of the Bileeko RV Backup Camera System. It labels the physical buttons on the 7-inch monitor (AV1/AV2 push button, Screen Switch, Menu button, Volume-, Volume+, Power standby, Infrared receiver) and the functions of each button on the included remote control (Power, Video V1/V2 selecting, VOL+, Menu for brightness/colors/contrast, Mode for display results, VOL-).
Monitor Controls:
- AV1/AV2 Push Button: Switches between video input channels (V1 and V2).
- Screen Switch: Toggles display modes or views.
- Menu Button: Accesses the on-screen display (OSD) menu for settings adjustments.
- Volume - / Volume +: Adjusts audio volume (if applicable, though typically not for backup cameras).
- Power Standby: Puts the monitor into standby mode.
- Infrared Receiver: Receives signals from the remote control.
Remote Control Functions:
- POWER: Switches the power supply on/off.
- VIDEO V1/V2: Selects between video input channels.
- VOL+: Increases volume.
- MENU: Accesses settings for brightness, colors, and contrast.
- MODE: Selects display results or modes.
- VOL-: Reduces volume.
When the vehicle is in reverse, the monitor will automatically display the camera feed from V2 (if configured for auto-reverse trigger) along with parking guidelines.
Maintenance
Proper maintenance ensures the longevity and optimal performance of your backup camera system.
- Cleaning the Camera Lens: Regularly clean the camera lens with a soft, damp cloth to remove dirt, dust, or water spots that may obstruct the view. Avoid abrasive cleaners.
- Cleaning the Monitor Screen: Use a soft, lint-free cloth specifically designed for electronic screens. Do not spray cleaning solutions directly onto the screen.
- Cable Inspection: Periodically check all cables and connections for signs of wear, damage, or loose connections. Secure any loose cables to prevent interference or disconnection.
- Environmental Protection: While the camera is waterproof (IP68), extreme temperatures or prolonged exposure to harsh weather conditions can affect performance. Ensure the monitor is protected from direct sunlight and extreme cold when not in use.
Troubleshooting
If you encounter issues with your RV Backup Camera System, refer to the following common problems and solutions:
| Problem | Possible Cause | Solution |
|---|---|---|
| No image on monitor |
|
|
| Image is blurry or distorted |
|
|
| Night vision is poor |
|
|
| Remote control not working |
|
|
Specifications
7-inch TFT LCD Car Monitor:
- Screen Size: 7 inch
- Resolution: 800*480
- Housing: ABS
- TV System: NTSC/PAL
- Video Input: 2 channels
- Rear-view: V2 auto reverse when trigger activated
- Screen Adjustment: Up/down/left/right rotation
- Power Supply: DC 12V - 24V
- Power Consumption: 5W
- Operate Mode: Key operation and remote control
- Work Temperature: -10℃~+40℃
- Storage Temperature: -25℃~+80℃
18 IR LEDs Backup Camera:
- Waterproof Rating: IP68
- Horizontal Resolution: 420TV lines
- Effective Pixels: NTSC: 648×488 pixels
- Power Supply: DC 12V-24V
- Operating Temperature: -20℃~70℃, RH95% MAX
- Storage Temperature: -40℃~85℃, RH95% MAX
- Real Angle of View: 120 Degrees
Warranty and Support
For warranty information or technical support, please refer to the contact details provided with your purchase or visit the official Bileeko website. Keep your purchase receipt as proof of purchase for warranty claims.
If you require further assistance or have questions not covered in this manual, please contact Bileeko customer service.


