1. Introduction
The VJOYCAR H500G is a GPS Head-Up Display (HUD) speedometer designed to provide real-time driving information directly in your line of sight. It collects speed data from GPS satellites, ensuring compatibility with a wide range of vehicles without interfering with the car's engine or OBD port. This device is suitable for use in SUVs, ATVs, pick-up trucks, scooters, golf carts, buses, boats, trains, bikes, motorcycles, and other vehicles.
Unlike traditional LED HUDs, the H500G does not require a projection film on the car glass and avoids double images even under direct sunlight. It features a built-in vibration sensor for automatic power on/off, conserving power when stationary.

Figure 1: The VJOYCAR H500G GPS HUD Speedometer is universally compatible with all vehicle types, including fuel vehicles, new energy vehicles, pick-up trucks, and large trucks.
2. Product Features
- GPS Satellite Data Collection: Obtains speed data directly from GPS satellites, ensuring accuracy and broad vehicle compatibility.
- Heads-Up Display (HUD): Projects digital driving speed onto its own HD display, eliminating the need for reflective films and preventing ghosting.
- Multiple Display Functions: Shows driving speed (MPH or KM/H), compass direction, current time, altitude, trip time, and trip distance.
- 5 Different Display UIs: Offers various user interface layouts to customize the information displayed.
- Safety Alerts: Includes an over-speed alarm light reminder and a fatigue driving alert.
- Automatic On/Off: Features a built-in vibration sensor that automatically turns the device on when motion is detected and off after 3 minutes of being stationary, ensuring zero power consumption when off.
- Ambient Light Sensor: Automatically adjusts display brightness for optimal visibility day and night.
- Dual Chipset Technology: Utilizes 10 Hz high refresh rate GPS + Beidou dual-mode chip for quick and delay-free speed updates.

Figure 2: Overview of the main functions and display elements of the H500G, including driving speed, time, compass, trip distance, trip time, and satellite quantity.
3. Product Overview and Components
Familiarize yourself with the physical components and ports of your H500G GPS HUD Speedometer.
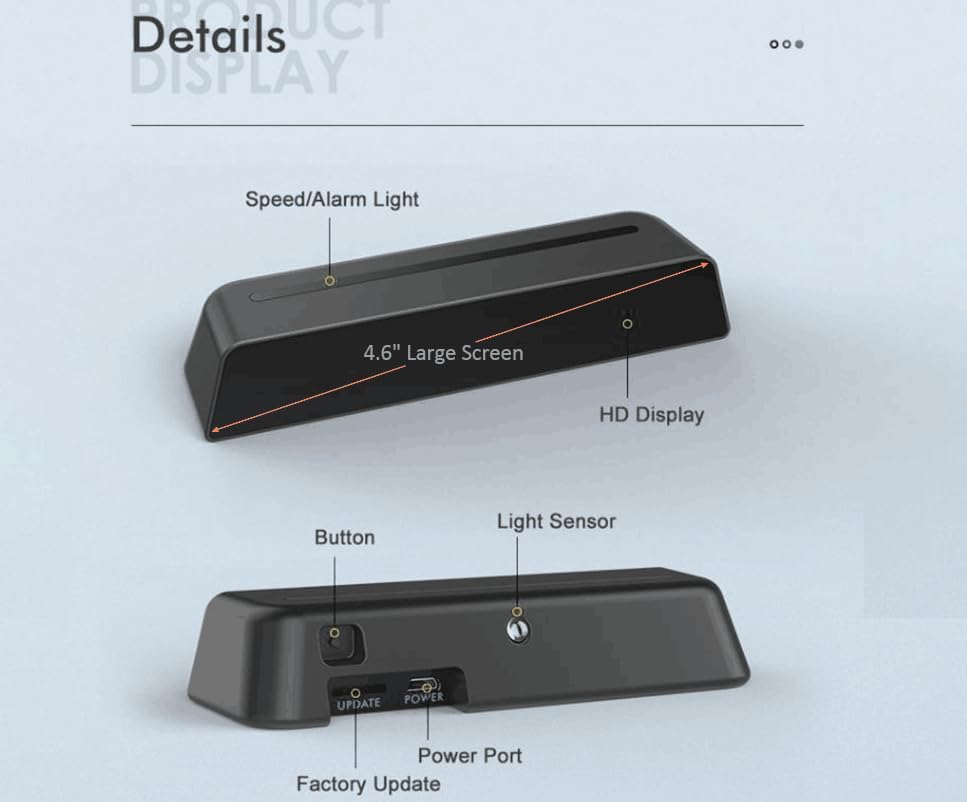
Figure 3: Detailed diagram of the H500G unit, highlighting the 4.6-inch screen, HD display, speed/alarm light, control button, light sensor, power port, and factory update port.
Components:
- HD Display: Shows driving information clearly.
- Speed/Alarm Light: Indicates speed and alerts.
- Button: Used for setup and adjustments.
- Light Sensor: Automatically adjusts display brightness.
- Power Port: USB connection for power supply.
- Factory Update Port: For firmware updates (not for user access).
4. Setup and Installation
- Placement: Place the H500G unit on your vehicle's dashboard in a position that does not obstruct your view of the road. Ensure it is stable and secure.
- Power Connection: Connect the provided USB cable to the H500G's power port and plug the other end into a USB power source in your vehicle (e.g., a car charger, USB port). The device is designed for plug-and-play operation.
- Initial GPS Signal Acquisition: Upon first use, the device will automatically search for GPS signals. This process may take 10-30 seconds. Ensure the vehicle is outdoors with a clear view of the sky for optimal signal reception. The device cannot function indoors.
- Automatic Power On/Off: The H500G will automatically power on when it detects vehicle motion. It will power off automatically if the vehicle remains stationary for more than 3 minutes.
Video 1: This video demonstrates the USB power connection process for the VJOYCAR H500G GPS HUD Speedometer, showing how to plug it into a car's USB port and the device powering on.

Figure 4: The H500G features automatic brightness adjustment for clear visibility in both daytime and nighttime driving conditions.
5. Operating Instructions
5.1 Display Modes (UI)
The H500G offers 5 different display user interfaces (UIs) to show various combinations of information. You can cycle through these modes using the control button on the device.
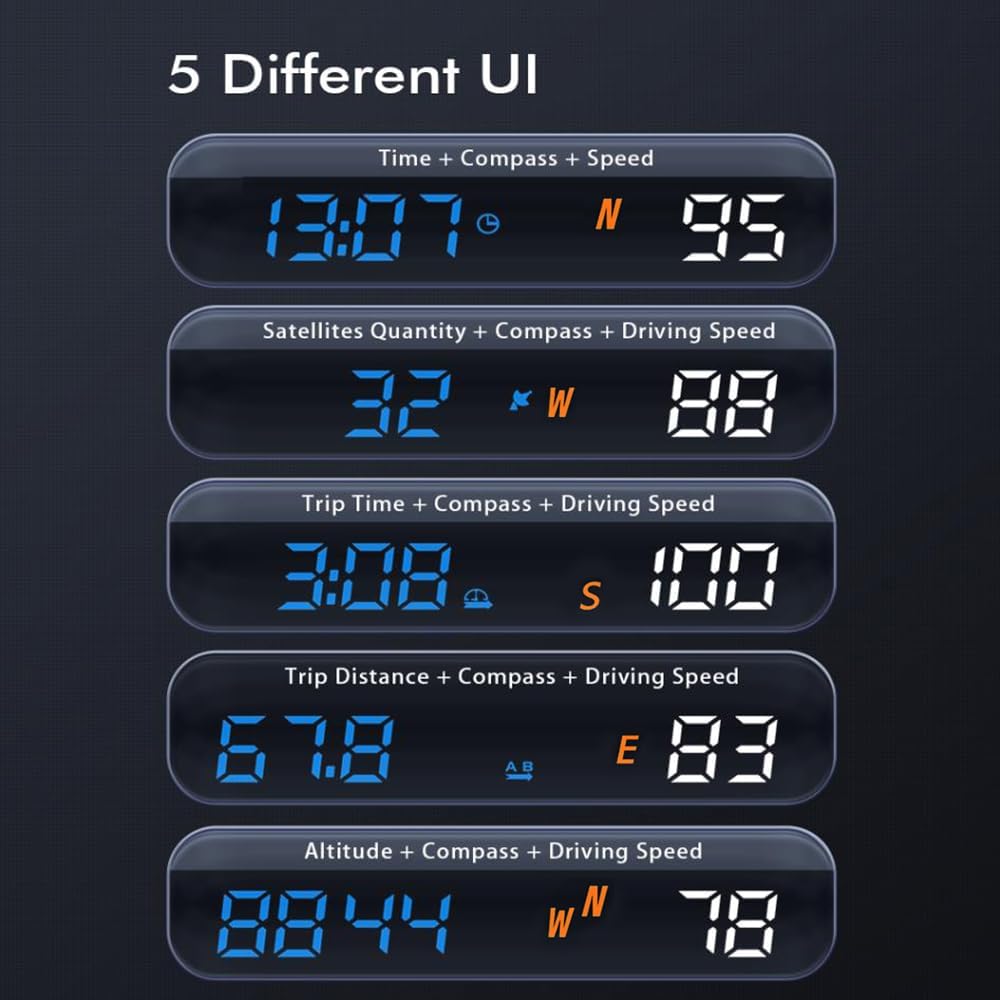
Figure 5: Examples of the 5 different display UIs available on the H500G, combining information such as time, compass, speed, satellite quantity, trip time, trip distance, and altitude.
5.2 Information Displayed:
- Driving Speed: Real-time speed collected from satellites. Can be displayed in MPH or KM/H.
- Time: Local time collected from satellites.
- Compass: Displays driving direction (N/S/E/W).
- Trip Distance: Distance traveled between ACC On and ACC Off.
- Trip Time: Driving time between ACC On and ACC Off.
- Satellites Quantity: Number of satellites currently connected.
- Altitude: Current altitude.

Figure 6: The H500G mounted on a car dashboard, showing clear display of time, compass, and speed in various driving conditions.
6. Settings and Adjustments
The H500G supports manual setup and adjustment of certain parameters. Refer to the specific instructions provided with your product packaging for detailed steps on how to use the control button to navigate settings menus and make adjustments (e.g., switching between MPH/KM/H, setting over-speed alarm thresholds).
Video 2: This video demonstrates how to manually adjust settings on the VJOYCAR H500G GPS HUD Speedometer using the device's button, showing changes in display modes and units.
7. Alarms and Alerts
- Over-Speed Alarm: The device features an over-speed alarm light reminder. When your vehicle exceeds a preset speed limit, the alarm lights will flash gradually from the center to the sides, illuminating one by one. The default alarm speed is 130 km/h, with each light representing a value of 13 km/h (130/10). This threshold can typically be adjusted in the settings.
- Fatigue Driving Alert: The H500G also includes a fatigue driving alert to remind drivers to take breaks during long journeys.

Figure 7: Illustration of the over-speed alarm light system, where lights illuminate progressively to indicate exceeding the set speed limit.
8. Maintenance
- Cleaning: Use a soft, dry cloth to clean the display and exterior of the device. Avoid using abrasive cleaners or solvents.
- Storage: When not in use for extended periods, disconnect the device from power and store it in a cool, dry place.
- Avoid Extreme Temperatures: Do not expose the device to extreme heat or cold, as this may affect its performance and lifespan.
9. Troubleshooting
| Problem | Possible Cause | Solution |
|---|---|---|
| Device does not power on. | No power supply or loose connection. | Ensure the USB cable is securely connected to both the device and a working USB power source in the vehicle. Check the vehicle's power outlet. |
| No GPS signal / Slow signal acquisition. | Device is indoors or obstructed view of the sky. | Move the vehicle to an open outdoor area with a clear view of the sky. Initial signal acquisition can take 10-30 seconds. |
| Speed display is inaccurate. | Temporary GPS signal fluctuation or calibration needed. | Ensure a strong GPS signal. If persistent, refer to the manual for manual calibration steps (if available) or contact support. |
| Over-speed alarm beeps frequently. | Speed limit set too low. | Adjust the over-speed alarm threshold in the device settings to a suitable value for your driving conditions. |
10. Specifications
- Model: H500G
- Brand: VJOYCAR
- Dimensions (L x W x H): 5.43 x 1.06 inches (approximate, based on available data)
- Weight: Approximately 7 ounces
- Material: Glass (for display surface)
- Display Type: HD Digital Display
- Connectivity: USB Power
- GPS Chipset: 10 Hz high refresh rate GPS + Beidou dual-mode chip
- Features: Speed (KM/H, MPH), Compass, Time, Altitude, Trip Time, Trip Distance, Satellite Quantity, Over-Speed Alarm, Fatigue Driving Alert, Automatic Brightness Adjustment, Automatic On/Off.
11. Warranty and Support
The VJOYCAR H500G GPS HUD Speedometer comes with a 24-month quality warranty. If you require assistance, encounter any issues, or have questions regarding the product, please contact VJOYCAR customer support at any time. Refer to your product packaging or the VJOYCAR official website for specific contact information.
For the latest information and support, please visit the VJOYCAR Store on Amazon.


