1. Introduction and Safety Information
This manual provides essential instructions for the safe and effective operation, maintenance, and troubleshooting of your CIGMAN CM-701SE 3x360° Self-Leveling Laser Level. Please read this manual thoroughly before first use and retain it for future reference.
1.1 Safety Warnings
WARNING: LASER RADIATION
- Do not stare directly into the laser beam.
- Do not intentionally direct the laser beam at others.
- Laser Class II product (<1mW). Compliant with U.S. safety standards.
- Avoid exposing the device to extreme temperatures, moisture, or direct sunlight for prolonged periods.
- Keep out of reach of children.
2. Package Contents
Verify that all items listed below are included in your package. If any items are missing or damaged, please contact customer support.
- 1x CIGMAN CM-701SE Laser Level Tool
- 1x Portable Bag
- 1x Magnetic "L" Base Bracket
- 1x Remote Control
- 1x Type-C USB Cable
- 1x User Manual (this document)
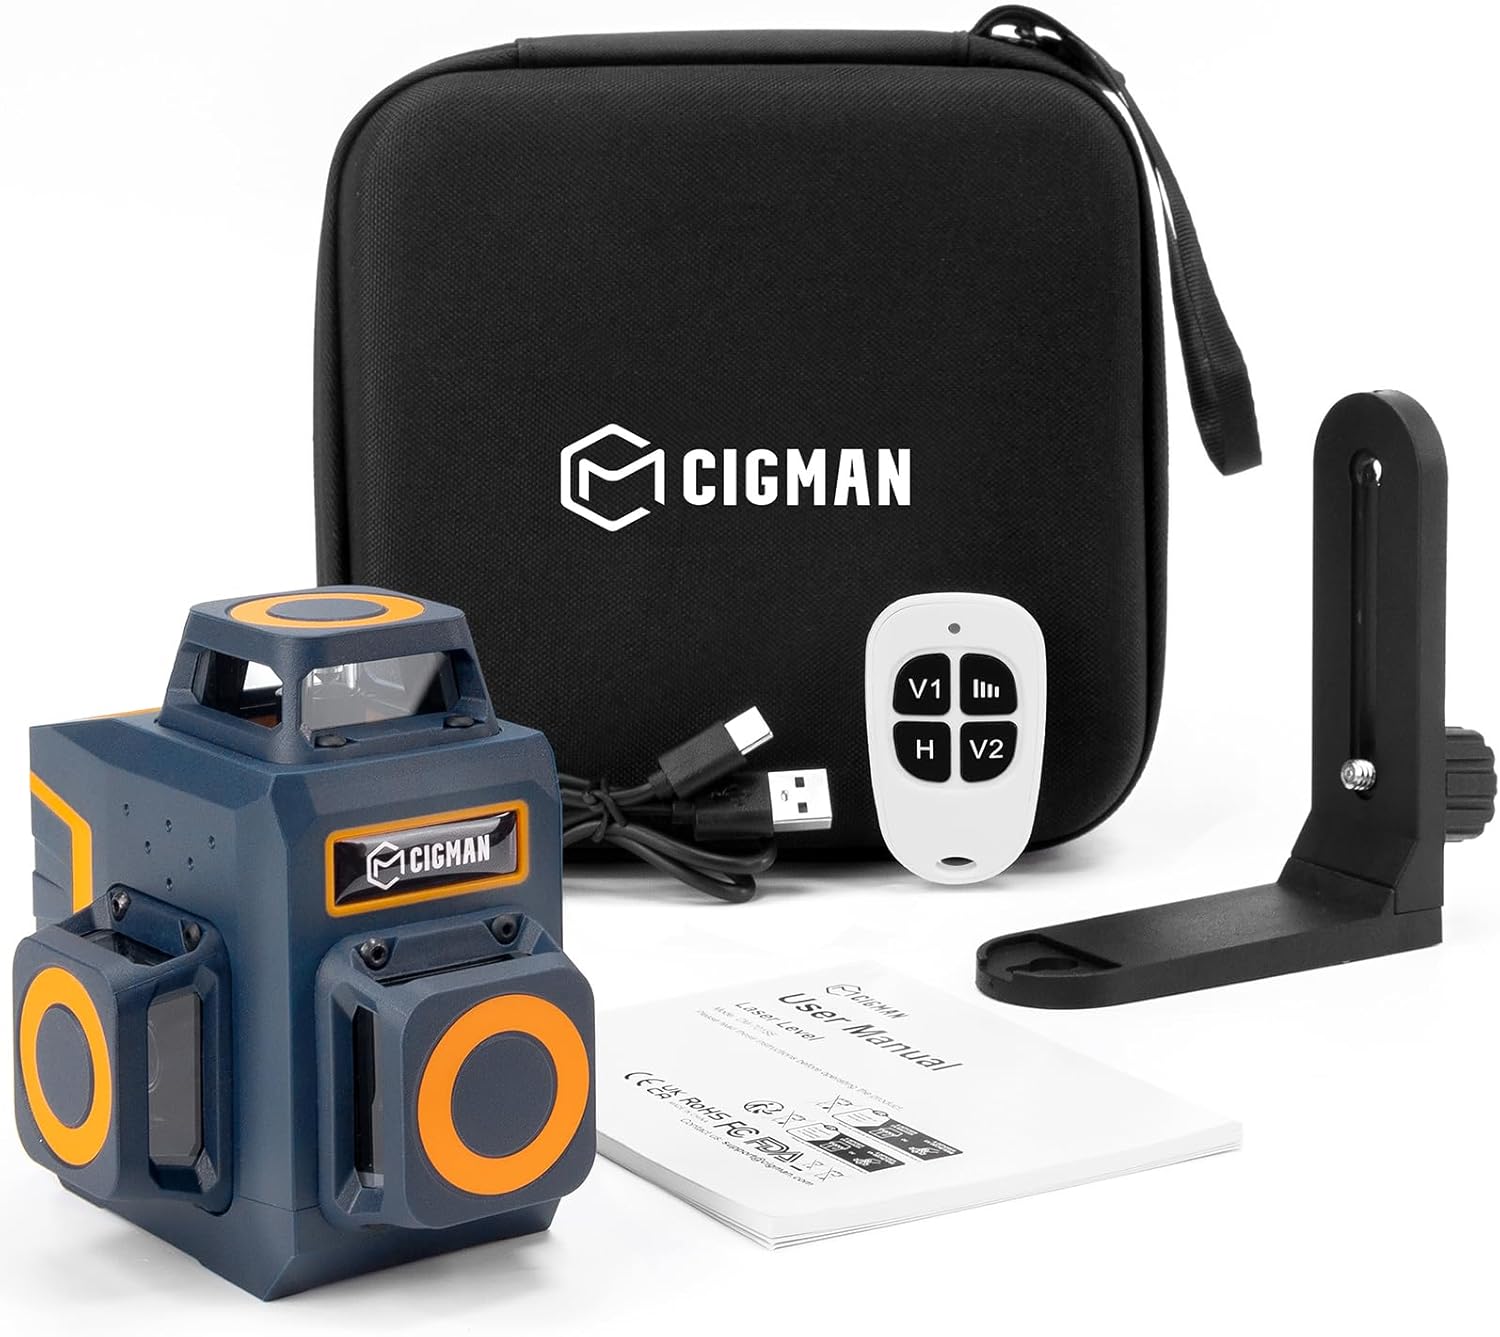
Image: The CIGMAN CM-701SE laser level, portable bag, magnetic L-bracket, remote control, and USB-C cable.
3. Product Overview
The CIGMAN CM-701SE is a 3x360° self-leveling laser level designed for various alignment tasks. It projects three full 360° green laser lines: one horizontal and two vertical, providing comprehensive coverage for precise measurements.

Image: The laser level projecting three distinct 360-degree green laser lines, illustrating its full room coverage capability.
3.1 Key Features
- 3x360° Green Laser Lines: One horizontal and two vertical lines for comprehensive leveling and alignment.
- Self-Leveling Function: Automatically levels within a specified range.
- Manual Mode: Allows projection of lines at any angle.
- Pulse Mode: Enhances visibility for outdoor use or with a laser receiver.
- Remote Control: For convenient operation from a distance.
- Rechargeable Battery: Built-in 4000mAh battery with USB-C charging.
- Versatile Mounting: 1/4"-20 mounting thread and 360° magnetic bracket.
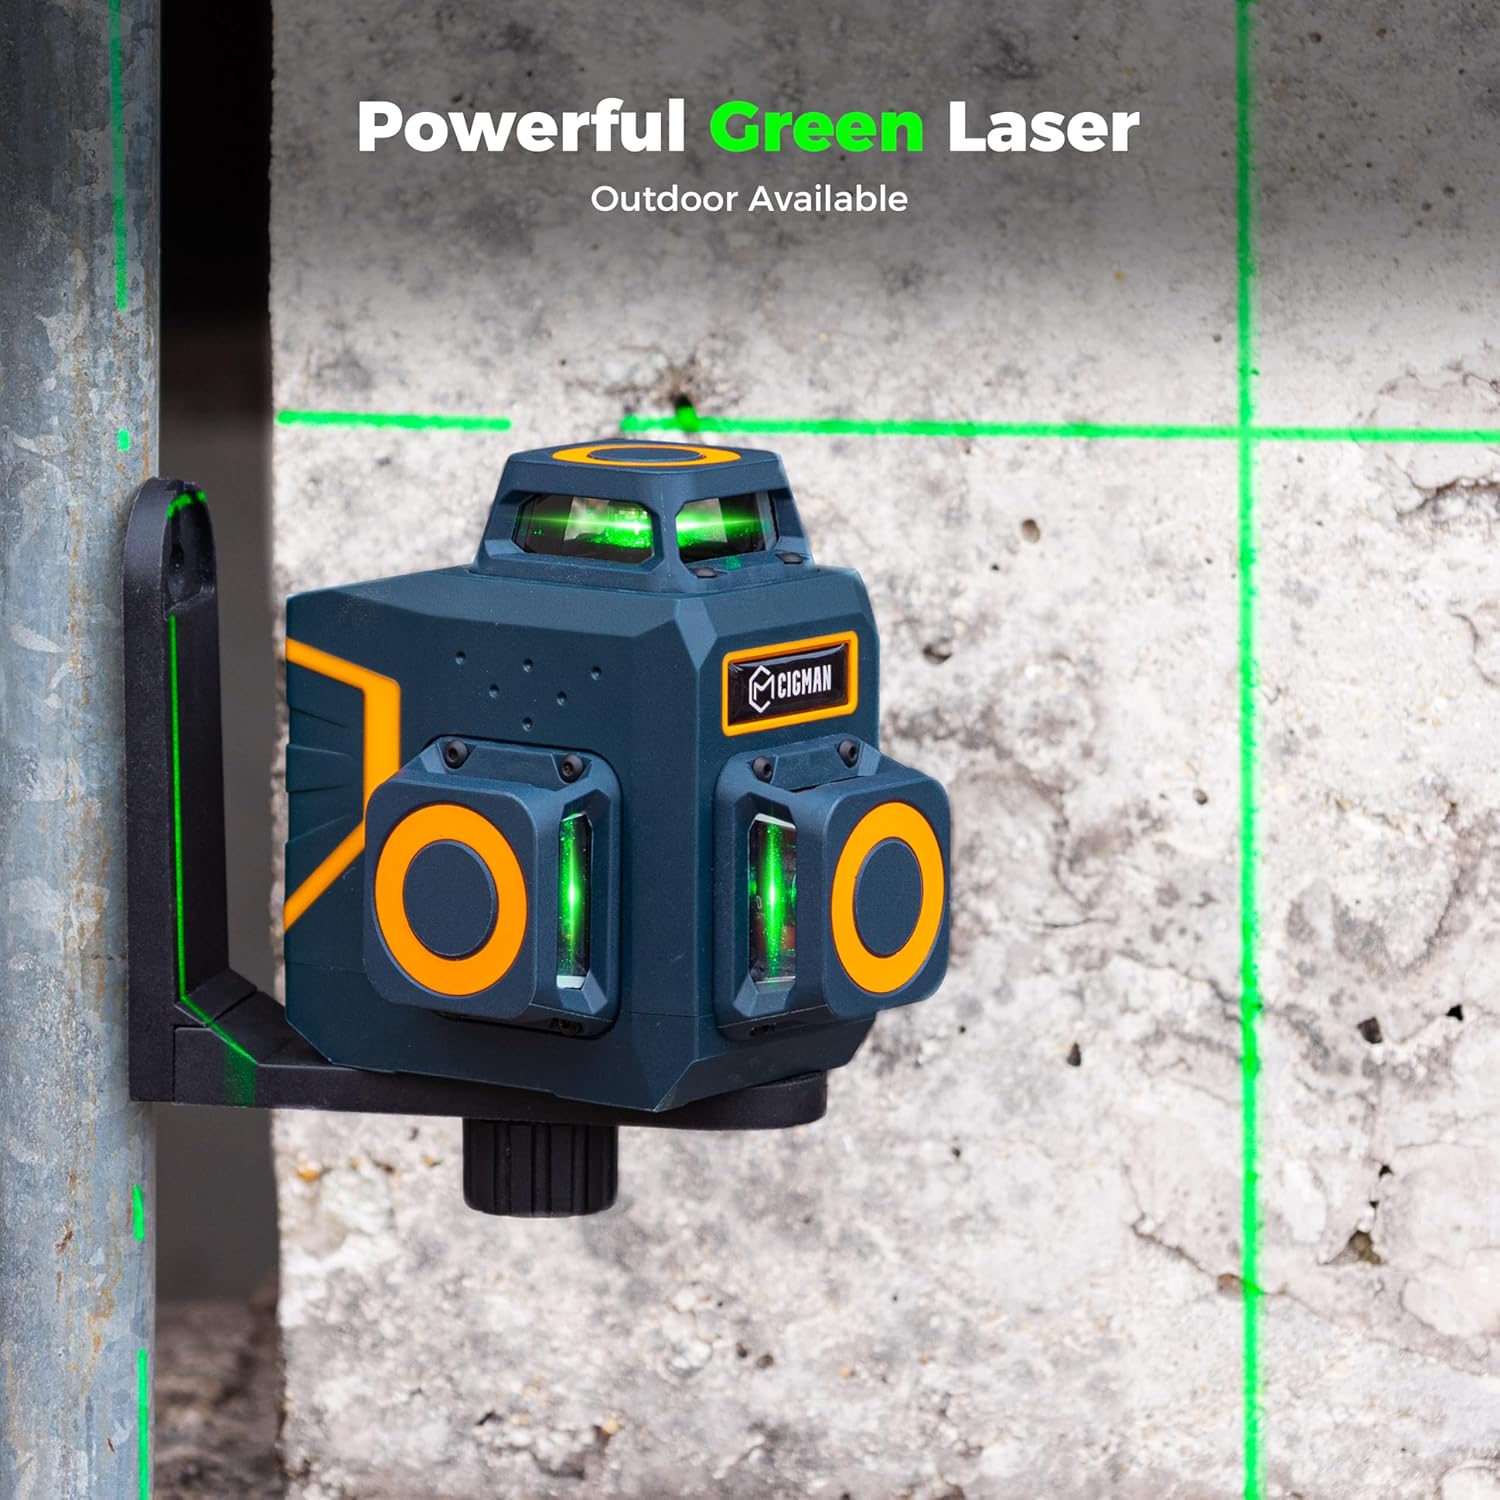
Image: The laser level mounted on a magnetic bracket, projecting bright green laser lines onto a concrete surface, demonstrating its visibility.
4. Setup
4.1 Initial Charging
Before first use, fully charge the laser level. The device features a built-in 4000mAh rechargeable battery.
- Connect the provided Type-C USB cable to the charging port on the laser level.
- Connect the other end of the cable to a compatible USB power source (e.g., wall adapter, power bank, laptop).
- The battery indicator lights on the device will show the charging status. A full charge provides approximately 6 hours of use at the brightest setting.

Image: The laser level with a USB-C cable inserted into its charging port, indicating the charging process.

Image: The laser level connected to a USB-C cable, highlighting its rechargeable battery and extended battery life.
4.2 Mounting the Device
The CM-701SE offers multiple mounting options for flexibility.
- Tripod Mounting: The base of the laser level includes a 1/4"-20 mounting thread, compatible with standard tripods (tripod not included).
- Magnetic Bracket: Use the included 360° strong magnetic L-bracket to attach the laser level to metal surfaces. The bracket supports both 1/4"-20 and 5/8"-11 threads.
- Hanging Holes: The magnetic bracket also features two hanging-hole anchors for additional mounting possibilities.
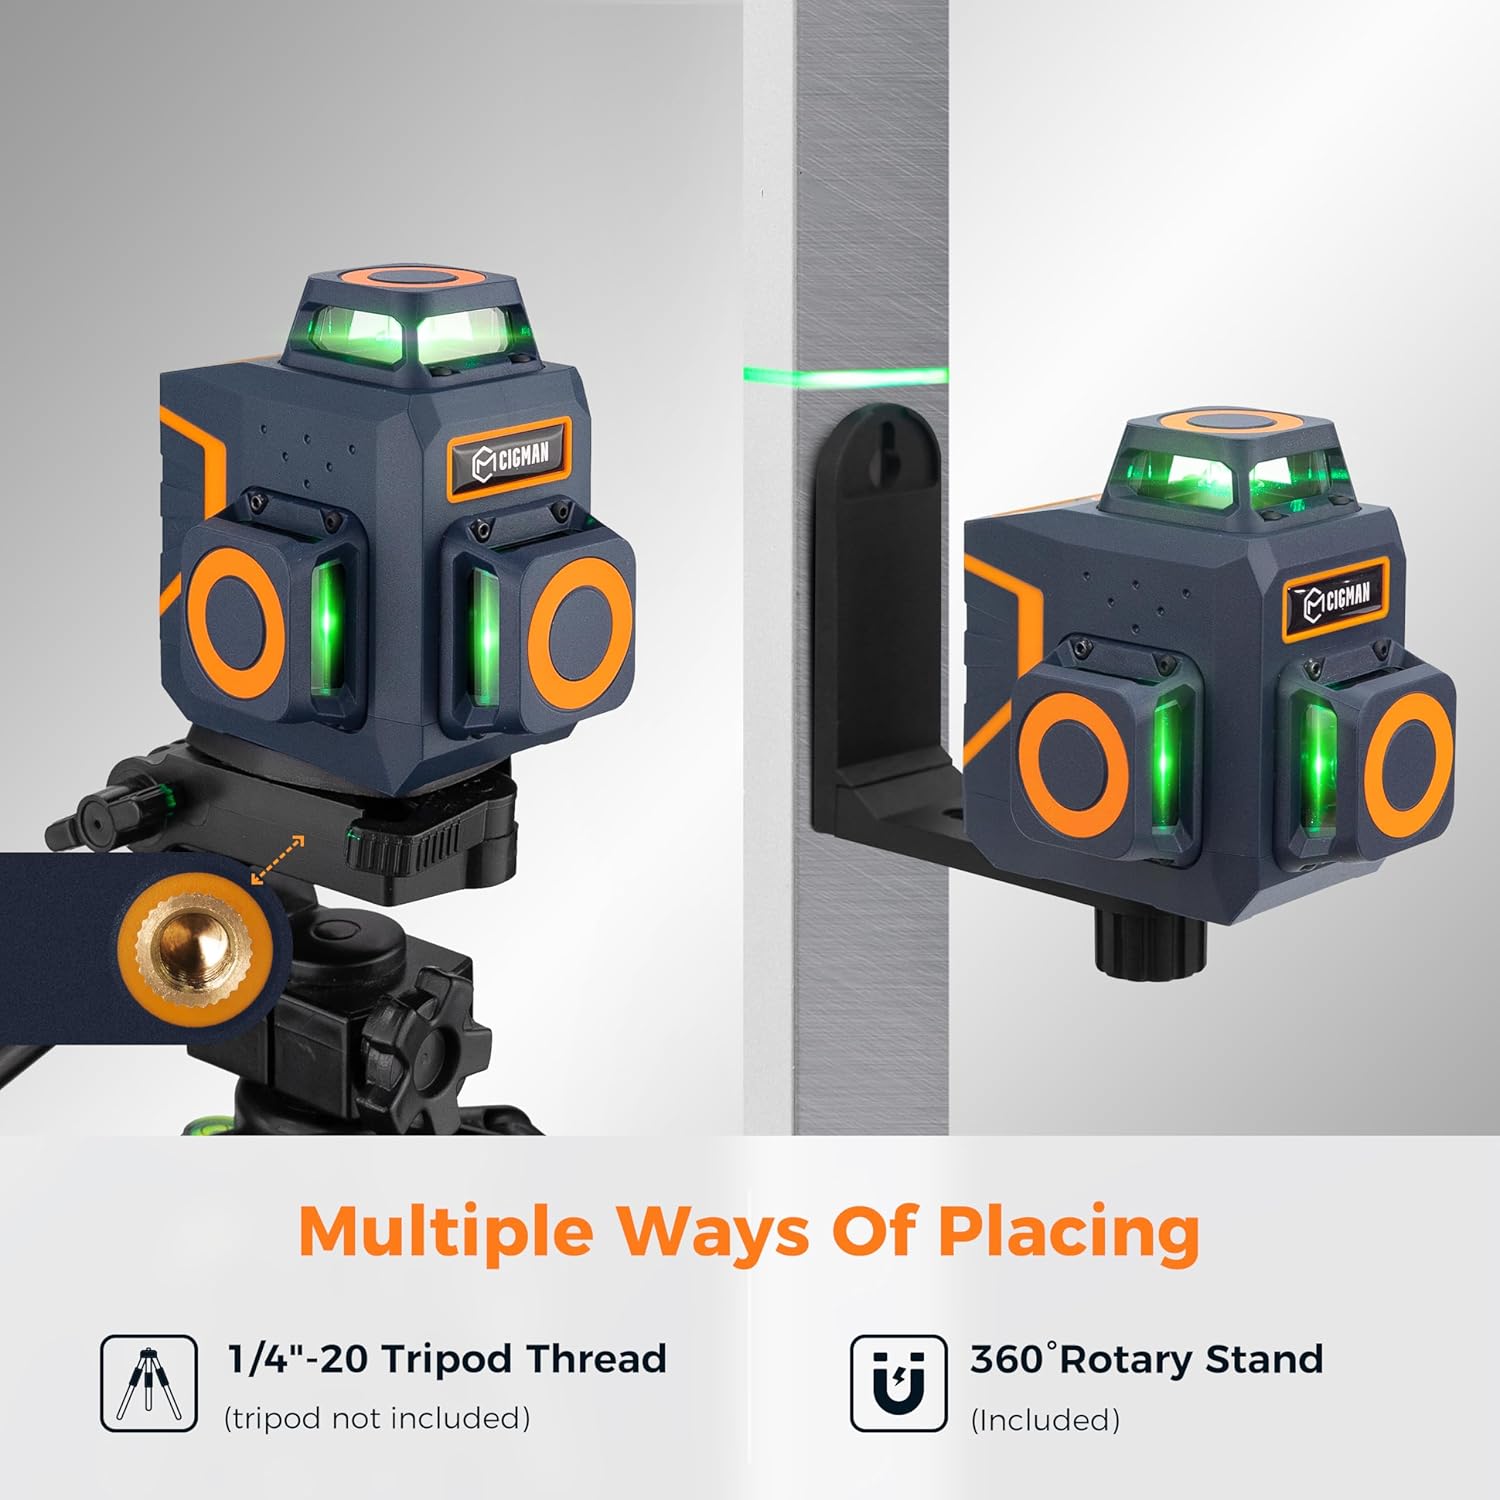
Image: Illustrations demonstrating how to mount the laser level using a tripod (via 1/4"-20 thread) and the magnetic L-bracket on a metal surface.
5. Operating Modes
The CIGMAN CM-701SE features three primary operating modes: Self-leveling, Manual, and Pulse.
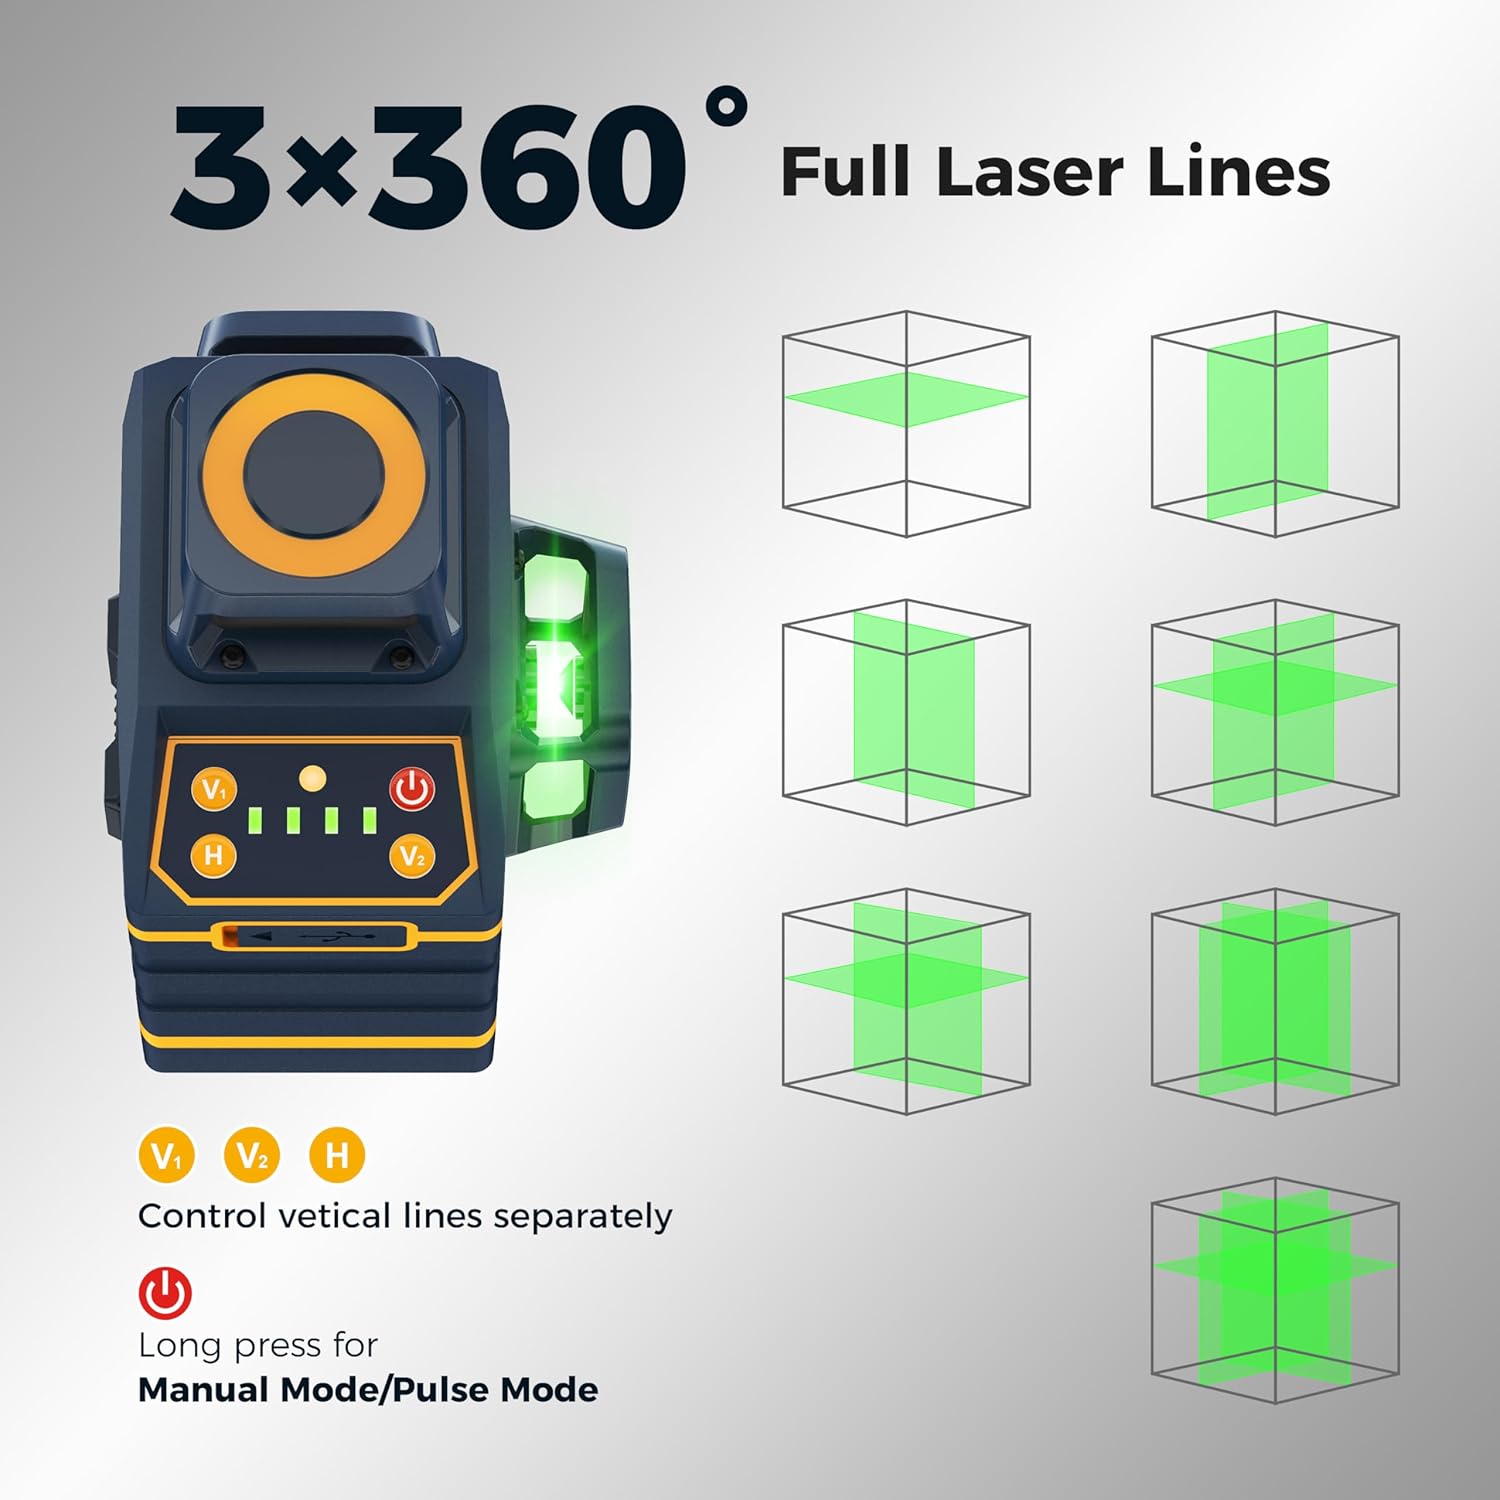
Image: A diagram illustrating the different combinations of 360-degree horizontal and vertical laser lines that can be projected by the device.
5.1 Self-Leveling Mode
This mode is used for projecting accurate horizontal or vertical lines on flat surfaces.
- Slide the pendulum lock switch to the unlocked position.
- Place the laser level on a stable surface. The device will automatically self-level within 4 degrees.
- If the inclination exceeds 4 degrees, the laser lines will flash rapidly, indicating that the device is out of level. Adjust the position of the laser level until the lines stop flashing and become steady.
- Press the 'H' button to activate/deactivate the horizontal line. Press 'V1' or 'V2' to activate/deactivate the vertical lines.

Image: A user utilizing the laser level in self-leveling mode to ensure a perfectly horizontal line for hanging a picture.
5.2 Manual Mode (Lock Mode)
Manual mode allows you to project laser lines at any desired angle, useful for custom or complex layouts such as stair railings or sloped ceilings.
- Slide the pendulum lock switch to the locked position.
- Press and hold the power button (red button) for approximately 3 seconds to enter Manual Mode. The laser lines will activate without self-leveling.
- Position the laser level to project lines at your desired angle.
- Press the 'H' button to activate/deactivate the horizontal line. Press 'V1' or 'V2' to activate/deactivate the vertical lines.
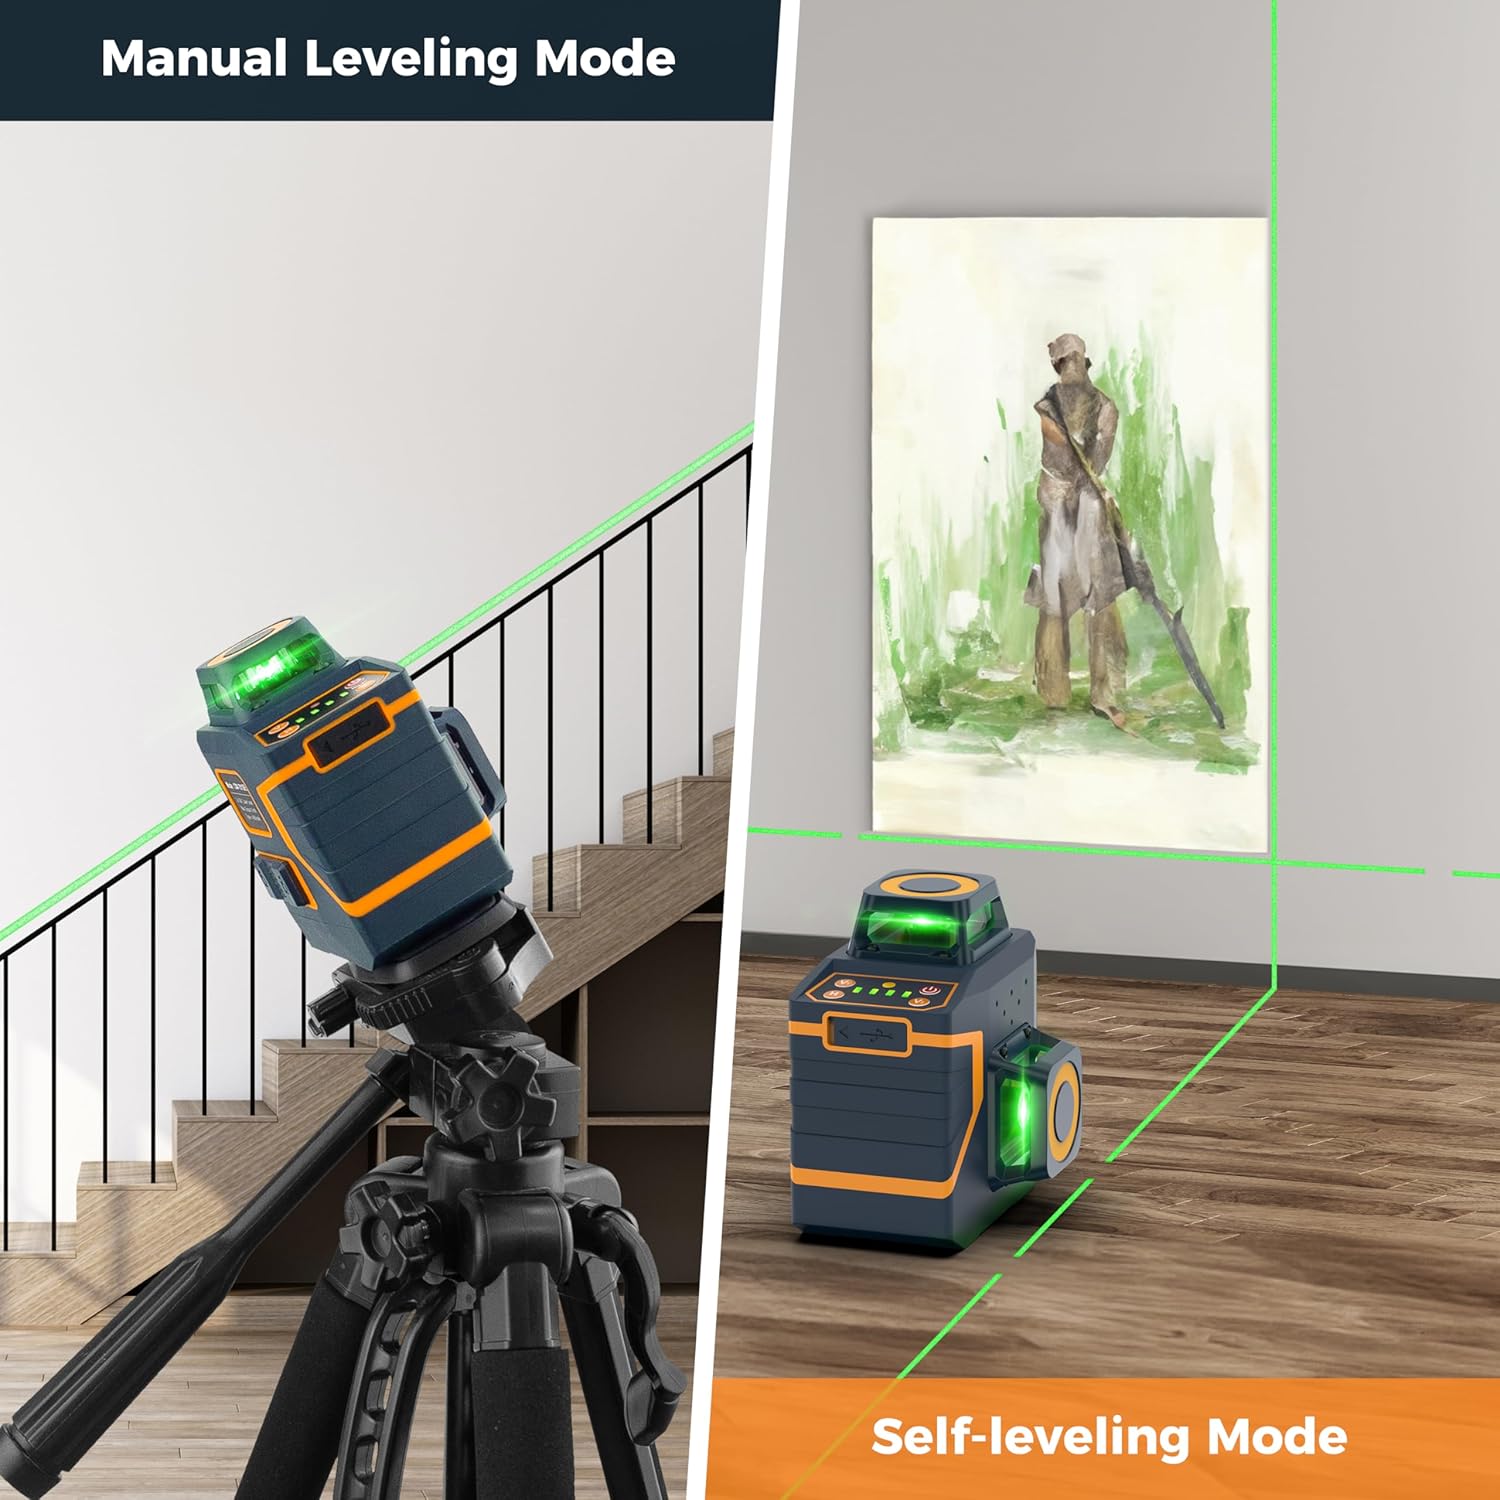
Image: A visual comparison showing the laser level projecting a sloped line in Manual Leveling Mode and a perfectly horizontal line in Self-leveling Mode.

Image: The laser level positioned on a wooden surface, demonstrating its use in manual mode for angled projections.
5.3 Pulse Mode
Pulse mode boosts the visibility of the laser lines, especially in bright environments or when using a laser receiver to extend the working range.
- Ensure the laser level is in Self-leveling Mode (pendulum unlocked).
- Briefly press the power button (red button) to activate Pulse Mode. The laser lines will become brighter, and the indicator light will change.
- When using a compatible laser receiver (not included), the working range can be extended from 100ft (30m) up to 165ft (50m).
- Press the power button again to exit Pulse Mode.
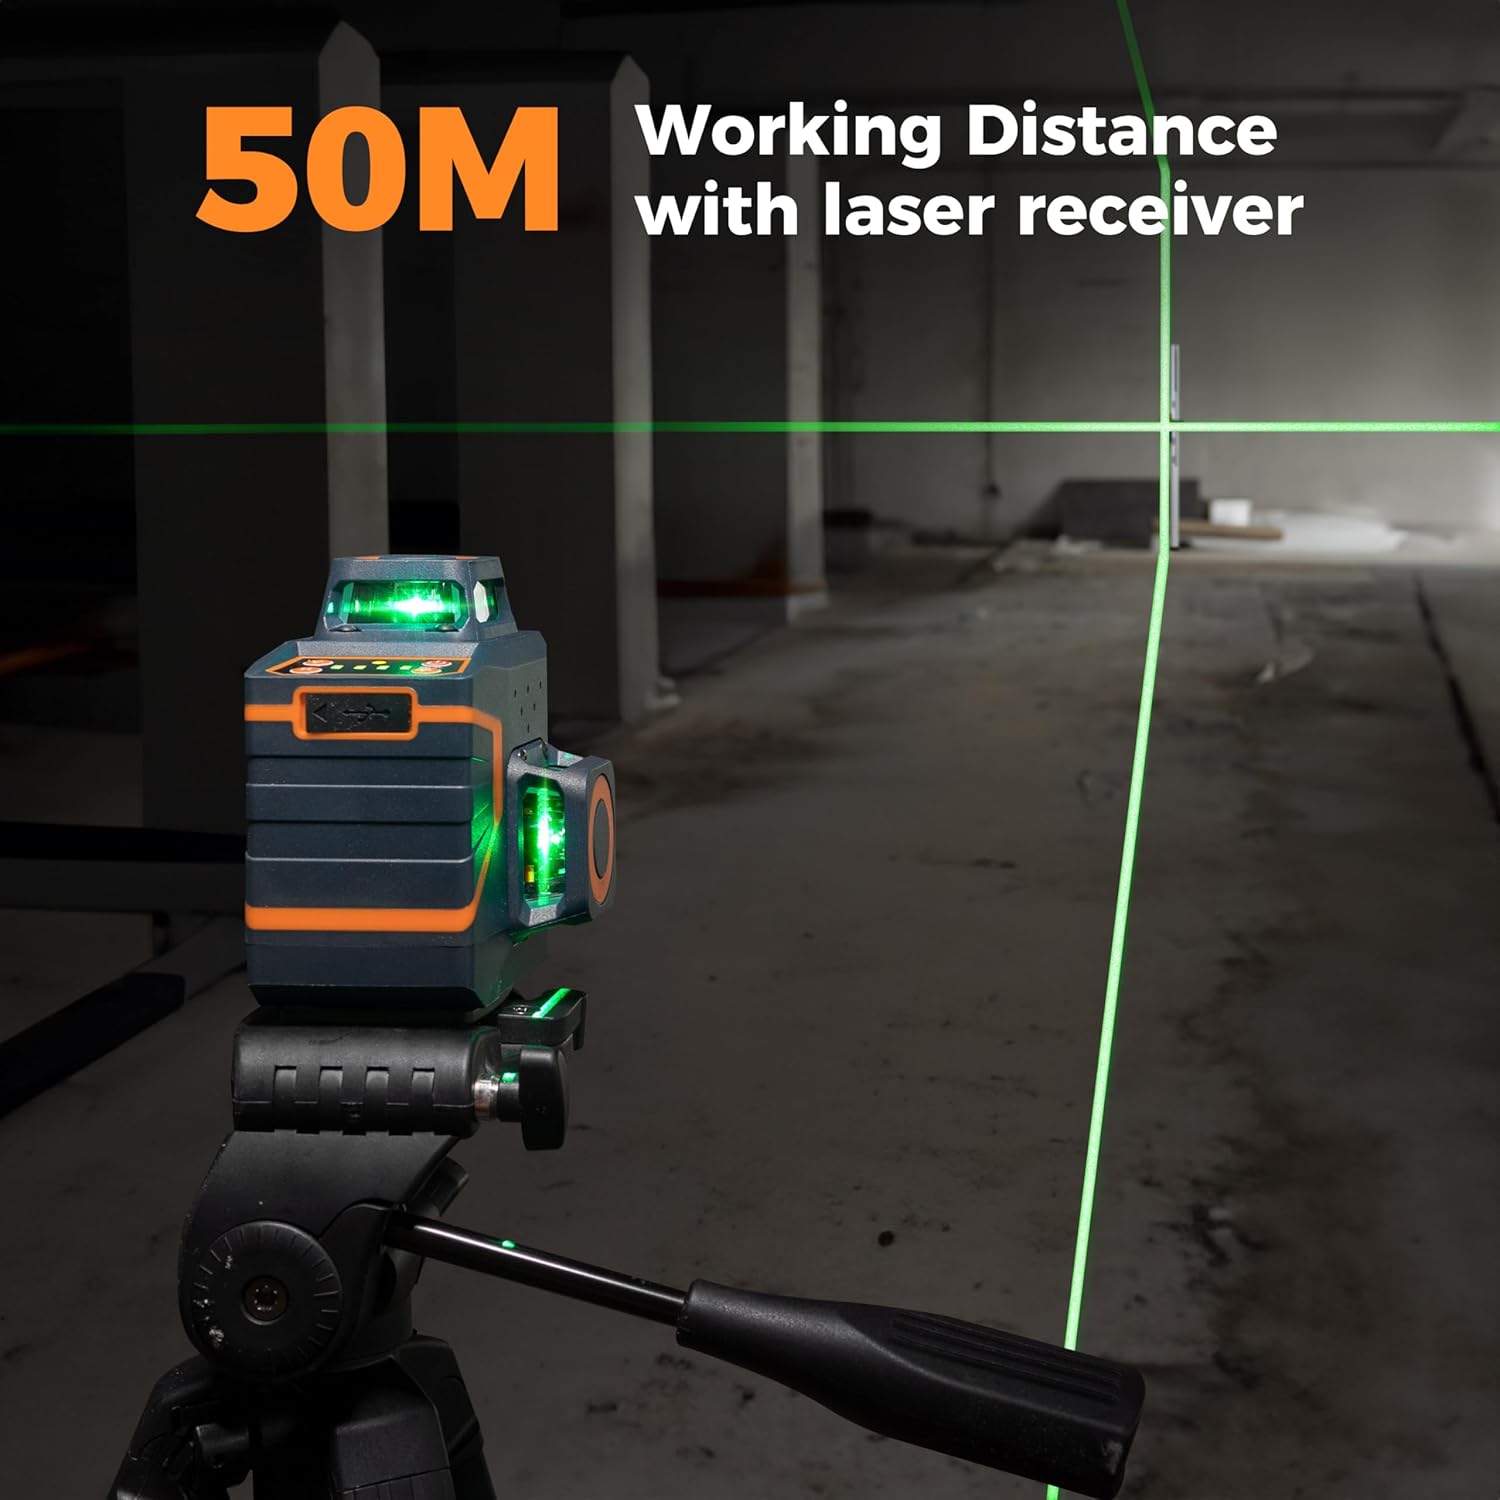
Image: The laser level projecting lines over a long distance, with a laser receiver shown in the background, illustrating the extended working range in Pulse Mode.
6. Remote Control Operation
The included remote control allows for convenient adjustment of the laser level's settings from a distance, eliminating the need to constantly approach the device.
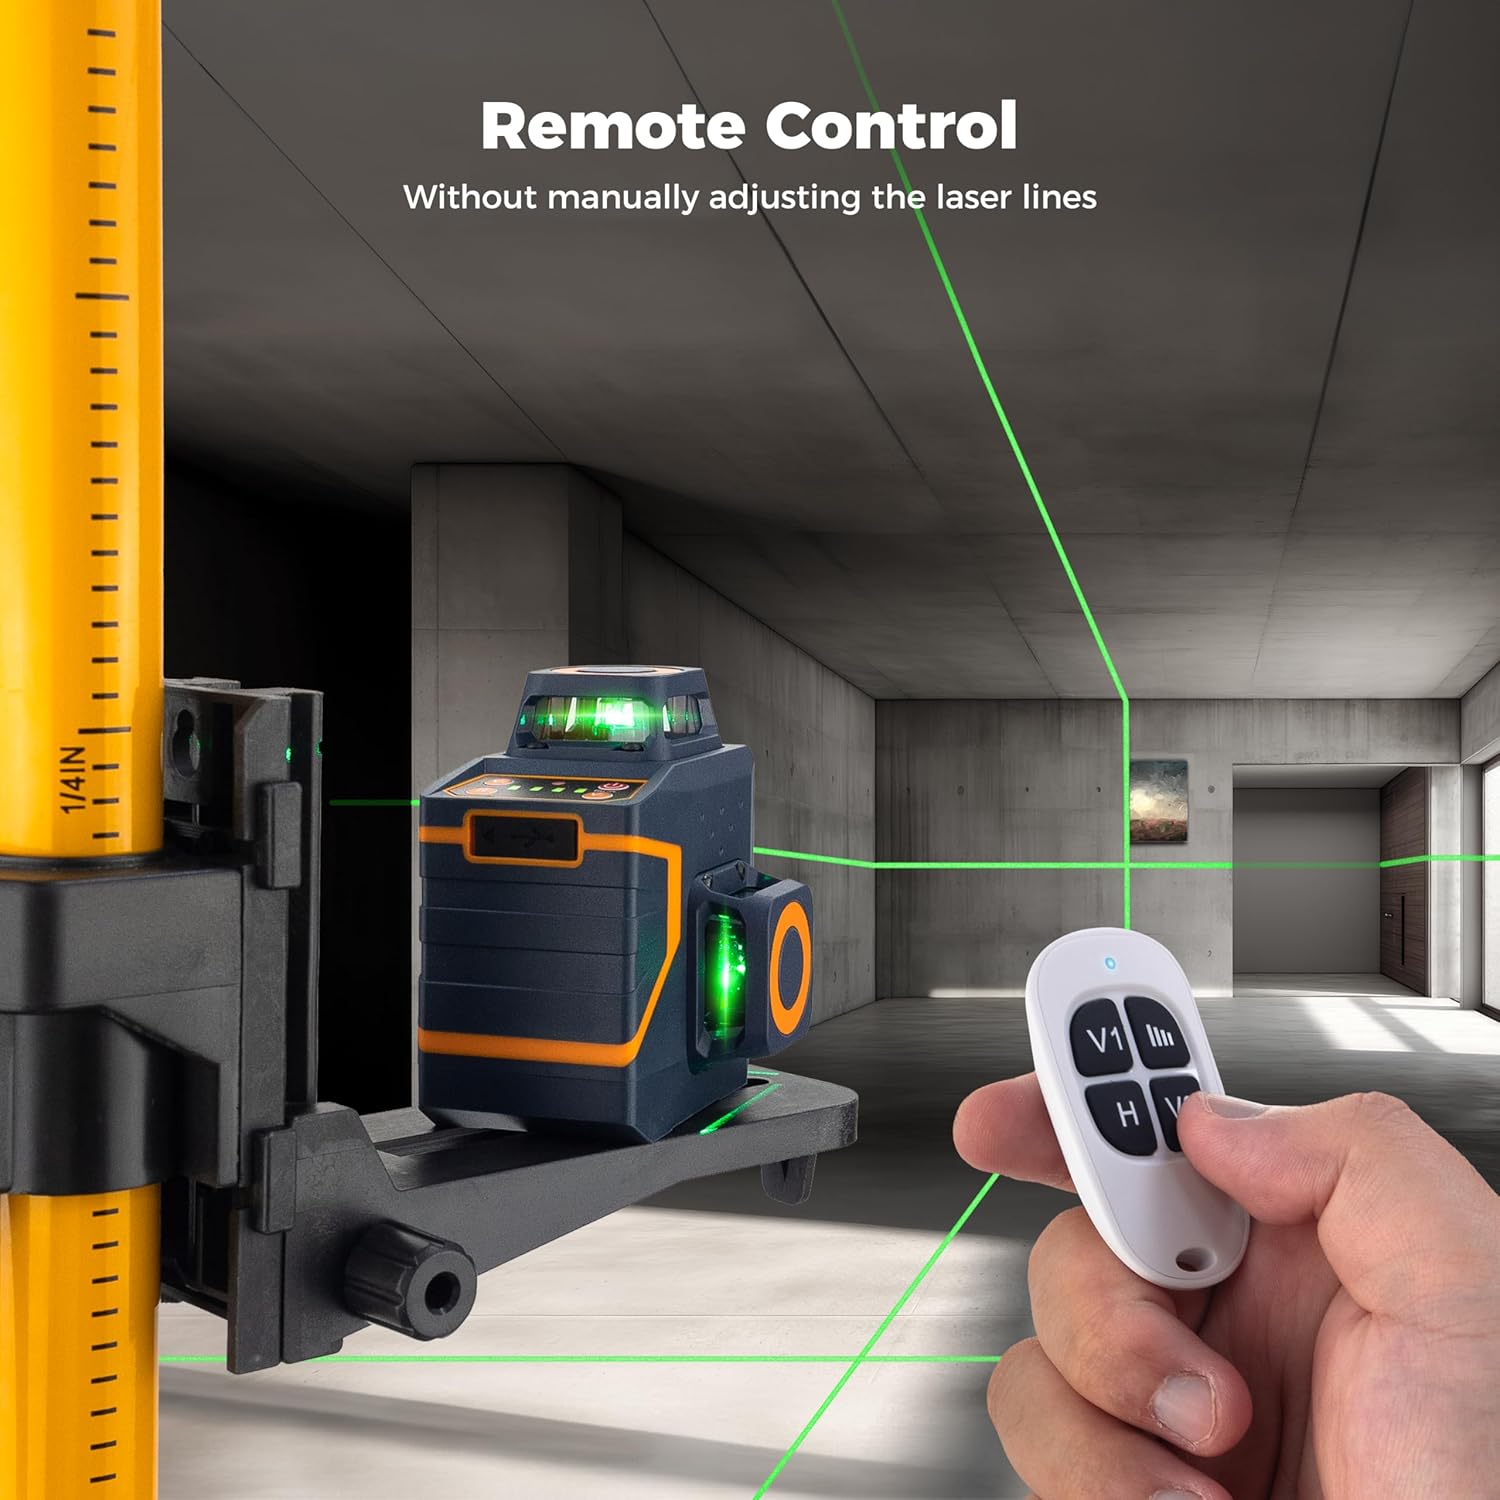
Image: A hand holding the remote control, with the laser level visible in the background, demonstrating remote operation.
6.1 Remote Control Functions
- H Button: Activates/deactivates the horizontal laser line.
- V1 Button: Activates/deactivates the first vertical laser line.
- V2 Button: Activates/deactivates the second vertical laser line.
- Brightness Adjustment: The remote control may also feature buttons to adjust the brightness of the laser lines (refer to remote markings for specific buttons).
7. Maintenance
Proper maintenance ensures the longevity and accuracy of your laser level.
- Cleaning: Use a soft, damp cloth to clean the device. Do not use abrasive cleaners or solvents.
- Storage: When not in use, store the laser level in its portable bag in a dry, cool place, away from direct sunlight. Ensure the pendulum lock is engaged during storage and transport.
- Battery Care: Recharge the battery regularly, even if the device is not in frequent use, to maintain battery health. Avoid fully discharging the battery for extended periods.
- Calibration Check: Periodically check the calibration of the laser level. If you suspect inaccuracy, refer to the troubleshooting section or contact customer support.
8. Troubleshooting
If you encounter issues with your CIGMAN CM-701SE laser level, refer to the following common problems and solutions.
| Problem | Possible Cause | Solution |
|---|---|---|
| Laser lines are flashing rapidly. | Device is out of its self-leveling range (>4° inclination). | Adjust the position of the laser level to a more level surface until the lines become steady. |
| Laser lines are dim or not visible outdoors. | Bright ambient light or Pulse Mode is not activated. | Activate Pulse Mode. Use a laser receiver for extended outdoor range. Avoid direct sunlight. |
| Device does not turn on. | Low battery or pendulum lock engaged. | Charge the battery. Ensure the pendulum lock is in the unlocked position for normal operation. |
| Remote control is not working. | Remote battery depleted or obstruction. | Replace the remote control battery (if applicable). Ensure no obstructions between the remote and the laser level. |
If the problem persists after attempting these solutions, please contact CIGMAN customer support.
9. Specifications
| Feature | Detail |
|---|---|
| Brand | CIGMAN |
| Model Number | CM-701SE |
| Laser Class | Class II (<1mW) |
| Laser Color | Green |
| Laser Lines | 3x360° (1 Horizontal, 2 Vertical) |
| Self-Leveling Range | ±4° |
| Working Distance | Up to 100ft (30m); Up to 165ft (50m) with receiver in Pulse Mode |
| Power Source | Built-in 4000mAh Lithium Ion Battery |
| Charging Port | USB-C |
| Operating Time | Approx. 6 hours (at brightest setting) |
| Mounting Thread | 1/4"-20 |
| Material | Metal, Plastic ABS |
| Product Dimensions | 7.09"L x 6.69"W |
| Item Weight | 1.32 pounds (0.6 Kilograms) |
10. Warranty and Support
CIGMAN provides a 36-month after-sales service for the CM-701SE laser level. If you have any questions, require technical assistance, or need to claim warranty service, please contact our professional technology team. We are available online 24 hours a day to assist you.
For support, please refer to the contact information provided with your purchase or visit the official CIGMAN website.


