1. Introduction
Thank you for choosing the Rhythm CMJ586NR06 Hourly Strike Wooden Frame Wall Clock. This manual provides detailed instructions for the proper setup, operation, and maintenance of your new clock. Please read this manual thoroughly before use to ensure optimal performance and longevity of your product.

Image 1: Front view of the Rhythm CMJ586NR06 Hourly Strike Wooden Frame Wall Clock, showcasing its octagonal wooden frame and classic dial.
2. Safety Information
- Always handle batteries with care. Do not mix old and new batteries, or different types of batteries.
- Ensure the clock is securely mounted to a wall stud or appropriate anchor to prevent falling.
- Keep the clock away from direct sunlight, extreme temperatures, and high humidity.
- Do not attempt to disassemble or repair the clock yourself. Contact qualified service personnel for assistance.
- Keep out of reach of children to prevent accidental damage or injury.
3. Package Contents
Please check that all items are present in the package:
- Rhythm CMJ586NR06 Wall Clock (1 unit)
- C Battery (1 unit)
4. Setup
4.1 Battery Installation
- Locate the front door of the clock. Gently open the front door to access the clock mechanism.
- Identify the battery compartment.
- Insert one (1) C battery, ensuring the polarity (+/-) matches the indicators inside the compartment.
- Close the front door securely.
4.2 Mounting the Clock
The Rhythm CMJ586NR06 is designed for wall mounting. Consider the clock's dimensions and weight when choosing a location.
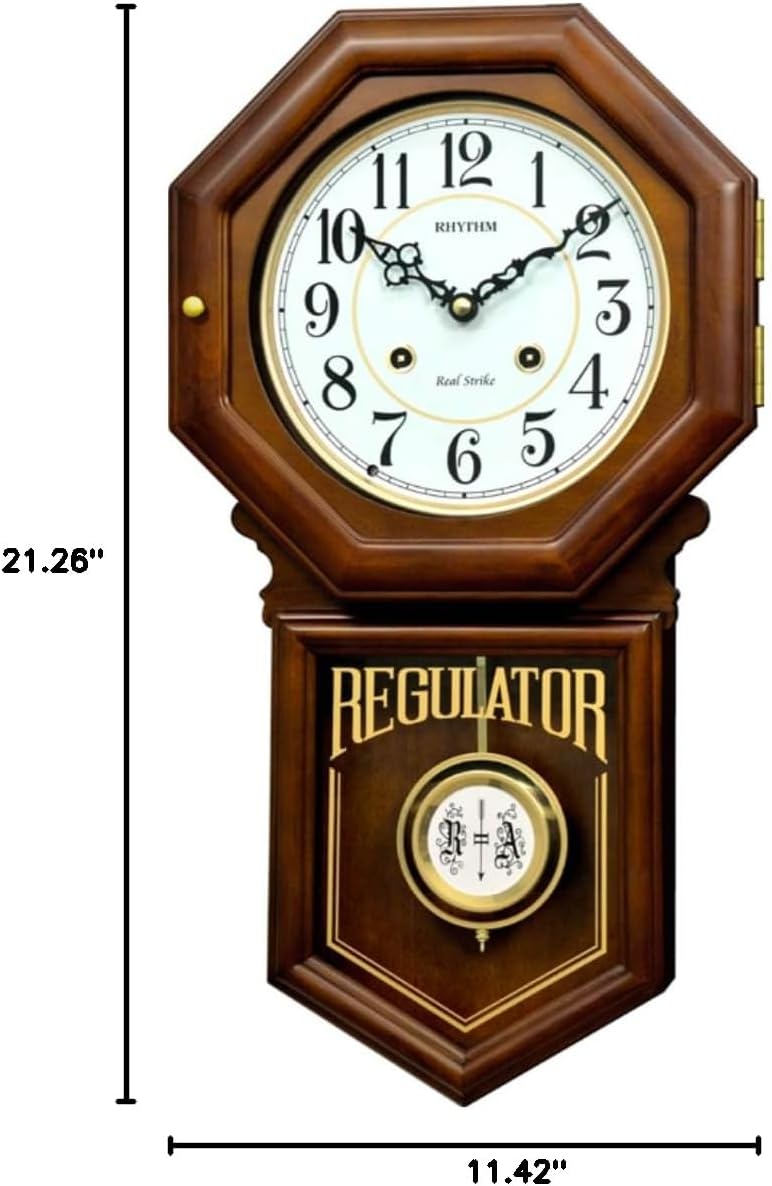
Image 2: Dimensions of the Rhythm CMJ586NR06 Wall Clock, showing a height of 21.26 inches and a width of 11.42 inches.
- Select a suitable wall location, preferably a wall stud, to support the clock's weight (approximately 9.08 pounds).
- Install a sturdy screw or wall anchor into the chosen location, leaving a small portion protruding from the wall.
- Carefully hang the clock onto the screw/anchor using the hanging slot on the back of the clock.
- Ensure the clock is level and securely fastened to prevent it from falling.
5. Operating Instructions
5.1 Setting the Time
- Gently open the front door of the clock.
- Carefully turn the minute hand (the longer hand) clockwise until the correct time is displayed. Do not move the hour hand directly.
- If the clock has a strike feature, allow it to strike at each hour as you pass it to synchronize the strike with the time.
- Close the front door.
5.2 Strike Settings (Hourly and Half-Hourly)
This clock features a real gong striking mechanism that sounds on the hour and half-hour.
- Hourly Strike: The clock will strike the number of hours at the top of each hour (e.g., 3 strikes at 3:00).
- Half-Hour Strike: The clock will strike once at the half-hour mark (e.g., one strike at 3:30).
- Ensure the time is set correctly for the strike mechanism to synchronize properly.
5.3 Auto Night Shut-off by Sensor
The clock is equipped with an automatic night shut-off sensor. This feature silences the hourly and half-hourly strikes during nighttime hours to prevent disturbance.
- The sensor detects ambient light levels. When the room becomes dark, the strike function will automatically cease.
- When sufficient light returns, the strike function will resume operation.
- Ensure the sensor (typically a small light-sensitive component on the clock face or side) is not obstructed.
5.4 Pendulum Operation
The clock features a decorative pendulum. After mounting the clock and installing the battery, the pendulum should begin to swing automatically. If it does not, gently give it a slight push to start its motion.
6. Maintenance
- Cleaning: Wipe the clock's wooden frame and glass with a soft, dry cloth. Do not use abrasive cleaners or chemical sprays, as these can damage the finish.
- Battery Replacement: Replace the C battery annually, or sooner if the clock begins to lose time or the strike mechanism weakens. Always dispose of used batteries responsibly.
- Location: Avoid placing the clock in areas with high vibration or direct heat sources, which can affect its accuracy and mechanism.
7. Troubleshooting
| Problem | Possible Cause | Solution |
|---|---|---|
| Clock not running | Dead or incorrectly installed battery | Replace battery with a new C battery, ensuring correct polarity. |
| Clock losing or gaining time | Weak battery; environmental factors | Replace battery. Ensure clock is not exposed to extreme temperatures. |
| Strike not working | Auto night shut-off active; weak battery; time not synchronized | Check ambient light. Replace battery. Reset time by advancing minute hand past 12 to synchronize strike. |
| Pendulum not swinging | Not started; obstruction | Gently push the pendulum to start its swing. Check for any obstructions. |
8. Specifications
| Feature | Detail |
|---|---|
| Brand | RHYTHM |
| Model Number | CMJ586NR06 |
| Color | Brown |
| Style | Antique |
| Special Feature | Cordless, Auto Night Shut-off, Real Gong Striking |
| Product Dimensions | 11.42"W x 21.26"H |
| Power Source | Battery Powered |
| Indoor/Outdoor Usage | Indoor |
| Material | Wood |
| Frame Material | Wood |
| Batteries Required | 1 C battery (included) |
| Mounting Type | Wall Mount |
| Operation Mode | Mechanical |
| Clock Form | Pendulum |
| Item Weight | 9.08 pounds |
9. Warranty and Support
For warranty information or technical support, please refer to the documentation provided with your purchase or contact Rhythm customer service directly. Keep your purchase receipt as proof of purchase.


