
ViewSonic LS832WU
ViewSonic LS832WU Ultra Short Throw Projector User Manual
Model: LS832WU | Brand: ViewSonic
1. Introduction
This user manual provides detailed instructions for the setup, operation, and maintenance of your ViewSonic LS832WU Ultra Short Throw Projector. Please read this manual thoroughly before using the projector to ensure proper and safe operation.
The ViewSonic LS832WU is a high-performance ultra-short throw laser projector designed for various environments, including auditoriums, conference rooms, and educational settings. It features 5,000 ANSI lumens brightness, WUXGA (1920x1200p) resolution, and a 0.25 throw ratio, allowing for large, bright images from a very short distance.

Figure 1.1: ViewSonic LS832WU Projector, top-down view.
2. What's in the Box
Verify that all items listed below are included in your package. If any items are missing or damaged, please contact ViewSonic customer support.
- ViewSonic LS832WU Projector
- Power Cord
- Remote Control
- User Manual (this document)
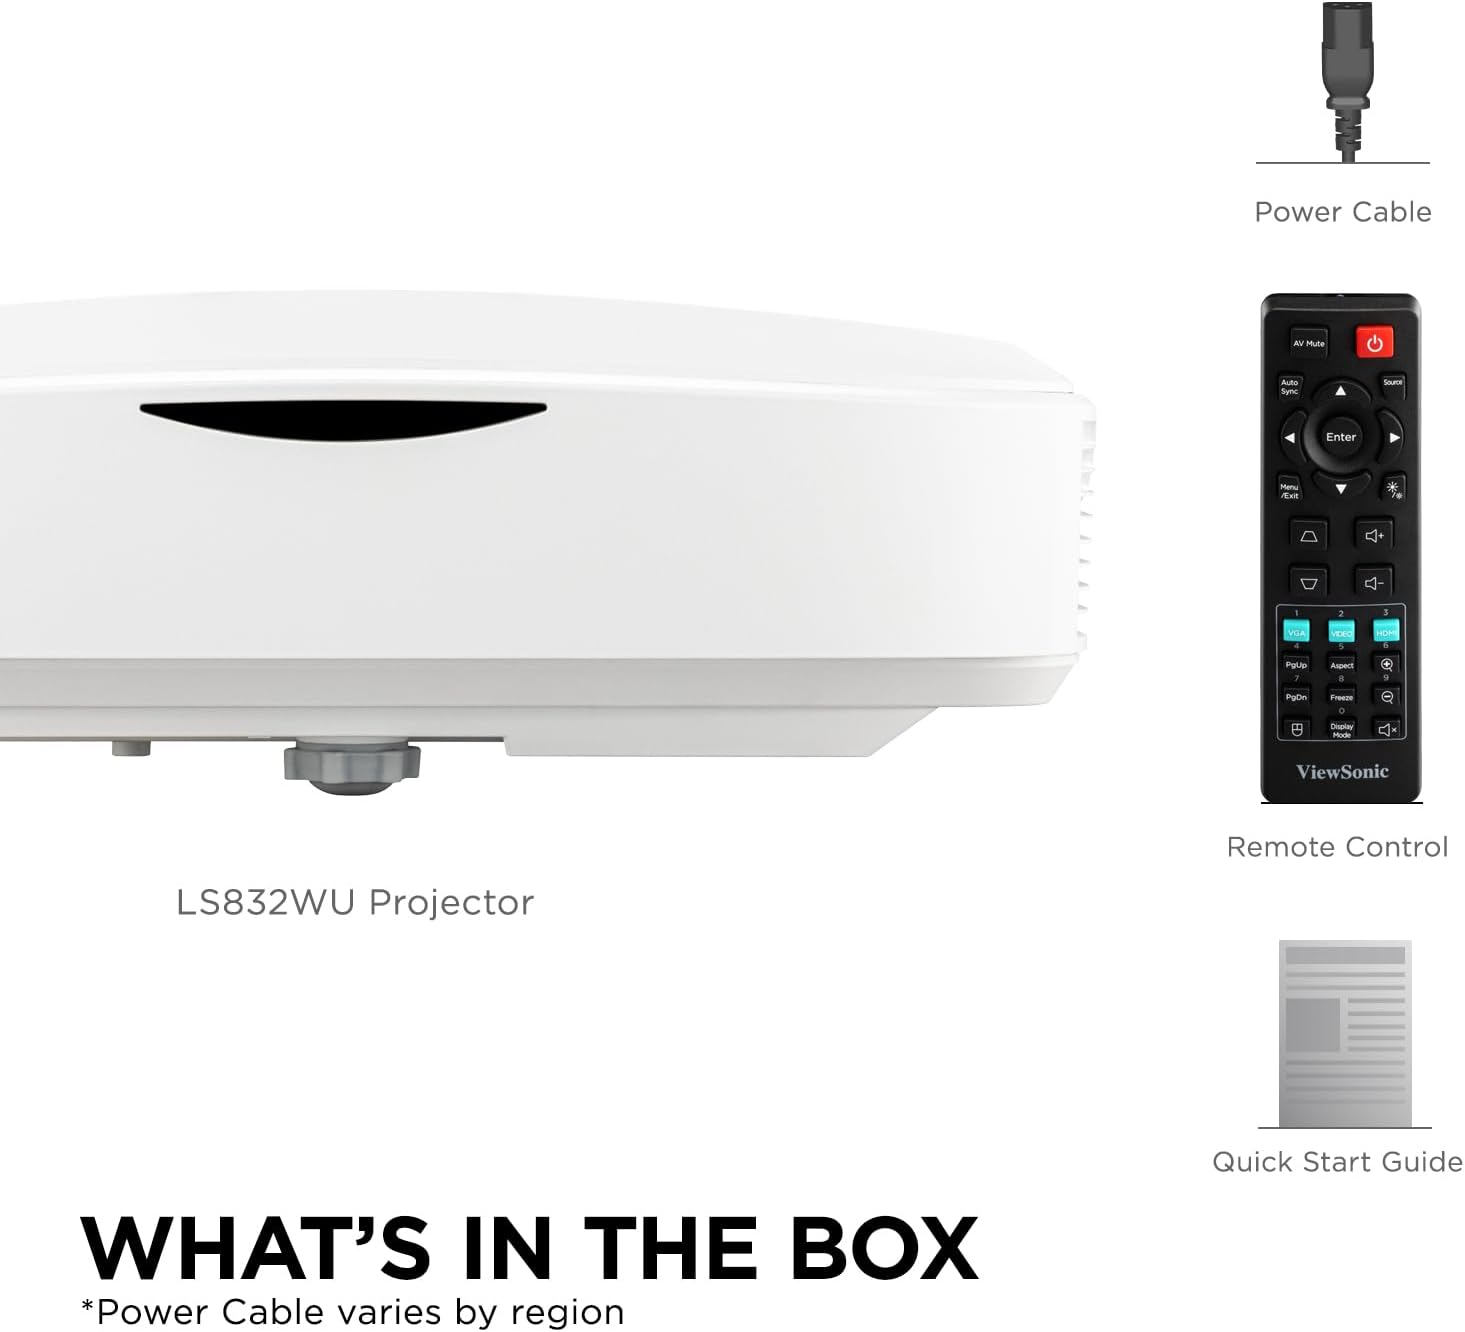
Figure 2.1: Package Contents. Note: Power cable type may vary by region.
3. Product Overview
3.1. Projector Features
- Ultra-Short Throw Laser Projector: WUXGA (1920x1200p) resolution with a 0.25 throw ratio and 5,000 ANSI lumens for bright, detailed images in compact spaces.
- Vibrant Colors & HDR Support: SuperColor technology and HDR/HGL compatibility deliver a wide color gamut with enhanced contrast and visual depth.
- Flexible Screen Size & Throw Range: Projects screen sizes from 30" to 150" with a throw distance of 6" - 19"; displays a 100" image from 11 inches away.
- Instant Power On/Off: Enables quick startup and shutdown with optional settings for automatic power control.
- Versatile Installation Options: Supports table or ceiling installation and is compatible with ViewSonic mounts PJ-WMK-305 and PJ-WMK-007.
3.2. Connectivity Ports
The LS832WU projector offers a comprehensive set of connectivity options for various devices.
- 1 x HDMI 2.0
- 1 x HDCP 1.4
- 1 x RS232
- 1 x RJ45 (LAN Control)
- 1 x USB Type-A
- 1 x USB Type-B
- 1 x Audio In/Out (3.5mm Jack)
- 1 x VGA In/Out
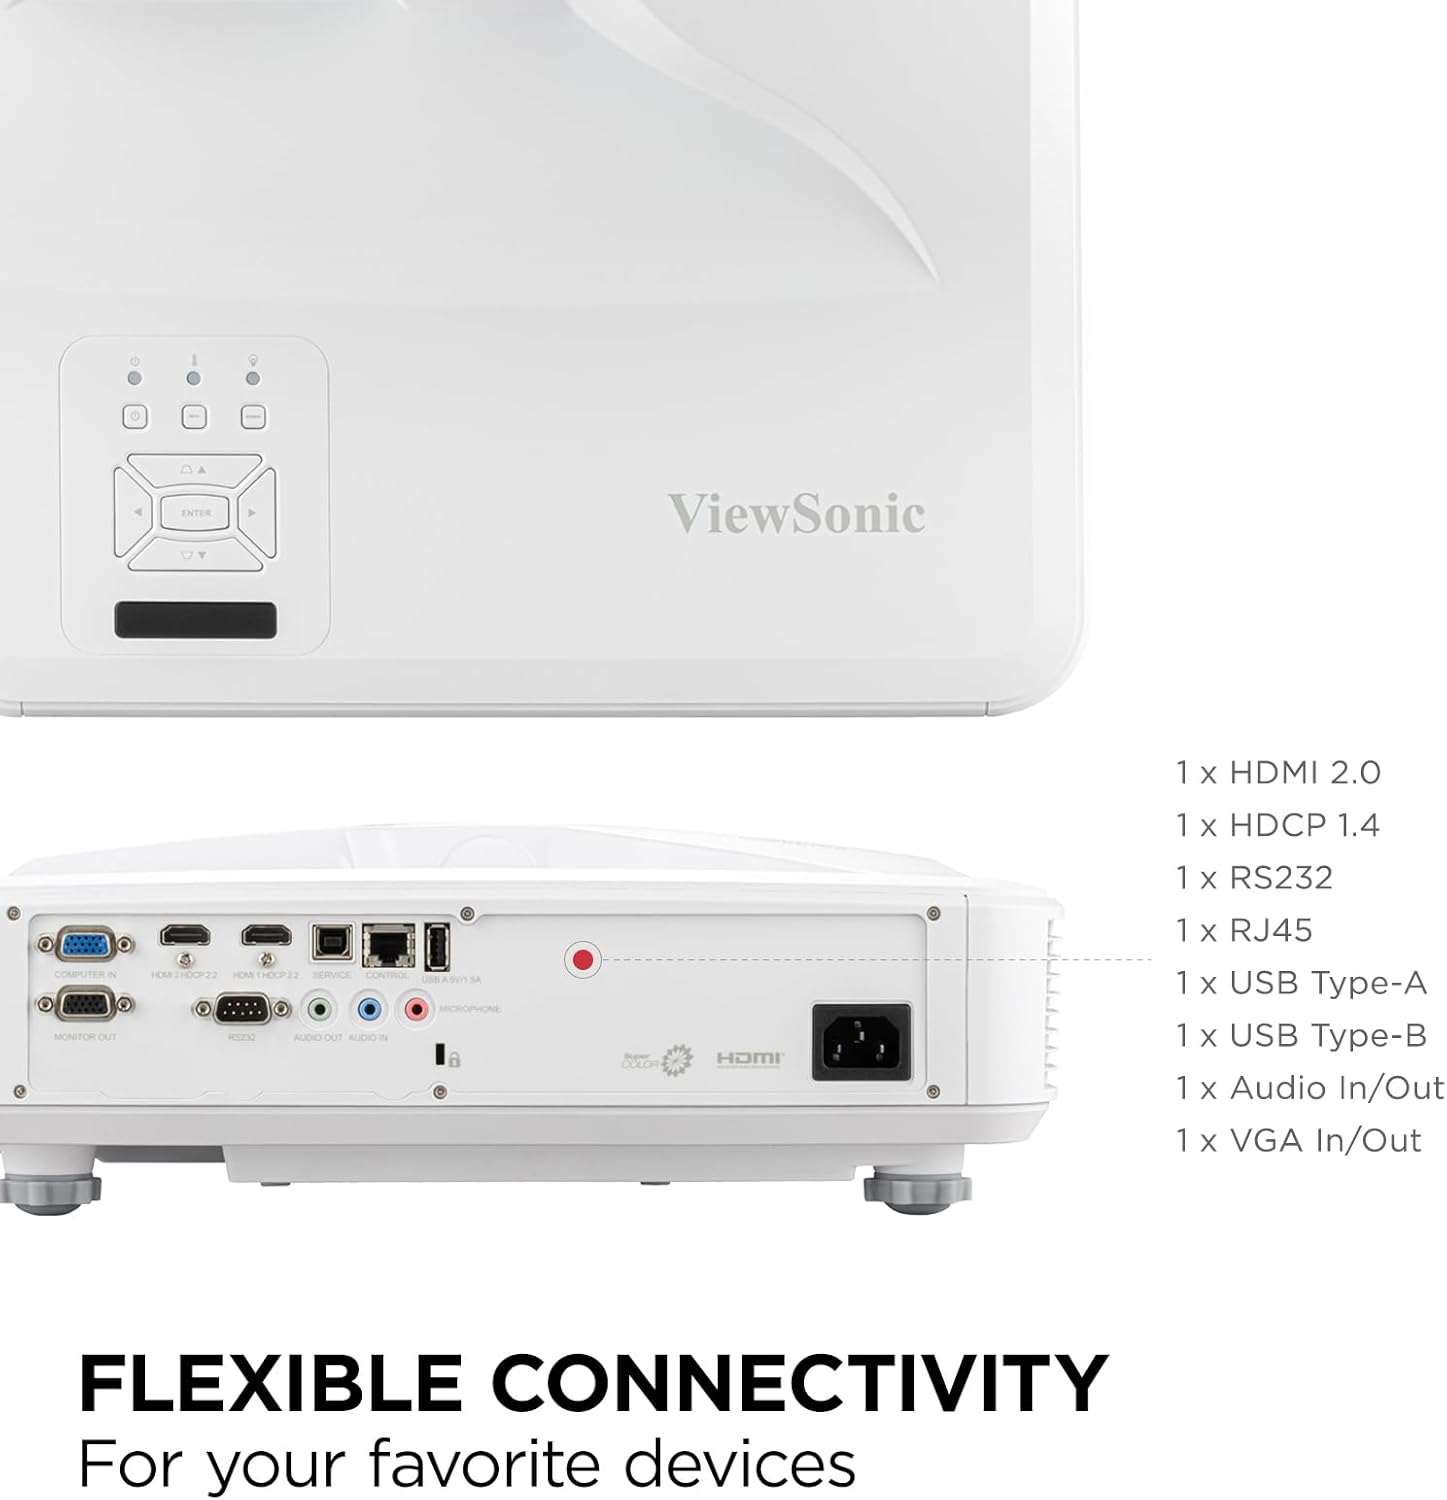
Figure 3.1: Flexible Connectivity Ports.
4. Setup
4.1. Placement and Installation
The ultra-short throw design allows for flexible placement close to the projection surface. Consider the desired screen size and the throw distance when positioning the projector.
- Table-top Placement: Place the projector on a stable, flat surface directly in front of the screen or wall.
- Ceiling Mount: For permanent installations, the projector can be mounted to the ceiling using compatible ViewSonic mounts (PJ-WMK-305 and PJ-WMK-007). Ensure the mount is securely fastened and the projector is oriented correctly.

Figure 4.1: Ultra Short-Throw Projector Placement.
Refer to the following image for approximate throw distances and corresponding image sizes:
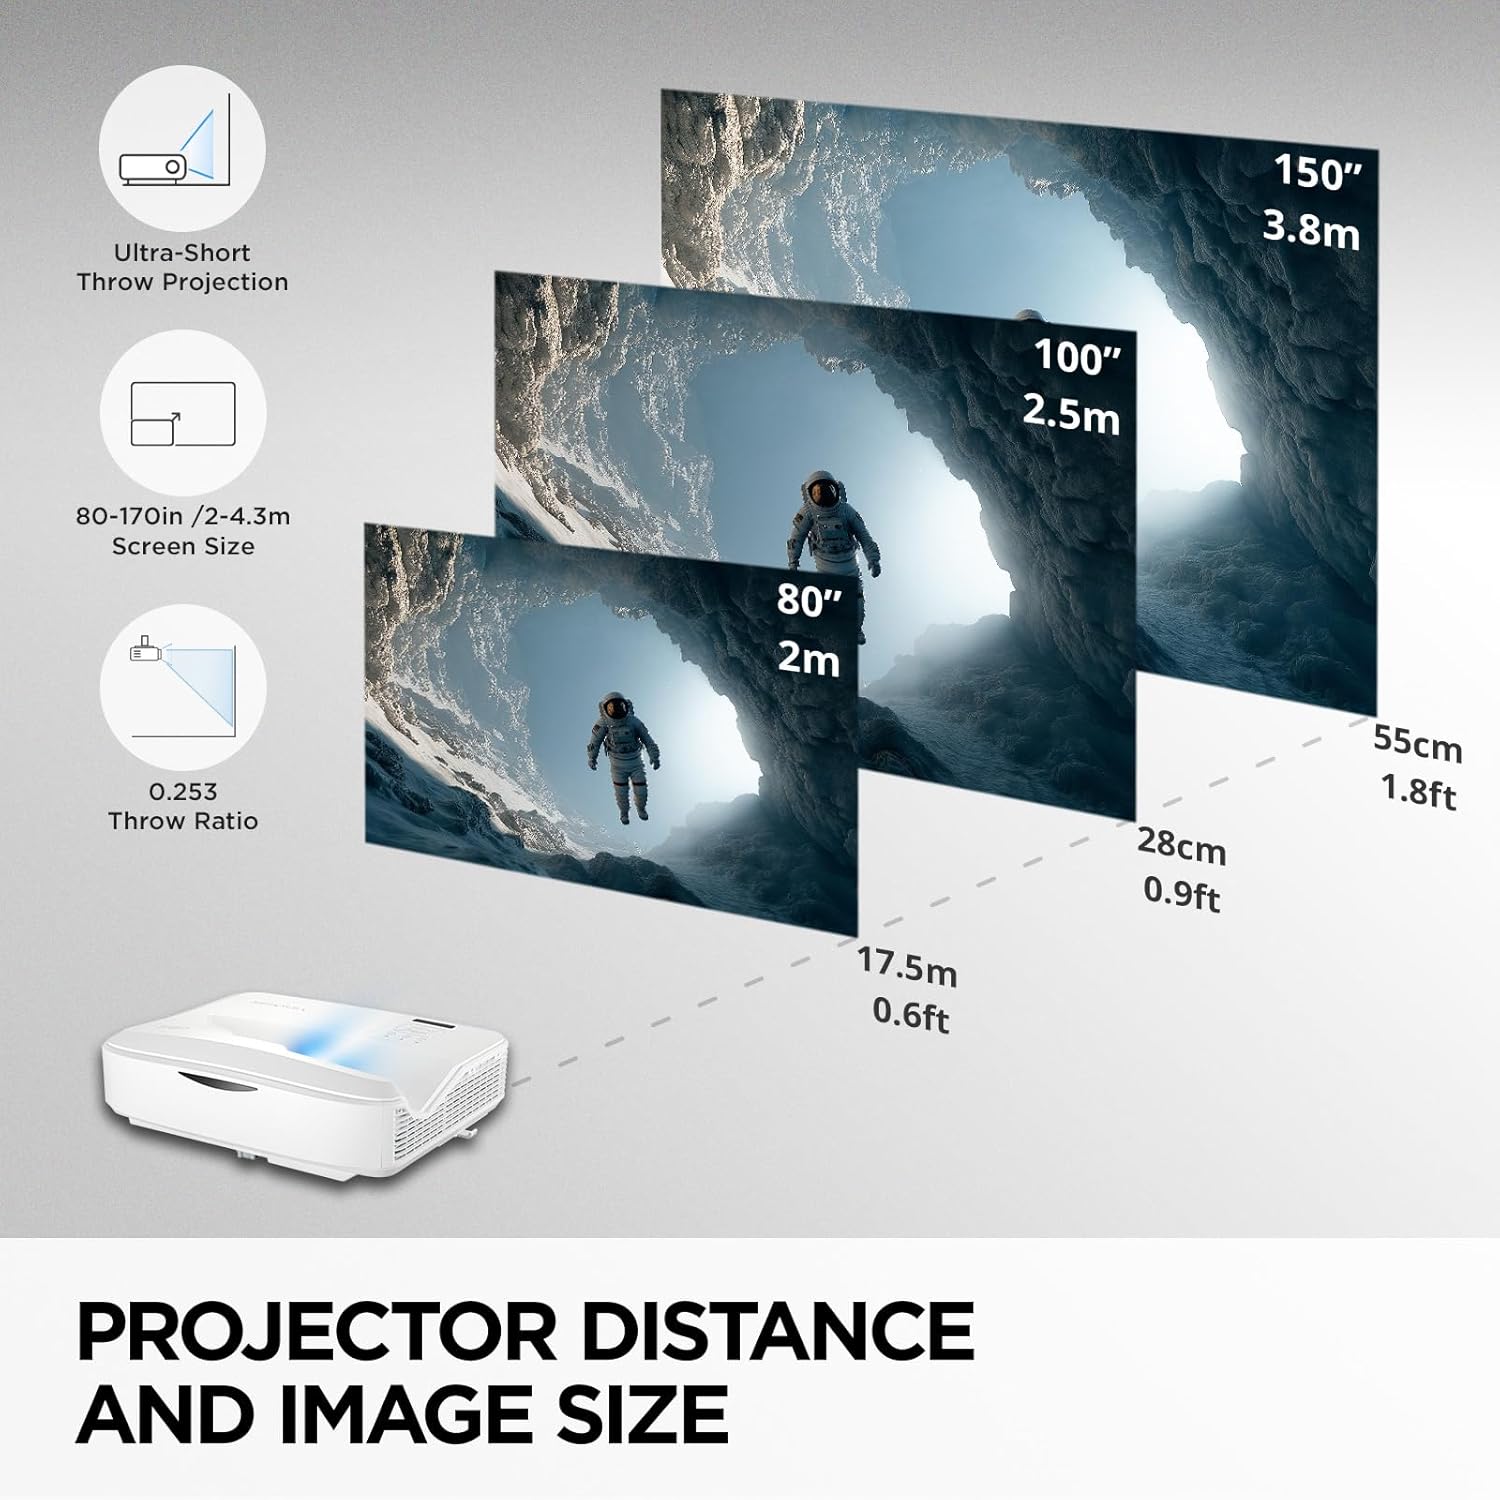
Figure 4.2: Projector Distance and Image Size Guide.
4.2. Connecting Power and Source Devices
- Connect the power cord to the projector's power inlet and then to a grounded electrical outlet.
- Connect your source device (e.g., laptop, Blu-ray player, gaming console) to the projector using an appropriate cable (HDMI, VGA, etc.).
- Press the power button on the projector or remote control to turn on the unit.
5. Operating Instructions
5.1. Basic Operation
- Power On/Off: Press the power button on the remote or projector. The laser light source provides instant on/off capabilities.
- Source Selection: Use the "Source" button on the remote or projector control panel to cycle through available input sources (HDMI, VGA, etc.).
- Menu Navigation: Use the arrow keys and "Enter" button on the remote or control panel to navigate the on-screen display (OSD) menu.
5.2. Image Adjustment
To optimize your projection, use the following image adjustment features:
- Keystone Correction: Corrects trapezoidal distortion when the projector is not perfectly perpendicular to the screen. Access this setting via the OSD menu.
- 4-Corner Adjustment: Allows for precise adjustment of each corner of the image independently, ideal for irregular surfaces or complex installations.
- Digital Zoom: Adjusts the size of the projected image (0.8x–2.0x) without moving the projector.
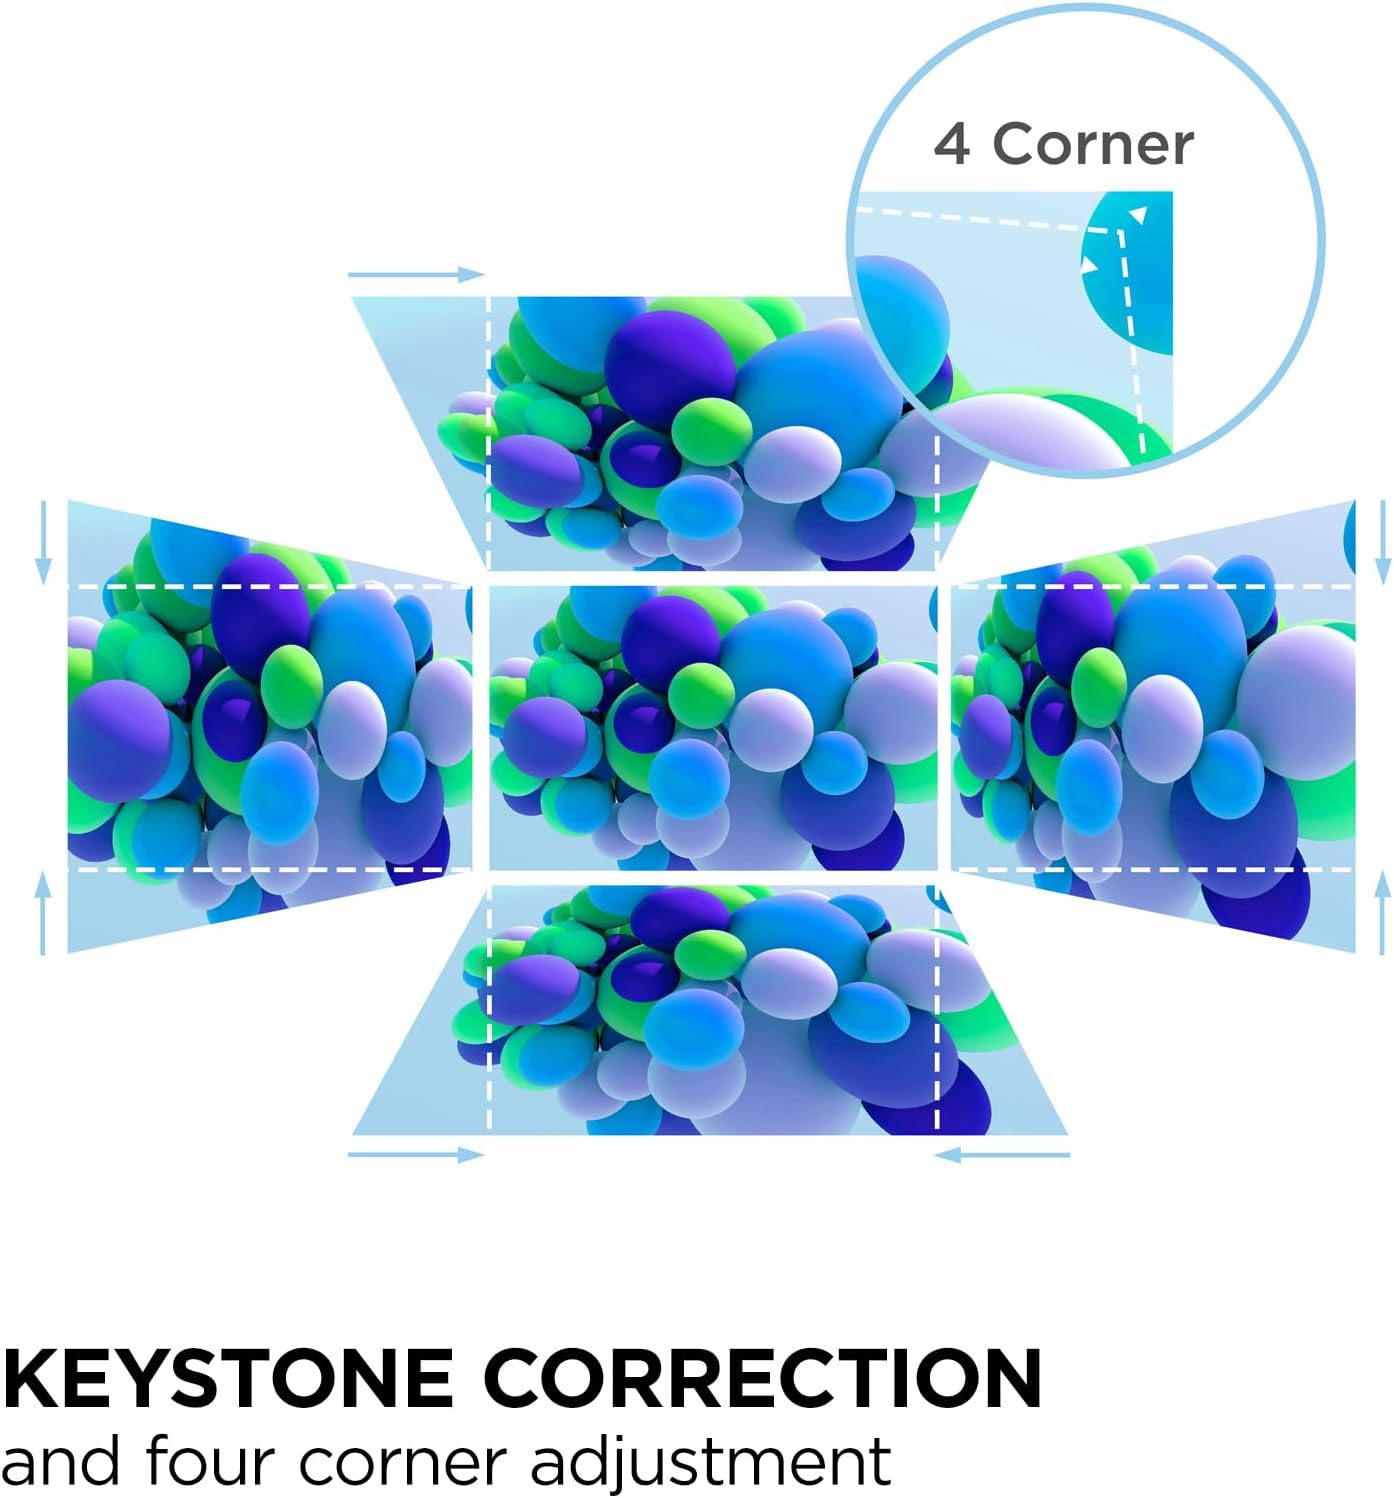
Figure 5.1: Keystone and 4-Corner Adjustment.
5.3. Advanced LAN Control
The LS832WU supports advanced LAN control for centralized management and scheduling. It is compatible with Crestron, AMX, Extron, PJ Link, ATEN, and ViewSonic vController systems. Connect the projector to your network via the RJ45 port and configure settings through the OSD menu or your chosen control software.
6. Maintenance
The ViewSonic LS832WU utilizes laser phosphor technology, offering a maintenance-free projection experience without the need for lamp replacements. However, regular cleaning is recommended to ensure optimal performance and longevity.
- Cleaning the Lens: Gently wipe the projector lens with a soft, lint-free cloth specifically designed for optical surfaces. Do not use abrasive cleaners or excessive force.
- Cleaning the Projector Body: Use a soft, dry cloth to wipe down the exterior of the projector. For stubborn marks, a slightly damp cloth with mild detergent can be used, followed by a dry wipe. Ensure no liquid enters the projector.
- Ventilation: Ensure the projector's ventilation openings are clear and not obstructed to prevent overheating.
The laser light source is designed for extended use, with a lifespan of up to 30,000 hours in SuperEco+ Mode, which translates to more than 10 years of use at 8 hours per day.
7. Troubleshooting
If you encounter issues with your projector, refer to the following common problems and solutions:
| Problem | Possible Cause | Solution |
|---|---|---|
| No image projected | Power cable disconnected, incorrect input source selected, source device not powered on. | Check power connections. Select correct input source. Ensure source device is on and outputting signal. |
| Image is blurry or out of focus | Projector lens dirty, incorrect focus adjustment, projector too close/far from screen. | Clean the lens. Adjust digital zoom. Ensure projector is within optimal throw distance. |
| Image is distorted (trapezoid shape) | Projector not perpendicular to the screen. | Use Keystone Correction or 4-Corner Adjustment from the OSD menu. |
| No audio | Audio cable disconnected, volume too low, incorrect audio output on source device. | Check audio cable connections. Increase projector volume. Verify audio settings on source device. |
For further assistance, please contact ViewSonic customer support.
8. Specifications
| Feature | Detail |
|---|---|
| Model Number | LS832WU |
| Display Resolution | WUXGA (1920 x 1200) |
| Brightness | 5000 ANSI Lumens |
| Throw Ratio | 0.25 |
| Screen Size (Diagonal) | 30" to 150" (up to 170" / 432 cm visible screen diagonal) |
| Throw Distance | 6" - 19" (100" image from 11 inches away) |
| Light Source | Laser Phosphor |
| Light Source Life | Up to 30,000 hours (SuperEco+ Mode) |
| Connectivity Technology | 3.5mm Jack, HDMI, USB, RJ45, RS232, VGA |
| Special Features | 3D-Ready, Built-In Speaker, Digital Keystone Correction, SuperColor, Ultra Short Throw, HDR/HGL compatibility, 4-Corner Adjustment, Advanced LAN Control |
| Product Dimensions (L x W x H) | 15 x 12.5 x 5.2 inches (38.1 x 31.75 x 13.2 cm) |
| Item Weight | 12.8 pounds |
| Manufacturer | ViewSonic |
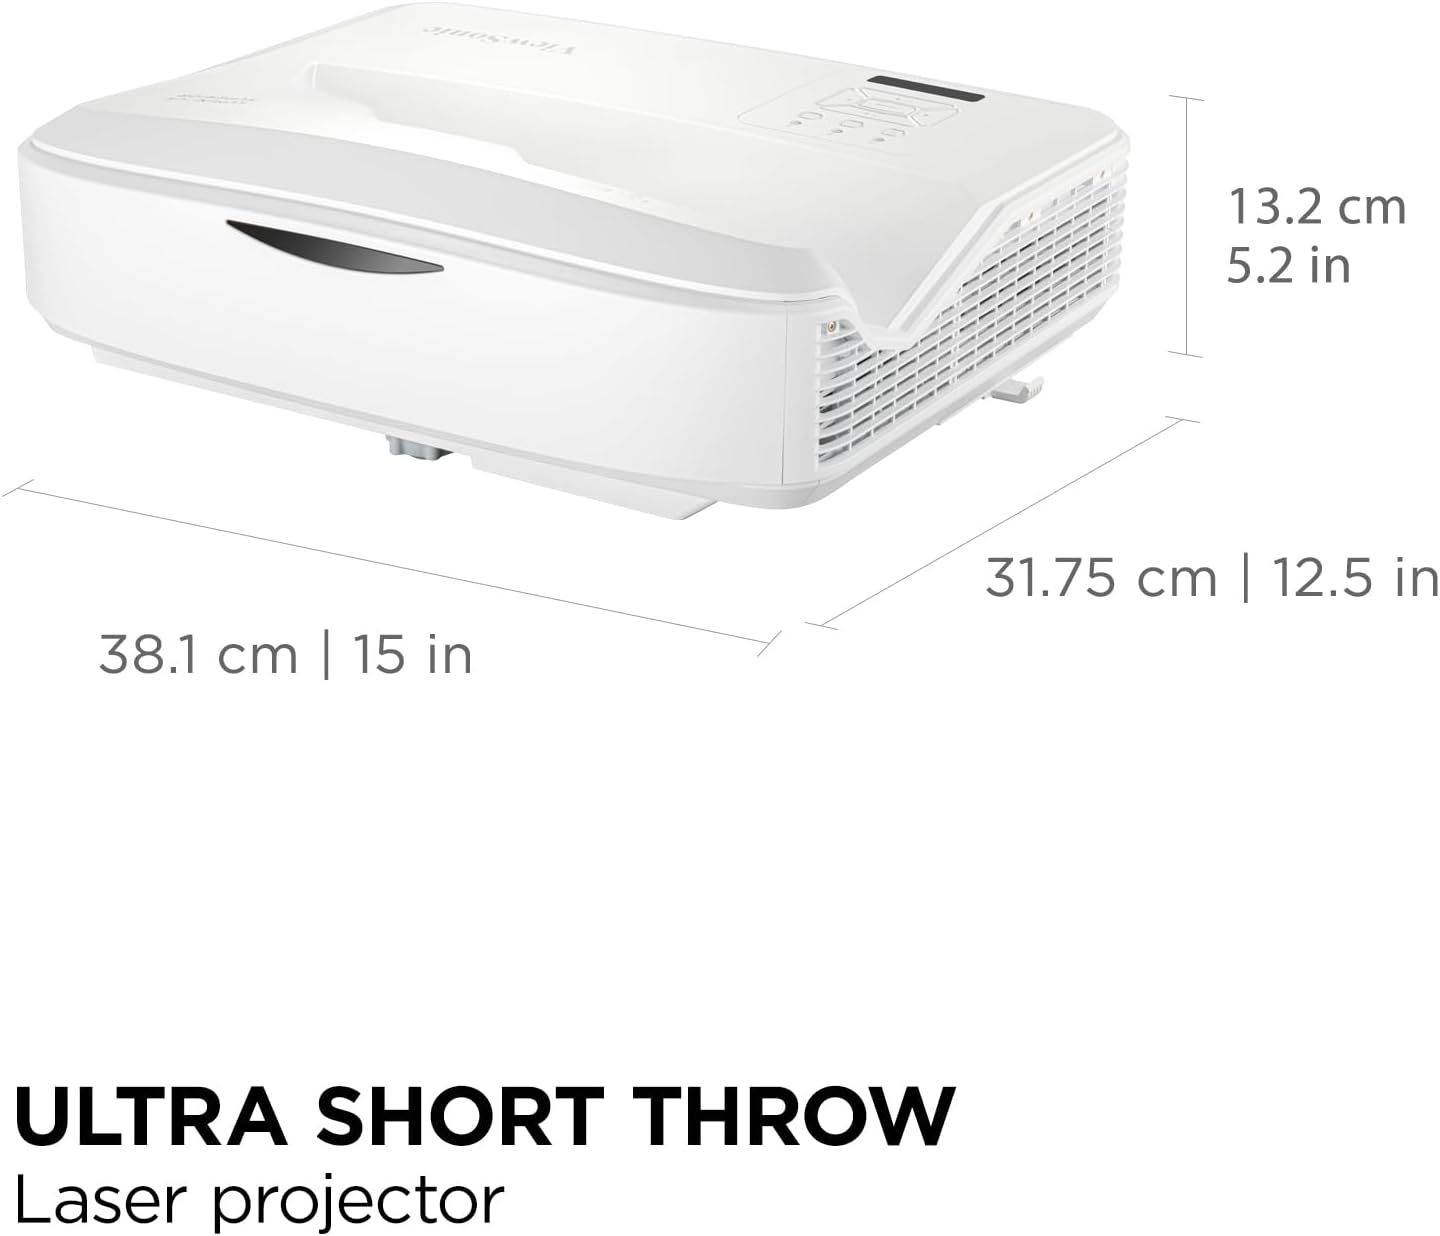
Figure 8.1: Projector Dimensions.
9. Warranty and Support
9.1. Warranty Information
ViewSonic products typically come with a manufacturer's warranty. For specific warranty terms and conditions applicable to your LS832WU projector, please refer to the warranty card included in your product packaging or visit the official ViewSonic website.
Common warranty coverage includes:
- 3-Year Limited Warranty (for the projector unit)
- Specific coverage for the laser light source (often aligned with the projector warranty or a separate extended period).
9.2. Customer Support
If you require technical assistance, have questions about your product, or need to initiate a warranty claim, please contact ViewSonic customer support. Have your product model number (LS832WU) and serial number ready when contacting support.
You can typically find support contact information on the official ViewSonic website (www.viewsonic.com) or in the Quick Start Guide provided with your projector.
Related documentsLS832WU


Ask a question about this manual
Ask about setup, troubleshooting, compatibility, parts, safety, or missing instructions. Manuals+ will review the question and use this page’s manual context to help answer it.