1. Introduction
Thank you for choosing the Elmark EL-WDT-2 Digital Plug-in Timer. This device is designed to provide automated control over your electrical appliances, helping you save energy and enhance convenience. It features a digital display for precise programming, child protection for safety, and a rechargeable Ni-MH battery to maintain settings during power outages. Please read this manual carefully before use to ensure proper operation and to maximize the lifespan of your timer.
2. Safety Information
- Ensure the timer is used with a power supply matching its specifications (230V, 50Hz).
- Do not immerse the timer in water or expose it to excessive moisture.
- Do not open the casing or attempt to repair the device yourself. Refer all servicing to qualified personnel.
- Keep out of reach of children. The integrated child protection features are designed to prevent accidental access to live parts.
- Do not overload the timer beyond its maximum rated current.
- Unplug the timer from the wall socket before cleaning.
3. Product Features
- Digital display for clear time and program viewing.
- Child protection for enhanced safety.
- Rechargeable Ni-MH battery for memory backup during power interruptions.
- Two operating modes: permanent ON/OFF and timed control.
- Minimum setting time: 15 minutes.
- Maximum setting time: 24 hours.
- Supply Voltage: 230 V, 50 Hz.
4. Setup
- Initial Charge: Before first use, plug the timer into a wall socket for at least 4 hours to fully charge the internal Ni-MH battery. This ensures that your settings are retained even if the timer is unplugged or there is a power cut.
- Resetting the Timer: If the display is blank or showing erratic characters, use a pointed object (like a pen tip) to press the 'RESET' button (usually a small recessed hole) to clear all settings and restart the timer.
- Setting the Current Time:
- Press the 'CLOCK' button.
- Use the '+' and '-' buttons to adjust the hour.
- Press 'SET' or 'ENTER' (depending on model) to confirm the hour and move to minutes.
- Use the '+' and '-' buttons to adjust the minutes.
- Press 'CLOCK' again to exit time setting mode.
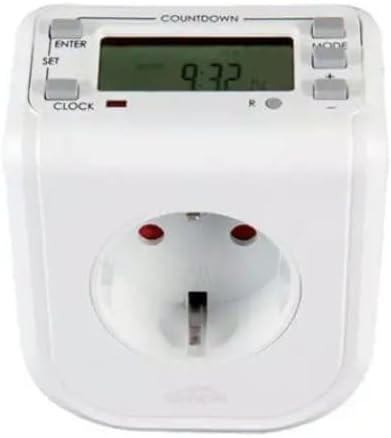
Figure 1: Front view of the Elmark EL-WDT-2 Digital Plug-in Timer. The display shows '9:32'. Control buttons include 'ENTER', 'SET', 'CLOCK', 'MODE', '+', and '-'. A standard European Type F (Schuko) socket is visible at the bottom.
5. Operating Instructions
5.1. Setting Programs (ON/OFF Times)
- Press the 'MODE' button repeatedly until 'PROG' or 'PROGRAM' appears on the display.
- The display will show '1 ON'. Use the '+' and '-' buttons to set the desired ON time (hour and minute) for the first program. Press 'SET' or 'ENTER' to confirm each segment.
- After setting '1 ON', the display will show '1 OFF'. Set the desired OFF time for the first program using the '+' and '-' buttons, then confirm.
- Repeat steps 2 and 3 for additional programs (e.g., '2 ON', '2 OFF', etc.). The timer typically supports multiple ON/OFF programs.
- Once all programs are set, press the 'CLOCK' button to return to the current time display.
5.2. Manual Override / Operating Modes
The timer usually has a switch or button to select between different operating modes:
- ON: The connected appliance will remain continuously ON, ignoring all programmed settings.
- OFF: The connected appliance will remain continuously OFF, ignoring all programmed settings.
- AUTO: The connected appliance will operate according to the programmed ON/OFF times. This is the standard mode for automated control.
Locate the physical switch or press the 'MODE' button until the desired operating mode (e.g., 'AUTO', 'ON', 'OFF') is displayed.
5.3. Countdown Function (if available)
If your timer features a 'COUNTDOWN' function (indicated by text above the display), you can set a specific duration after which the connected appliance will turn ON or OFF.
- Press the 'COUNTDOWN' button.
- Use the '+' and '-' buttons to set the desired countdown duration (hours, minutes).
- Press 'ENTER' or 'SET' to start the countdown. The display will show the remaining time.
6. Maintenance
- Cleaning: Wipe the timer with a soft, dry cloth. Do not use abrasive cleaners, solvents, or immerse in water.
- Storage: Store the timer in a cool, dry place when not in use.
- Battery: The internal Ni-MH battery is designed for long-term use and is not user-replaceable. Ensure the timer is regularly plugged in to keep the battery charged.
7. Troubleshooting
| Problem | Possible Cause | Solution |
|---|---|---|
| Display is blank or flickering. | Internal battery is low or depleted. | Plug the timer into a live wall socket for at least 4 hours to charge the battery. |
| Appliance does not turn ON/OFF at programmed times. | Timer is not in 'AUTO' mode. Incorrect program settings. | Ensure the timer is set to 'AUTO' mode. Recheck your ON/OFF program settings. Verify the appliance is correctly plugged into the timer and is functional. |
| Timer buttons are unresponsive. | Temporary software glitch. | Perform a reset using the 'RESET' button. This will clear all settings, so you will need to reprogram. |
8. Specifications
- Model: EL-WDT-2
- Brand: Elmark
- Supply Voltage: 230 V, 50 Hz
- Minimum Setting Time: 15 minutes
- Maximum Setting Time: 24 hours
- Material: EL-WDT-2 Digital (Plastic housing)
- Color: White
- Product Dimensions: 7P x 8l x 7H cm (approximately)
9. Warranty and Support
Elmark products are manufactured to high-quality standards. For warranty information, technical support, or service inquiries, please refer to the warranty card included with your purchase or contact your local Elmark distributor or retailer. Please have your model number (EL-WDT-2) and purchase details ready when contacting support.


