
Hantek TO1112C
Contents
Hantek TO1112C Digital Oscilloscope User Manual
Model: TO1112C | Brand: Hantek
1. Introduction
This manual provides comprehensive instructions for the safe and effective operation of your Hantek TO1112C Touch Screen Digital Oscilloscope. The TO1112C model integrates an oscilloscope and a multimeter, offering versatile measurement capabilities for various applications. Please read this manual thoroughly before using the device to ensure proper functionality and to prevent damage.

Figure 1.1: Hantek TO1112C Digital Oscilloscope, a handheld device with a large touch screen display, featuring multiple input ports on the side and a kickstand for angled viewing.
2. Safety Information
Always observe the following safety precautions to avoid personal injury and prevent damage to the instrument or other connected devices.
- Do not operate the device in wet or damp conditions.
- Do not apply voltage or current that exceeds the specified maximum ratings.
- Ensure proper grounding when connecting to external circuits.
- Use only the specified power adapter and accessories.
- Do not attempt to open or repair the device; refer all servicing to qualified personnel.
- Keep the device away from strong electromagnetic fields.
3. Product Overview
The Hantek TO1112C is a compact, multi-functional instrument designed for electronic testing and measurement. It features a multi-touch large screen with 800x480 resolution for intuitive operation.
3.1 Key Features
- Oscilloscope Function: 2 channels, 110MHz bandwidth, 250MSa/s sampling rate, 8M storage depth.
- Multimeter Function: High-precision multimeter with data recording, storage, trend chart, and statistical analysis.
- Display: Multi-touch large screen, 800x480 resolution.
- Battery: Built-in super large capacity lithium battery for long endurance (up to half a year standby).
- Charging: Supports Type-C fast charging with standard 18W charger.
- Design: Suspension foot design for multi-angle adjustment, anti-falling, and anti-seismic.
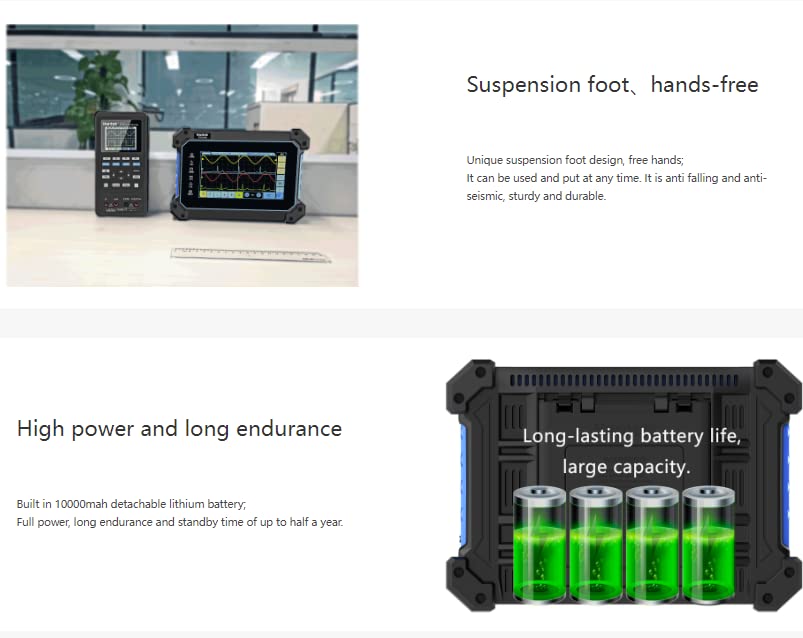
Figure 3.1: The Hantek TO1112C displaying multiple waveforms, illustrating its integrated functions as a digital storage oscilloscope, arbitrary function signal generator, high-precision multimeter, data recorder, frequency meter, and FFT spectrum analyzer. A hand is shown interacting with the touch screen interface.
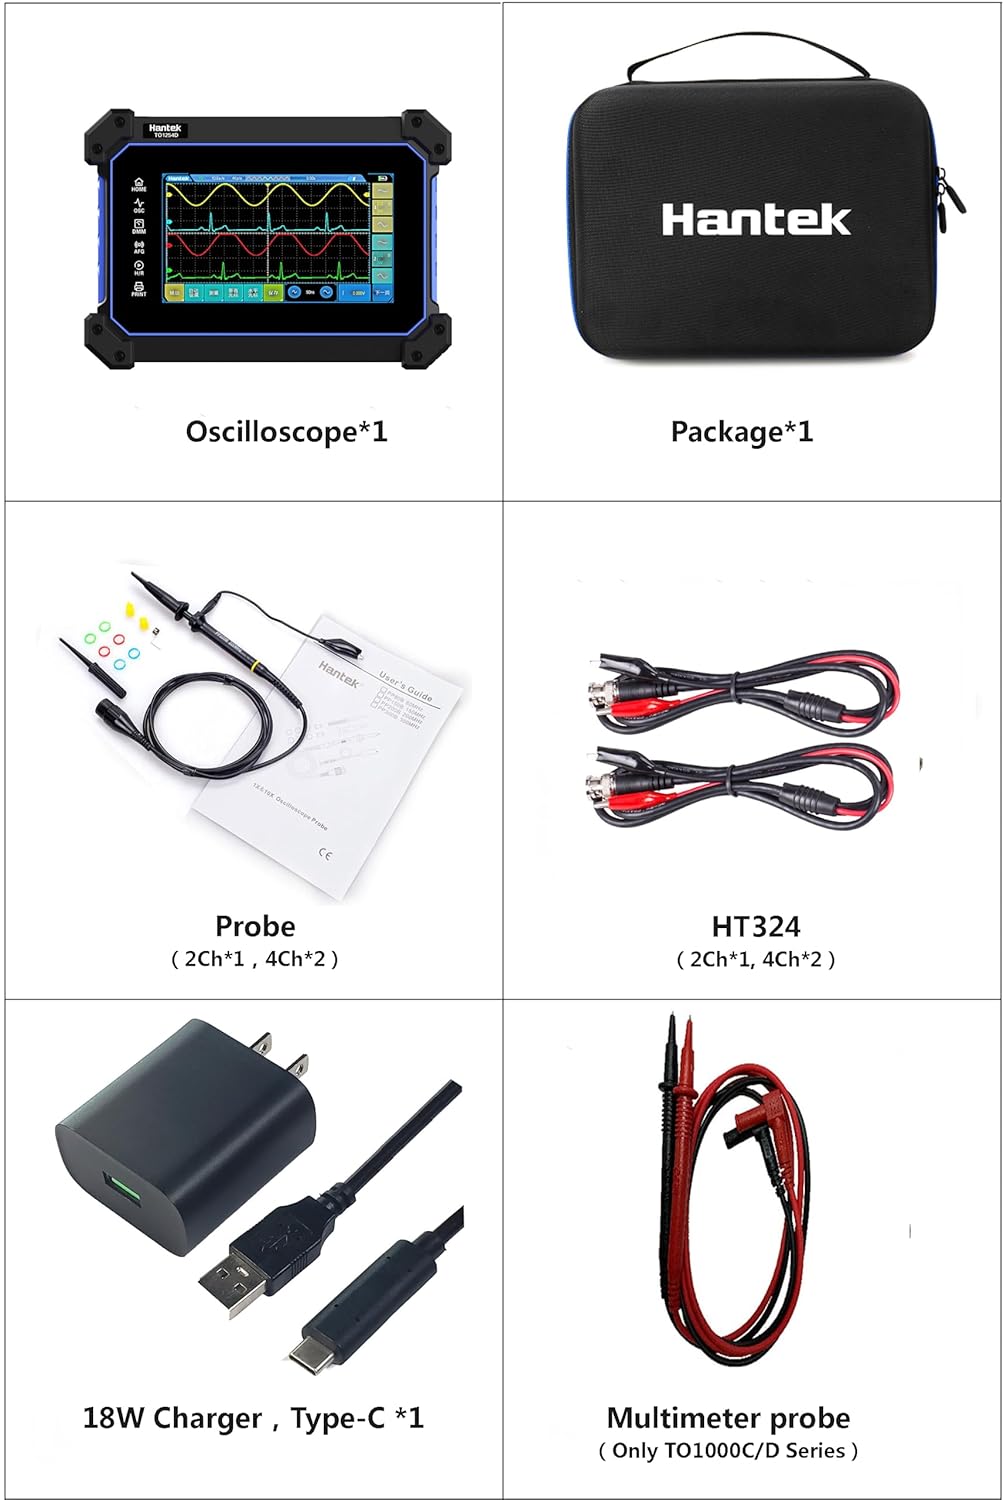
Figure 3.2: The Hantek TO1112C shown with its suspension foot extended for hands-free operation, highlighting its robust design. An illustration of four battery cells indicates its long-lasting battery life and large capacity.
4. Setup
4.1 Unpacking and Inspection
Carefully unpack the device and all accessories. Inspect for any signs of damage during transit. If any components are missing or damaged, contact your vendor immediately.
4.2 What's in the Box
The standard package for the Hantek TO1112C includes the following items:
- Hantek TO1112C Oscilloscope Unit (x1)
- Protective Carrying Case (x1)
- Oscilloscope Probes (x2, for 2 channels)
- HT324 BNC to Alligator Clip Cables (x2, for 2 channels)
- 18W Type-C Charger (x1)
- Multimeter Probes (x1 set, red and black)
- User Manual (this document)

Figure 4.1: Visual representation of the items included in the Hantek TO1112C package, showing the oscilloscope unit, a carrying case, oscilloscope probes, HT324 cables, an 18W Type-C charger, and multimeter probes.
4.3 Charging the Device
Before first use, fully charge the device. Connect the provided 18W Type-C charger to the device's Type-C port and plug it into a power outlet. The charging indicator will show the charging status. The device supports fast charging and can share charging equipment with mobile phones.

Figure 4.2: Close-up view of the Hantek TO1112C's side panel, highlighting the Type-C charging port and indicating its fast charging capability.
4.4 Powering On/Off
Press and hold the power button located on the side of the device to turn it on or off. A short press will typically put the device into standby mode or wake it up.
5. Operating Instructions
The Hantek TO1112C offers multiple measurement modes accessible via its touch screen interface.
5.1 Oscilloscope Function
To use the oscilloscope function, connect the oscilloscope probes to the BNC input channels (CH1, CH2) on the device and to the circuit under test. Navigate to the 'OSC' mode on the touch screen. Adjust the vertical scale (Volts/Div) and horizontal scale (Time/Div) as needed. Use the trigger settings to stabilize the waveform display.
- Bandwidth: 110MHz
- Sampling Rate: 250MSa/s
- Storage Depth: 8M
- Channels: 2
- Measurement Functions: Supports various measurements including Edge, Slope, Pulse Width, Video, Timeout, and up to 42 other measurement functions.
5.2 Multimeter Function
For multimeter measurements, connect the multimeter probes to the dedicated input jacks (VΩmA, COM) on the device. Select the 'DMM' mode on the touch screen. Choose the desired measurement type (Voltage, Current, Resistance, Capacitance, Diode, Continuity). The multimeter function provides data recording, storage, trend charts, and statistical analysis capabilities.
5.3 General Operation and UI
The device features a user-friendly interface with intuitive touch controls. Navigate through menus and settings by tapping and swiping. One-key waveform storage is available for quick saving of measurement data.
6. Maintenance
6.1 Cleaning
To clean the device, use a soft, dry cloth. For stubborn dirt, a slightly damp cloth with mild detergent can be used, ensuring no liquid enters the device. Do not use abrasive cleaners or solvents.
6.2 Battery Care
The built-in lithium battery is designed for long life. To maximize battery longevity, avoid fully discharging the battery frequently. If storing the device for an extended period, ensure it is charged to approximately 50% and recharge every six months.
7. Troubleshooting
| Problem | Possible Cause | Solution |
|---|---|---|
| Device does not power on. | Low battery or power adapter issue. | Charge the device using the provided Type-C charger. Ensure the charger is properly connected and the power outlet is functional. |
| No waveform displayed on oscilloscope. | Incorrect probe connection, wrong input settings, or no signal. | Verify probe connections. Check vertical (Volts/Div) and horizontal (Time/Div) settings. Ensure a signal is present at the input. Adjust trigger settings. |
| Multimeter readings are inaccurate. | Incorrect probe connection, wrong measurement mode, or faulty probes. | Ensure multimeter probes are correctly inserted into the VΩmA and COM jacks. Select the appropriate measurement mode (e.g., DC Voltage, AC Voltage, Resistance). Test probes for continuity. |
| Touch screen is unresponsive. | Temporary software glitch or screen damage. | Restart the device. If the issue persists, contact customer support. |
8. Specifications
Detailed technical specifications for the Hantek TO1112C model.
| Parameter | Value |
|---|---|
| Model | TO1112C |
| Oscilloscope Channels | 2 CH |
| Bandwidth | 110 MHz |
| Sampling Rate | 250 MSa/s |
| Storage Depth | 8M |
| Signal Source | Not applicable for TO1112C (available on TO1112D) |
| Multimeter Function | Yes |
| Display Resolution | 800 x 480 pixels |
| Product Dimensions | 6.93 x 9.76 x 2.13 inches |
| Product Weight | 3.31 Pounds |
| Manufacturer | Hantek |
| Country of Origin | China |

Figure 8.1: A comparison table detailing different Hantek oscilloscope models (TO1154D, TO1204D, TO1254D, TO1112, TO1112C, TO1112D) and their respective specifications including Oscilloscope Channel count, Bandwidth, Sampling Rate, Storage Depth, Signal Source availability, and Multimeter functionality.

Figure 8.2: A detailed parameters table for Hantek TO1000 Series (1G Sampling) and TO1112 Series (250M Sampling) oscilloscopes, including specifications like Horizontal Scale Range, Incremental Time Measurement Accuracy, A/D Converter, Vertical Scale Range, and Vertical Sensitivity Range.
9. Warranty and Support
Warranty information for your Hantek TO1112C is typically provided with the product packaging or can be found on the official Hantek website. For technical support, troubleshooting assistance beyond this manual, or warranty claims, please contact Hantek customer service or your authorized dealer.
Visit the official Hantek store for more information: Hantek Store on Amazon
Ask a question about this manual
Ask about setup, troubleshooting, compatibility, parts, safety, or missing instructions. Manuals+ will review the question and use this page’s manual context to help answer it.