
Introduction
This manual provides instructions for the proper setup, operation, and maintenance of your SMALLRIG 4236 4-inch Camera Suction Mount with Ball Head Magic Arm. Please read this manual thoroughly before use to ensure optimal performance and safety.
Product Components
The SMALLRIG 4236 kit includes the following main components:
- 4-inch Vacuum Suction Cup: Provides strong adhesion to smooth, dry, and flat surfaces.
- Magic Arm with Ball Head: Allows for multi-angle camera adjustment and flexible shooting positions.
- Action Camera Mount: For attaching action cameras.
- Silicone Rings: Two included for secure connections.

Setup & Assembly
Follow these steps to assemble and prepare your SMALLRIG 4236 Camera Suction Mount for use:
- Prepare the Surface: Ensure the mounting surface is clean, dry, flat, and smooth. Avoid rough, wet, uneven, unclean, fragile, or easily damaged surfaces.
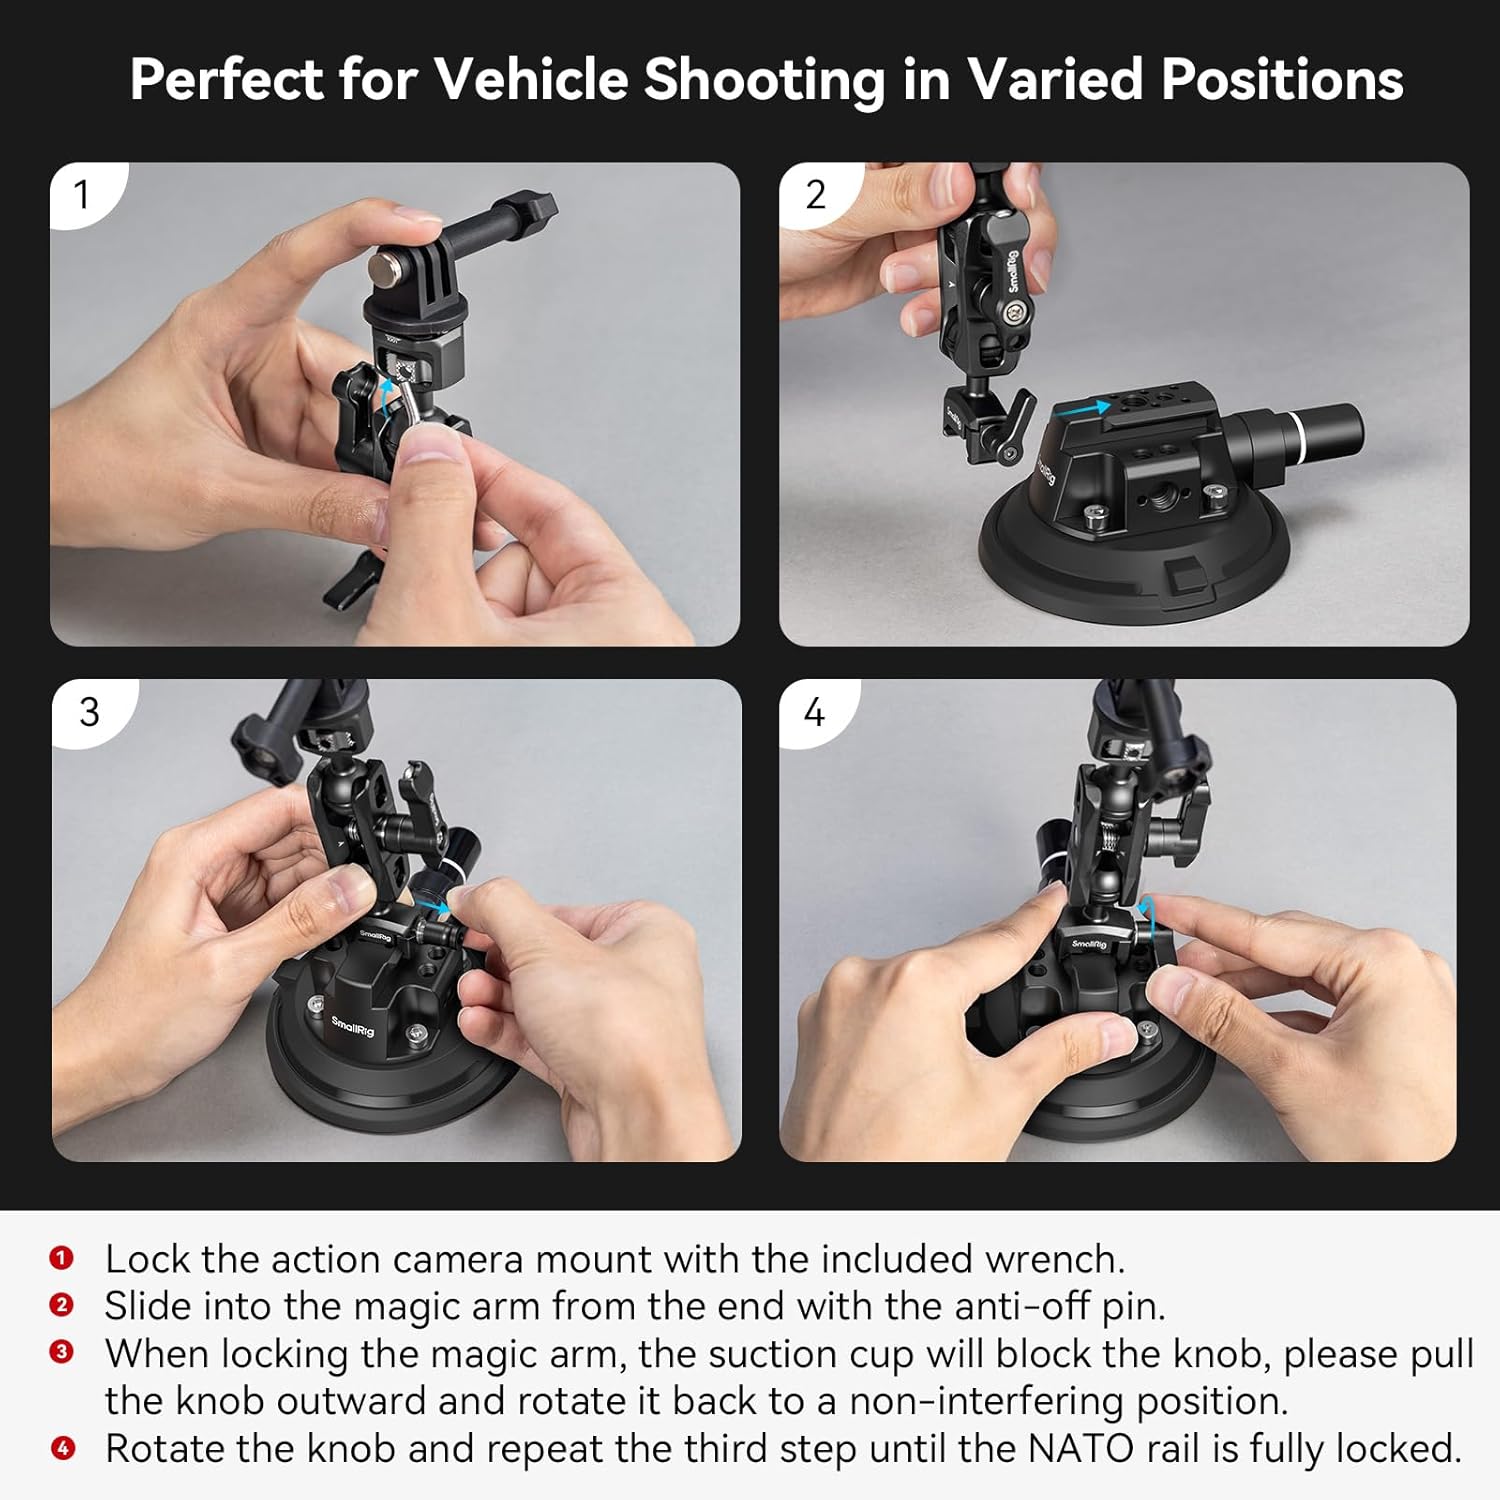
- Attach the Magic Arm to the Suction Cup: The magic arm and the suction cup connect via a NATO rail system. Slide the NATO clamp of the magic arm onto the NATO rail of the suction cup base.
- Secure the Connection: When locking the magic arm, the suction cup may block the knob. Pull the knob outward and rotate it back to a non-interfering position. Rotate the knob until the NATO rail is fully locked.
- Attach Your Camera:
- For lightweight cameras (e.g., Sony ZV-E10, Canon EOS M50): Use the 1/4"-20 screw on the magic arm to directly attach your camera.
- For action cameras (e.g., GoPro11/10/9, DJI Action 3): Attach the included action camera mount to the magic arm, then secure your action camera to it.
- Engage the Suction Cup: Place the suction cup firmly against the prepared surface. Press the manual pump repeatedly until the warning line indicator is no longer visible. This indicates a strong vacuum seal.


Operation
The SMALLRIG 4236 is designed for versatile camera positioning. Once assembled and securely mounted, you can adjust the magic arm and ball head to achieve your desired camera angle.
- Adjusting the Magic Arm: Loosen the central knob on the magic arm to adjust the angle and position of your camera. Tighten the knob firmly to lock the position.
- Monitoring Suction: The suction cup features a warning line indicator. If this line becomes exposed during use, it signifies a loss of vacuum pressure. Immediately re-pump the manual pump until the line is no longer visible to restore full suction.
- Vehicle Mounting: When mounting on a vehicle, it is recommended to use a safety tether and ensure the dynamic load does not exceed 3kg (6.6 pounds) at speeds up to 80km/h (50mph). Regularly check the suction force every two hours.

Important Notes & Precautions
Adhering to these guidelines will help ensure the longevity and safe operation of your suction mount:
- Only use the mount on clean, dry, flat, glossy, solid surfaces. Do not use on rough, wet, uneven, unclean, fragile, or easily damaged surfaces such as painted surfaces, natural marble, old tiles, breathable wallpaper, diatom mud walls, unpainted wood, or frosted glass.
- Regularly check the suction cup's seal, especially during prolonged use or when mounted on a vehicle. If the safety line of the air extraction valve is exposed, pump air immediately until the line is no longer visible.
- Keep the suction cup chassis and filter cotton intact and clean. If either is damaged or dirty, discontinue use immediately.
- The mount is suitable for temperatures between -20°C and 60°C.
- When adhering to a vehicle, always use a cable tether for added security and ensure the camera setup does not exceed 3kg. Drive smoothly at speeds below 80km/h (50mph).

Specifications
| Feature | Detail |
|---|---|
| Model Number | 4236 |
| Product Dimensions | 4.17 x 1.98 x 5.5 inches (139.6 x 105.8 x 50.2mm) |
| Item Weight | 12.5 ounces (355.0 ± 5.0g) |
| Maximum Dynamic Load | 3kg / 6.6 pounds (at speeds ≤ 80km/h) |
| Material | Aluminum Alloy, NBR, ABS, Stainless Steel |
| Operating Temperature | -20°C to 60°C |
| Mounting Type | Vehicle Mount (Suction Cup) |
| Compatibility | Lightweight Cameras, Action Cameras, Smartphones |

Maintenance
To ensure the longevity and optimal performance of your SMALLRIG 4236 Camera Suction Mount, follow these maintenance tips:
- Cleaning: After each use, especially when exposed to dust or dirt, clean the suction cup and the mounting surface thoroughly. Use a soft, damp cloth to wipe away any residue. Ensure both surfaces are completely dry before storage or next use.
- Storage: When not in use, always apply the provided dust cover to the suction cup to prevent dust and debris from accumulating on the rubber surface. Store the mount in a cool, dry place away from direct sunlight and extreme temperatures.
- Inspection: Periodically inspect the rubber of the suction cup for any signs of wear, cracks, or damage. Also, check all moving parts and screws for tightness. If any damage is observed, discontinue use and replace the affected components.
Troubleshooting
If you encounter issues with your SMALLRIG 4236 Camera Suction Mount, refer to the following common problems and solutions:
| Problem | Possible Cause | Solution |
|---|---|---|
| Suction cup does not hold securely. | Surface is not clean, dry, or smooth; warning line is visible; suction cup is damaged. | Clean and dry the mounting surface thoroughly. Re-pump the manual pump until the warning line disappears. Inspect the suction cup for damage; replace if necessary. Ensure the surface is suitable (not rough, porous, or painted). |
| Camera wobbles or shifts after mounting. | Magic arm knob is not tightened sufficiently; camera attachment is loose. | Ensure the central knob on the magic arm is tightened firmly. Check that the camera or action camera mount is securely attached to the 1/4"-20 screw or adapter. |
| Difficulty in attaching/detaching the magic arm from the suction cup. | NATO clamp knob is interfering with the base. | Pull the NATO clamp knob outward and rotate it to a non-interfering position before sliding or locking. |
Warranty & Support
For warranty information and customer support, please refer to the official SMALLRIG website or contact your retailer. Keep your purchase receipt as proof of purchase for any warranty claims.