Introduction
Thank you for choosing the WOLTU Ice Maker, Model EM05sb. This manual provides essential information for the safe and efficient operation, maintenance, and troubleshooting of your new appliance. Please read these instructions thoroughly before first use and keep them for future reference.
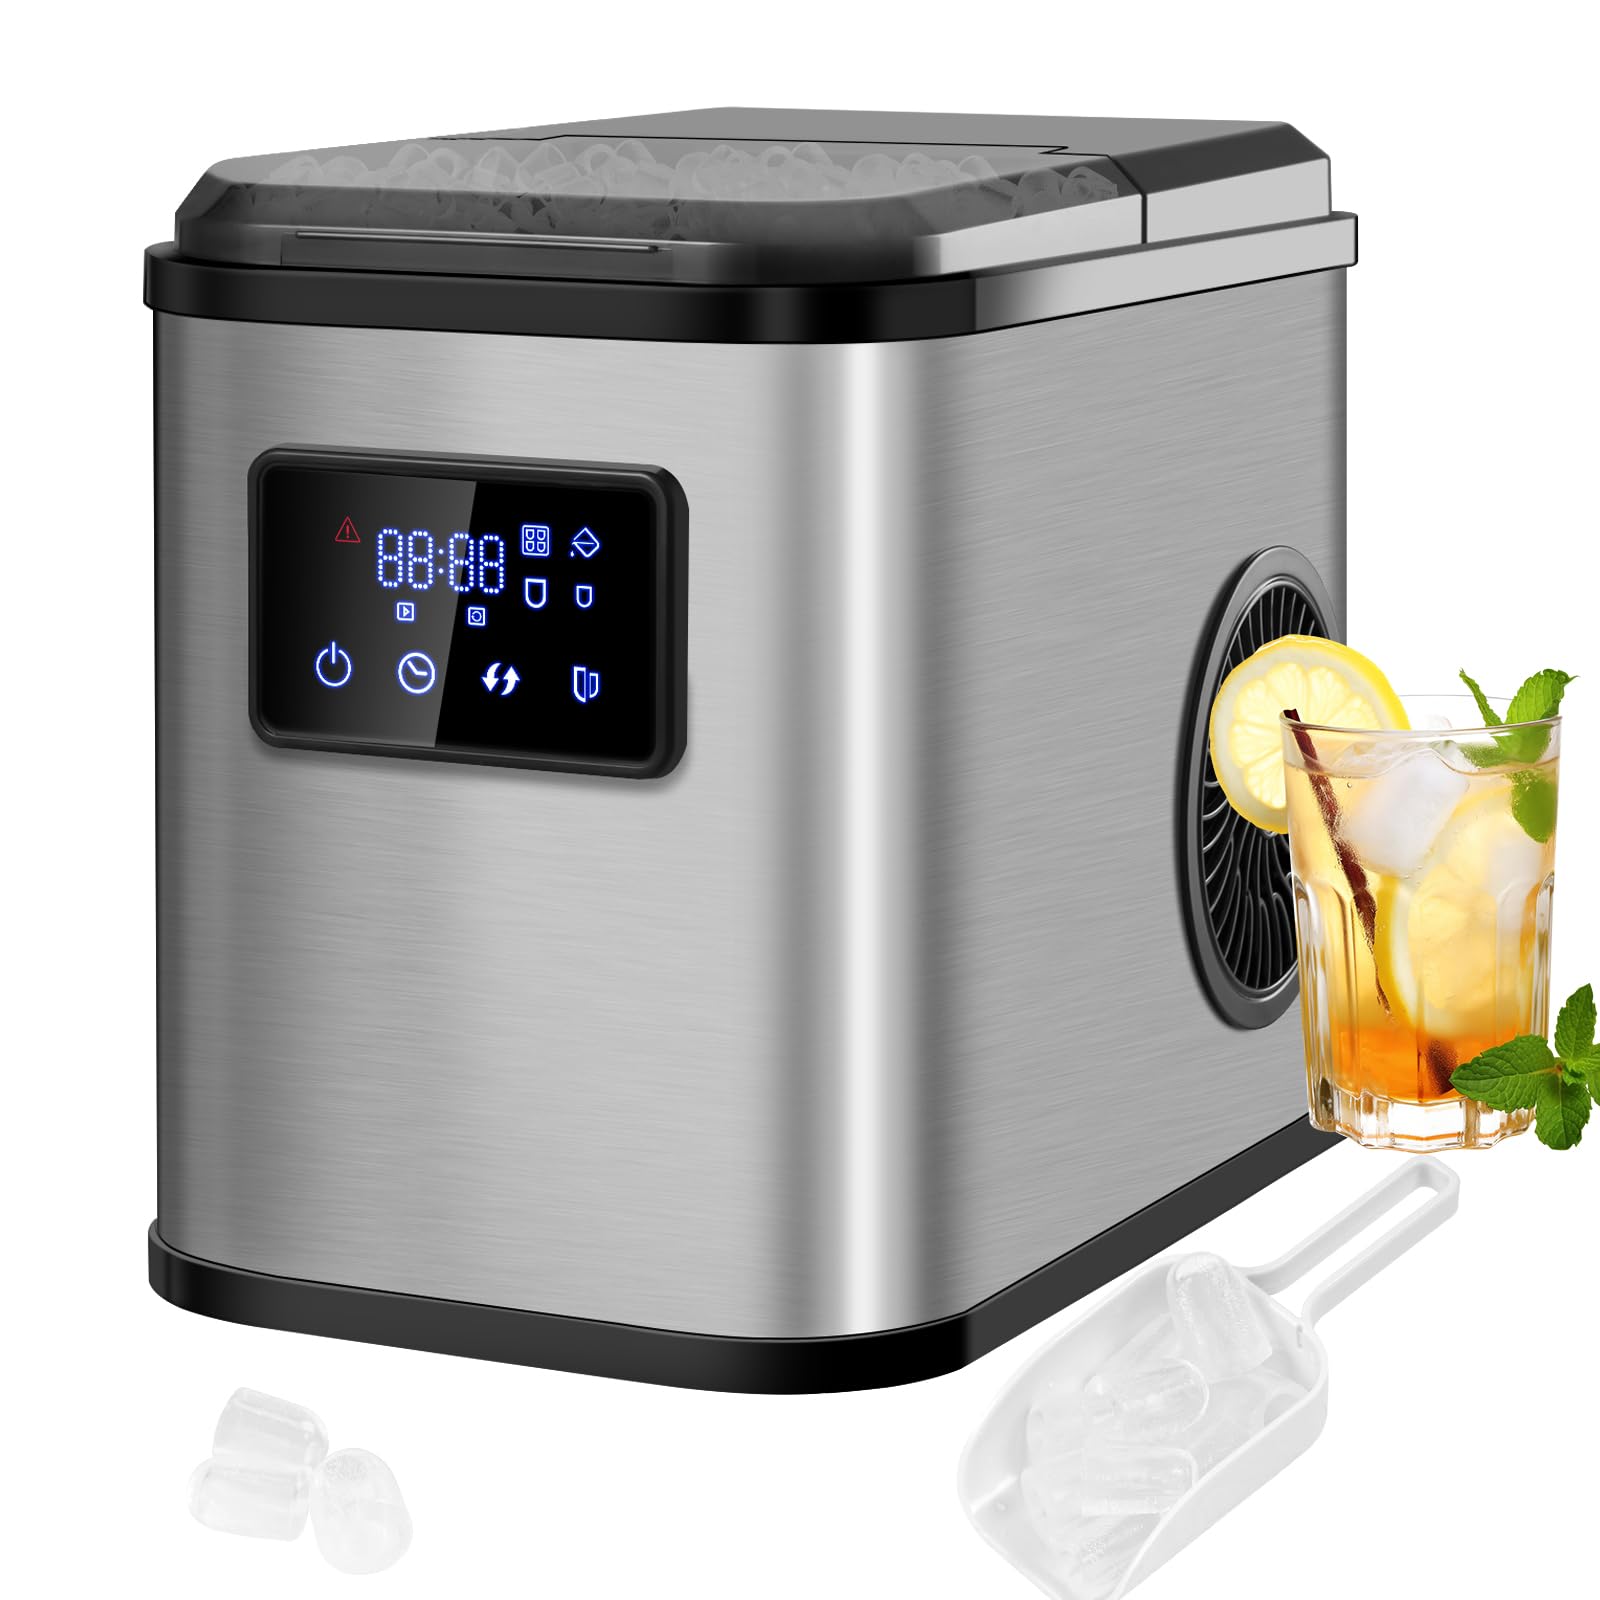
Front view of the WOLTU Ice Maker, Model EM05sb, showcasing its compact design and stainless steel finish.
Safety Instructions
To ensure safe operation and prevent damage, please observe the following safety precautions:
- Always connect the appliance to a grounded power outlet with the correct voltage (220-240V).
- Do not immerse the appliance, power cord, or plug in water or other liquids.
- Keep the ice maker away from heat sources, direct sunlight, and corrosive gases.
- Ensure adequate ventilation around the appliance. Maintain at least 15 cm of space on all sides.
- Do not use hot water to fill the reservoir, as this may damage the appliance. Use cold or room temperature water.
- Unplug the ice maker before cleaning or when not in use for extended periods.
- Do not operate the appliance with a damaged cord or plug. Contact customer support for repairs.
- This appliance is for household use only. Do not use it for commercial purposes.
- Keep children away from the ice maker during operation.
Product Overview
Components
- Ice Maker Unit
- Ice Basket
- Ice Scoop
- User Manual
Control Panel
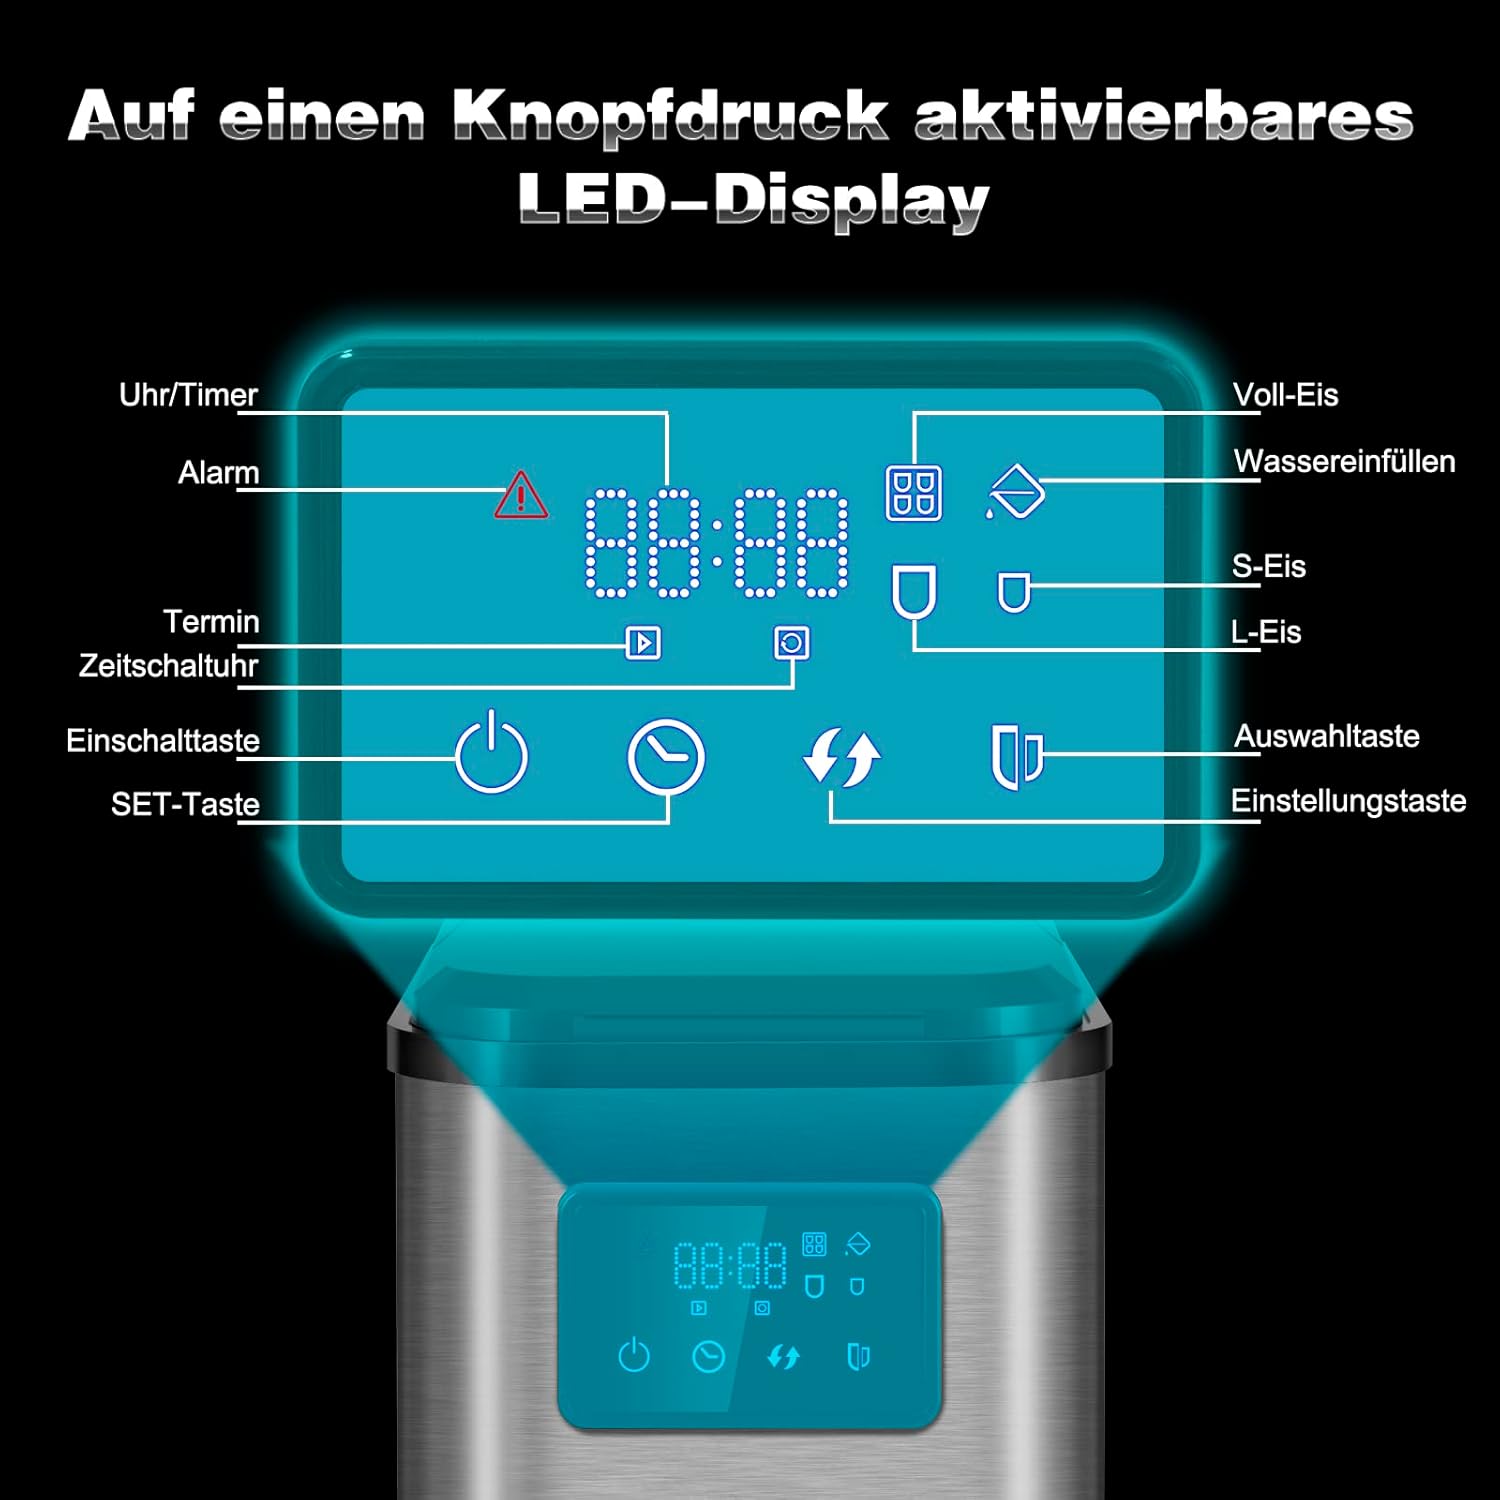
A detailed view of the WOLTU Ice Maker's LED control panel, showing buttons for power, timer, ice size selection (S/L), and indicators for 'Full Ice' and 'Add Water'.
The LED display and control buttons allow you to manage the ice production process:
- Power Button: Turns the ice maker on or off.
- Select Button: Toggles between small (S) and large (L) ice cube sizes.
- Timer Button: Activates the timer function for scheduled operation.
- 'Add Water' Indicator: Lights up when the water reservoir needs refilling.
- 'Ice Full' Indicator: Lights up when the ice basket is full.
- Time Display: Shows current time or timer settings.
Setup
Unpacking and Placement
- Remove all packaging materials and inspect the ice maker for any damage.
- Place the ice maker on a stable, level surface, away from direct sunlight and heat sources.
- Ensure there is at least 15 cm of clear space around the unit for proper ventilation.
- Allow the appliance to stand upright for at least 2 hours before plugging it in, especially if it was transported horizontally. This allows the refrigerant to settle.
Initial Cleaning
Before first use, clean the interior of the ice maker:
- Open the lid and remove the ice basket.
- Clean the interior with a soft cloth dampened with warm water and a mild detergent.
- Rinse thoroughly and wipe dry.
- Ensure the drain plug at the bottom is securely closed.
Filling the Water Reservoir

A composite image illustrating the four main steps for using the ice maker: 1. Filling the water reservoir, 2. Turning on the machine via the control panel, 3. Scooping out produced ice cubes, and 4. Cleaning the unit.
Refer to Step 1: Wasser einfüllen (Fill Water) in the image above.
- Open the lid of the ice maker.
- Pour clean, cold drinking water into the reservoir up to the MAX fill line. Do not overfill.
- Close the lid.
Operation
Starting the Machine
Refer to Schritt 2: Die Maschine anschieben (Turn on the Machine) in the image provided in the Setup section.
- Plug the ice maker into a grounded power outlet.
- Press the Power button on the control panel to turn on the appliance. The indicator light will illuminate.
Selecting Ice Size
Press the 'Select' button to choose your desired ice cube size:
- S (Small): For faster ice production, suitable for crushed ice or smaller drinks.
- L (Large): For slower melting ice, ideal for beverages that require longer cooling.
Ice Production Cycle
The ice maker will automatically begin the ice production cycle. The first batch of ice (9 cubes) will be ready in approximately 8-10 minutes, depending on the selected size and ambient temperature. Subsequent batches will be produced more quickly.
- The 'Add Water' indicator will light up if the water level is too low. Refill the reservoir to continue production.
- The 'Ice Full' indicator will light up when the ice basket is full, and the machine will pause production. Remove ice to resume.
Scooping Ice
Refer to Schritt 3: Die Eiswürfel herausschaufeln (Scoop out the Ice Cubes) in the image provided in the Setup section.
Use the provided ice scoop to remove ice cubes from the ice basket. For best results, transfer the ice to a freezer for storage, as the ice maker is not a freezer and will melt the ice over time.
Maintenance
Regular Cleaning
Refer to Schritt 4: Einfache Reinigung (Easy Cleaning) in the image provided in the Setup section.
Regular cleaning ensures optimal performance and hygiene:
- Unplug the ice maker from the power outlet.
- Remove the ice basket.
- Drain any remaining water from the reservoir by opening the drain plug located at the bottom of the unit.
- Clean the interior with a soft cloth, warm water, and a mild, non-abrasive detergent.
- Wipe all surfaces dry.
- Close the drain plug securely.
- For self-cleaning function (if available on your model), consult the specific instructions in your included manual.
Storage
If the ice maker will not be used for an extended period:
- Perform a thorough cleaning as described above.
- Ensure the unit is completely dry before storing.
- Store the ice maker in a cool, dry place, away from direct sunlight and extreme temperatures.
Troubleshooting
Before contacting customer support, please refer to the following table for common issues and solutions:
| Problem | Possible Cause | Solution |
|---|---|---|
| Ice maker not turning on | No power supply; Power button not pressed. | Check power connection; Press the Power button. |
| 'Add Water' indicator is on | Water reservoir is empty or low. | Fill the water reservoir up to the MAX line. |
| 'Ice Full' indicator is on | Ice basket is full. | Remove ice from the basket. |
| No ice production | Lack of water; Ambient temperature too high; Compressor issue. | Add water; Ensure proper ventilation; Contact support if problem persists. |
| Ice cubes are too small or sticky | Water temperature too high; Ambient temperature too high; Insufficient water. | Use colder water; Ensure proper ventilation; Check water level. |
| Unusual noise during operation | Normal compressor operation; Unit not level; Foreign object. | Ensure unit is on a level surface; Check for obstructions; Contact support if noise is excessive. |
Specifications

An image displaying the physical dimensions of the WOLTU Ice Maker: 30 cm in height, 24 cm in width, and 37 cm in depth.
| Feature | Specification |
|---|---|
| Model Number | EM05sb |
| Dimensions (W x D x H) | 24 cm x 37 cm x 30 cm |
| Weight | 7.5 kg |
| Water Tank Capacity | 2.2 Liters |
| Daily Ice Production | Up to 12-15 kg / 24 hours |
| Ice Cube Sizes | Small (S), Large (L) |
| Voltage | 240 Volts |
| Power | 120 Watts |
| Refrigerant | R600a |
| Material | PP (Polypropylene) |
| Included Components | Ice Maker, Ice Basket, Ice Scoop |
Warranty and Support
WOLTU products are manufactured to high-quality standards. For warranty information, please refer to the warranty card included with your purchase or contact your retailer. If you encounter any issues or require technical assistance, please contact WOLTU customer support through the retailer's platform or the official WOLTU website.


