
TOP-MAX RM
Contents
TOP-MAX RM Motorcycle Dash Cam User Manual
Dual 1080P Waterproof Night Vision Driving Recorder
1. Introduction
Thank you for choosing the TOP-MAX RM Motorcycle Dash Cam. This manual provides detailed instructions for the installation, operation, and maintenance of your new driving recorder. Designed for motorcycles, this system features dual 1080P waterproof cameras, night vision capabilities, and a 3-inch display to capture your rides with clarity and security.
2. What's in the Box
Please verify that all components are present in your package:
- 1x Dash Cam Main Unit (with 3-inch screen)
- 1x Holder/Mounting Bracket
- 2x Cameras (Front & Rear, 1080P, Waterproof)
- 1x Power Cable
- 1x User Manual

Description: An image displaying all the individual components of the TOP-MAX RM Motorcycle Dash Cam system, including the main unit, two cameras, power cable, and various mounting accessories, neatly arranged on a surface.
3. Product Overview
The TOP-MAX RM Dash Cam is designed for robust performance and ease of use on your motorcycle. Below are the key components and their functions.
3.1 Main Unit
The main unit features a 3-inch split screen display, allowing you to view footage from both cameras simultaneously or switch between them. It houses the control buttons for navigation and settings adjustments.

Description: A close-up image of the TOP-MAX RM Dash Cam's main unit, highlighting its screen, control buttons, and the various cables extending from its side, ready for connection.
3.2 Cameras
Two 1080P waterproof cameras are included, one for the front and one for the rear. They feature a 140° wide-angle lens and night vision capabilities for clear recording in various conditions.
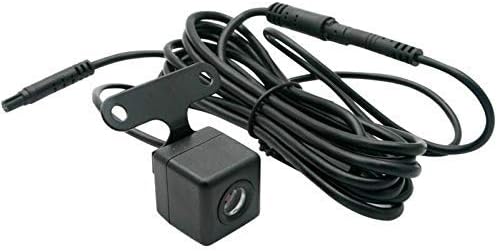
Description: A detailed image of one of the compact, black, waterproof cameras with its attached cable, designed for either front or rear installation on the motorcycle.
4. Setup and Installation
Proper installation is crucial for optimal performance. Follow these steps carefully.
4.1 Power Connection
The dash cam requires connection to your motorcycle's power supply. It is designed for automatic recording when the ignition is on and delayed shutdown when the ignition is off.
- Locate your motorcycle's battery and fuse box.
- Identify the B+ (constant power) and ACC (switched power) lines using a multimeter.
- Connect the yellow wire of the dash cam's power cable to the B+ line.
- Connect the red wire of the dash cam's power cable to the ACC line.
- Connect the black wire of the dash cam's power cable to the negative terminal (ground) of the battery.
- Ensure all connections are secure and properly insulated.
Description: This video demonstrates the step-by-step process of wiring a motorcycle dash cam, including opening the seat, locating the fuse box, using a multimeter to identify power lines (B+ and ACC), and securely connecting the dash cam's power cable to the motorcycle's electrical system.
4.2 Camera Installation
Mount the front and rear cameras in suitable locations on your motorcycle. The cameras are waterproof and designed for outdoor use.
- Identify suitable mounting points for the front and rear cameras, ensuring a clear, unobstructed view.
- Clean the mounting surface thoroughly.
- Attach the camera mounts using the provided adhesive pads or screws, ensuring they are firmly secured.
- Connect the camera cables to the main unit, ensuring the correct camera (front/rear) is connected to its designated port.
- Route the camera cables neatly along the motorcycle frame, securing them with cable ties to prevent interference with moving parts or exposure to damage.

Description: An image showing the dash cam's main unit mounted on the handlebars of a motorcycle, displaying a split screen view of the road ahead and the rider, illustrating the camera's wide-angle perspective.
Description: This video provides a general guide for installing a WiFi-enabled motorcycle dash camera, covering aspects like mounting the cameras, routing cables, and connecting the main unit.
4.3 Main Unit Placement
The main unit should be placed in a secure and accessible location, typically under the seat or in a storage compartment, to protect it from the elements and theft.
- Choose a location that is protected from direct exposure to rain and excessive heat.
- Ensure the location allows for proper ventilation.
- Secure the main unit using the provided holder or cable ties to prevent movement during rides.
5. Operating Instructions
Learn how to use your TOP-MAX RM Dash Cam for effective recording.
5.1 Power On/Off
The dash cam is designed for automatic operation:
- Power On: The camera automatically starts recording when the motorcycle's ignition is turned on.
- Power Off: The camera automatically shuts down after a 5-second delay when the motorcycle's ignition is turned off.
5.2 Recording Modes
The dash cam supports continuous and protected recording:
- Automatic Cycle Coverage Shooting: Ensures continuous recording without data loss by overwriting the oldest files when the memory card is full.
- Built-in Collision Sensor (G-Sensor): Detects sudden impacts or collisions. When an abnormality occurs, the current recording is automatically locked and protected from being overwritten, ensuring critical evidence is saved.
- Powerful Document Protection: Video files remain intact even in the event of sudden power failure or machine damage.
5.3 Mobile App Connection
Connect your dash cam to a mobile app for live view, playback, and settings adjustments.
- Ensure the dash cam is powered on.
- On your smartphone, open the app store and search for the recommended app (refer to your user manual for the specific app name, e.g., 'Vidure').
- Download and install the app.
- Enable Wi-Fi on your smartphone and connect to the dash cam's Wi-Fi network (SSID and password can be found in the dash cam settings or user manual).
- Open the app and follow the on-screen instructions to connect to your dash cam.
Description: This video showcases the product's display features and provides a visual guide to its wiring process, concluding with a demonstration of connecting the device to a mobile application for control and viewing.
6. Maintenance
Regular maintenance ensures the longevity and optimal performance of your dash cam.
- Cleaning: Use a soft, damp cloth to clean the main unit screen and camera lenses. Avoid abrasive cleaners.
- Cable Inspection: Periodically check all cables and connections for wear, damage, or looseness. Secure any loose cables.
- Memory Card: Format the memory card regularly (e.g., once a month) to maintain optimal recording performance and prevent data corruption. Use a high-quality microSD card (Class 10 or higher).
- Firmware Updates: Check the manufacturer's website periodically for firmware updates to ensure your device has the latest features and bug fixes.
7. Troubleshooting
Here are solutions to common issues you might encounter:
- Dash Cam Does Not Power On:
- Check all power cable connections to the motorcycle battery (B+, ACC, Ground).
- Ensure the motorcycle's ignition is on.
- Verify the motorcycle battery has sufficient charge.
- Dash Cam Powers Off Unexpectedly:
- Check for loose power connections.
- Ensure the ACC wire is correctly connected to a switched power source.
- If the issue persists, consult a professional for electrical system inspection.
- Recording Issues (e.g., not recording automatically, missing footage):
- Ensure a compatible microSD card is inserted and properly formatted.
- Check the loop recording settings in the dash cam menu or mobile app.
- Verify the G-sensor sensitivity settings; very high sensitivity might lock too many files, filling the card.
- Poor Video Quality / Blurry Images:
- Clean camera lenses thoroughly.
- Ensure cameras are securely mounted and not vibrating excessively.
- Check resolution settings in the dash cam menu; ensure it's set to 1080P.
- Wi-Fi Connection Problems:
- Ensure the dash cam's Wi-Fi is enabled.
- Verify the correct Wi-Fi network (SSID) and password are being used.
- Try restarting both the dash cam and your smartphone.
8. Specifications
| Feature | Detail |
|---|---|
| Model Name | RM |
| Brand | TOP-MAX |
| Video Capture Resolution | 1080p |
| Field Of View | 140 Degrees |
| Special Feature | Night Vision |
| Connectivity Technology | USB, Wireless |
| Mounting Type | Windshield Mount (adaptable for motorcycle) |
| Item Weight | 14.9 ounces |
| Product Dimensions | 9.96 x 2.95 x 6.1 inches |
| Color | Black |
9. Warranty and Support
Your TOP-MAX RM Motorcycle Dash Cam comes with a standard manufacturer's warranty. For specific warranty terms and conditions, please refer to the warranty card included in your package or contact TOP-MAX customer support.
9.1 Customer Support
If you encounter any issues not covered in this manual or require further assistance, please contact TOP-MAX customer support through the vendor's contact information provided with your purchase or on their official website.
Consider purchasing an extended protection plan for additional coverage:
- 2-Year Protection Plan
- 3-Year Protection Plan
- Complete Protect (monthly plan covering eligible purchases)
Ask a question about this manual
Ask about setup, troubleshooting, compatibility, parts, safety, or missing instructions. Manuals+ will review the question and use this page’s manual context to help answer it.