1. Introduction
This manual provides instructions for the installation of the Electrolux Built-in Dishwasher Door Mounting Kit, model 140125033039. This kit is designed to securely attach a custom cabinet panel or decorative door to your integrated dishwasher, ensuring a seamless look with your kitchen cabinetry. Please read these instructions carefully before beginning the installation process.
2. Safety Information
- Always disconnect the dishwasher from the power supply before performing any installation or maintenance.
- Wear appropriate personal protective equipment, such as gloves and safety glasses, during installation.
- Ensure all screws and fasteners are tightened securely to prevent the door from becoming loose.
- If you are unsure about any step, consult a qualified technician.
- Keep small parts out of reach of children.
3. Package Contents
Verify that all components listed below are present in your kit. Refer to the image for visual identification of the parts.
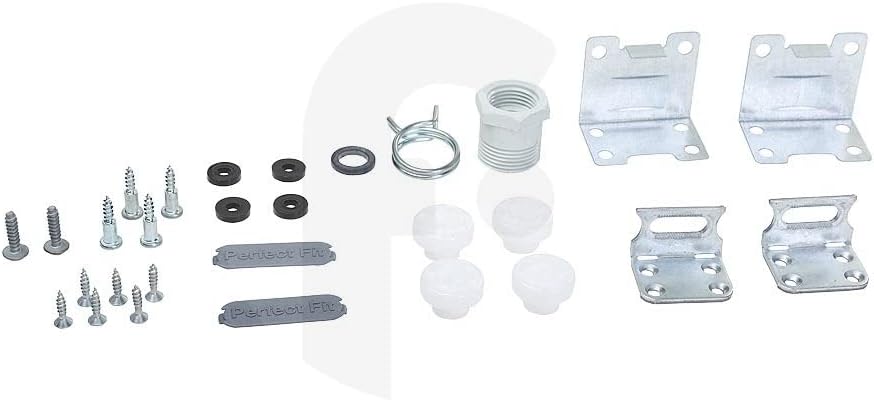
Figure 1: Components of the Electrolux Built-in Dishwasher Door Mounting Kit.
The kit includes various screws of different sizes, L-shaped metal brackets for securing the door, small rubber washers, a metal hose clamp, a threaded plastic connector, and several white plastic spacers or feet.
- Mounting Screws: Various sizes for securing brackets and panels.
- Metal Brackets: L-shaped brackets for door attachment (typically 4 pieces).
- Rubber Washers: For sealing or vibration dampening.
- Hose Clamp: For securing hoses (if applicable to your specific dishwasher model).
- Plastic Threaded Connector: For water inlet/outlet connections (if applicable).
- Plastic Spacers/Feet: For leveling or spacing.
- "Perfect Fit" Guides: Small grey plastic pieces, likely for alignment or spacing.
4. Installation Instructions
Follow these steps to install the custom door panel onto your built-in Electrolux dishwasher.
4.1. Preparation
- Ensure the dishwasher is disconnected from the power supply.
- Gather necessary tools: screwdriver set, drill (if required for pilot holes), measuring tape, pencil.
- Prepare the custom door panel according to your dishwasher's specifications (dimensions, weight).
4.2. Attaching Brackets to the Dishwasher Door
- Locate the mounting points on the dishwasher door where the L-shaped metal brackets will attach. These are typically at the top corners or sides.
- Align the metal brackets with the designated holes on the dishwasher door.
- Secure the brackets using the appropriate screws from the kit. Ensure they are firmly attached but do not overtighten.
4.3. Mounting the Custom Panel
- Carefully position the custom door panel against the dishwasher door, aligning it with your kitchen cabinetry.
- Mark the screw locations on the back of the custom panel through the holes in the metal brackets.
- Optional: Drill pilot holes into the custom panel at the marked locations to prevent wood splitting, if applicable.
- Attach the custom panel to the metal brackets using the remaining screws from the kit. Ensure the panel is level and flush with adjacent cabinets.
- Use the "Perfect Fit" guides if your dishwasher model requires them for precise alignment or spacing.
4.4. Final Adjustments
- Open and close the dishwasher door several times to check for smooth operation and proper alignment.
- Adjust the screws on the brackets or the dishwasher's leveling feet (if necessary) to achieve perfect alignment with your cabinetry.
- If included, use the plastic spacers/feet to fine-tune the door's position or provide additional support.
- Reconnect the dishwasher to the power supply once installation is complete and verified.
5. Compatible Models
This mounting kit is compatible with various dishwasher models from Electrolux, Faure, Arthur Martin, A.E.G, and Zanussi. Please verify your specific model number against the list below:
Electrolux Models:
- ESL5324LO, ESL4510LO - 91107606502, ESL5322LO - 91153634001, ESL5333LO - 91153636500, ESL5333LO - 91153636501, ESL5343LA - 91153636600, ESL5343LA - 91153636601, ESL5343LO - 91153633701, ESL5344LO - 91153637300, ESL5344LO - 91153637301, ESL5355LO - 91153616704, ESL5326LO - 91153521700, ESL5326LO - 91153521701, ESL5350LO - 91153616605, ASL4559LA - 91107607201, ESL5212LO - 91153922400, ESL5321LO - 91153521101, ESL5325LO - 91153633901, ESL5335LO - 91153633801, ESL5361LB - 91153637600, ESL5361LB - 91153637601, ESL5362LB - 91153637500, ESL5362LB - 91153637501, ESL5365LO - 91153638600, ESL5365LO - 91153638601, TT604L3 - 91153521201, GG560VI - 91153629505, FSS52615Z - 91153630605, FSB41600Z - 91153628801, FSE53600Z - 91153629102, FSB52620Z - 91153629604, FSB52600Z - 91153628903, FSE53605Z - 91153629705, ASL5368LA - 91153618400, ESL5360LA - 91153617803
Faure Models:
- FDT24003FA - 91153521601, FDT26022FA - 91153636101
Arthur Martin Models:
- ASL5342LA - 91153636301, ASL5347LA - 91153636201, ASL5368LA - 91153618404
A.E.G Models:
- FSB41600Z - 91153628804, FSB41600Z - 91153629802, FSB41600Z - 91153628803, FSB52610Z - 91153629004, FSB52610Z - 91153629003, FSE53600Z - 91153629104, FSE62400P - 91107402304, FSS52615Z - 91153630603, FSS5360XZ - 91153629305, FSB52620Z - 91153629603, FSE53605Z - 91153629703, FSE53605Z - 91153629704, FSK53600Z - 91153630104, GG560VI - 91153629504
Zanussi Models:
- ZDT24003FA - 91153520001, ZDT24003FA - 91153520501, ZDT24003FA - 91153521500, ZDT24003FA - 91153521501
6. Specifications
| Brand | Electrolux |
| Model Number | 140125033039 |
| Color | White (components may vary) |
| Product Type | Built-in Dishwasher Door Mounting Kit |
| ASIN | B0C64BBDCL |
7. Troubleshooting
If you encounter issues during or after installation, consider the following common solutions:
- Door not aligning properly: Check if the dishwasher itself is level. Adjust the dishwasher's leveling feet or reposition the mounting brackets on the door panel.
- Door feels loose: Ensure all screws are securely tightened. Verify that the correct screw lengths were used for both the dishwasher door and the custom panel.
- Gaps between panel and cabinetry: Re-check the alignment and use the plastic spacers/feet for fine adjustments if necessary. Ensure the custom panel dimensions match the dishwasher's requirements.
- Difficulty closing the door: Inspect for any obstructions. Ensure the panel is not too heavy or improperly balanced, causing strain on the hinges.
8. Maintenance
Once installed, the mounting kit requires minimal maintenance. Periodically check the following:
- Screw Tightness: Over time, screws may loosen due to vibration. Periodically check and retighten any loose screws on the mounting brackets and the custom panel.
- Alignment: Ensure the door panel remains properly aligned with your cabinetry. Adjust if necessary.
- Hinge Operation: If the dishwasher door hinges become stiff or noisy, consult your dishwasher's main instruction manual for hinge lubrication or adjustment procedures.
9. Warranty and Support
For specific warranty information regarding this Electrolux product, please refer to the documentation provided with your original dishwasher or contact Electrolux customer support directly. For further assistance or to purchase additional parts, you may visit the official Electrolux store or contact their service department.
Official Electrolux Store: Visit Electrolux Store on Amazon.fr


