1. Introduction
Thank you for choosing the VAXMAY PST080 2-Gallon Electric Garden Sprayer. This battery-powered sprayer is designed to simplify various tasks such as watering plants, applying fertilizers, controlling weeds, and general cleaning. Its efficient design and adjustable features make it a versatile tool for both experienced gardeners and beginners. Please read this manual thoroughly before initial use to ensure proper assembly, operation, and maintenance, which will help achieve optimal performance and extend the product's lifespan.
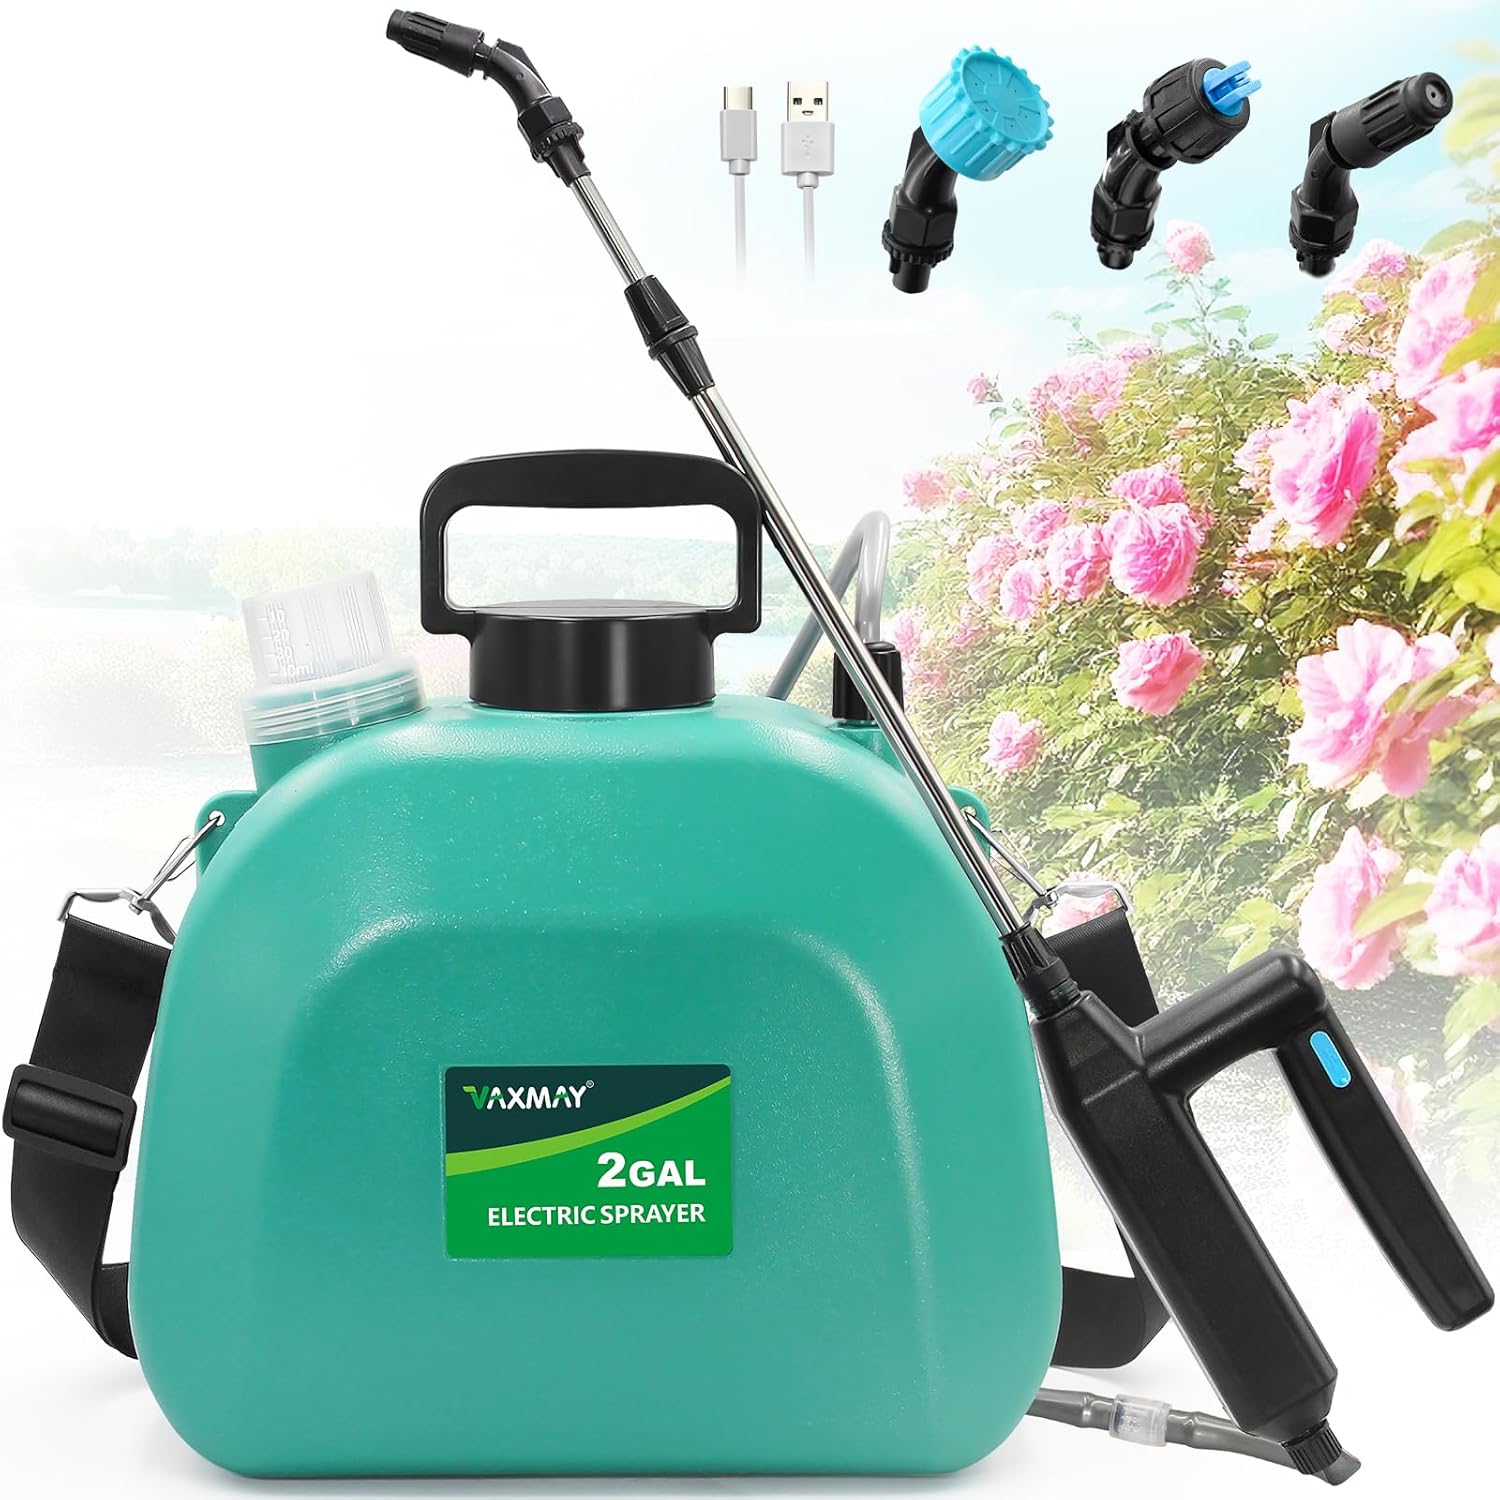
Image 1.1: VAXMAY PST080 2-Gallon Electric Garden Sprayer. This image shows the green sprayer unit, the handle with the retractable wand, three different spray nozzles, and a USB charging cable.
2. Safety Information
Always prioritize safety when operating the sprayer. Failure to follow these instructions may result in injury or damage to the product.
- Wear appropriate personal protective equipment (PPE) such as gloves, eye protection, and a mask, especially when handling chemicals.
- Avoid direct contact with skin and eyes when spraying. In case of contact, rinse immediately with plenty of water and seek medical attention if irritation persists.
- Do not ingest or inhale the contents being sprayed. Ensure adequate ventilation when using the sprayer indoors or in enclosed spaces.
- Keep the sprayer and any chemicals out of reach of children and pets.
- Do not use flammable liquids or corrosive chemicals that are incompatible with the sprayer's materials (HDPE and ABS).
- Ensure the charging port is dry before connecting the USB charging cord.
- Do not submerge the electric handle in water.
3. Package Contents
Verify that all components are present in the package:
- 1 x Electric Handle
- 1 x Telescopic Wand
- 1 x Water Hose with Filter
- 1 x Water Tank (2 Gallon capacity)
- 3 x Spray Nozzles (Fan, Cone, 6-Hole Pattern)
- 1 x USB Charge Cord
- 1 x Adjustable Shoulder Strap
- 3 x O-Ring Gaskets (spare)
- 1 x Instruction Manual (this document)
4. Product Overview
Familiarize yourself with the main parts of your VAXMAY electric sprayer:
- Water Tank: 2-gallon capacity, made of HDPE, with translucent volume scale for easy monitoring. Features two wide openings for filling.
- Electric Handle: Contains the battery and control button. Connects to the telescopic wand and water hose.
- Telescopic Wand: Retractable design for extended reach, connecting to the electric handle and spray nozzle.
- Spray Nozzles: Three interchangeable nozzles (Fan, Cone, 6-Hole Pattern) for various spray patterns.
- Shoulder Strap: Adjustable for comfortable carrying during use.
- USB Charge Port: Located on the electric handle for convenient charging.

Image 4.1: Product Details. This image highlights key features including two water injection ports, the spray lever slot, shoulder strap hook, volume scale on the tank, and the one-button control on the handle.
5. Setup Instructions
Follow these steps to prepare your sprayer for first use:
5.1. Charging the Battery
- Locate the USB Type-C charging port on the electric handle.
- Connect the provided USB charge cord to the port and a suitable USB power adapter (not included).
- The indicator light on the handle will illuminate during charging. A full charge typically takes approximately 3 hours.
- Ensure the battery is fully charged before initial use for optimal performance. The sprayer provides up to 3 hours of continuous spraying on a full charge.

Image 5.1: Charging and Work Time. This image illustrates the sprayer in operation and highlights the 3-hour work time and USB Type-C charging feature.
5.2. Assembly
- Connect the Hose: Securely attach the water hose with the filter to the designated inlet on the water tank and the electric handle. Ensure the connections are tight to prevent leaks.
- Attach the Wand: Connect the telescopic wand to the electric handle.
- Select a Nozzle: Choose one of the three spray nozzles (Fan, Cone, or 6-Hole Pattern) and screw it onto the end of the telescopic wand. Twist the nozzle to adjust the spray pattern as needed.
- Attach Shoulder Strap: Hook the adjustable shoulder strap to the designated points on the water tank for comfortable carrying.
5.3. Filling the Tank
- Unscrew one of the wide openings on the top of the water tank.
- Carefully pour the desired liquid (water, fertilizer, weed killer, etc.) into the tank. The translucent volume scale allows for easy monitoring of the liquid level.
- Do not overfill the tank.
- Securely screw the cap back onto the opening to prevent spills.
6. Operating Instructions
Once assembled and filled, your sprayer is ready for use.
6.1. Powering On/Off
Press the power button on the electric handle to turn the sprayer on. Press it again to turn it off.
6.2. Adjusting Spray Pattern
The sprayer comes with three adjustable nozzles:
- Fan Nozzle: Provides a wide, flat spray pattern, ideal for covering large areas quickly.
- Cone Nozzle: Delivers a conical spray, suitable for general watering and applying treatments to individual plants.
- 6-Hole Pattern Nozzle: Offers a multi-stream spray, useful for targeted application or specific plant types.
To change the spray pattern, simply twist the installed nozzle on the end of the wand until the desired pattern is achieved. To change nozzles, unscrew the current nozzle and screw on the preferred one.

Image 6.1: Nozzle Types. This image displays the Fan, Cone, and 6-Hole Pattern nozzles, illustrating their respective spray patterns.
6.3. Using the Retractable Wand
The telescopic wand can be extended to reach higher plants or difficult-to-access areas. To extend, gently pull the wand outwards. To retract, push it back in. Ensure it is securely locked in place during use.

Image 6.2: Telescopic Wand. This image shows the dimensions of the telescopic wand and handle, demonstrating its extendable feature.
6.4. General Operation
With the sprayer on and the desired nozzle selected, aim the wand at the target area and press the trigger on the electric handle to begin spraying. Release the trigger to stop. The self-priming water pump ensures consistent pressure.

Image 6.3: Sprayer in Use. A person is shown using the VAXMAY PST080 electric sprayer to spray a bush in a garden.
7. Maintenance
Proper maintenance ensures the longevity and efficient operation of your sprayer.
7.1. Cleaning After Use
It is crucial to clean the sprayer after each use, especially when using chemicals:
- Empty any remaining liquid from the tank.
- Rinse the tank thoroughly with clean water.
- Fill the tank with clean water and spray it through the wand and nozzle for a few minutes to flush out any residue from the hose and wand.
- Disassemble the nozzles and rinse them under running water.
- The filter at the end of the water hose should be checked and cleaned regularly to prevent clogging.
- Allow all components to air dry completely before reassembling or storing.
7.2. Storage
Store the sprayer in a cool, dry place, away from direct sunlight and extreme temperatures. Ensure the battery is partially charged (not fully depleted or fully charged) if storing for extended periods to maintain battery health.
8. Troubleshooting
If you encounter issues with your sprayer, refer to the following common problems and solutions:
| Problem | Possible Cause | Solution |
|---|---|---|
| Sprayer does not turn on. | Battery is depleted. | Charge the battery using the provided USB cord. Ensure the charging indicator light is on. |
| No spray or weak spray. | Tank is empty or liquid level is too low. | Refill the tank. |
| Nozzle is clogged. | Remove and clean the nozzle. Ensure the filter on the hose is also clean. | |
| Hose or wand connection is loose. | Tighten all connections. | |
| Leaking from connections. | Connections are not tight or O-rings are damaged. | Ensure all connections are securely tightened. Check O-rings for damage and replace if necessary using the provided spares. |
| Battery does not charge. | Faulty charging cable or power adapter. | Try a different USB Type-C cable and power adapter. Ensure the charging port is clean and dry. If the issue persists, contact customer support. |
9. Specifications
| Feature | Detail |
|---|---|
| Brand | VAXMAY |
| Model Name | PST080 |
| Tank Volume | 2 Gallons (approx. 8 Liters) |
| Power Source | Battery Powered (2 Lithium Ion batteries included) |
| Motor Voltage | 7.4V (Upgraded) |
| Continuous Work Time | Up to 3 hours |
| Charging Time | Approx. 3 hours |
| Hose Length | 3.28 Feet |
| Product Dimensions | 10 x 7 x 11 inches |
| Item Weight | 2.13 pounds (0.97 Kilograms) |
| Material | ABS handle, HDPE water can |
| Included Components | Electric handle, telescopic wand, water hose with filter, water tank, 3 spray nozzles, USB charge cord, adjustable shoulder strap, 3 O-ring gaskets, instruction manual |
10. Warranty Information
The VAXMAY PST080 Electric Garden Sprayer typically comes with a manufacturer's warranty. Based on customer feedback, a one-year warranty is often provided. Please retain your proof of purchase for any warranty claims. For specific details regarding your product's warranty period and terms, refer to the documentation included with your purchase or contact VAXMAY customer support.
11. Customer Support
If you have any questions, require assistance, or experience issues that cannot be resolved using the troubleshooting guide, please contact VAXMAY customer support. You can typically find contact information on the product packaging, the VAXMAY official website, or through the retailer where you purchased the product.