
1. Introduction
Thank you for choosing the SERVOMASTER SM01 Handheld Cordless Vacuum Cleaner. This manual provides essential information for the safe and efficient operation, maintenance, and care of your new device. Please read these instructions thoroughly before first use and retain them for future reference.
Video 1: SERVOMASTER Handheld Vacuum Cordless, Car Vacuum SM01 - An overview of the product and its features.
2. Product Overview & Package Contents
The SERVOMASTER SM01 is a powerful, portable, and lightweight cordless vacuum cleaner designed for quick clean-ups in your car, home, or office. Its compact design and versatile attachments make it ideal for reaching tight spaces and handling various types of debris.
2.1 Package Contents
- SM01 Handheld Cordless Vacuum Cleaner
- Crevice Tool
- Dusting Brush
- USB Type-C Charging Cable
- Extra HEPA Filter
- Drawstring Storage Bag
- User Manual

Image 1: The SERVOMASTER SM01 Handheld Cordless Vacuum Cleaner along with its included accessories: crevice tool, dusting brush, USB-C charging cable, and extra HEPA filter.

Image 2: An exploded view illustrating the main components of the SM01 vacuum cleaner, including the dust cup, filter, brush, long nozzle, cleaning brush, and charging cord.
3. Setup
3.1 Initial Charging
Before first use, fully charge the vacuum cleaner. Connect the provided USB Type-C charging cable to the charging port on the vacuum and plug the other end into a compatible USB power source (e.g., laptop, power bank, car charger, 5V/2A adapter). The indicator light will show charging status.

Image 3: The SM01 vacuum cleaner connected to a power source via its USB Type-C charging cable, demonstrating its fast charging capability and multiple charging options.
3.2 Filter Installation
Ensure the HEPA filter is correctly installed before use. The vacuum comes with one filter pre-installed and an extra filter. To install or replace, twist and detach the dust cup, then insert the filter firmly into its housing.
3.3 Attaching Accessories
Select the appropriate attachment for your cleaning task. The crevice tool is for narrow gaps and corners, while the dusting brush is ideal for keyboards, carpets, and irregular surfaces. Simply push the desired tool onto the vacuum's nozzle until it is securely attached.

Image 4: The SM01 vacuum cleaner shown with its multifunctional accessories, including the dust brush and crevice tool, highlighting their use for different cleaning needs.
4. Operating Instructions
4.1 Powering On/Off & Suction Levels
Press the power button to turn the vacuum on. The SM01 features multiple power levels for varied cleaning intensity. Press the power button once for the standard suction level, and press it again to switch to a higher suction level. Press a third time to turn the vacuum off.

Image 5: The SM01 vacuum cleaner showcasing its powerful suction capability, effectively cleaning various dry debris such as hair, dirt, and cat litter.
4.2 Usage Scenarios
The compact and cordless design allows for versatile cleaning across various environments.
- Car: Easily clean car seats, floor mats, and tight crevices.
- Home: Ideal for quick clean-ups in the living room, kitchen, or stairs.
- Office: Perfect for dusting keyboards and cleaning desk areas.

Image 6: The SM01 vacuum cleaner being used in various settings, including a living room, kitchen, car interior, and office desk, demonstrating its multi-scene cleaning capabilities.

Image 7: The SM01 vacuum cleaner in use inside a car, illustrating its lightweight (0.8 lb) and cordless design for comfortable and fatigue-free cleaning, with a noise level of less than 75dB.
5. Maintenance
5.1 Emptying the Dust Cup
To maintain optimal suction and performance, empty the dust cup regularly. Press the dust cup release button and detach the dust cup. Dispose of the collected debris into a trash bin. The split-type design ensures no direct contact with dirt.

Image 8: The split-type design of the SM01 vacuum cleaner, allowing for easy and hygienic emptying of collected debris without direct contact with dirt.
5.2 Cleaning the HEPA Filter
The integrated HEPA filter is washable and reusable. After emptying the dust cup, remove the filter. Rinse the filter and dust cup with clean water. Ensure the filter is completely dry before reinserting it into the vacuum cleaner. Regular cleaning extends the filter's lifespan and maintains suction power.
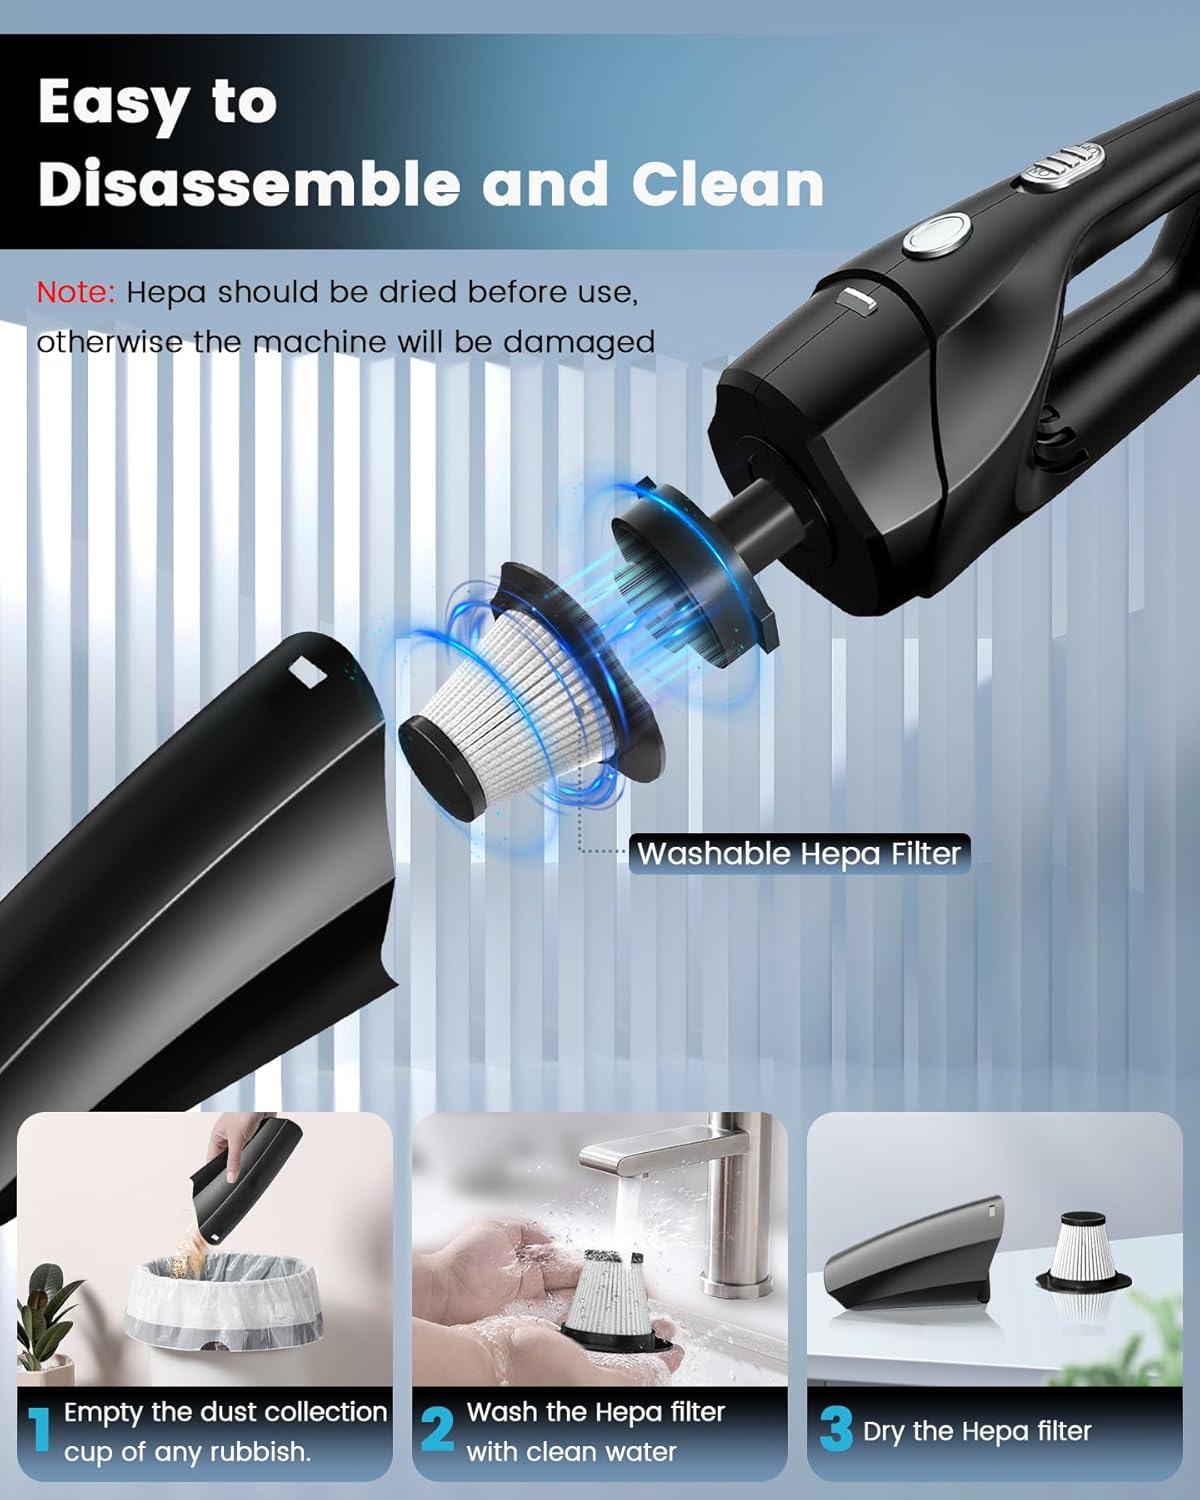
Image 9: A visual guide demonstrating the easy disassembly and cleaning process of the SM01 vacuum cleaner, emphasizing the washable HEPA filter. Note: The HEPA filter must be dried completely before reuse to prevent damage.

Image 10: Detailed steps for washing and reusing the HEPA filter and dust cup, ensuring proper maintenance for sustained performance.
6. Troubleshooting
If you encounter any issues with your SERVOMASTER SM01, please refer to the following common solutions:
- Low Suction: Check if the dust cup is full and empty it. Ensure the HEPA filter is clean and properly installed. If the filter is clogged, clean or replace it.
- Vacuum Not Turning On: Ensure the battery is fully charged. If the device has been idle for an extended period, recharge it to activate the battery.
- Short Battery Life: Fully charge the vacuum before each use. Battery life can vary based on suction level and usage.
For further assistance, please contact SERVOMASTER customer support via your Amazon account page.
7. Specifications
| Feature | Detail |
|---|---|
| Brand | SERVOMASTER |
| Model Name | SM01 Handheld Vacuum Cleaner |
| Special Feature | Cordless, Portable, Lightweight, Type-C Charging, Extra HEPA Filter |
| Filter Type | HEPA Filter |
| Is Cordless? | Yes |
| Capacity | 400 Grams |
| Wattage | 120 Nanowatts |
| Recommended Uses | For car, home, office, couch, carpet, and pet hair cleaning |
| Form Factor | Handheld |
| Product Dimensions | 11"L x 4"W x 4"H |
| Noise Level | 60 Decibels |
| Battery Life | 20 minutes |
| Item Weight | 1.19 pounds |
| Power Source | Battery Powered |
8. Warranty & Support
SERVOMASTER products are designed for quality and reliability. For any warranty claims, technical support, or product inquiries, please refer to the contact information provided with your purchase or reach out through your Amazon account page. Please note that regular maintenance, as outlined in this manual, is crucial for optimal product performance and longevity.