1. Introduction
This manual provides detailed instructions for the safe and effective operation of your AlfaBot R1 Smart Battery Charger. The AlfaBot R1 is designed for charging and maintaining 6V and 12V lead-acid (Wet, GEL, MF, CA, EFB, AGM) and Lithium (LiFePO4 with BMS) batteries, making it suitable for a wide range of vehicles including cars, motorcycles, boats, trucks, and SUVs.
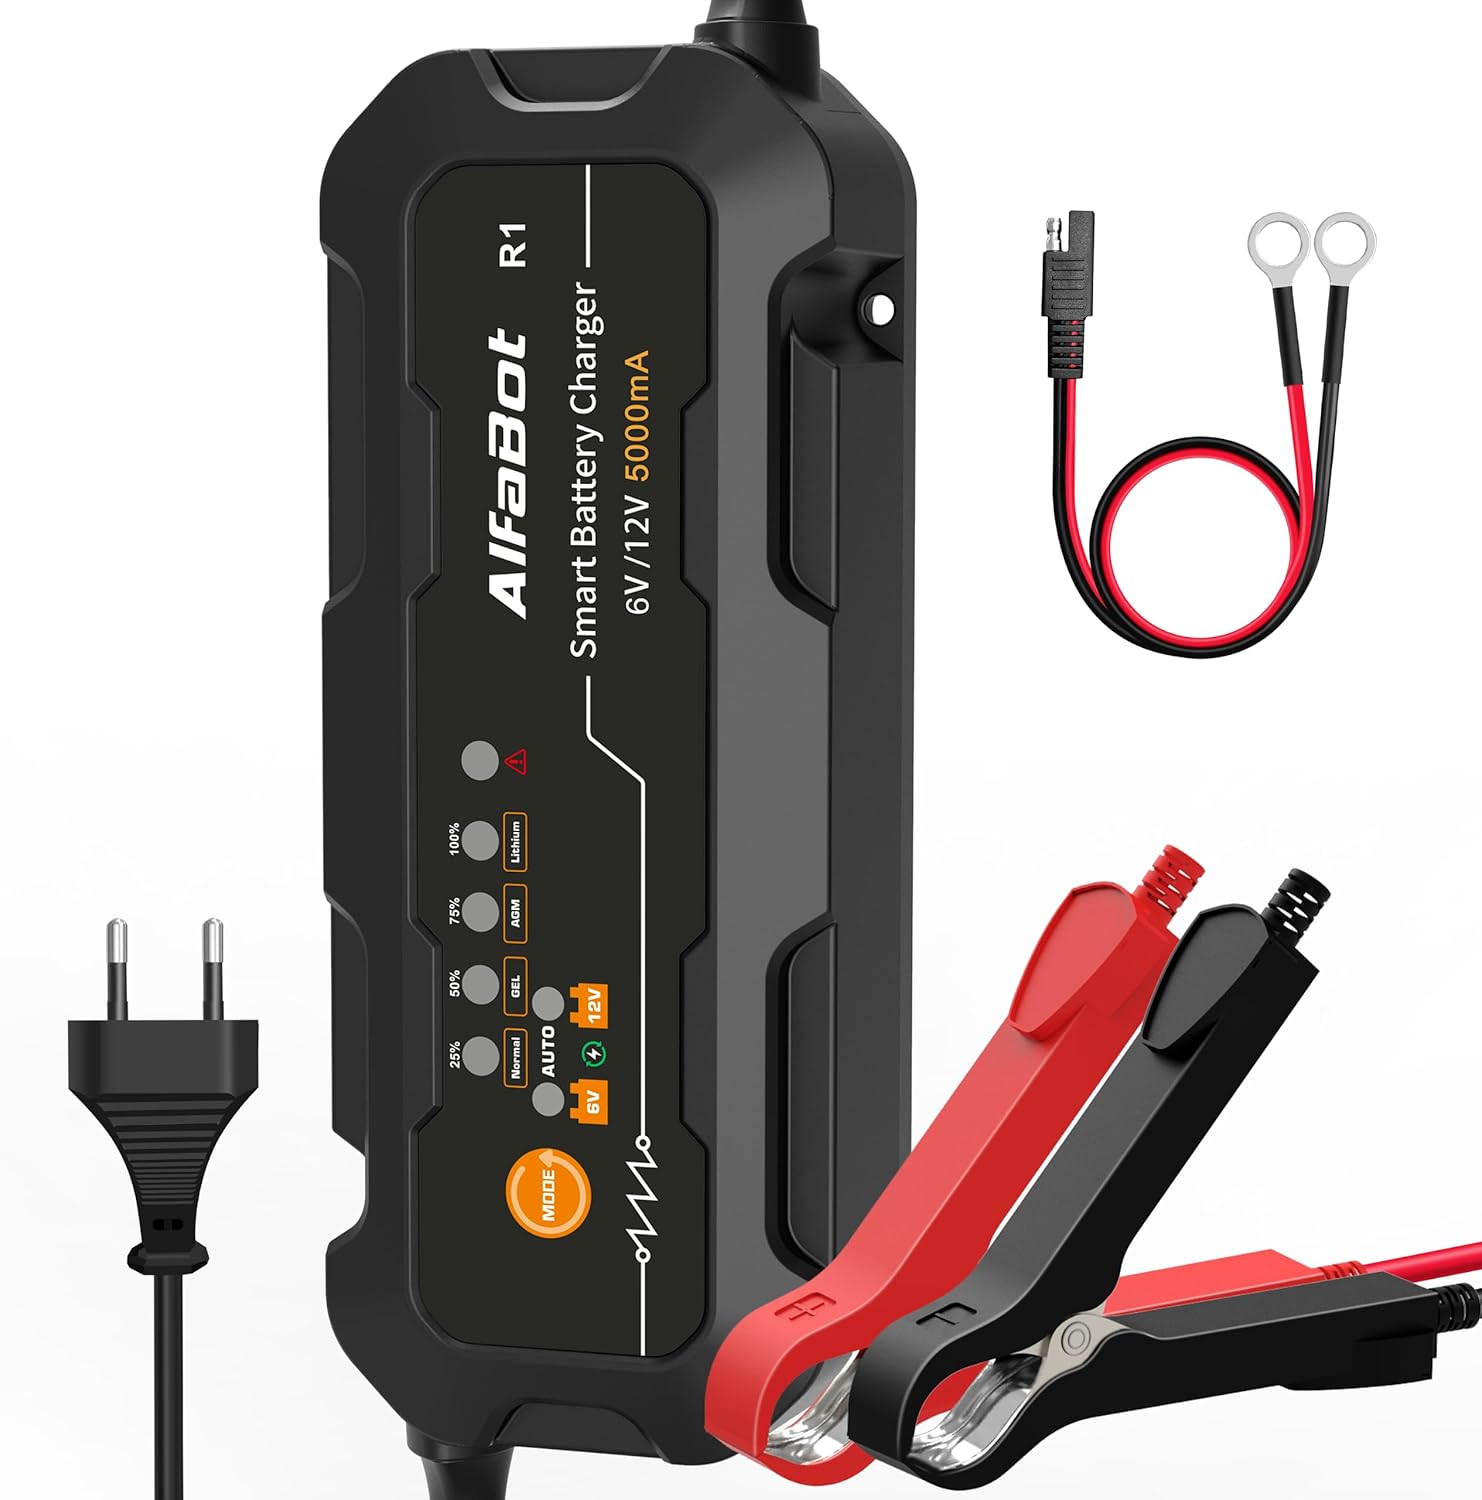
The AlfaBot R1 Smart Battery Charger, featuring its main unit, AC power plug, and battery connection cables.
2. Safety Information
Always prioritize safety when working with batteries and electrical equipment. Failure to follow these instructions may result in electric shock, fire, or serious injury.
- Read all instructions before using the charger.
- Ensure the charger is disconnected from the power supply before making or breaking connections to the battery.
- Use the charger in a well-ventilated area.
- Avoid sparks and flames near the battery, as batteries can produce explosive gases.
- Wear eye protection and protective clothing when working with batteries.
- Keep out of reach of children.
- The charger features multiple protection systems including reverse polarity, overheating, short circuit, overcharge, and overvoltage protection. However, always ensure correct connection.

The AlfaBot R1 incorporates multiple protection systems for safe battery charging.
3. Package Contents
Verify that all items are present in your package:
- 1 x AlfaBot R1 Smart Battery Charger
- 1 x AC Power Cable
- 1 x Cable with Smart Clamps (Red and Black)
- 1 x Cable with Ring Connectors (Red and Black)
- 1 x Multilingual User Manual

All components included in the AlfaBot R1 Smart Battery Charger package.
4. Product Features
- Wide Application: Compatible with 6V and 12V batteries, including lead-acid (Wet, GEL, MF, CA, EFB, AGM) and Lithium (LiFePO4 with BMS). Suitable for cars, motorcycles, boats, trucks, and SUVs.
- Intelligent Multi-Stage Charging: Features a multi-stage charging process with floating, pulse, and desulfation functions to optimize battery performance and extend lifespan.
- Forced Charging Mode: Allows charging of batteries with voltage below 1V by pressing and holding the mode button. Note: This function does not work for completely dead batteries.
- User-Friendly Operation: Simple plug-and-play design with intuitive mode selection.
- Advanced Safety: Equipped with comprehensive protection against reverse polarity, overheating, short circuits, overcharging, and overvoltage.
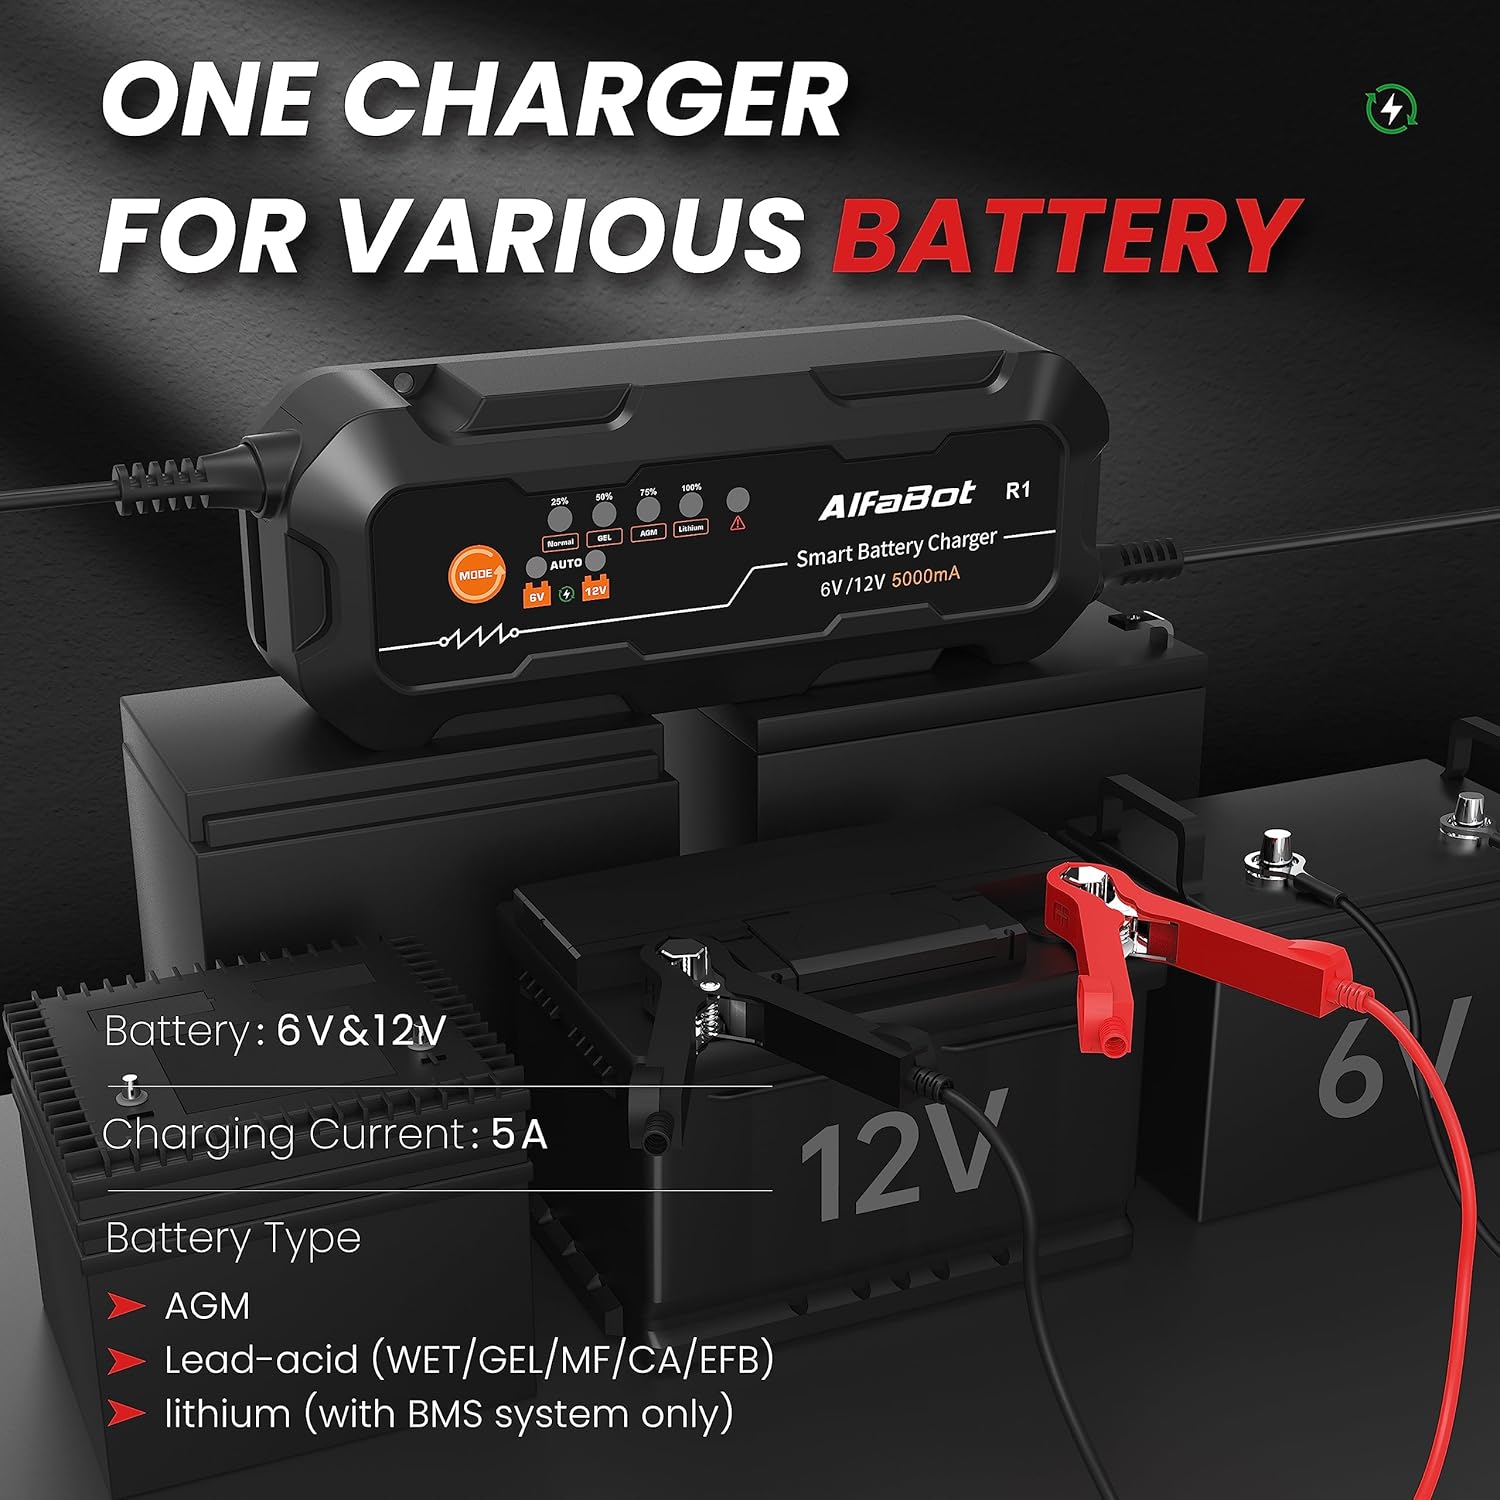
The AlfaBot R1 charger is compatible with a wide range of 6V and 12V battery types.
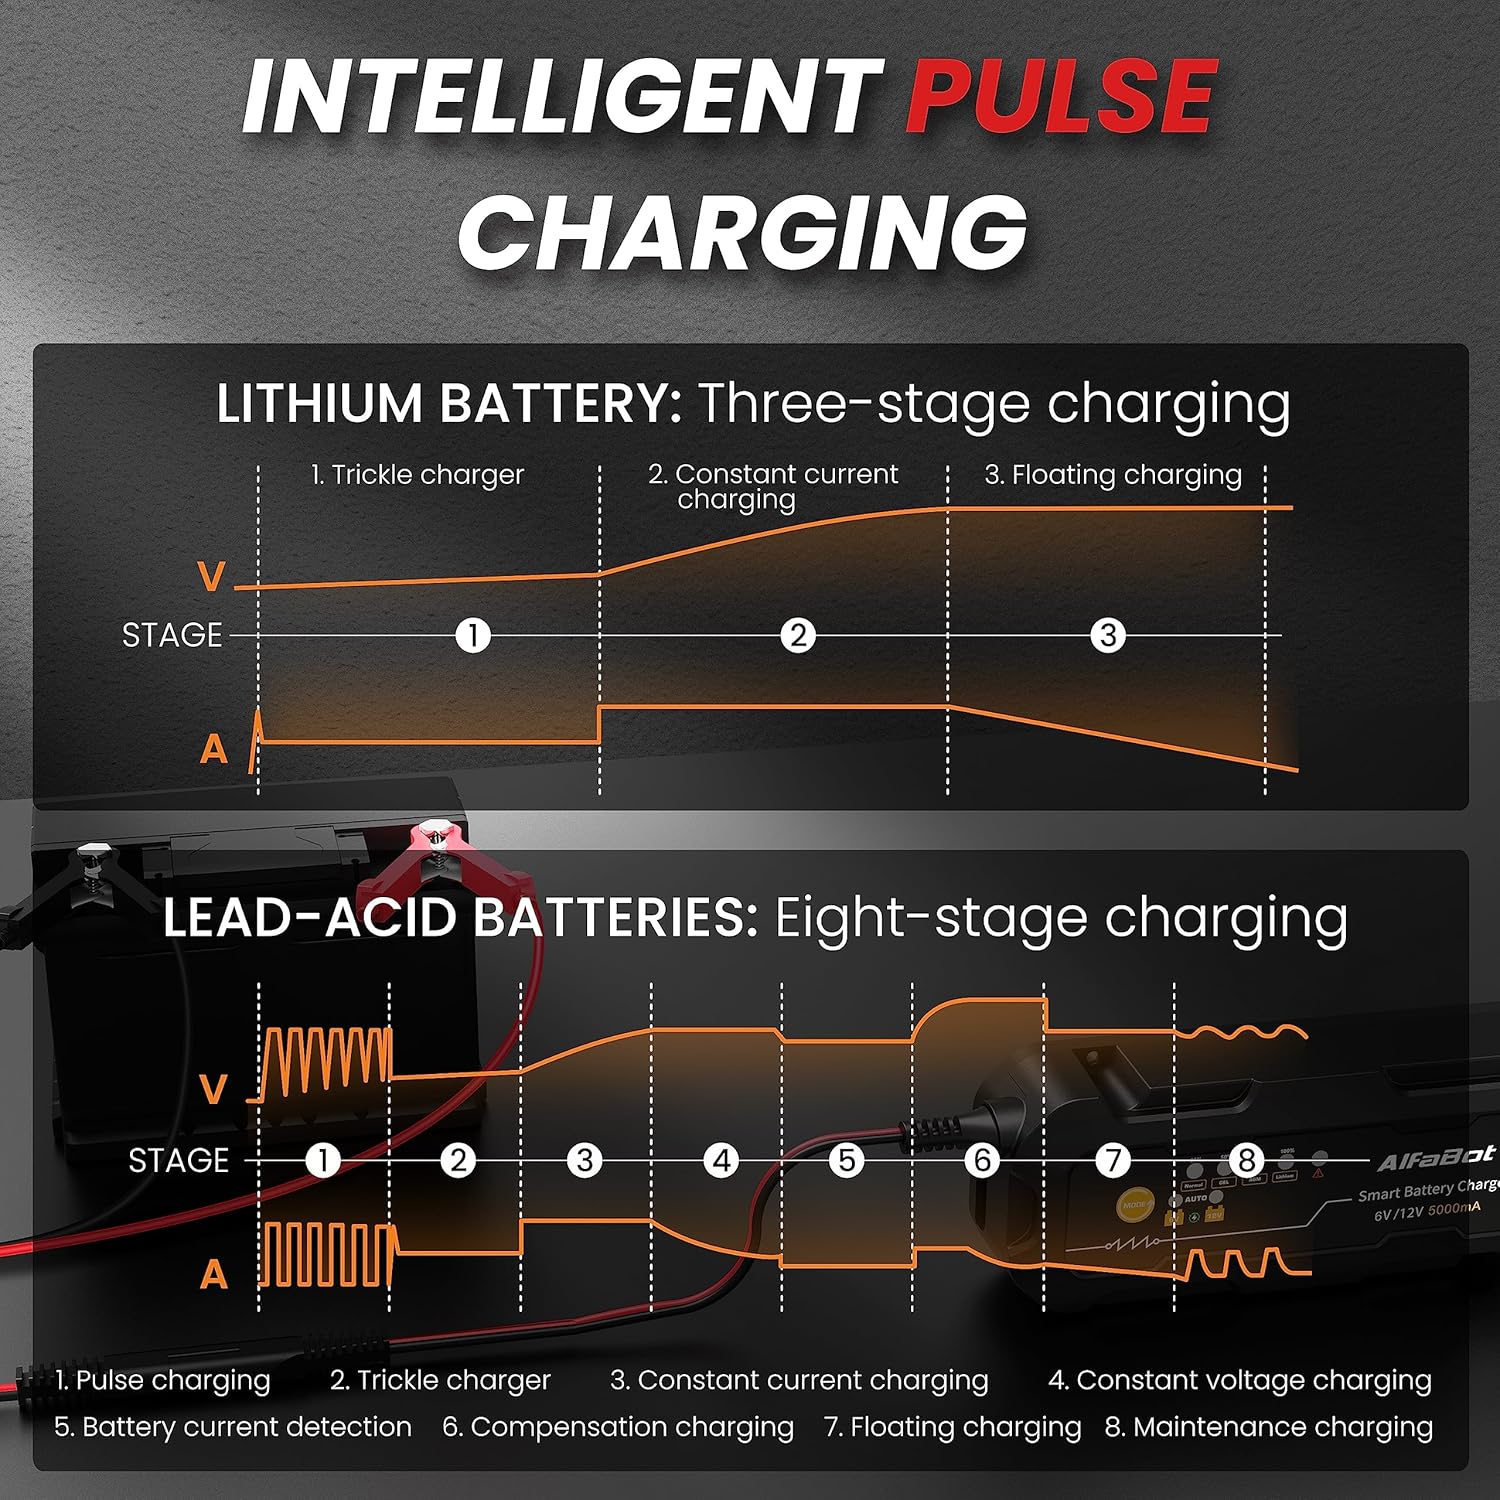
Intelligent multi-stage charging process for both Lithium and Lead-Acid batteries.
5. Setup and Connection
Follow these steps to connect the charger to your battery:
- Connect to Battery: Attach the red (+) clamp/ring connector to the positive terminal of the battery and the black (-) clamp/ring connector to the negative terminal. Ensure a secure connection.
- Connect to Power: Plug the AC power cable into a standard electrical outlet.
- Select Mode: Press the 'MODE' button on the charger to select the appropriate charging program for your battery type (Normal, GEL, AGM, Lithium) and voltage (6V or 12V).

Simple three-step process for connecting and starting the AlfaBot R1 charger.
6. Operating Instructions
6.1. Charging Modes
The AlfaBot R1 offers various charging modes to suit different battery types. Use the 'MODE' button to cycle through the options:
- Normal: Standard charging for lead-acid batteries.
- GEL: Optimized for GEL batteries.
- AGM: Optimized for AGM batteries.
- Lithium: For LiFePO4 batteries with a Battery Management System (BMS).
The charger will automatically detect if it's a 6V or 12V battery once connected, but you must select the correct battery chemistry mode.

Use the MODE button to select the appropriate charging program for your battery.
6.2. Forced Charging Mode
If your battery's voltage is below 1V, the charger may not initiate charging automatically. To activate forced charging:
- Connect the charger to the battery and power.
- Press and hold the 'MODE' button for several seconds. The charger will attempt to force charge the low-voltage battery.
Important: This mode is not effective for completely dead batteries (0V).

The forced charging mode can be used for batteries with very low voltage (above 0V).
6.3. Automatic Maintenance
Once the battery is fully charged, the AlfaBot R1 will automatically switch to a maintenance (float) charging phase. This prevents overcharging and keeps the battery at an optimal level, eliminating the need to disconnect the charger immediately.
7. Battery Types Supported
The AlfaBot R1 is designed to charge and maintain a variety of 6V and 12V battery types:
- Lead-Acid Batteries (Wet, Flooded)
- GEL Batteries
- MF (Maintenance-Free) Batteries
- CA (Calcium) Batteries
- EFB (Enhanced Flooded Battery) Batteries
- AGM (Absorbed Glass Mat) Batteries
- Lithium (LiFePO4) Batteries (requires a Battery Management System - BMS)

The AlfaBot R1 is ideal for charging 6V and 12V batteries across a wide range of vehicles.
8. Troubleshooting
Refer to the table below for common error indications and their solutions:
| LED Indicator | Fault Analysis | Solutions |
|---|---|---|
| Red Fault Indicator (flashing rapidly) | Battery connection is short-circuited or the battery itself is short-circuited. | Resolve the short circuit in the connection or replace the battery. |
| Red Fault Indicator (solid on) | Charger clamps are connected to the positive and negative terminals of the battery in reverse polarity. | Reconnect the clamps: red clamp to positive (+), black clamp to negative (-). |
| All LED Indicators (off) | 1. Ambient temperature is too high. 2. Charger temperature is too high. | 1. Place the charger in a standard charging environment (0°C to 40°C). 2. Remove any objects covering or surrounding the charger to improve ventilation. |
| Orange Fault Indicator (slowly flashing) | Incorrect battery voltage selection. | Select the correct battery voltage (6V or 12V) using the MODE button. |
| 6V, 12V, and Fault Indicators (all solid on) | Battery internal resistance is too high or open circuit. | Replace the battery. |

Troubleshooting guide for common issues indicated by the charger's LEDs.
9. Specifications
| Specification | Detail |
|---|---|
| Brand | AlfaBot |
| Model Number | R1 |
| Color | Black |
| Compatible Devices | Car, Truck, Caravan, Van, Motorcycle |
| Battery Composition | Lithium-ion (for LiFePO4 with BMS) |
| Rechargeable Battery | No (refers to the charger itself) |
| Product Dimensions | 18P x 7l x 4H centimeters |
| Output Voltage | 12 Volts (DC) |
| Compliant Specifications | CE |
| Input Voltage | 12 Volts (AC input is implied for the power cable, but 12V is listed as input voltage) |
| Current Rating | 5 A |
10. Maintenance
To ensure optimal performance and longevity of your AlfaBot R1 Smart Battery Charger:
- Keep the charger clean and dry. Wipe with a soft, damp cloth if necessary.
- Store the charger in a cool, dry place when not in use.
- Regularly inspect the cables and connectors for any signs of damage. Do not use if cables are frayed or connectors are corroded.
- Ensure proper ventilation during operation to prevent overheating.

The charger is designed for safe operation within a temperature range of 0°C to 40°C.
11. Warranty and Support
For any questions, technical assistance, or support regarding your AlfaBot R1 Smart Battery Charger, please do not hesitate to contact AlfaBot directly. Specific warranty details are not provided in this manual; please refer to your purchase documentation or contact AlfaBot customer service for warranty information.