
Pretul SOIN-101MP
Pretul SOIN-101MP Mini Inverter Welder User Manual
Model: SOIN-101MP (29961)
1. Introduction
Thank you for choosing the Pretul SOIN-101MP Mini Inverter Welder. This compact and lightweight welding machine is designed for shielded metal arc welding (SMAW) processes, offering higher efficiency and lower power consumption compared to conventional welders. This manual provides essential information for the safe and effective operation, maintenance, and troubleshooting of your new welder.
Please read this manual thoroughly before operating the machine and keep it for future reference.
2. Safety Information
WARNING: Welding can be dangerous. Always follow safety precautions to prevent serious injury or death.
- Always wear appropriate personal protective equipment (PPE), including a welding helmet with proper shade, welding gloves, protective clothing, and safety shoes.
- Ensure adequate ventilation in the work area to avoid inhaling welding fumes.
- Protect yourself and others from electric shock. Do not touch live electrical parts. Ensure the machine is properly grounded.
- Be aware of fire and explosion hazards. Remove all flammable materials from the welding area. Have a fire extinguisher readily available.
- Arc rays can burn eyes and skin. Use proper eye and face protection.
- Do not operate the welder in wet conditions or near water.
- Disconnect power before performing any maintenance or adjustments.
3. Package Contents
Verify that all items listed below are included in your package:
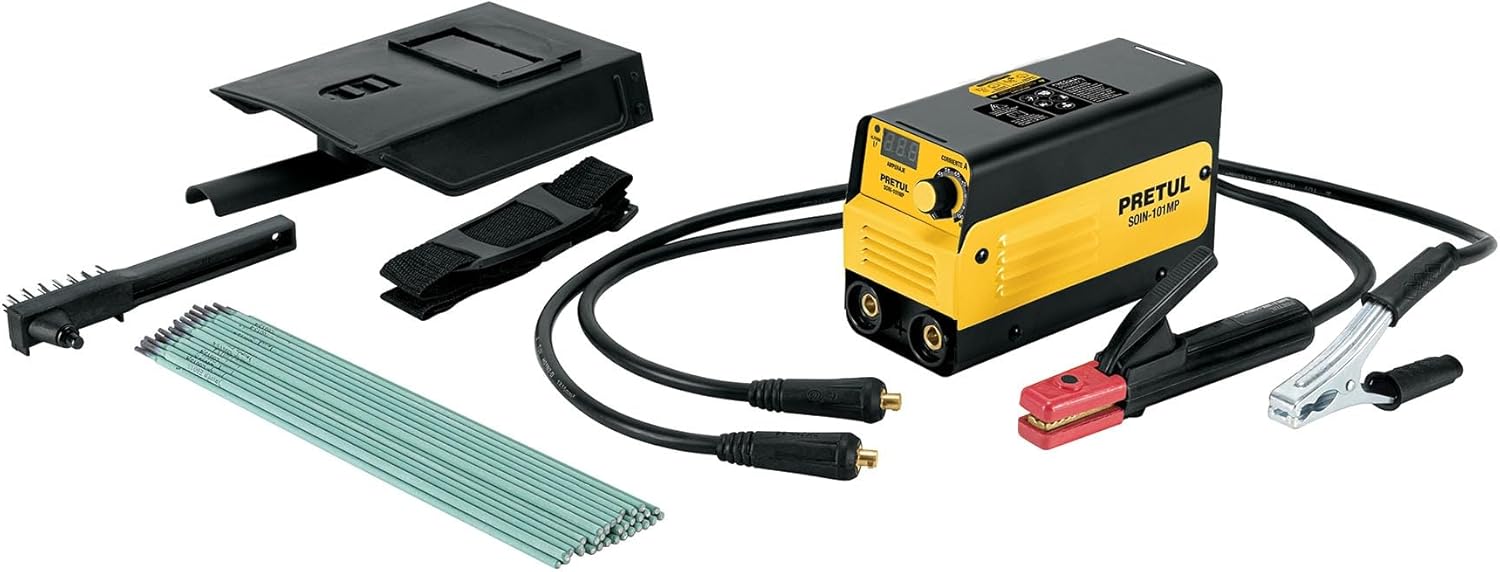
Image: The Pretul SOIN-101MP Mini Inverter Welder shown with all its included accessories: the welding machine, electrode holder cable, ground clamp cable, shoulder strap, protective welding mask, wire brush, power cable with plug, and a pack of welding electrodes.
- 1 x Pretul SOIN-101MP Mini Inverter Welder
- 1 x Electrode Holder Cable (2 m, #7 AWG / 10 mm²)
- 1 x Ground Clamp Cable (2 m, #7 AWG / 10 mm²)
- 1 x Shoulder Strap
- 1 x Protective Welding Mask
- 1 x Wire Brush
- 1 x Power Cable with Plug
- 1 x 1 kg pack of 1/8" E6013-4 Electrodes

Image: A visual list of included accessories, detailing the ground clamp cable, electrode holder cable, strap, protective mask, wire brush, power cable, and electrodes.
4. Product Overview
Familiarize yourself with the main components of your Pretul SOIN-101MP welder:

Image: A detailed view of the welder, highlighting key components such as the electronic current adjustment control, power cable input, on/off switch, and quick-change terminals.
- Electronic Control for Current Adjustment: Digital display and knob for precise amperage setting.
- Power Cable Input: Connection point for the main power supply.
- On/Off Switch: Main power control for the unit.
- Quick-Change Terminals (Bornes): 3/8" terminals for connecting the electrode holder and ground clamp cables.
- Cooling Fan: Located internally to prevent overheating.
5. Setup
- Placement: Place the welder on a stable, level surface in a well-ventilated area, away from flammable materials. Ensure there is sufficient space around the unit for air circulation.
- Connect Ground Clamp: Connect the ground clamp cable to the appropriate quick-change terminal on the welder. Securely attach the ground clamp to the workpiece or a clean, bare metal part of the welding table, ensuring good electrical contact.
- Connect Electrode Holder: Connect the electrode holder cable to the other quick-change terminal on the welder. Insert the desired electrode into the electrode holder.
- Power Connection: Ensure the welder's ON/OFF switch is in the "OFF" position. Plug the power cable into a grounded 127 V, 1-phase power outlet.
- Personal Protective Equipment (PPE): Before turning on the welder, put on all necessary PPE, including your welding helmet, gloves, and protective clothing.
6. Operating Instructions
- Turn On: Flip the ON/OFF switch to the "ON" position. The digital display will illuminate.
- Adjust Current: Use the current adjustment knob to set the desired amperage. The digital display will show the selected current. Refer to the electrode manufacturer's recommendations for appropriate current settings.
- Electrode Selection: This welder is designed for shielded metal arc welding (SMAW) and is compatible with the following electrode types:
- 6013 (Up to 1/8")
- 6011 (Up to 1/8")
- 7018 (Up to 3/32")

Image: A chart illustrating compatible electrode types (6013, 6011, 7018) and their recommended sizes for 1-phase operation with the SMAW process. It also indicates N/A for TIG tungsten.
- Start Welding: With the electrode in the holder and the ground clamp attached, strike an arc on the workpiece. Maintain a consistent arc length and travel speed for optimal weld quality.
- Post-Welding: After completing the weld, turn off the welder. Allow the machine to cool down before storing. Clean the workpiece and remove any slag.
7. Maintenance
Regular maintenance ensures the longevity and optimal performance of your welder.
- Cleaning: Periodically clean the exterior of the welder with a dry, soft cloth. Use compressed air to blow out dust and debris from the ventilation openings. Ensure the machine is unplugged before cleaning.
- Cable Inspection: Regularly inspect all cables (power, electrode, ground) for cuts, fraying, or damaged insulation. Replace any damaged cables immediately.
- Terminal Check: Ensure the quick-change terminals are clean and free of corrosion. Tighten connections as needed.
- Storage: Store the welder in a dry, clean environment, away from direct sunlight and extreme temperatures.
8. Troubleshooting
| Problem | Possible Cause | Solution |
|---|---|---|
| Welder does not turn on. | No power supply; faulty power cable; internal fault. | Check power outlet and circuit breaker. Inspect power cable. If problem persists, contact support. |
| No arc or weak arc. | Poor ground connection; incorrect current setting; damp or incorrect electrode; internal issue. | Ensure ground clamp has good contact. Adjust current. Use dry, appropriate electrodes. |
| Welder overheats and shuts off. | Exceeded duty cycle; blocked ventilation; high ambient temperature. | Allow welder to cool down. Ensure clear ventilation. Reduce welding time or current. |
| Electrode sticks frequently. | Low current setting; improper arc length; damp electrode. | Increase current. Maintain proper arc length. Use dry electrodes. The Anti-Stick feature helps prevent this. |
9. Specifications

Image: The Pretul SOIN-101MP welder with dimensions indicated: 18 cm height, 25 cm depth, and 10 cm base width.
| Feature | Detail |
|---|---|
| Model Number | SOIN-101MP (29961) |
| Input Voltage | 1 Phase (127 V) |
| Current Range | 20A DC - 100A DC |
| Duty Cycle | 60% (at 100A) |
| Electrode Compatibility | 6013, 6011 (up to 1/8"), 7018 (up to 3/32") |
| Quick-Change Terminals | 3/8" |
| Dimensions (L x W x H) | 25 cm x 10 cm x 18 cm (approx. 33 x 27 x 20.7 cm package) |
| Weight | 4.8 kg (package weight) |
| Power Source | AC/DC |
Technical Features:

Image: A list of technical features including IGBT Inverter, Thermal Protect, Arc Force, Anti Stick, Hot Start, and Lift TIG, with brief descriptions.
- IGBT Inverter Technology: Allows operation at any current level, providing stable and efficient welding.
- Thermal Protect: Thermal protection against overload, automatically shutting down the unit to prevent damage.
- Arc Force: Adjusts the optimal arc value and allows welding in different positions.
- Anti Stick: Prevents overheating and sticking of the electrode to the workpiece.
- Hot Start: Facilitates arc ignition, making it easier to start welding.
- Lift TIG: Facilitates arc ignition with the TIG process (Note: This model is primarily for SMAW, TIG functionality may require additional accessories not included).
10. Warranty and Support
For warranty information and technical support, please refer to the documentation included with your product or contact Pretul customer service directly. Keep your purchase receipt as proof of purchase for warranty claims.
For further assistance, you may visit the official Pretul brand store on Amazon: Pretul Store
Related documentsSOIN-101MP


Ask a question about this manual
Ask about setup, troubleshooting, compatibility, parts, safety, or missing instructions. Manuals+ will review the question and use this page’s manual context to help answer it.