1. Introduction and Overview
The VIZIUUY 3MP Solar Security Camera offers advanced outdoor surveillance with its wireless design, solar power capabilities, and comprehensive features. This manual provides essential information for setting up, operating, and maintaining your camera to ensure optimal performance and security.

Image: VIZIUUY 3MP Solar Security Camera with its solar panel.
2. What's in the Box
Carefully unpack all components and verify that you have received the following items:
- 1 x 3MP Solar PTZ Camera
- 1 x Solar Panel
- 1 x User Manual
- 1 x Power Cable
- 1 x Warning Sticker
- 2 x Stand (1 for Camera, 1 for Panel)
- 2 x Screw bags

Image: All components included in the product packaging.
3. Setup Guide
3.1 Initial Setup (App & Pairing)
- Charge the Camera: Before installation, fully charge the camera indoors using the provided power cable. This ensures the built-in battery has sufficient power for initial setup and operation.
- Download the App: Download the free "Cloudedge" app from your smartphone's app store (Google Play for Android or Apple App Store for iOS).
- Create an Account: Open the Cloudedge app and follow the on-screen instructions to sign up and create a new user account.
- Add Device: In the app, select 'Add Device' and choose 'Battery Camera'. Follow the prompts to power on the camera and reset it if necessary.
- Connect to Wi-Fi: Select your 2.4GHz Wi-Fi network and enter the password. The camera does not support 5GHz Wi-Fi.
- Scan QR Code: The app will display a QR code. Hold your smartphone with the QR code 5-8 inches in front of the camera lens. The camera will emit a sound indicating successful pairing.
- Complete Setup: Once connected, follow the remaining app prompts to name your camera and finalize the setup process.
Video: A customer's unboxing and setup guide for the VIZIUUY Solar Security Camera, demonstrating the initial pairing process with the Cloudedge app.
3.2 Physical Installation
The VIZIUUY camera and solar panel can be mounted using the provided stands and screws. Choose a location that provides optimal sunlight exposure for the solar panel and a clear view for the camera.
- Mounting Location: Identify a suitable outdoor location for both the camera and the solar panel. Ensure the solar panel receives direct sunlight for several hours daily.
- Install Camera Bracket: Use the provided mounting template to mark drill holes for the camera bracket. Secure the bracket to the wall or ceiling using the screws and wall anchors. The camera slides onto this bracket for easy attachment and removal.
- Install Solar Panel Bracket: Similarly, install the solar panel bracket in a location with maximum sun exposure.
- Attach Solar Panel: Secure the solar panel to its bracket and adjust its angle to face the sun.
- Connect Solar Panel: Connect the solar panel's power cable to the camera's charging port. Ensure the connection is secure and waterproof.

Image: Installation diagram for the camera and solar panel.

Image: Solar panel connected to the camera for continuous power.
4. Operating Instructions
4.1 Pan, Tilt & Digital Zoom
Control the camera's viewing angle remotely through the Cloudedge app. The camera offers 355° horizontal pan and 90° vertical tilt, providing a 360° field of view. Utilize the 4x digital zoom to inspect details within the live feed.

Image: Pan, Tilt, and 4X Digital Zoom functionality.
4.2 Night Vision
The camera features upgraded 4pcs bright spotlights for enhanced night vision. It supports both color night vision (up to 50ft/15m) and infrared (IR) night vision for clear video in total darkness.
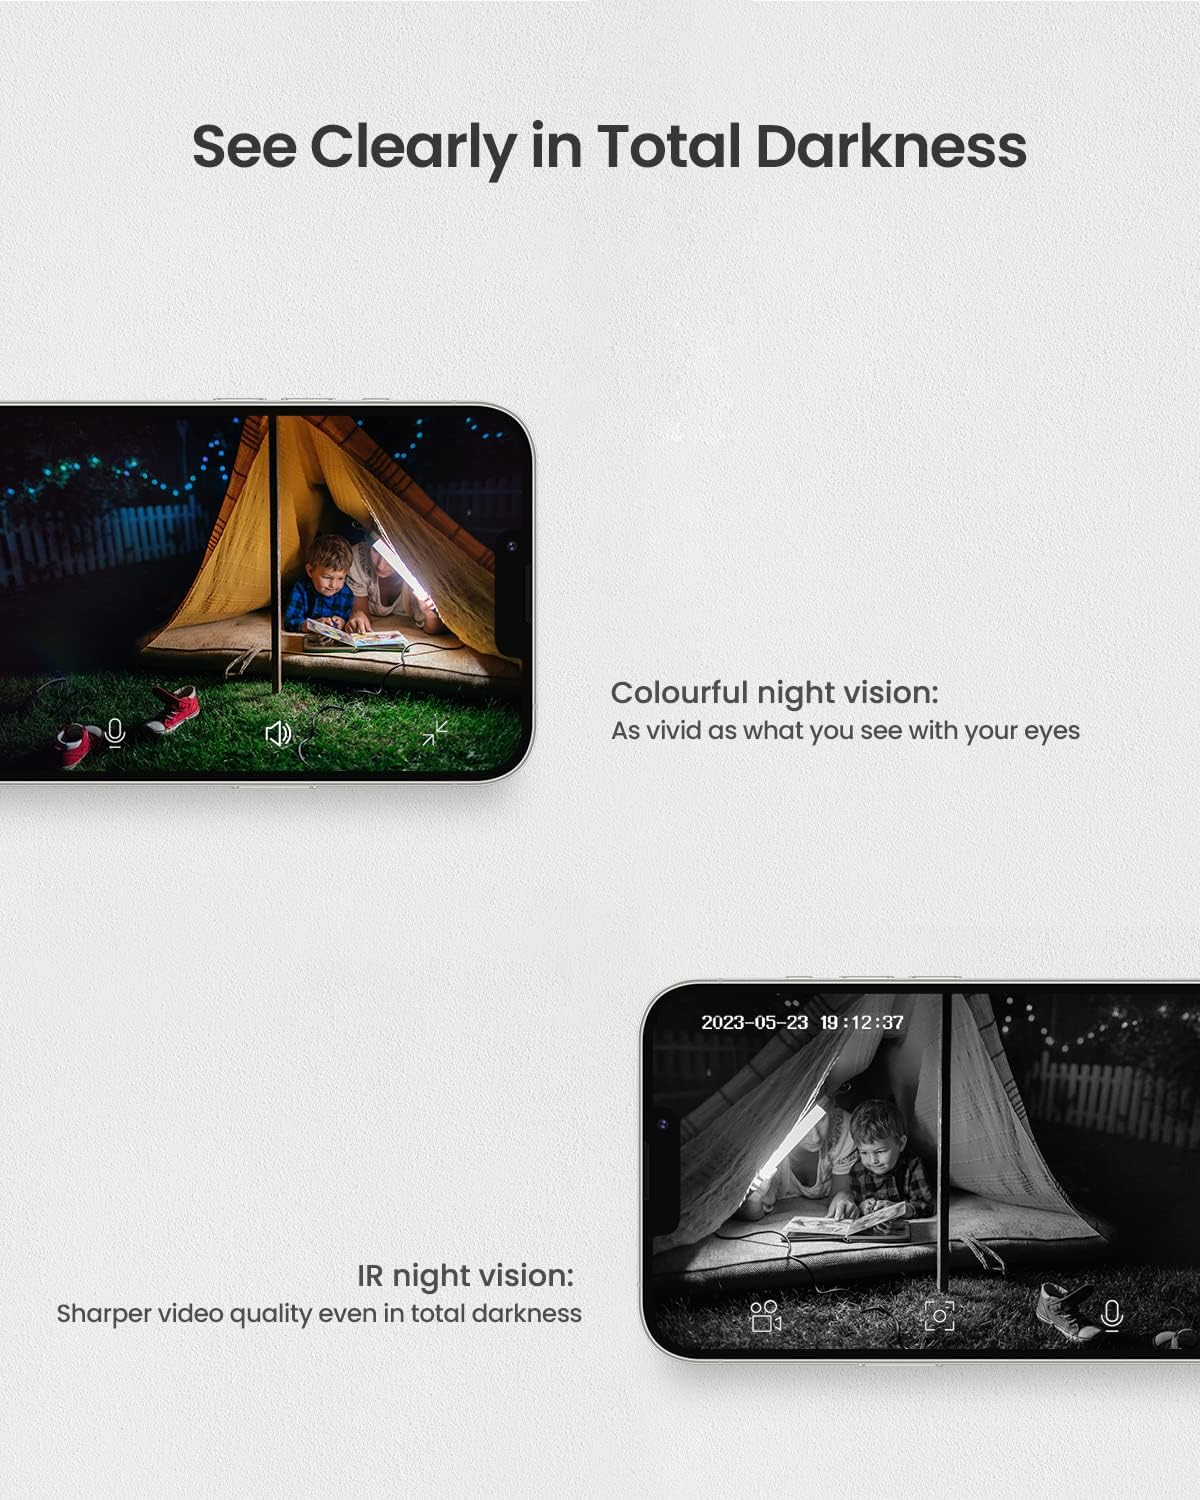
Image: Night vision capabilities, including color and IR modes.

Image: Visual comparison of camera view during day and night with color night vision.
4.3 Intelligent Motion Detection & Multi-Alarms
Equipped with upgraded PIR technology, the camera significantly enhances human-like recognition, reducing false alarms. Upon motion detection, the camera can automatically activate its floodlight and siren to deter intruders. Notifications are pushed to your smartphone. You can also customize motion detection areas and sensitivity levels (1-10) within the app.

Image: Intelligent motion detection features.

Image: Motion detection triggering spotlight and app alerts.

Image: Setting customized activity zones for motion detection.
4.4 Two-Way Audio
The built-in microphone and speaker enable two-way communication. You can hear what's happening and speak to anyone in view of the camera directly from your smartphone.

Image: Two-way audio communication via the app.
4.5 Storage Options
The camera supports two storage methods: local storage via a Micro SD card (up to 128GB, not included) and optional cloud storage with a free 7-day trial.

Image: Cloud and Micro SD card storage options.
4.6 Alexa Compatibility
The VIZIUUY camera is compatible with Alexa, allowing for voice control and integration with smart home systems. You can ask Alexa to show you the camera feed on compatible devices.

Image: Alexa voice control integration.
5. Maintenance
- Clean Lens and Solar Panel: Regularly wipe the camera lens and solar panel with a soft, damp cloth to remove dust, dirt, or debris. This ensures clear image quality and efficient solar charging.
- Check Mounting: Periodically inspect the camera and solar panel mounting brackets to ensure they are secure and have not loosened due to weather conditions.
- Software Updates: Keep the Cloudedge app updated to the latest version to benefit from new features, bug fixes, and security enhancements.
6. Troubleshooting
- Camera Offline: Ensure the camera is fully charged and the solar panel is receiving adequate sunlight. Check your Wi-Fi connection and ensure the camera is within range of your 2.4GHz router. Try restarting the camera and your router.
- Poor Image Quality: Clean the camera lens. Ensure there are no obstructions in the camera's field of view. Check your Wi-Fi signal strength in the app; a weak signal can affect video quality.
- False Motion Alerts: Adjust the motion detection sensitivity settings in the app. Define specific activity zones to exclude areas with frequent non-threatening movement (e.g., trees swaying).
- Battery Not Charging: Verify the solar panel is clean and positioned to receive direct sunlight. Ensure the solar panel cable is securely connected to the camera. If issues persist, try charging the camera directly with the power cable indoors.
- Two-Way Audio Issues: Check the volume settings on your smartphone and within the app. Ensure there is no obstruction blocking the camera's microphone or speaker.
7. Specifications
| Feature | Detail |
|---|---|
| Model Name | VZ-3PT2-A |
| Video Capture Resolution | 3 MP (2560*1920) |
| Indoor/Outdoor Usage | Outdoor |
| Power Source | Solar Powered / Power Adapter |
| Connectivity Protocol | Wi-Fi (2.4GHz ONLY) |
| Controller Type | CloudEdge App |
| Viewing Angle | 355° Pan, 90° Tilt (360° Field of View) |
| Night Vision Range | Up to 50ft/15m (Color Night Vision) |
| Digital Zoom | 4X |
| Battery Power | 9600 Milliamp Hours |
| Storage | Micro SD Card (up to 128GB), Cloud Storage |
| International Protection Rating | IP66 |
| Item Dimensions L x W x H | 7 x 5 x 8 inches |
8. Warranty and Support
VIZIUUY is committed to providing high-quality products and customer satisfaction. Your VIZIUUY Solar Security Camera comes with:
- 1-Year Warranty: Covers manufacturing defects and malfunctions under normal use.
- Lifetime Technical Support: Access to dedicated technical assistance for the lifespan of your product.
- Local Phone Service: Support available via local phone service for convenient assistance.
- 90 Days Free Return: For returns within 90 days of purchase.
For any inquiries or support needs, please refer to the contact information provided in your Quick Start Guide or on the VIZIUUY official website.


