1. Introduction
This manual provides comprehensive instructions for the installation, operation, and maintenance of your HomePilot Gurtwickler RolloTron Classic. This device is an automatic belt winder designed for controlling roller shutters, offering both manual and automated operation modes. Please read this manual carefully before using the product to ensure safe and efficient operation.

Image 1.1: The HomePilot Gurtwickler RolloTron Classic and its packaging, highlighting key features like 45 kg lifting capacity, 23 mm Maxi belt compatibility, and soft start/stop function.
2. Safety Information
Always observe the following safety precautions to prevent injury or damage to the device:
- Ensure the power supply is disconnected before installation or maintenance. The device operates at 230 Volts and 1 Amps.
- Installation should only be performed by qualified personnel or under strict adherence to these instructions.
- Do not expose the device to moisture or extreme temperatures.
- Keep children away from the operating roller shutter.
- This product is CE certified, indicating compliance with European safety standards.
3. Package Contents
Verify that all components are present in the package:
- 1 x HomePilot Gurtwickler RolloTron Classic (Model: 10132345)
- 1 x RolloTron Standard 1300 (included component)
- Instruction Manual (this document)
4. Installation and Setup
The RolloTron Classic is designed for external mount installation. Follow these steps carefully:
- Prepare the Installation Area: Ensure the existing belt winder is removed and the wall opening is clear. The device dimensions are 21 x 6.1 x 16.6 cm. Refer to the technical drawing for precise measurements.
- Insert the Belt: Carefully feed the roller shutter belt into the RolloTron Classic unit. Ensure it is properly seated on the internal winding mechanism.
- Mount the Device: Position the RolloTron Classic into the wall opening. Secure it firmly using appropriate screws (not included, typically). The plug profile is designed for external mounting.
- Connect Power: Once securely mounted, plug the device into a standard 230V power outlet.

Image 4.1: Step-by-step visual guide for installing the RolloTron Classic, showing belt insertion, unit placement, securing, and power connection.
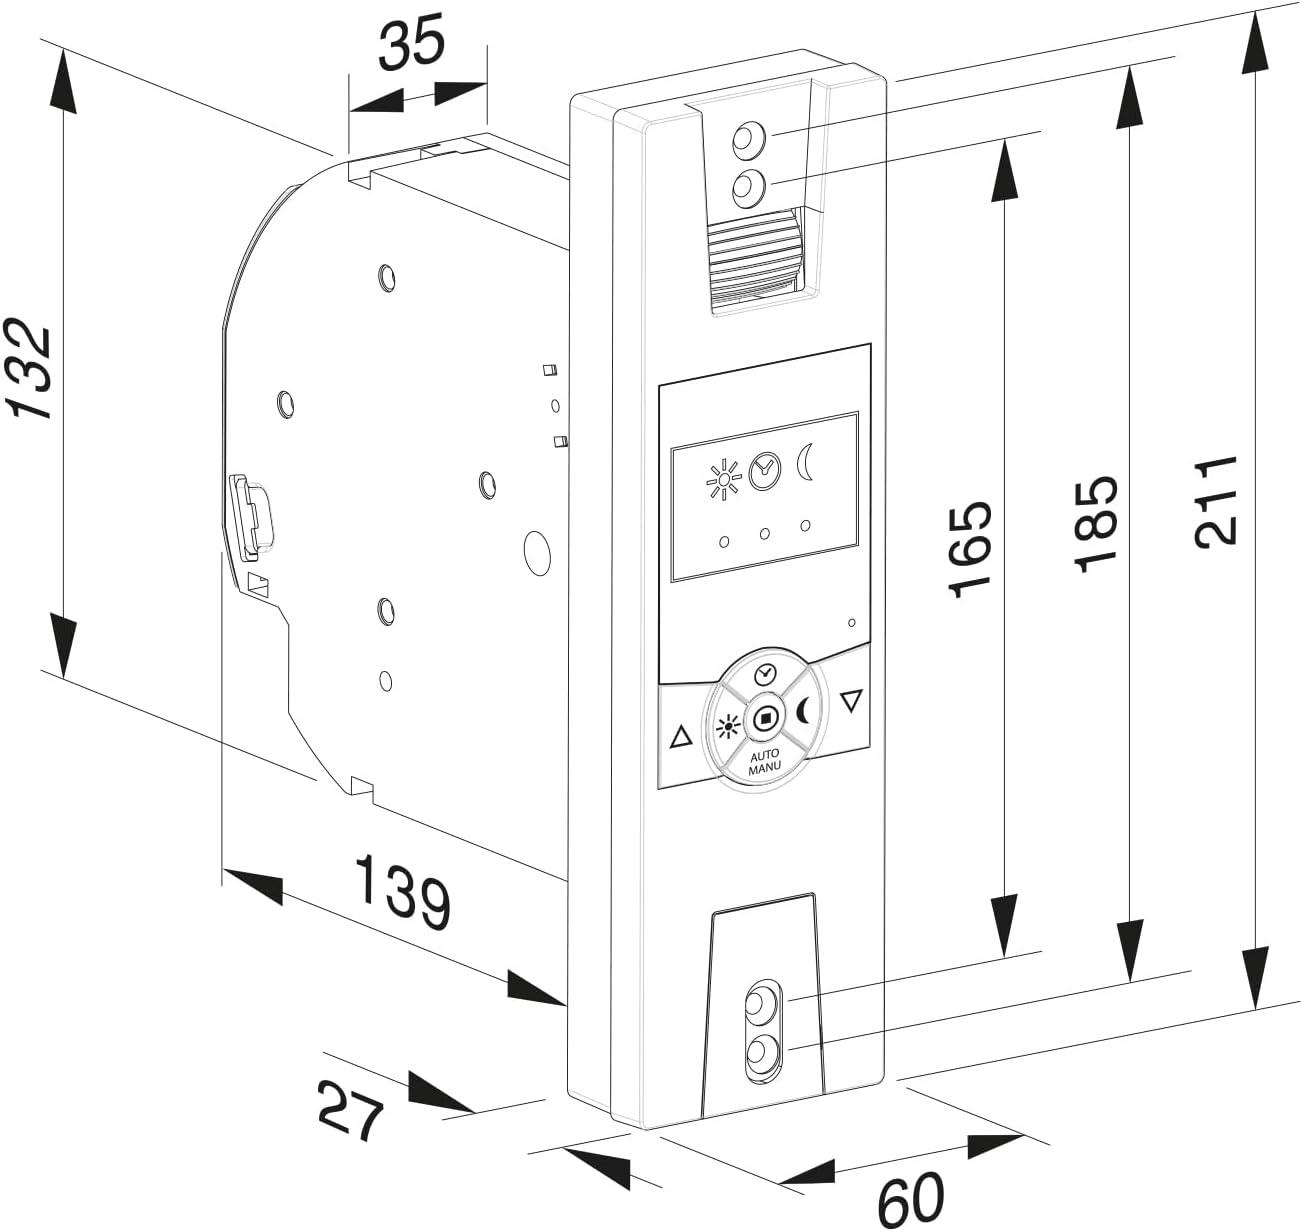
Image 4.2: Detailed technical drawing providing precise dimensions (in millimeters) for the RolloTron Classic, essential for accurate installation planning.
5. Operating Instructions
The RolloTron Classic offers both manual and automatic operation modes. The control panel features intuitive buttons and indicators.
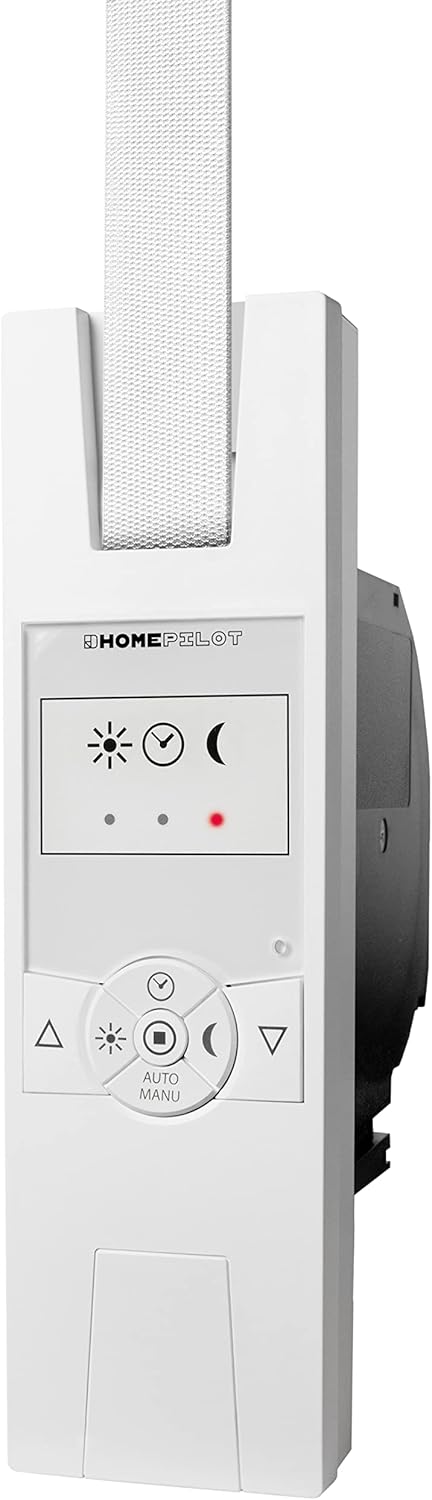
Image 5.1: Front view of the RolloTron Classic, showing the control panel with buttons for manual operation, mode selection, and status indicators.
5.1 Manual Operation
- Up Button (▲): Press to raise the roller shutter.
- Down Button (▼): Press to lower the roller shutter.
- The device features a "Soft Start/Stop" function for smooth and quiet operation.
5.2 Automatic Operation
The RolloTron Classic supports automatic operation. Use the "AUTO/MANU" button to switch between modes. In automatic mode, the device can operate based on pre-set times or light conditions (if equipped with a light sensor).
- Sun/Moon Icons: These indicators typically represent light sensor status or programmed up/down times.
- Red Dot Indicator: May indicate an error, manual override, or specific mode. Refer to the full manufacturer's manual for detailed programming instructions.
6. Maintenance
The HomePilot Gurtwickler RolloTron Classic requires minimal maintenance. Follow these guidelines:
- Cleaning: Wipe the surface of the device with a soft, dry cloth. Do not use abrasive cleaners or solvents.
- Inspection: Periodically check the roller shutter belt for wear and tear. Ensure the belt winder operates smoothly.
- Do not attempt to open or repair the device yourself. Refer to qualified service personnel.
7. Troubleshooting
If you encounter issues with your RolloTron Classic, try the following steps:
- Device Not Responding: Check if the device is properly plugged into the power outlet. Ensure there is power to the outlet.
- Roller Shutter Not Moving: Verify that the belt is correctly installed and not jammed. Check for any obstructions in the roller shutter's path.
- Automatic Function Not Working: Ensure the device is in automatic mode. Re-check your programmed settings (times, light sensitivity).
- If the problem persists, disconnect the power for a few minutes and then reconnect it. If the issue remains unresolved, contact customer support.
8. Technical Specifications
| Feature | Detail |
|---|---|
| Model Number | 10132345 |
| Part Number | 14234519 |
| Brand | HOMEPILOT |
| Manufacturer | DELTA DORE RADEMACHER GmbH |
| Product Dimensions (L x W x H) | 21 x 6.1 x 16.6 cm |
| Weight | 800 g |
| Colour | Ultrawhite |
| Material | Plastic |
| Operating Voltage | 230 Volts |
| Current Rating | 1 Amps |
| Operation Mode | Automatic |
| Plug Profile | External Mount |
| Switch Type | Toggle |
| Connector Type | Plug In |
| Included Components | RolloTron Standard 1300 |
| Certification | CE |
| Specific Uses | Window (Roller Shutters) |
9. Warranty Information
Warranty terms and conditions for the HomePilot Gurtwickler RolloTron Classic are provided by the manufacturer, DELTA DORE RADEMACHER GmbH, or your point of purchase. Please retain your proof of purchase for any warranty claims. For detailed warranty information, refer to the documentation included with your product or visit the manufacturer's official website.
10. Customer Support
If you require further assistance, have questions about installation, operation, or troubleshooting that are not covered in this manual, please contact:
- Your retailer or the online store where you purchased the product.
- The manufacturer, DELTA DORE RADEMACHER GmbH, through their official support channels.
Please have your product model number (10132345) and ASIN (B0C5D382ZC) ready when contacting support.


