
VOLFVERT VOLFVERT-
VOLFVERT 1100W Pure Sine Wave Inverter User Manual
Model: VOLFVERT-
1. Introduction
Thank you for choosing the VOLFVERT 1100 Watt Pure Sine Wave Inverter. This device converts 12V DC power from your battery into 110V/120V AC household power, suitable for a wide range of applications including home use, RVs, and off-grid solar systems. It features two AC outlets, USB ports, Type-C ports, an LCD display, and a remote controller for convenient operation. This manual provides essential information for safe and efficient use of your inverter.

Figure 1.1: VOLFVERT 1100W Pure Sine Wave Inverter with included accessories.
2. Safety Information
Please read and understand all safety instructions before installing or operating the inverter. Failure to follow these instructions may result in electric shock, fire, serious injury, or death.
- Ventilation: Ensure adequate ventilation around the inverter. Do not block ventilation openings.
- Environment: Operate the inverter in a dry, well-ventilated area, away from direct sunlight, heat sources, and flammable materials.
- Water Exposure: Do not expose the inverter to rain, moisture, or water spray.
- Connections: Ensure all connections are tight and secure. Loose connections can cause overheating and damage.
- Grounding: Always properly ground the inverter as per local electrical codes.
- Overload Protection: Do not exceed the inverter's rated continuous power output. Overloading can cause damage to the inverter and connected devices.
- Battery Voltage: Connect the inverter only to a 12V DC battery system. Connecting to other voltages may cause severe damage.
- Maintenance: Do not attempt to open or service the inverter yourself. Refer all servicing to qualified personnel.
- Children: Keep the inverter out of reach of children.
3. Package Contents
Verify that all items are present in your package:
- VOLFVERT 1100W Pure Sine Wave Inverter
- Wireless Remote Controller
- Battery Cables (Red for Positive, Black for Negative)
- Grounding Cable
- Spare Fuses
- User Manual (this document)

Figure 3.1: Inverter with all included accessories, including battery cables, remote, and fuses.
4. Product Features and Components
Familiarize yourself with the main parts of your VOLFVERT inverter:
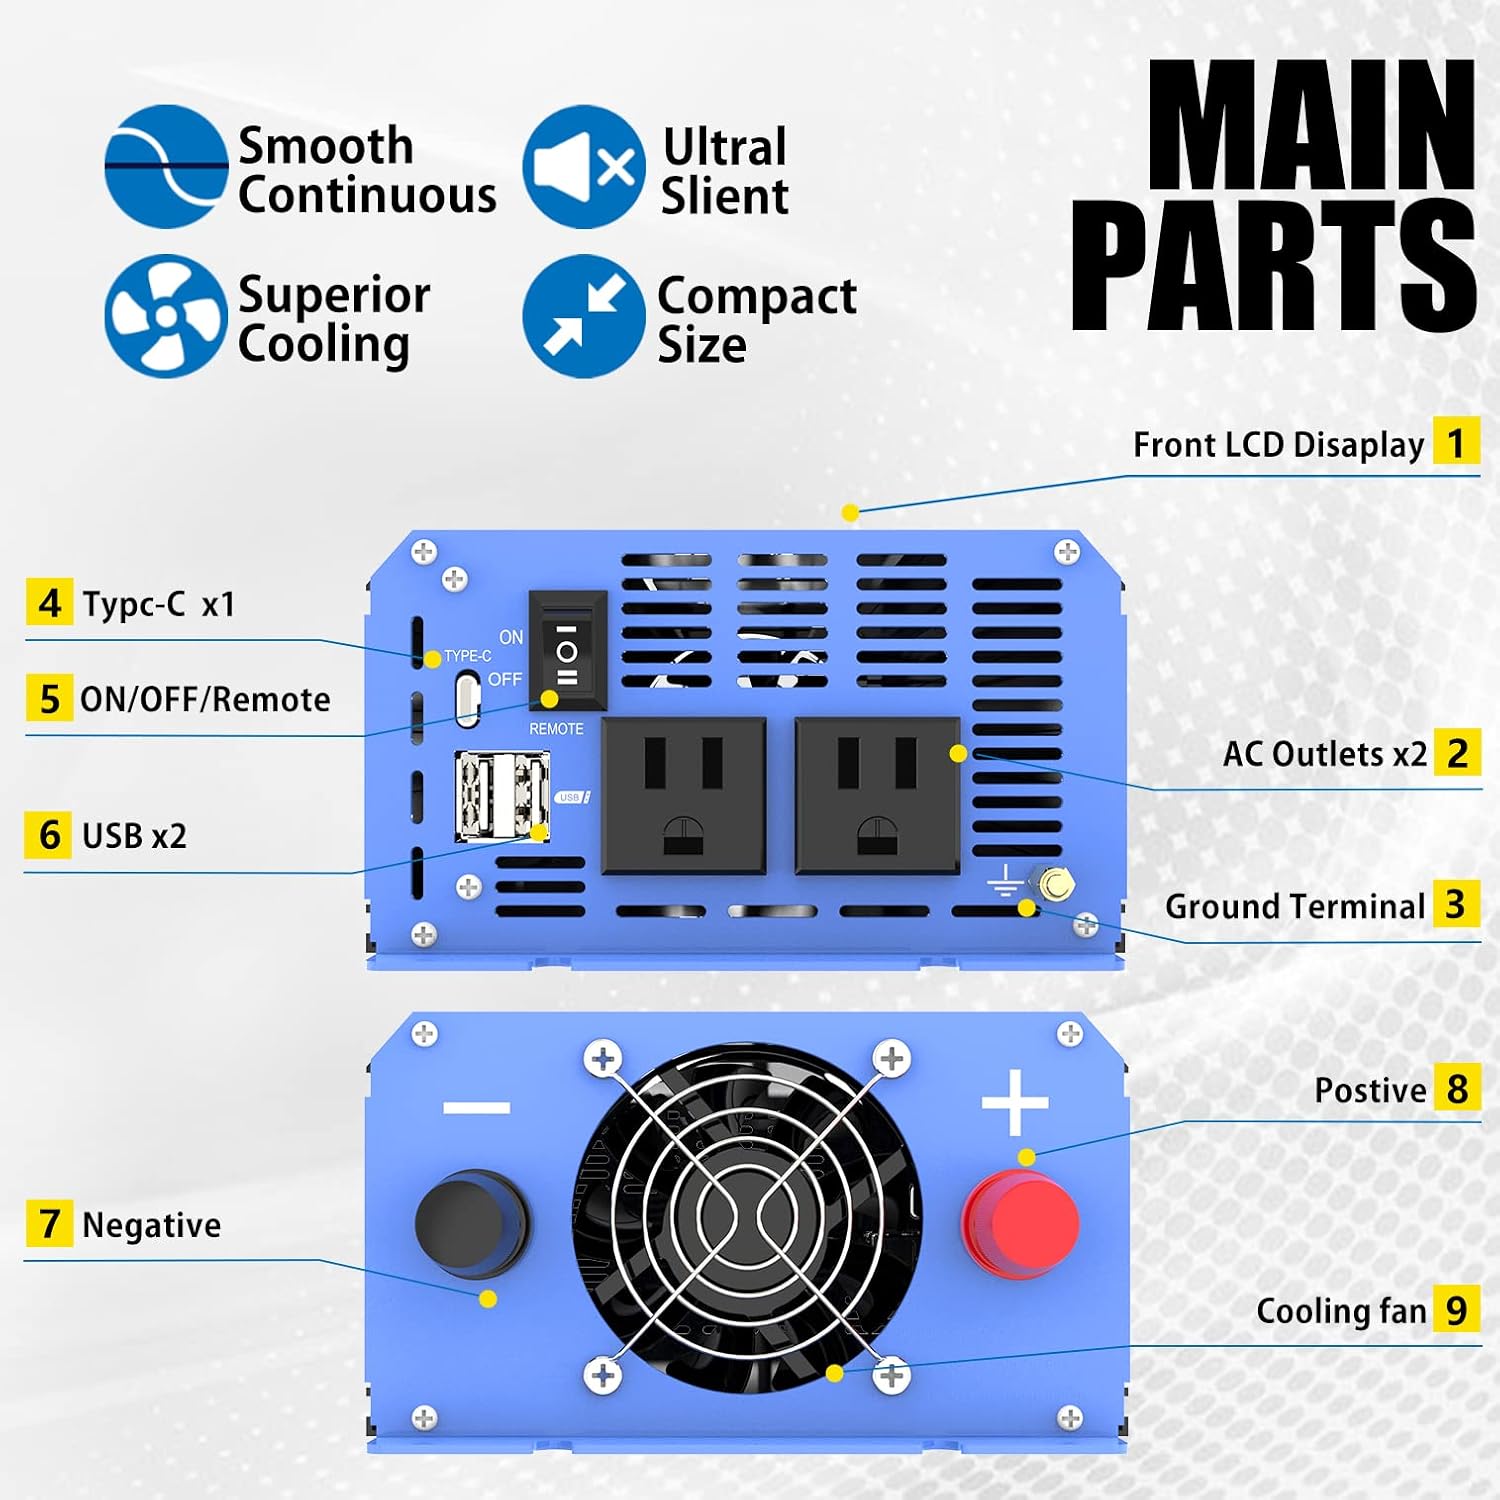
Figure 4.1: Main components of the VOLFVERT 1100W Inverter.
- Front LCD Display: Shows input voltage, output voltage, frequency, battery level, and load wattage.
- AC Outlets (x2): Standard 110V/120V AC outlets for connecting appliances.
- Ground Terminal: For connecting the inverter to an earth ground.
- Type-C Port (x1): USB Type-C charging port.
- ON/OFF/Remote Switch: Main power switch for the inverter, also enables remote control.
- USB Ports (x2): Standard USB-A charging ports.
- Negative Terminal: Black terminal for connecting the negative battery cable.
- Positive Terminal: Red terminal for connecting the positive battery cable.
- Cooling Fan: Automatically activates to dissipate heat and maintain optimal operating temperature.

Figure 4.2: Inverter cooling fan for efficient heat dissipation.
5. Setup and Installation
Follow these steps for proper installation of your inverter:
- Mounting: Choose a dry, cool, and well-ventilated location for mounting the inverter. Ensure there is sufficient space around the unit for airflow.
- Grounding: Connect the grounding terminal (3) on the inverter to a proper earth ground using the provided grounding cable. This is crucial for safety.
- Battery Connection:
- Ensure the inverter's ON/OFF switch (5) is in the "OFF" position.
- Connect the RED positive battery cable to the RED positive terminal (8) on the inverter.
- Connect the other end of the RED cable to the positive (+) terminal of your 12V battery.
- Connect the BLACK negative battery cable to the BLACK negative terminal (7) on the inverter.
- Connect the other end of the BLACK cable to the negative (-) terminal of your 12V battery.
- Ensure all connections are tight to prevent voltage drops and overheating.
- Remote Control Connection (Optional): If using the remote control, plug its cable into the designated "REMOTE" port next to the ON/OFF switch.
6. Operating Instructions
Operating your VOLFVERT inverter is straightforward:
6.1 Powering On/Off
- To turn on the inverter, switch the ON/OFF/Remote switch (5) to the "ON" position. The LCD display will illuminate.
- To turn off the inverter, switch the ON/OFF/Remote switch (5) to the "OFF" position.
- If using the remote control, ensure the switch (5) is in the "REMOTE" position. Then use the ON/OFF buttons on the remote.
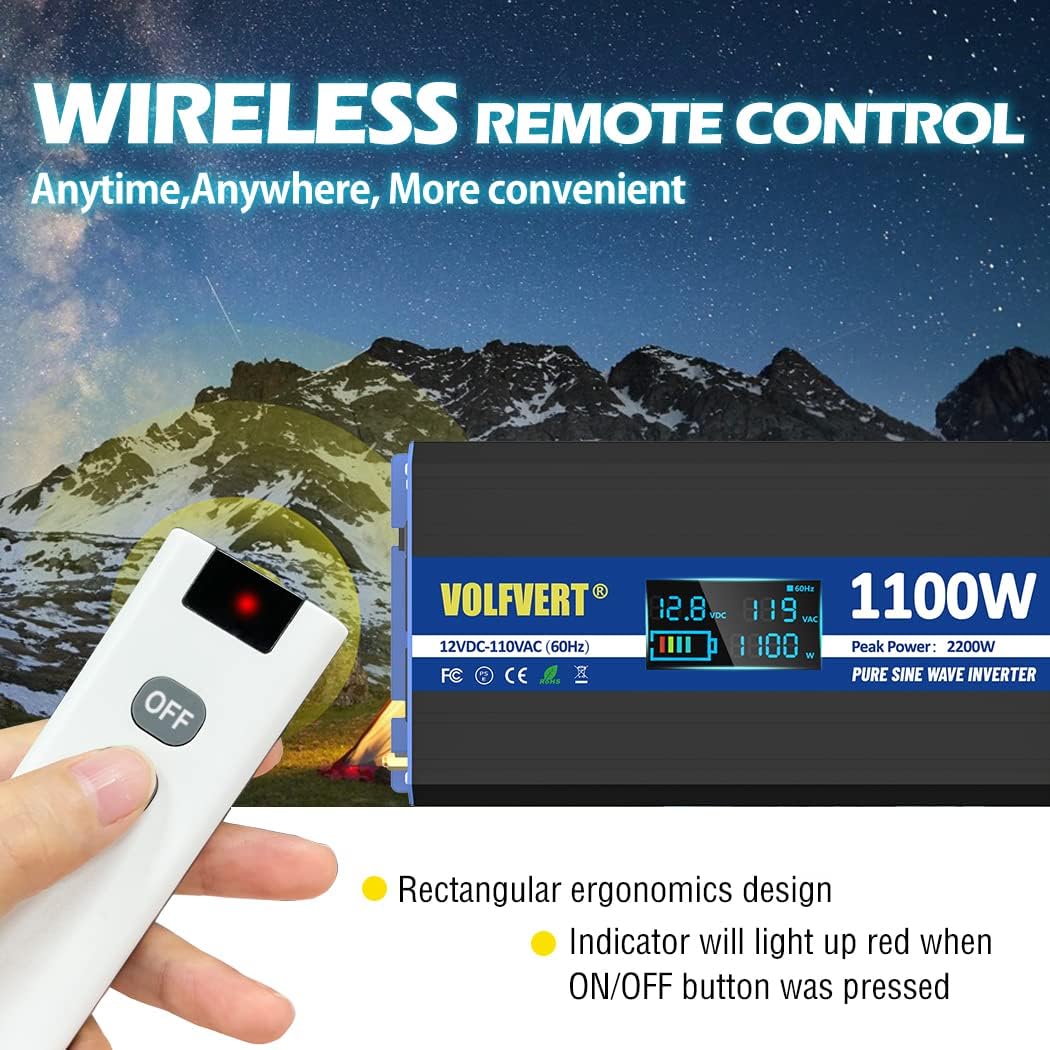
Figure 6.1: Wireless remote control for convenient operation.

Figure 6.2: Using the wireless remote control.
6.2 Connecting Appliances
- Once the inverter is on, plug your AC appliances into the AC Outlets (2).
- For charging mobile devices, use the USB Ports (6) or Type-C Port (4).
- Ensure the total wattage of all connected appliances does not exceed the inverter's continuous power rating (1100W).
6.3 LCD Display Information
The LCD display (1) provides real-time operational data:
- Input Voltage (VDC): Shows the current DC voltage from your battery.
- Output Voltage (VAC): Displays the AC output voltage (typically 110V/120V).
- Hertz (Hz): Indicates the output frequency (60Hz).
- Battery Output: A graphical representation of the battery charge level.
- Load Wattage (W): Shows the total power consumption of connected devices.
- Warning Indicator: Displays icons for various protection states (Under-Voltage, Over-Voltage, Over-Load, Short-Circuit).

Figure 6.3: LCD Display and Smart Protection Indicators.
7. Maintenance
Proper maintenance ensures the longevity and optimal performance of your inverter:
- Cleaning: Periodically clean the exterior of the inverter with a dry, soft cloth. Do not use liquid cleaners or solvents.
- Ventilation: Regularly check that the cooling fan and ventilation openings are free from dust and debris. Blocked vents can lead to overheating.
- Connections: Periodically inspect all electrical connections (battery cables, grounding cable) to ensure they remain tight and free from corrosion.
- Storage: If storing the inverter for an extended period, disconnect it from the battery and store it in a cool, dry place.
8. Troubleshooting
If you encounter issues with your inverter, refer to the following common problems and solutions:
| Problem | Possible Cause | Solution |
|---|---|---|
| Inverter does not turn on. |
|
|
| No AC output. |
|
|
| Fan runs constantly or loudly. |
|
|
| LCD display shows error code/warning. |
|
|
If the problem persists after trying these solutions, please contact VOLFVERT customer support.
9. Specifications
| Feature | Specification |
|---|---|
| Model | VOLFVERT- |
| Continuous Power | 1100 Watts |
| Peak Power | 2200 Watts |
| Input DC Voltage | 12V DC |
| Output AC Voltage | 110V - 120V AC |
| Output Waveform | Pure Sine Wave |
| USB Output | 2 x USB-A Ports |
| Type-C Output | 1 x Type-C Port |
| Dimensions (Package) | 11.14 x 6.3 x 4.45 inches |
| Item Weight | 3.87 pounds |
| Manufacturer | VOLFVERT |
10. Warranty and Support
VOLFVERT products are designed for reliability and performance. This product typically comes with a 1-year limited warranty from the date of purchase, covering defects in materials and workmanship. Please retain your proof of purchase for warranty claims.
For technical support, troubleshooting assistance, or warranty inquiries, please contact VOLFVERT customer service through the retailer's platform or the official VOLFVERT website. Provide your product model number and a detailed description of the issue for prompt assistance.
Manufacturer: VOLFVERT
Related documentsVOLFVERT-


Ask a question about this manual
Ask about setup, troubleshooting, compatibility, parts, safety, or missing instructions. Manuals+ will review the question and use this page’s manual context to help answer it.