
Hitron CODA-4589
Hitron CODA-4589 DOCSIS 3.1 Cable Modem Router User Manual
Model: CODA-4589
1. Introduction
This manual provides detailed instructions for the installation, operation, maintenance, and troubleshooting of your Hitron CODA-4589 DOCSIS 3.1 Cable Modem Router. The CODA-4589 is a high-performance gateway designed to deliver multi-Gigabit speeds, ultra-HD video streaming, and robust networking capabilities for both home and small business environments. It integrates a DOCSIS 3.1 modem, an 802.11ac Wave 2 Wi-Fi router, MoCA 2.0, and voice ports into a single device.
2. What's in the Box
Please verify that all items are present in the package:
- Hitron CODA-4589 Cable Modem Router
- Power Supply
- CAT5 Ethernet Cable
- User Manual Guide (this document)
3. Product Overview
3.1 Front Panel
The front panel of the CODA-4589 features LED indicators that provide status information about the device's operation.
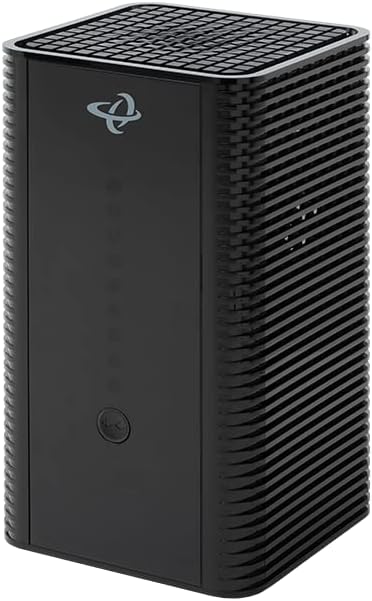
Image: Front view of the Hitron CODA-4589 Cable Modem Router, showing its sleek black design and LED indicators.
Refer to the LED Indicator section for detailed descriptions of each light.
3.2 Rear Panel
The rear panel contains all the necessary ports for connecting the CODA-4589 to your cable service, network devices, and power supply.

Image: Rear view of the Hitron CODA-4589 Cable Modem Router, displaying the coaxial input, Ethernet ports, power input, and voice ports.
- COAX Port: Connects to your cable service line.
- Ethernet Ports (LAN 1-4): Four Gigabit Ethernet ports for wired connections to computers, gaming consoles, or other network devices.
- TEL 1/2 Ports: For connecting telephone lines for voice services.
- RESET Button: Used to reset the device to factory default settings.
- POWER Port: Connects to the included power adapter.
3.3 LED Indicators
| Indicator | Status | Description |
|---|---|---|
| Power | Solid Green | Device is powered on. |
| DS (Downstream) | Solid Green | DOCSIS 3.0 channel bonding is complete. |
| US (Upstream) | Solid Green | DOCSIS 3.0 channel bonding is complete. |
| Online | Solid Green | Internet connection is established. |
| 2.4G Wi-Fi | Solid Green | 2.4 GHz Wi-Fi is active. |
| 5G Wi-Fi | Solid Green | 5 GHz Wi-Fi is active. |
| Tel 1/2 | Solid Green | Voice service is active. |
4. Setup
4.1 Before You Begin
- Ensure you have an active cable internet service subscription.
- Locate a suitable place for the modem, away from direct sunlight, heat sources, and obstructions.
- Have your account information ready for service activation.
4.2 Connecting Your CODA-4589
- Connect Coaxial Cable: Connect one end of the coaxial cable (not included) to the COAX port on the rear of the CODA-4589 and the other end to a cable wall outlet. Ensure the connection is finger-tight.
- Connect Ethernet Cable (Optional): For a wired connection, connect one end of the supplied CAT5 Ethernet cable to any of the yellow Ethernet ports (LAN 1-4) on the CODA-4589 and the other end to the Ethernet port on your computer or other network device.
- Connect Telephone Lines (Optional): If you have voice service, connect your telephone(s) to the TEL 1 and/or TEL 2 ports on the rear of the CODA-4589.
- Connect Power Adapter: Connect the supplied power adapter to the POWER port on the CODA-4589 and then plug the adapter into an electrical outlet.
- Power On: The modem will automatically power on. Wait for the LED indicators on the front panel to stabilize. The Power, DS, US, and Online LEDs should turn solid green, indicating a successful connection to your cable provider's network.
- Activate Service: Once the Online LED is solid green, open a web browser on a connected device. You may be redirected to your cable provider's activation page. Follow the on-screen instructions or call your cable provider to activate your service.

Image: A network diagram illustrating typical connections for the Hitron CODA-4589, including connections to the cable plant, wired devices (PC, NAS, printer), and wireless devices (smartphones, tablets, TVs, security cameras).
5. Operating Your CODA-4589
5.1 Wi-Fi Network Configuration
The CODA-4589 broadcasts both 2.4 GHz and 5 GHz Wi-Fi networks. The default Wi-Fi network name (SSID) and password (Wi-Fi Key) are typically found on a label on the bottom or back of the device.
- Connecting to Wi-Fi: On your wireless device (smartphone, laptop, tablet), search for available Wi-Fi networks. Select the SSID matching your CODA-4589 and enter the Wi-Fi Key when prompted.
- Changing Wi-Fi Settings: To customize your Wi-Fi network name or password, access the modem's web management interface. Open a web browser and enter the default IP address (e.g., 192.168.0.1 or 192.168.1.1). Log in with the default username and password (also found on the device label or in your provider's documentation). Navigate to the Wireless settings to make changes.
- WPS (Wi-Fi Protected Setup): The CODA-4589 supports WPS for easy connection of WPS-compatible devices. Press the WPS button on the modem (if available) and then activate WPS on your device within two minutes.
5.2 MoCA Network Extension
The CODA-4589 includes integrated MoCA 2.0, allowing you to extend your home network over existing coaxial cabling. This provides a high-speed wired backbone for devices in different rooms without running new Ethernet cables. For optimal performance, use Hitron MoCA extenders, which can be securely set up using Hitron's AutoSync software.
5.3 Voice Services
If your service plan includes voice telephony, the CODA-4589's two HD voice ports (TEL 1/2) enable you to connect standard telephones. Once activated by your service provider, the Tel 1/2 LEDs on the front panel will illuminate, indicating that voice services are ready for use.
6. Maintenance
To ensure optimal performance and longevity of your CODA-4589, consider the following maintenance tips:
- Ventilation: Ensure the modem is placed in a well-ventilated area to prevent overheating. Do not block the ventilation holes.
- Cleaning: Gently wipe the exterior of the device with a soft, dry cloth. Do not use liquid cleaners or aerosols.
- Firmware Updates: Firmware updates are typically managed automatically by your cable service provider. Do not attempt to manually update the firmware unless instructed by your provider.
- Power Cycle: If you experience minor connectivity issues, try power cycling the modem by unplugging the power adapter for 10-15 seconds and then plugging it back in.
7. Troubleshooting
This section provides solutions to common issues you might encounter with your CODA-4589.
| Problem | Possible Cause | Solution |
|---|---|---|
| No Power LED | Power adapter not connected or faulty outlet. | Ensure power adapter is securely connected to the modem and a working electrical outlet. Try a different outlet. |
| DS/US/Online LEDs blinking or off | No signal from cable provider or service not activated. | Check coaxial cable connection. Ensure service is activated with your provider. Contact your cable provider if issue persists. |
| No Internet connection (Online LED solid) | Device connected incorrectly or network configuration issue. | Ensure Ethernet cables are properly connected. Restart your computer/device. Power cycle the modem. Verify Wi-Fi settings. |
| Slow Internet speeds | Network congestion, Wi-Fi interference, or service plan limitations. | Try a wired connection to rule out Wi-Fi issues. Reduce number of active devices. Check for Wi-Fi interference. Contact your provider about your service plan. |
| Wi-Fi not working | Wi-Fi disabled or incorrect password. | Check 2.4G/5G Wi-Fi LEDs. Ensure Wi-Fi is enabled in modem settings. Verify Wi-Fi password. |
| No dial tone on phone | Voice service not active or phone not connected properly. | Ensure Tel 1/2 LED is solid green. Check phone cable connection. Contact your voice service provider. |
If the problem persists after trying these solutions, please contact your cable service provider for further assistance.
8. Specifications
| Feature | Detail |
|---|---|
| Model Name | CODA-4589 |
| DOCSIS Standard | DOCSIS 3.1 (backward compatible with DOCSIS 3.0) |
| Downstream Channels | Up to 32 SC-QAM / 2 OFDM (DOCSIS 3.0 / 3.1) |
| Upstream Channels | Up to 8 SC-QAM / 2 OFDMA (DOCSIS 3.0 / 3.1) |
| Wi-Fi Standard | 802.11ac Wave 2 (Dual-Band Concurrent MU-MIMO) |
| Wi-Fi Speed | Up to 2.3 Gbps (combined) |
| Ethernet Ports | 4 x Gigabit Ethernet (RJ-45) |
| Voice Ports | 2 x HD Voice (RJ-11) |
| MoCA | MoCA 2.0 Bonding |
| Dimensions | 5 x 5 x 9 inches |
| Weight | 3.27 pounds |
| Power Supply | External Power Adapter |
9. Warranty and Support
For warranty information and technical support, please refer to the documentation provided by your cable service provider or visit their official support website. Hitron products are typically supported directly by the Internet Service Provider (ISP) that distributes them. Do not attempt to open or service the device yourself, as this may void your warranty.
For general inquiries about Hitron products, you may visit the official Hitron website, but direct technical support for this device is usually handled by your service provider.
Related documentsCODA-4589


Ask a question about this manual
Ask about setup, troubleshooting, compatibility, parts, safety, or missing instructions. Manuals+ will review the question and use this page’s manual context to help answer it.