1. Introduction
This manual provides detailed instructions for the setup, operation, and maintenance of your Walfront Smart Security Camera. This indoor surveillance camera offers 1080P high-definition video, 360-degree rotation, two-way audio communication, and real-time motion detection alarms to enhance your home security. Please read this manual thoroughly before using the product to ensure proper functionality and safety.
2. Product Overview
2.1 Package Contents
Upon opening the package, verify that all components are present and in good condition. The standard package includes:
- Walfront Smart Security Camera
- USB Power Cable
- Mounting Accessories (Base, Adhesive Pad)
- User Manual (this document)

Figure 2.1: Walfront Smart Security Camera with included USB power cable and mounting base.
2.2 Camera Components
Familiarize yourself with the various parts of the camera:

Figure 2.2: Labeled diagram of the camera's front and rear components.
- Microphone Hole: Captures audio for two-way communication.
- HD Lens: 1080P high-definition camera lens.
- Photosensitive Resistor: Detects ambient light for automatic day/night mode switching.
- Base: Provides stability and mounting options.
- Horn Hole: Speaker for two-way audio output.
- Power Interface: USB port for connecting the power cable.
- Small Memory Card Slot: For local storage (MicroSD card, not included).
- Indicator Light: Displays camera status (e.g., power, network connection).
- Reset Key: Used to reset the camera to factory settings.
2.3 Product Dimensions

Figure 2.3: Front and side view with dimensions (55mm width, 85mm height).
3. Setup
3.1 Powering On
- Connect the provided USB power cable to the camera's Power Interface (6).
- Plug the other end of the USB cable into a compatible USB power adapter (not included) and then into a power outlet.
- The indicator light (8) will illuminate, indicating the camera is powering on. Wait for the camera to initialize.
3.2 App Installation and Account Creation
The Walfront Smart Security Camera operates via a smartphone application.
- Download the designated smart home security app from your smartphone's app store (e.g., Google Play Store for Android, Apple App Store for iOS). Refer to the packaging or quick start guide for the specific app name.
- Open the app and follow the on-screen instructions to create a new user account.
- Log in to your newly created account.
3.3 Connecting to Wi-Fi
Ensure your smartphone is connected to a 2.4GHz Wi-Fi network. The camera supports 2.4G Wi-Fi only.
- In the app, select "Add Device" or the "+" icon.
- Choose "Security Camera" or the appropriate device type.
- Follow the in-app instructions, which typically involve scanning a QR code displayed on your phone with the camera, or entering your Wi-Fi network details.
- Once connected, the indicator light (8) will change to a solid color (refer to app for specific status indications).
3.4 Mounting the Camera
The camera can be placed on a flat surface or mounted to a wall.
- Desktop Placement: Simply place the camera on a stable, flat surface in your desired indoor location.
- Wall Mounting: Use the provided mounting base and adhesive pad. Clean the wall surface thoroughly before applying the adhesive. Ensure the camera is securely attached.
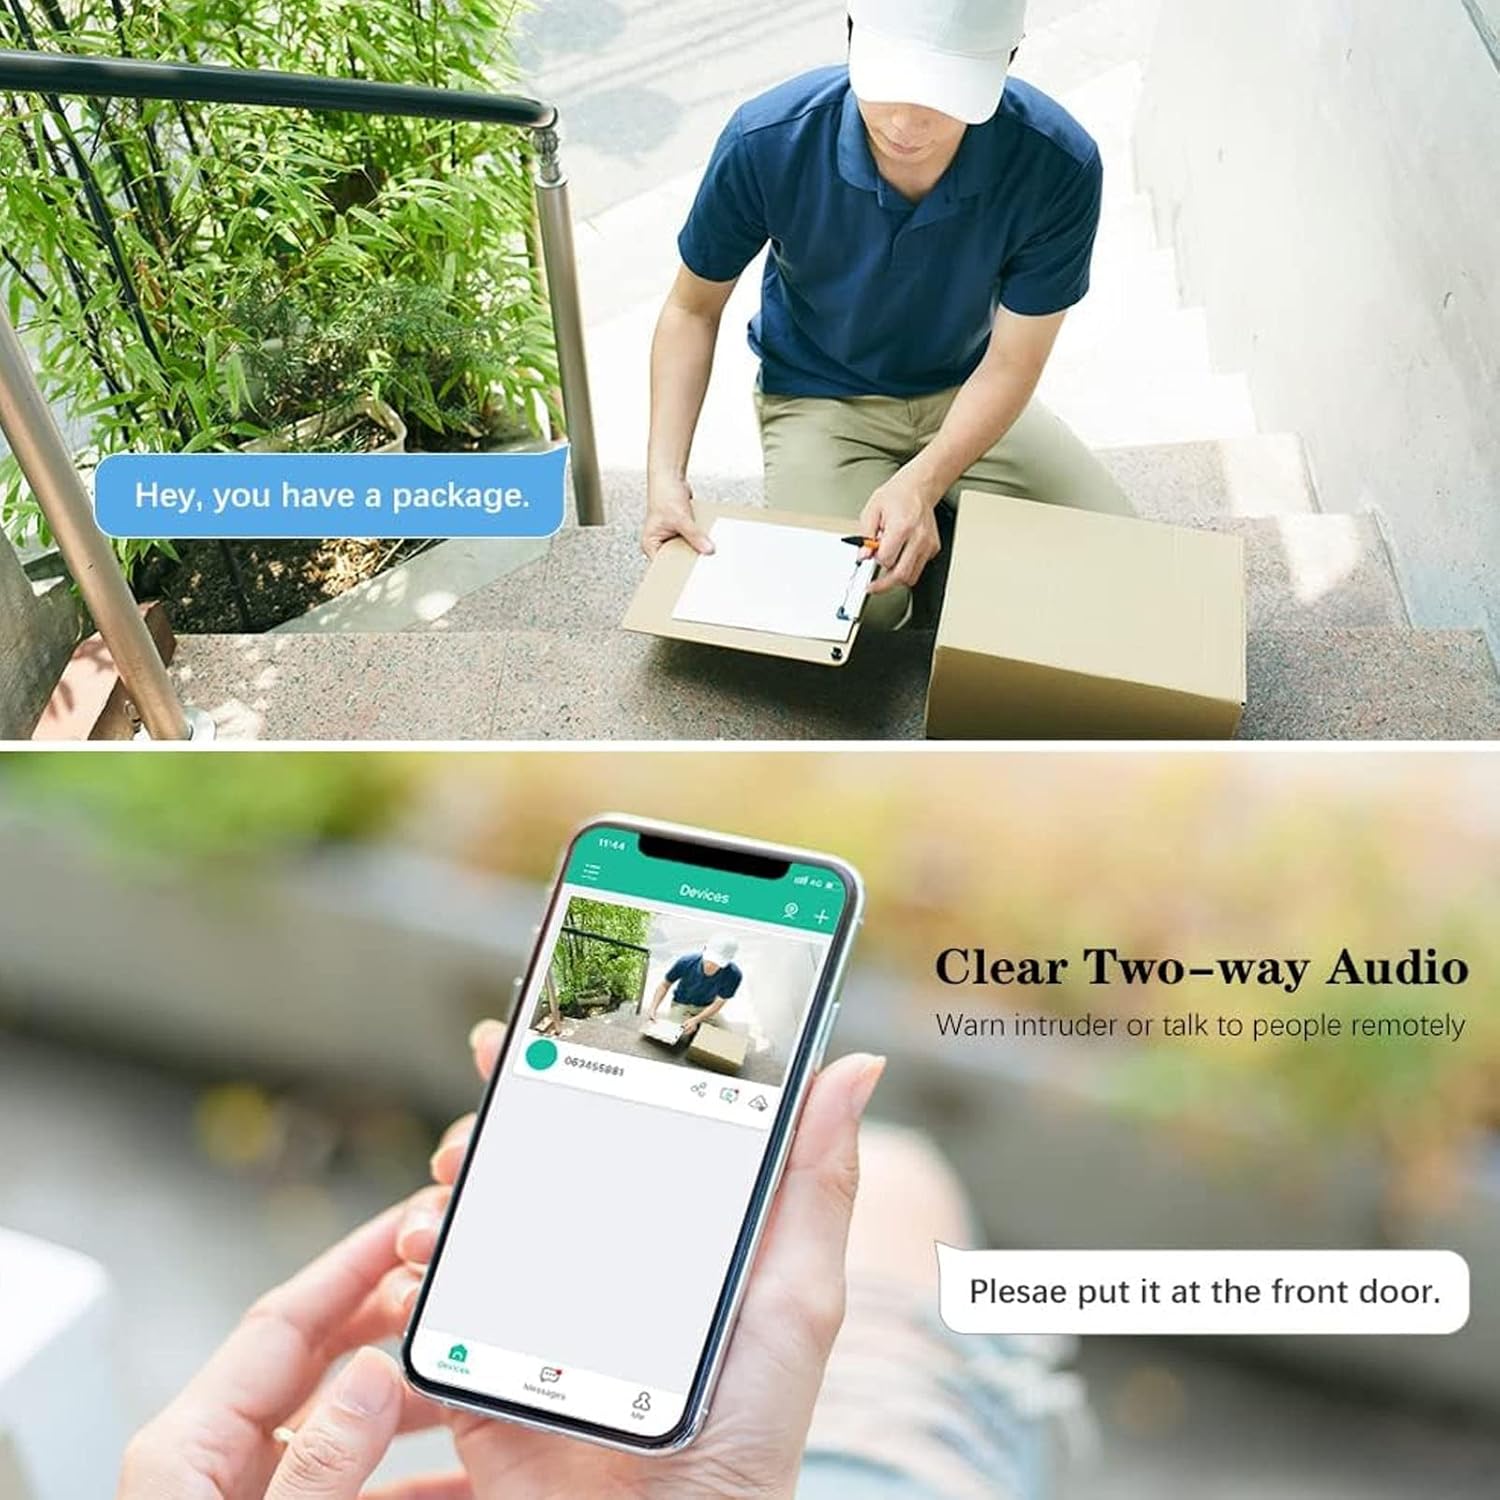
Figure 3.1: Camera positioned for indoor surveillance.
Note: While the camera has an IP67 rating in specifications, the product is primarily designed for indoor home surveillance as indicated by its title and feature descriptions. For optimal performance and longevity, it is recommended for indoor use.
4. Operation
4.1 Live View and PTZ Control
Access the live video feed through the smartphone app.
- Open the app and select your camera from the device list.
- The live 1080P video stream will appear.
- Use the on-screen controls to pan (horizontal) and tilt (vertical) the camera for a 360-degree viewing angle. The camera supports 355° horizontal and 90° vertical rotation.

Figure 4.1: Demonstrating the camera's 360-degree pan and tilt (PTZ) functionality via the mobile application.
4.2 Two-Way Audio Communication
The camera features a built-in microphone and loudspeaker, enabling real-time two-way voice communication.
- While viewing the live feed, tap the microphone icon in the app.
- Speak into your smartphone's microphone. Your voice will be transmitted through the camera's speaker.
- Listen for responses through your smartphone's speaker.

Figure 4.2: Example of using two-way audio to communicate with someone near the camera.
4.3 Motion Detection and Alarms
The camera is equipped with motion detection capabilities to alert you to activity.
- Enable motion detection in the camera settings within the app.
- When motion is detected, the camera will send a real-time notification to your phone.
- A 10-second video clip of the event will typically be recorded and sent with the notification.
- Adjust sensitivity settings in the app to minimize false alarms.
4.4 Storage Options
The camera supports two primary storage methods for recorded video:
- Cloud Storage: Utilizes financial encryption technology for secure storage of your data. Subscription may be required (check app for details).
- Local Storage: Insert a MicroSD card (not included) into the Small Memory Card Slot (7) for local recording. The camera supports continuous recording or event-triggered recording to the card.
4.5 Voice Control
The camera supports voice control functionality. Refer to the app's integration section for compatible voice assistants and setup instructions.
5. Maintenance
- Cleaning: Use a soft, dry cloth to clean the camera lens and body. Avoid abrasive cleaners or solvents.
- Placement: Ensure the camera is placed in a stable location, away from direct sunlight, heat sources, and excessive moisture.
- Software Updates: Regularly check the smartphone app for firmware updates to ensure optimal performance and security.
- Resetting: If the camera experiences issues, you can perform a factory reset using the Reset Key (9). Refer to the app or troubleshooting section for specific reset procedures.
6. Troubleshooting
| Problem | Possible Cause | Solution |
|---|---|---|
| Camera not powering on | Power cable disconnected; faulty power adapter; power outage. | Check power connections; try a different USB power adapter; verify power supply. |
| Unable to connect to Wi-Fi | Incorrect Wi-Fi password; camera too far from router; 5GHz Wi-Fi network used; router issues. | Verify Wi-Fi password; move camera closer to router; ensure 2.4GHz Wi-Fi is used; restart router. |
| No live video feed | Network connection unstable; camera offline; app issue. | Check Wi-Fi signal strength; restart camera and app; ensure camera is online. |
| Motion detection not working | Motion detection disabled; sensitivity too low; incorrect detection zone settings. | Enable motion detection in app; adjust sensitivity; configure detection zones. |
| Two-way audio issues | Microphone/speaker blocked; volume too low; network latency. | Ensure microphone/speaker holes are clear; adjust volume in app; check network connection. |
7. Specifications
| Feature | Detail |
|---|---|
| Brand | Walfront |
| Model Name | WALFRONTou8t62b7z0 |
| Indoor/Outdoor Usage | Indoor (Note: IP67 rating is listed in specifications, but product is designed for indoor use.) |
| Video Capture Resolution | 1080p (2 MP) |
| Connectivity Protocol | Wi-Fi (2.4GHz only) |
| Wireless Communication Technology | Wi-Fi |
| Power Source | Corded Electric |
| Mounting Type | Wall Mount |
| Special Feature | Motion Sensor, Two-Way Audio, 360-degree Rotation |
| Control Method | Voice, App |
| Material | Acrylonitrile Butadiene Styrene (ABS) |
| Item Weight | 4.9 ounces |
| Package Dimensions | 4.09 x 2.91 x 2.91 inches |
| Alert Type | Motion Only |
| Compatible Devices | Smartphone |
8. Warranty and Support
For warranty information and technical support, please refer to the documentation included with your purchase or visit the official Walfront website. Keep your purchase receipt as proof of purchase for warranty claims.
Online Resources:
- Walfront Official Website: Visit Walfront Store on Amazon
- Product Support: Check the app for in-app support options or FAQs.