1. Introduction
Thank you for purchasing the Proventa Premium Ceiling Fan with Light. This product combines a stylish ceiling lamp with practical fan functionality, designed to provide comfort in any living, bedroom, or dining area. This manual provides essential information for safe installation, operation, and maintenance of your new ceiling fan.

Figure 1: Proventa Premium Ceiling Fan with Light in a living room setting, demonstrating remote control use.
2. Safety Instructions
Please read all safety instructions carefully before installation and use. Failure to follow these instructions may result in electric shock, fire, or serious personal injury.
- Electrical Safety: Ensure the power supply is disconnected at the main circuit breaker before installation, maintenance, or cleaning. All electrical connections must be made in accordance with local codes and regulations. If you are unsure, consult a qualified electrician.
- Installation Location: The fan lamp must be mounted at a minimum height of 2.3 meters (7.5 feet) from the floor to the bottom of the fan blades. Ensure the mounting surface can support the weight of the fan (approximately 5.12 kg).
- Ventilation: Do not install the fan in areas with high humidity or direct water exposure.
- Children and Pets: Keep children and pets away from the fan during operation. Do not insert any objects into the fan blades.
- Cleaning: Always disconnect power before cleaning. Use a soft, damp cloth. Do not use abrasive cleaners or solvents.
3. Package Contents
Verify that all components are present before beginning installation:
- 1 x Proventa Premium Ceiling Fan with Light unit
- 1 x Remote Control (2 AAA batteries included)
- 4 x Screws
- 4 x Wall Plugs
- 1 x User Manual (this document)
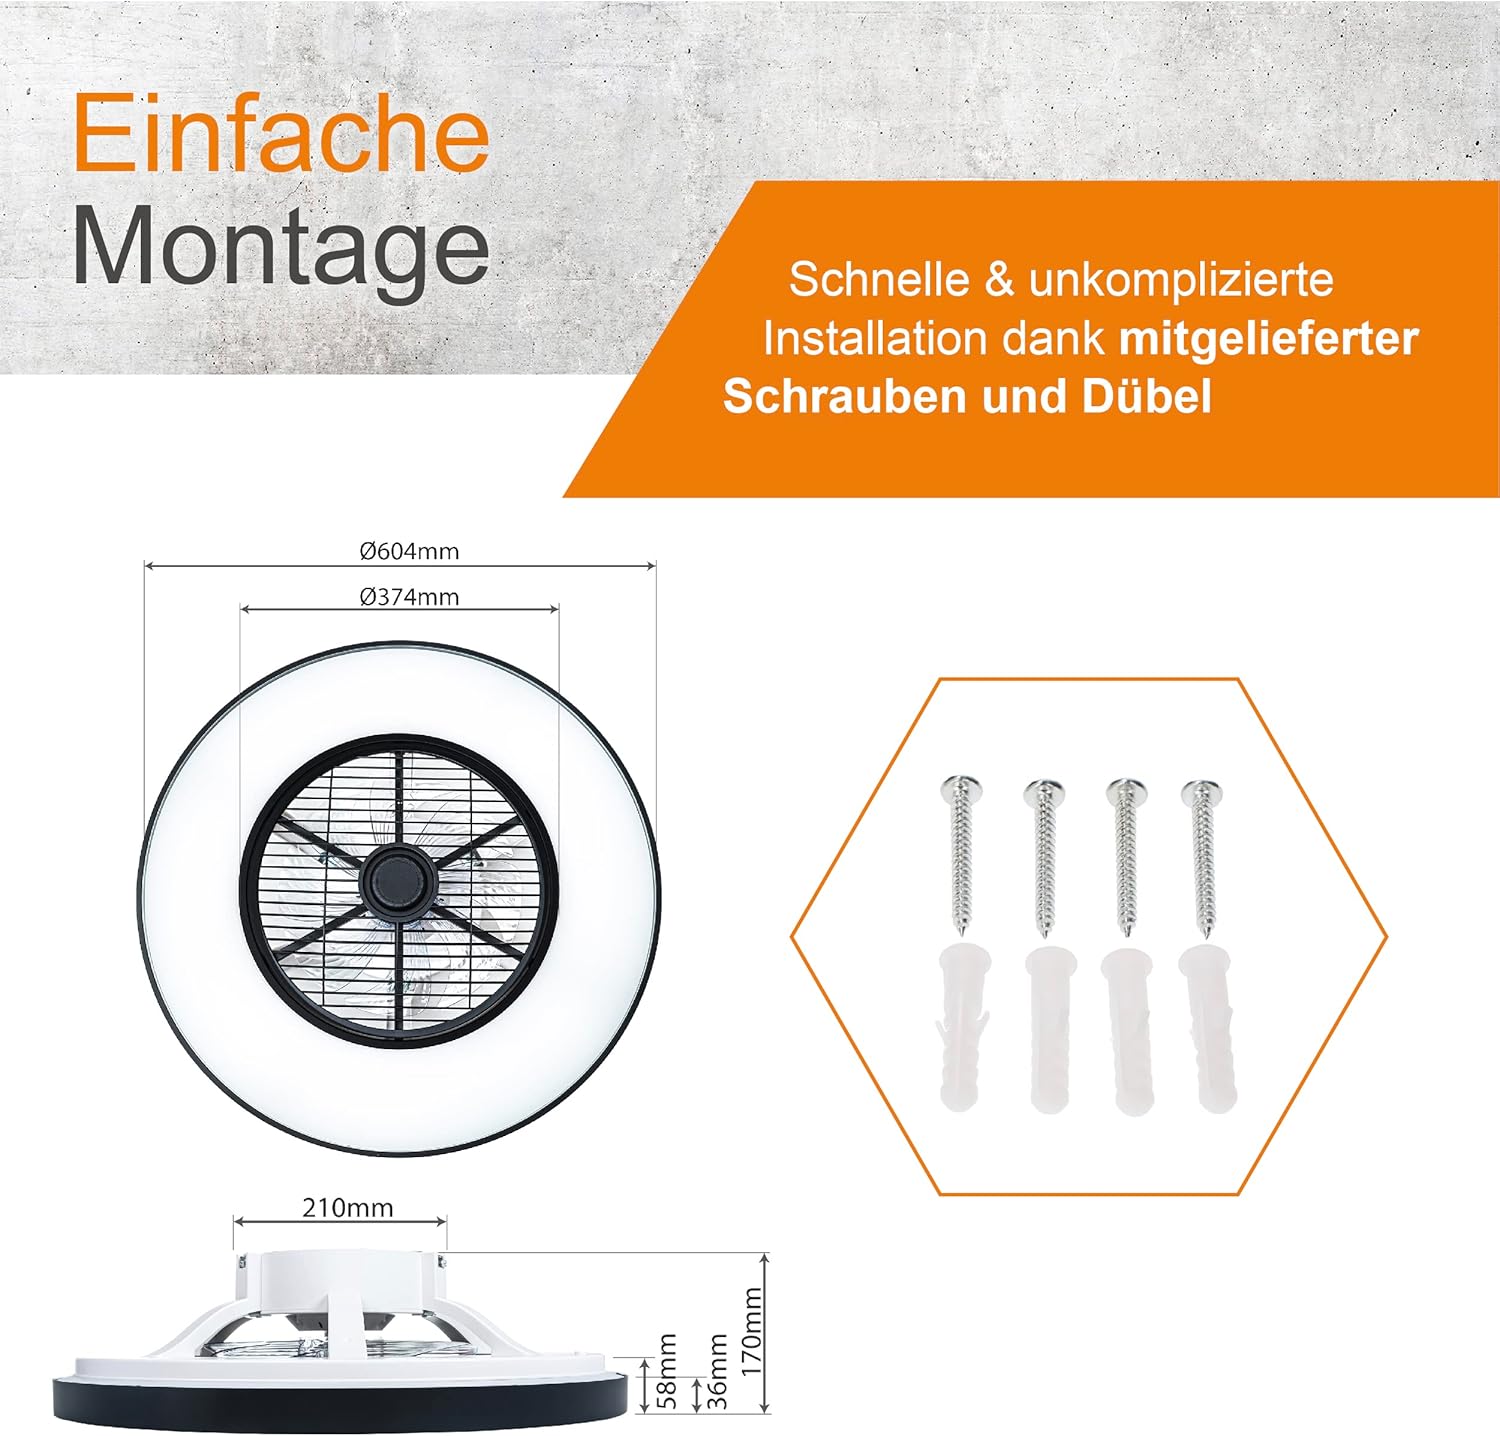
Figure 2: Package contents and fan dimensions (60.4 cm diameter, 17 cm height).
4. Product Features
Your Proventa Ceiling Fan with Light offers a range of features for enhanced comfort and convenience:
- Integrated Lighting: A perfect combination of a stylish ceiling lamp and a functional fan.
- Summer and Winter Modes:
- Summer Mode (Downward Airflow): Creates a cooling breeze by pushing air downwards.
- Winter Mode (Upward Airflow): Circulates warm air trapped near the ceiling, distributing it throughout the room for energy efficiency.
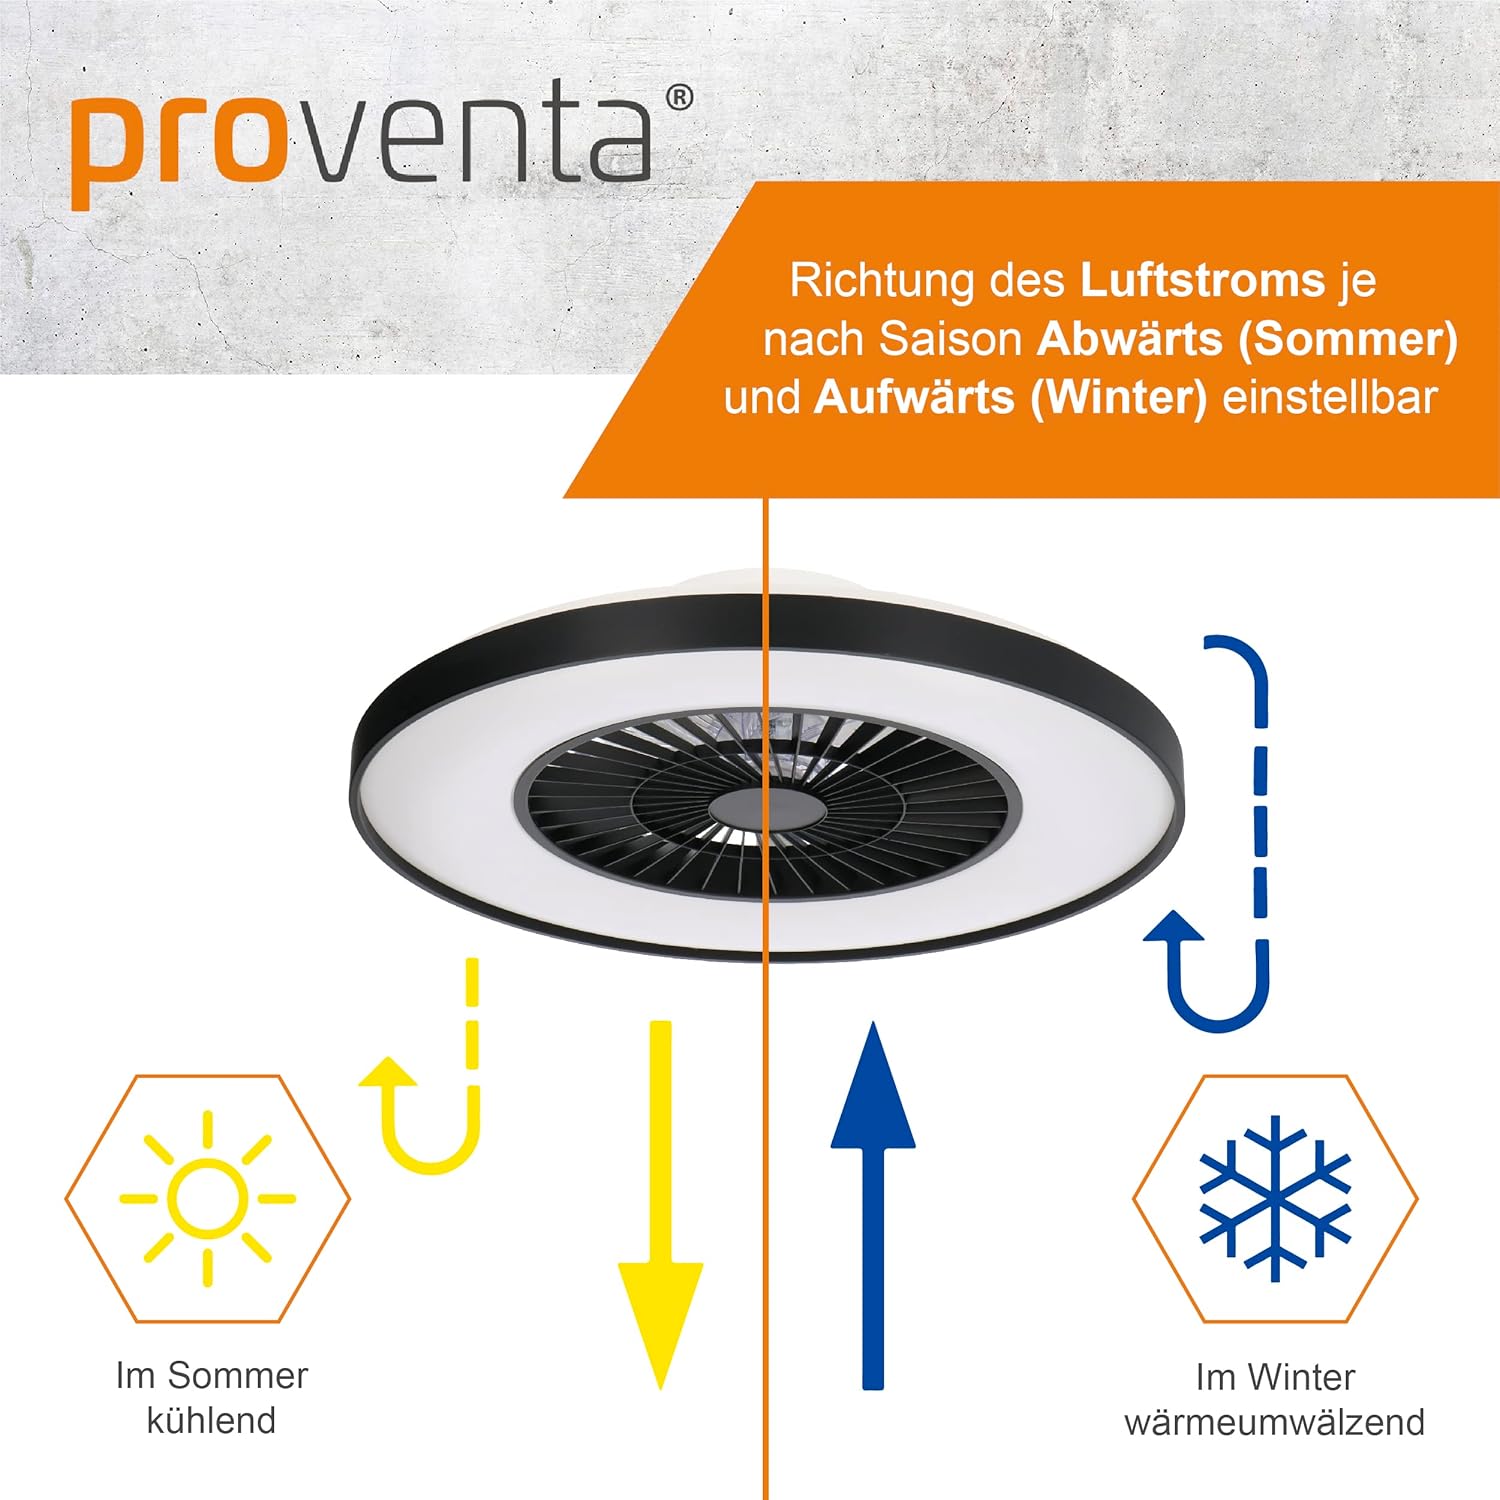
Figure 3: Summer (cooling) and Winter (heat circulation) modes.
- Remote Control Operation: Independently control fan speed and light settings with the included remote.
- Adjustable Light Temperature and Dimmability:
- Switch color temperature from warm white (2000K) to neutral white (4000K).
- Brightness is fully dimmable to create the desired ambiance.

Figure 4: Adjustable light temperature and dimming capabilities.
- High-Quality Materials: Constructed with durable Acrylonitrile Butadiene Styrene (ABS) and a powder-coated finish, featuring a modular system with opal diffuser and removable frame.

Figure 5: High-quality materials and modular design.
5. Setup and Installation
Follow these steps for quick and easy installation. Ensure power is disconnected before starting.
- Prepare the Installation Area: Choose a suitable location on the ceiling, ensuring it is structurally sound and can support the fan's weight. The minimum height from the floor to the fan blades must be 2.3 meters.
- Mark Drilling Points: Use the mounting bracket as a template to mark the drilling points on the ceiling.
- Drill Holes: Drill holes at the marked points and insert the wall plugs.
- Secure Mounting Bracket: Attach the mounting bracket to the ceiling using the provided screws.
- Electrical Connection: Connect the fan's electrical wires to your household wiring. Ensure correct polarity (Live, Neutral, Ground). If unsure, consult a qualified electrician.
- Mount the Fan Unit: Carefully lift the fan unit and attach it to the mounting bracket, ensuring it is securely fastened.
- Test Functionality: Restore power and test the fan and light functions using the remote control.
For detailed visual instructions, refer to the installation diagram in Figure 2.
6. Operating Instructions
Your ceiling fan is operated via the included remote control. Ensure the remote has 2 AAA batteries installed (included).
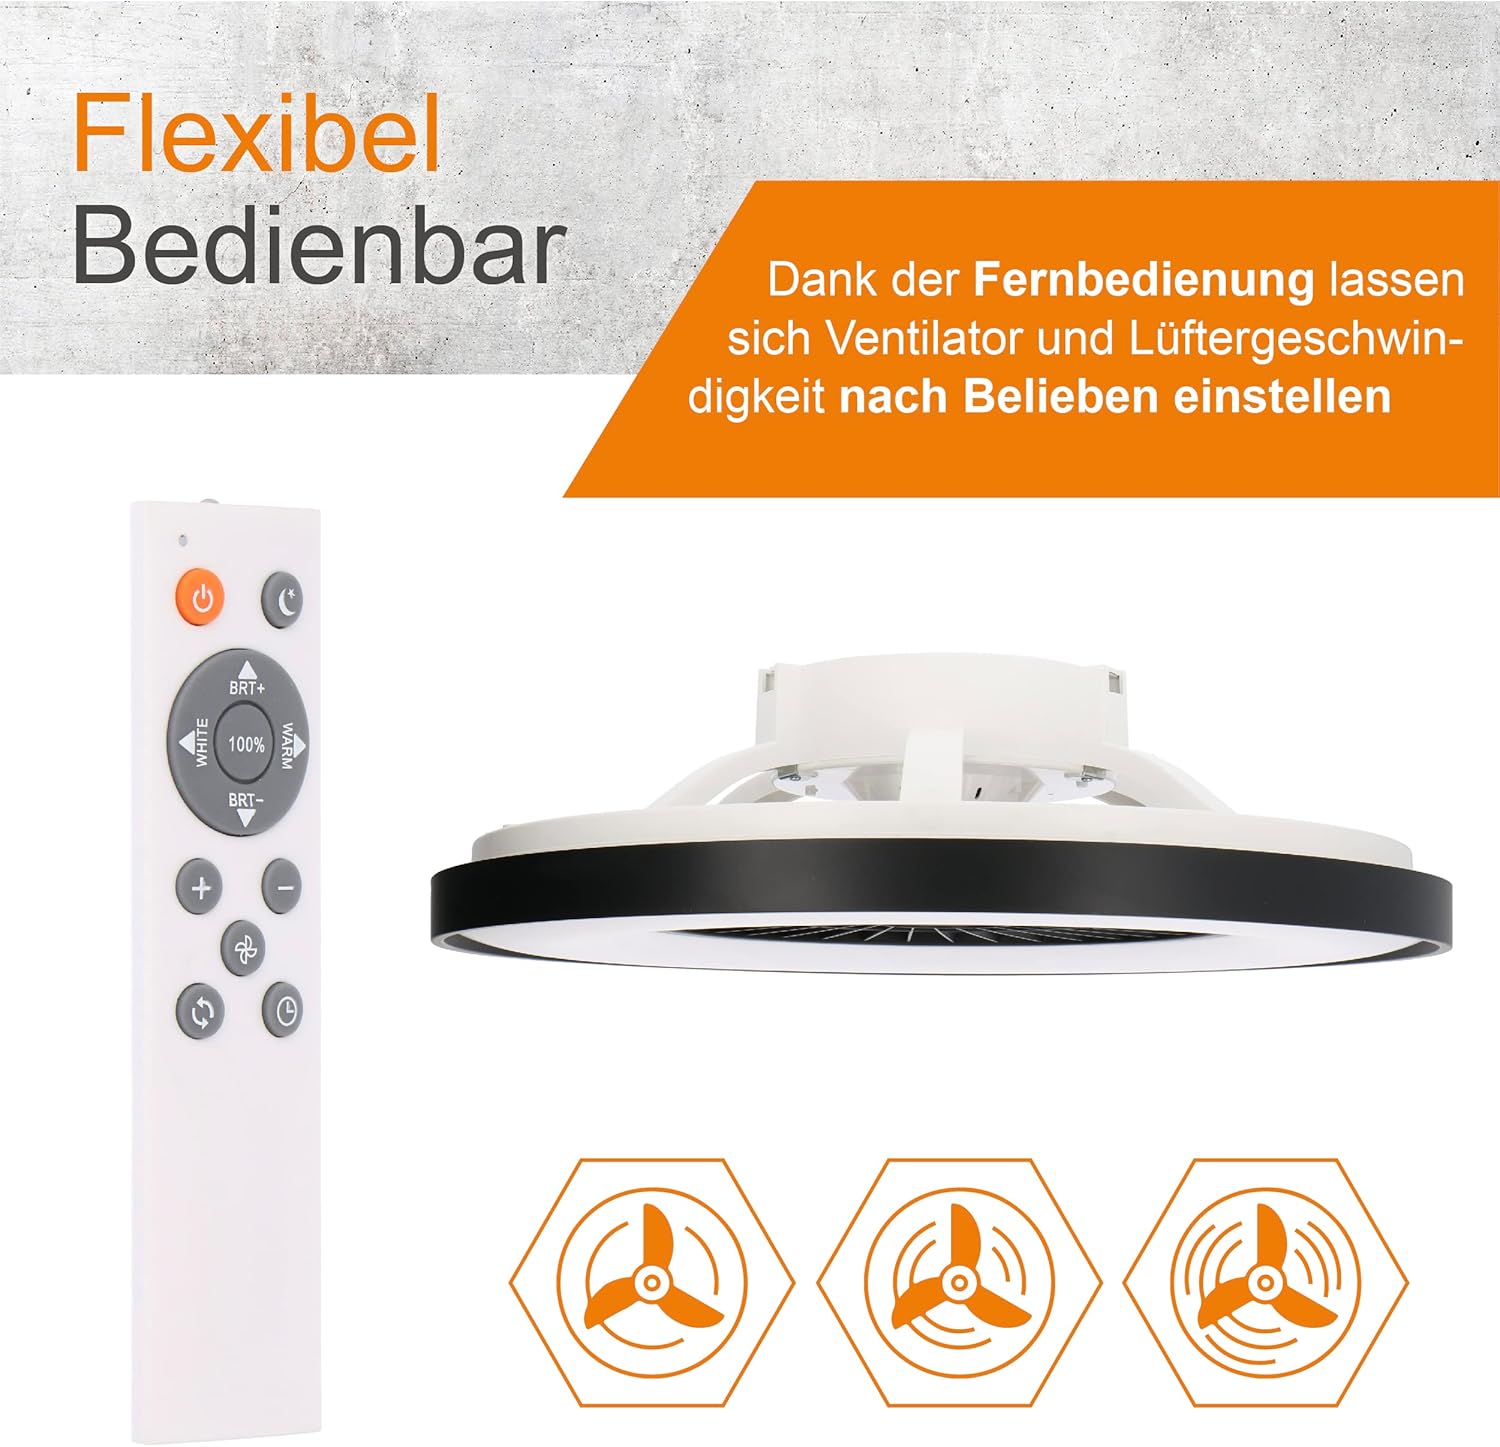
Figure 6: Remote Control Layout.
Remote Control Functions:
- Power Button (⏻): Turns the fan and light ON/OFF.
- Light ON/OFF Button (💡): Toggles the light on or off independently.
- Fan Speed Buttons (☁): Adjusts the fan speed (typically multiple levels).
- Light Temperature Buttons (WHITE / MENU): Cycles through warm white, neutral white, and potentially cool white color temperatures (2000K to 4000K).
- Brightness Adjustment (BRT+ / BRT-): Dims or brightens the light.
- Summer/Winter Mode Button (↻): Switches between downward (summer) and upward (winter) airflow directions.
- Timer Button (⏰): Sets a timer for the fan to turn off automatically.
The fan and light settings can be controlled independently. The last light setting (color temperature and brightness) will be remembered when the light is turned off and on again, even without the remote if controlled via a wall switch.
7. Maintenance
Regular maintenance ensures optimal performance and longevity of your ceiling fan.
- Cleaning:
- Before cleaning, ensure the power supply to the fan is disconnected.
- Wipe the fan and light housing with a soft, damp cloth.
- Do not use abrasive materials, harsh chemicals, or solvents, as these can damage the finish.
- Periodically check for dust accumulation on the fan blades and light diffuser and clean as necessary.
- Blade Balance: If the fan wobbles during operation, check that all screws on the mounting bracket and fan blades are securely tightened.
- Light Source: The integrated LED light source is designed for long life and is not user-replaceable. If the light fails, contact customer support.
8. Troubleshooting
If you encounter issues with your Proventa Ceiling Fan, refer to the following common problems and solutions:
| Problem | Possible Cause | Solution |
|---|---|---|
| Fan does not turn on. | No power supply; Remote control batteries are dead; Loose wiring connection. | Check circuit breaker; Replace remote batteries; Verify all electrical connections are secure (ensure power is off first). |
| Light does not turn on. | No power supply; Remote control batteries are dead; Light function not activated. | Check circuit breaker; Replace remote batteries; Press the light ON/OFF button on the remote. |
| Fan wobbles. | Loose mounting screws; Unbalanced blades. | Ensure all mounting screws are tightened; Check if blades are securely attached. |
| Remote control not working. | Dead batteries; Obstruction between remote and fan; Remote not paired (if applicable). | Replace batteries; Ensure clear line of sight; Refer to pairing instructions (if any, not specified in data). |
If the problem persists after trying these solutions, please contact Proventa customer support.
9. Specifications
Detailed technical specifications for your Proventa Ceiling Fan with Light:
| Attribute | Value |
|---|---|
| Brand | Proventa |
| Model Number | 80061x-PVT |
| Product Dimensions | 60.4 x 60.4 x 17 cm |
| Weight | 5.12 kg |
| Material | Acrylonitrile Butadiene Styrene (ABS) |
| Finish | Powder-coated |
| Color | Black |
| Number of Blades | 3 |
| Light Type | LED |
| Wattage | 60 watts |
| Voltage | 230 Volts |
| Color Temperature | 2000K to 4000K (Adjustable) |
| Special Features | Dimmable, Remote Control, Summer/Winter Mode |
| Power Source | Corded Electric |
| Batteries Required | Yes (2 AAA, included) |
| Certifications | CE, RoHS |
| Energy Efficiency Rating | F |

Figure 7: Energy Efficiency Label. For more details, visit the EPREL database.
10. Warranty and Support
Proventa products are designed for quality and reliability. For warranty information or technical support, please contact your retailer or visit the official Proventa website. Keep your proof of purchase for any warranty claims.