1. Introduction
This manual provides detailed instructions for the safe and effective use of your TOYOGO Instant Print Kids Camera Model Q5K. Please read this manual thoroughly before operating the device and retain it for future reference.
2. Product Overview
2.1 Package Contents
The package includes:
- TOYOGO Instant Print Kids Camera Model Q5K
- 5 Rolls of Thermal Print Paper
- USB Charging Cable
- Lanyard
- 32GB Micro SD Card
- User Manual
2.2 Camera Components
Familiarize yourself with the camera's buttons and ports:

Image: Labeled diagram of the camera's front lens, rear lens, TF card slot, charging port, control buttons, and paper slot.
- Front Lens: For taking forward-facing photos and videos.
- Rear Lens: For taking selfies.
- TF Card Slot: Insert the Micro SD card here for storage.
- Charging Port: Connect the USB cable for charging.
- Back/Left/Delete Button: Navigate menus, move left, or delete files.
- Confirm/Play/Print Button: Select options, play media, or initiate printing.
- Power On/Off Button: Turns the camera on or off.
- Paper Slot: Where printed photos exit.
- Photo/Video/Right/Convert Lens Button: Switch between photo and video modes, navigate right, or switch between front/rear lenses.
- Up/Zoom In/Volume Up Button: Navigate up, zoom in during photo/video, or increase volume.
- Down/Zoom Out/Volume Down Button: Navigate down, zoom out during photo/video, or decrease volume.
2.3 Key Features
- Inkless Instant Printing: Utilizes thermal printing technology for immediate black and white photo output without ink cartridges.
- Dual 12MP Lenses: Equipped with both front and rear cameras for versatile photography, including selfies.
- 1080P HD Video Recording: Capture high-definition video moments.
- 2.4-inch LCD Screen: Provides a clear display for viewing photos, videos, and navigating menus.
- Multifunctional Device: Supports photo taking, instant printing, video recording, MP3 playback, and built-in games.
- Expandable Storage: Includes a 32GB Micro SD card to store thousands of photos and videos.
- Rechargeable Battery: Integrated 1000mAh battery offers 3-4 hours of continuous use.
- Digital Zoom: Up to 6x digital zoom for capturing distant subjects.
- Time-lapse Photography: Capture sequences with 3s, 5s, or 10s intervals.
- Creative Options: Includes various photo frames and filters.
3. Setup
3.1 Charging the Camera
Before first use, fully charge the camera battery.
- Connect the small end of the provided USB charging cable to the camera's charging port.
- Connect the larger end of the USB cable to a USB power adapter (not included) or a computer's USB port.
- The charging indicator light will illuminate. Once charging is complete, the light may change color or turn off.

Image: Camera charging port with USB cable.
3.2 Inserting the Micro SD Card
The camera requires a Micro SD card for storing photos and videos. A 32GB card is included.
- Locate the TF Card Slot on the side of the camera.
- Gently insert the Micro SD card into the slot with the gold contacts facing down until it clicks into place.
- To remove, gently push the card in again until it springs out.
3.3 Loading Print Paper
The camera uses thermal paper for instant printing. Five rolls are included.
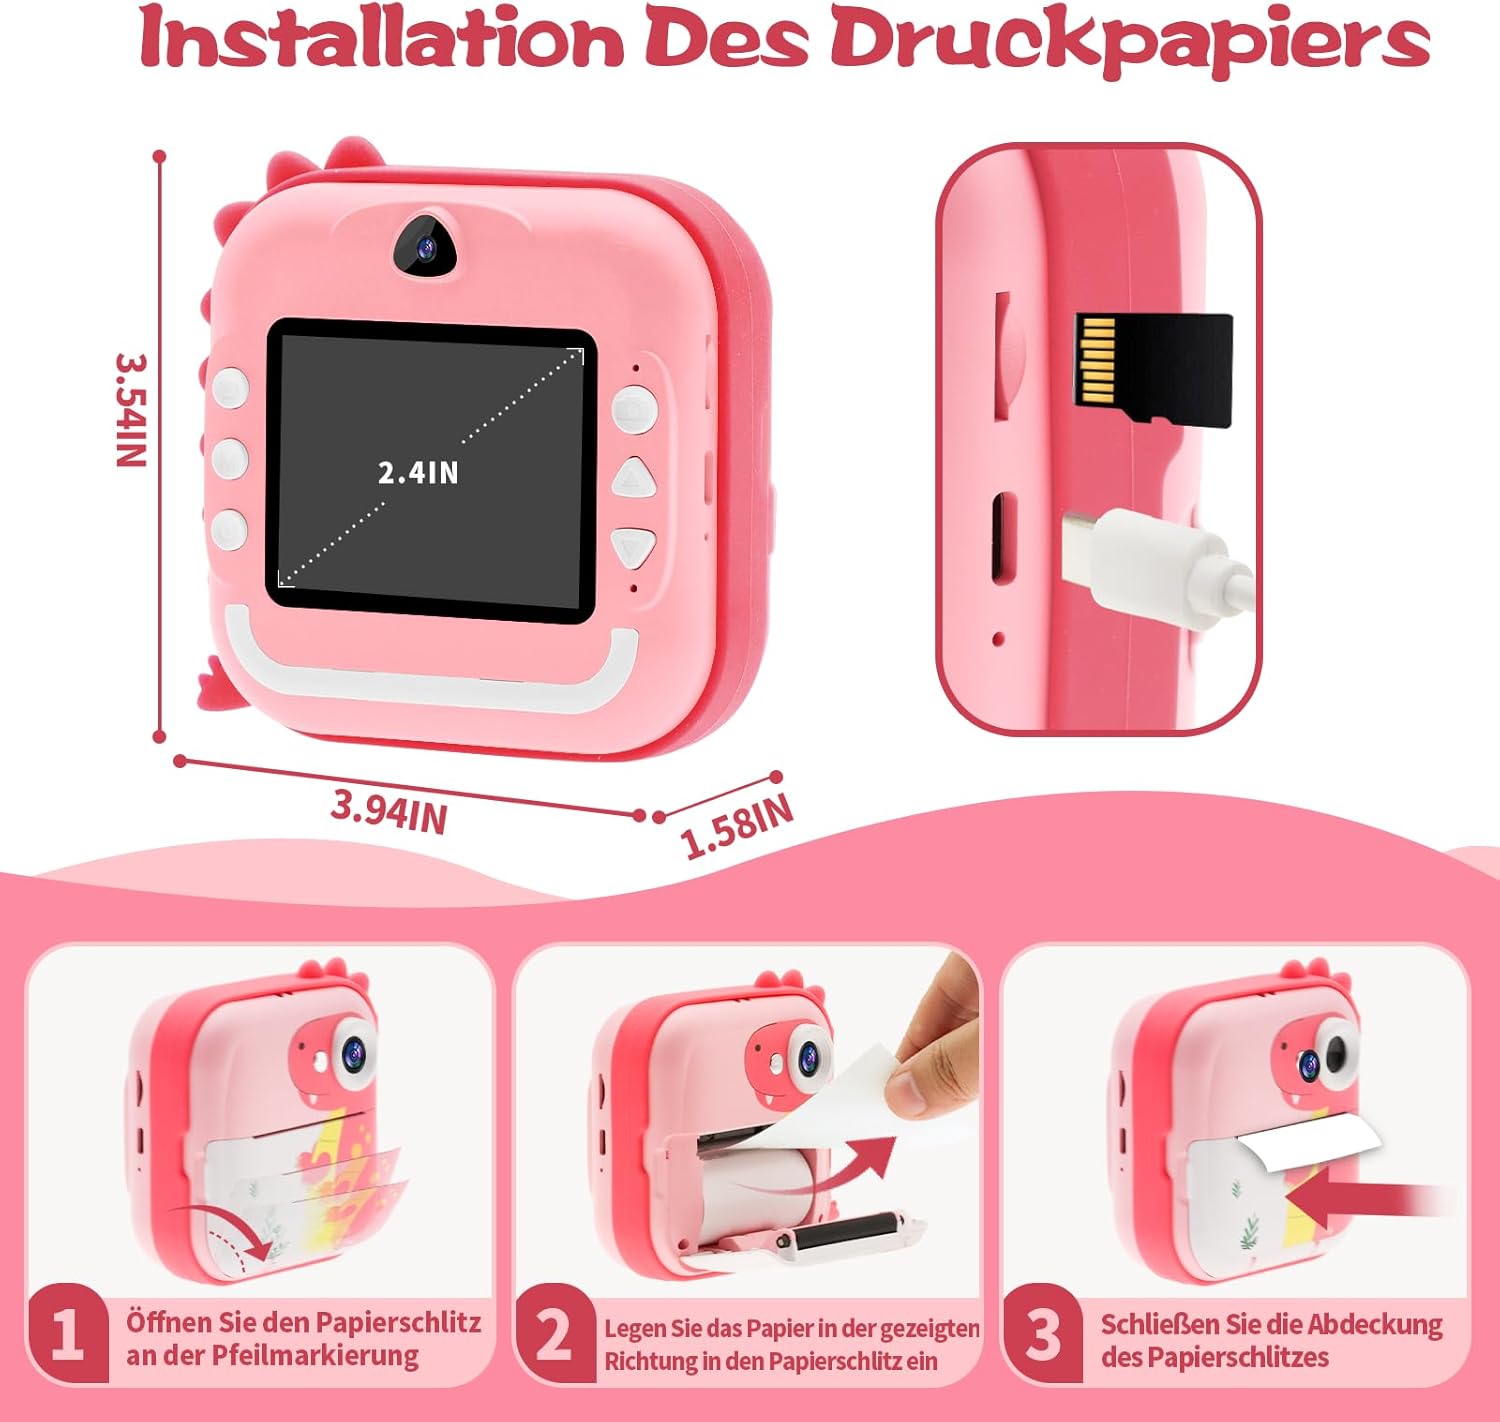
Image: Step-by-step guide for loading print paper.
- Locate the paper slot cover on the front of the camera and open it according to the arrow marking.
- Insert a roll of thermal paper into the compartment, ensuring the paper feeds out in the correct direction (as shown in the diagram).
- Close the paper slot cover securely.
3.4 Attaching the Lanyard
Attach the lanyard to the designated loop on the camera for secure carrying and to prevent accidental drops.

Image: Camera with lanyard attached.
4. Operating Instructions
4.1 Power On/Off
Press and hold the Power On/Off Button for a few seconds to turn the camera on or off.
4.2 Taking Photos
- Turn on the camera. It will typically start in photo mode.
- To switch between the front and rear lenses, press the Photo/Video/Right/Convert Lens Button.
- Frame your shot using the 2.4-inch LCD screen.
- Use the Up/Zoom In and Down/Zoom Out buttons to adjust the digital zoom (up to 6x).
- Press the Confirm/Play/Print Button to take a photo.

Image: Instant photo printing from the camera.
4.3 Instant Printing
After taking a photo, you can choose to print it instantly. Depending on settings, some photos may print automatically, or you can select them from the gallery.
- After taking a photo, or while viewing a photo in the gallery, press the Confirm/Play/Print Button to print the image.
- The camera will use its thermal printer to output a black and white image.
4.4 Recording Videos
- From photo mode, press the Photo/Video/Right/Convert Lens Button to switch to video recording mode.
- Press the Confirm/Play/Print Button to start recording. Press it again to stop recording.
- Videos are saved to the Micro SD card.

Image: Camera displaying 1080P HD video recording.
4.5 MP3 Playback
The camera can play MP3 audio files stored on the Micro SD card.
- Ensure MP3 files are loaded onto the Micro SD card.
- Navigate to the MP3 playback function in the camera's menu.
- Use the navigation buttons to select and play desired tracks.

Image: Camera interface showing MP3 player and puzzle game options.
4.6 Built-in Games
The camera includes several simple games for entertainment.
- Navigate to the Games section in the camera's menu.
- Select a game and use the navigation buttons to play.

Image: Camera displaying a puzzle game.
4.7 Time-lapse Photography
Capture a series of photos over time with the time-lapse function.
- Navigate to the Time-lapse mode in the camera's menu.
- Select the desired interval (e.g., 3s, 5s, 10s).
- Press the Confirm/Play/Print Button to start the time-lapse sequence.

Image: Camera showing time-lapse recording options.
4.8 Transferring Files to a Computer
You can transfer photos and videos from the camera to a computer.
- Connect the camera to your computer using the provided USB cable.
- The camera should appear as a removable disk or device on your computer.
- Open the camera's folder and copy the desired files to your computer.
5. Maintenance
5.1 Replacing Print Paper
When the camera runs out of thermal paper, follow the steps in Section 3.3 "Loading Print Paper" to replace the roll.

Image: Rolls of thermal print paper for replacement.
5.2 Battery Care
To prolong battery life:
- Avoid fully discharging the battery frequently.
- Charge the camera regularly, even if not in use for extended periods.
- Do not expose the camera to extreme temperatures.
5.3 Cleaning the Camera
Use a soft, dry cloth to clean the camera's exterior. Do not use liquid cleaners or abrasive materials.
6. Troubleshooting
If you encounter issues with your camera, refer to the following common problems and solutions:
| Problem | Possible Cause | Solution |
|---|---|---|
| Camera does not turn on. | Low battery. | Charge the camera fully. |
| Photos are not printing. | No thermal paper loaded or paper loaded incorrectly. | Check and reload thermal paper as per Section 3.3. |
| Poor print quality. | Low battery, dirty print head, or low-quality paper. | Ensure battery is charged. Gently clean the print head with a cotton swab. Use recommended thermal paper. |
| Micro SD card not recognized. | Card inserted incorrectly or card is corrupted. | Reinsert the Micro SD card. If the issue persists, try formatting the card (this will erase all data) or use a different card. |
| Camera freezes or is unresponsive. | Software glitch. | Press and hold the Power On/Off button to force a restart. |
7. Specifications
| Feature | Specification |
|---|---|
| Brand | TOYOGO |
| Model | Q5K |
| Screen | 2.4 inches LCD |
| Effective Photo Resolution | 12 Megapixels |
| Video Resolution | 1080p |
| Digital Zoom | 6x |
| Battery | 1000mAh Lithium-polymer |
| Connectivity | Bluetooth |
| Storage | Micro SD card (32GB included) |
| Dimensions (L x W x H) | 10 x 9 x 4.4 cm |
| Special Features | Inkless instant printing, dual lenses, MP3 player, games, time-lapse |
8. Warranty and Support
For warranty information or technical support, please refer to the product packaging or contact the manufacturer directly. Keep your purchase receipt as proof of purchase.


