
1. Product Overview
This LVWIT pendant light set includes four pendant light fixtures with E26 sockets and energy-efficient LED bulbs. It offers versatile lighting options with stepless dimming and color temperature adjustment (from warm white 2200K to daylight white 6500K), all controllable via the included remote. Designed for easy installation on duct rail systems, each fixture features a 100cm adjustable cord. The 4.5W LED bulbs provide brightness equivalent to a 30W incandescent bulb, ensuring significant energy savings. Additional features include a night light function and group management for controlling multiple bulbs. The product is PSE certified for safety.

Figure 1: LVWIT E26 Pendant Light set with LED bulb and remote control.
2. Package Contents
Please check that all items are present in the package:
- 4 x Pendant Light Fixtures (E26 socket, 100cm adjustable cord)
- 4 x Dimmable & Color-Tunable LED Bulbs (E26 base, 4.5W, 325lm)
- 1 x Remote Control (batteries not included)
- 1 x Instruction Manual
Note: The remote control requires 2 x AAA batteries, which are not included for shipping safety reasons.
3. Specifications
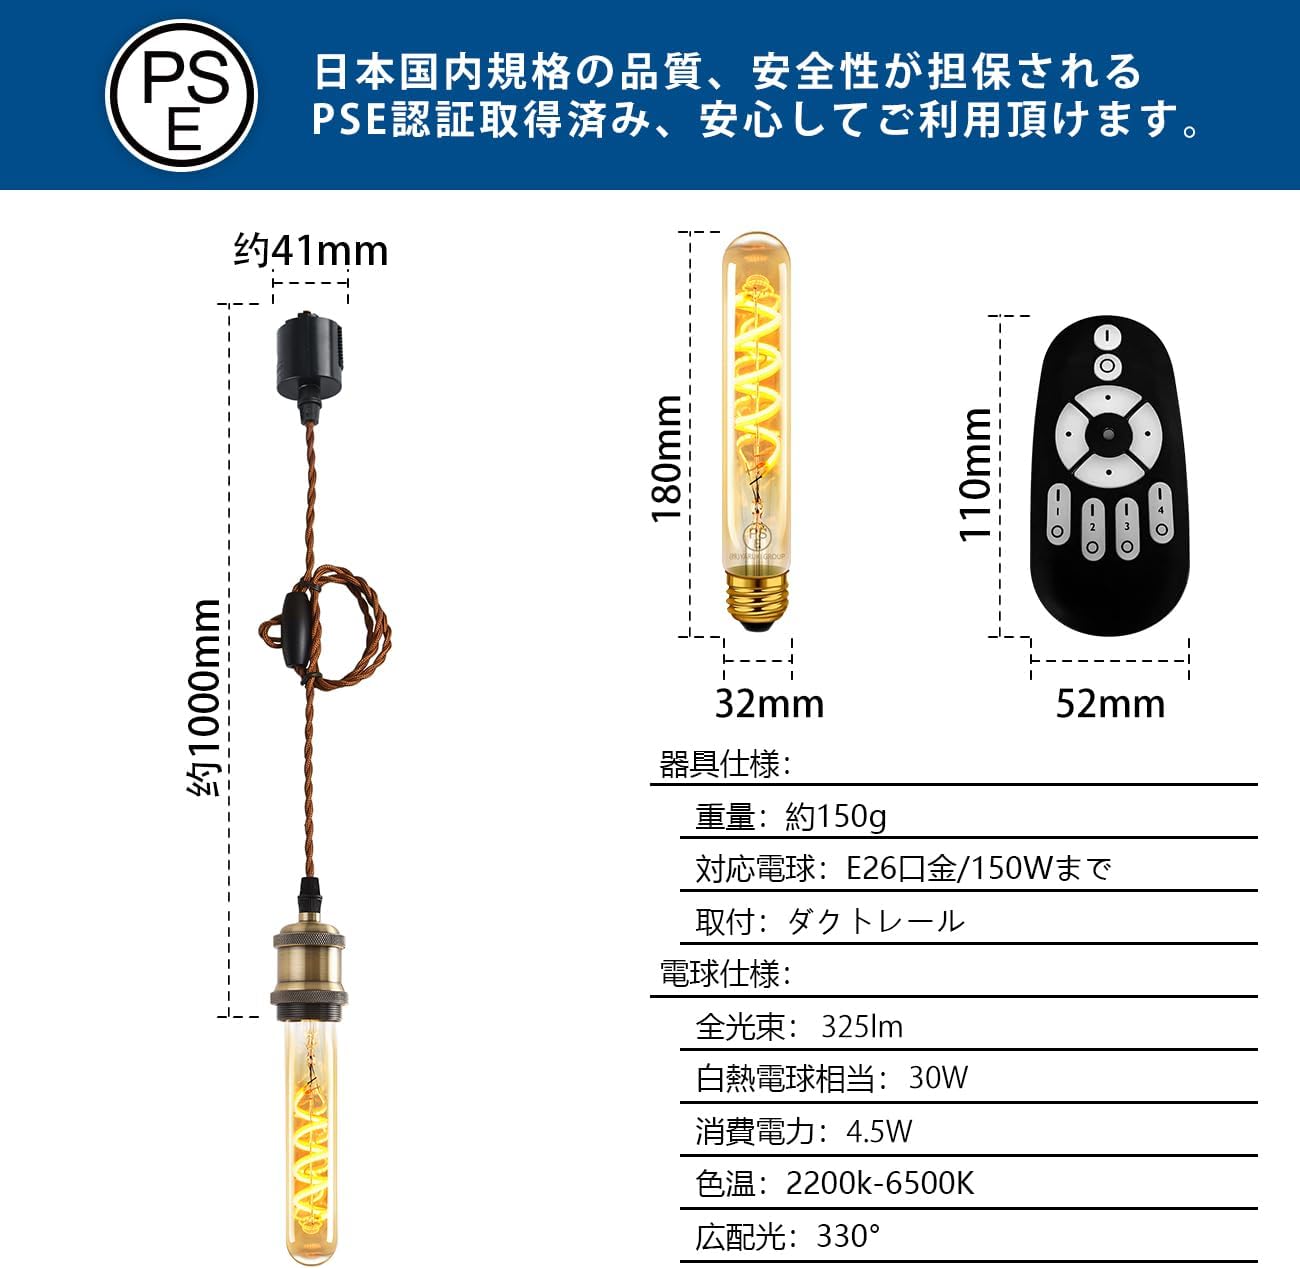
Figure 2: Product dimensions and specifications.
| Feature | Specification |
|---|---|
| Brand | LVWIT |
| Model Number | JPV-1000016-31 |
| Pendant Socket | E26 |
| Cord Length | 100cm (adjustable) |
| Fixture Weight | Approx. 150g |
| Max Bulb Wattage (Fixture) | 150W (max bulb weight 200g) |
| LED Bulb Base | E26 |
| LED Bulb Brightness | 325lm (dimmable) |
| LED Bulb Power Consumption | 4.5W (equivalent to 30W incandescent) |
| Color Temperature | 2200K-6500K (color tunable) |
| LED Bulb Size | Diameter 32mm * Height 180mm |
| Voltage | 100V (AC) |
| Usage Environment | Indoor |
| Power Source | Corded Electric |
| Controller Type | Remote Control (Push Button) |
| Connectivity | Infrared (IR) |
4. Safety Information
- Always disconnect power at the main circuit breaker before attempting any installation, removal, or maintenance.
- Do not touch the bulb or fixture immediately after use, as they may be hot and cause burns. Allow sufficient time for cooling.
- This product is designed exclusively for duct rail systems. Do not attempt to install it on other ceiling types, such as hook-type ceilings.
- The product is PSE certified, ensuring compliance with Japanese safety standards.
5. Setup & Installation
5.1. Cord Length Adjustment
The pendant light features a 100cm cord that can be adjusted to your desired length using the integrated cord stopper.

Figure 3: Cord length adjustment method.
To adjust, simply loop the cord through the cord stopper as illustrated in Figure 3. This allows you to customize the hanging height of each pendant light.
5.2. Duct Rail Installation
Ensure the power to the duct rail is OFF before proceeding with installation.

Figure 4: Duct rail installation and removal.
- Align the fixture's connector with the groove of the duct rail. Ensure the stopper on the connector is aligned with the rail.
- Insert the connector into the duct rail.
- Rotate the fixture clockwise until you hear a 'click'. This indicates that the fixture is securely locked in place. Installation is complete.
5.3. Duct Rail Removal
Ensure the power to the duct rail is OFF before proceeding with removal.
- Press down the stopper on the fixture's connector.
- Rotate the fixture counter-clockwise and gently pull it out from the duct rail.
5.4. Bulb Installation
Carefully screw the provided LED bulb into the E26 socket of the pendant light fixture until it is snug. Do not overtighten.
5.5. Straightening the Cord (Optional)
If the cord appears bent or coiled from packaging, you can gently straighten it. Over time, gravity will also help the cord to straighten naturally.

Figure 5: Method for straightening a bent cord.
To expedite straightening, you may use a hairdryer on a low heat setting (temperature below 50°C). Gently warm the cord while holding it straight. Avoid excessive heat or prolonged application to one spot.
6. Operating Instructions
The included remote control allows for convenient adjustment of your pendant lights.
6.1. Remote Control Functions

Figure 6: Remote control layout and functions.
- All ON Switch: Press to turn ON all paired lights.
- All OFF Switch: Press to turn OFF all paired lights.
- Brightness + Button: Increases the brightness level.
- Brightness - Button: Decreases the brightness level.
- Warm White Button: Sets the color temperature to a warm white (lower Kelvin) tone.
- Daylight White Button: Sets the color temperature to a daylight white (higher Kelvin) tone.
- Group Switches (1-4): Each button controls a specific group of lights. Press once to turn ON the group, press again to turn OFF.
- Indicator: Lights up when a button is pressed, confirming signal transmission.
6.2. Dimming (Brightness Adjustment)
The lights offer stepless dimming, allowing you to adjust brightness from 10% to 100% using the Brightness + and - buttons on the remote control.

Figure 7: Brightness adjustment from 10% to 100%.
6.3. Color Tuning (Color Temperature Adjustment)
Adjust the color temperature of the lights from a warm, cozy glow (2200K) to a bright, crisp daylight white (6500K) using the dedicated Warm White and Daylight White buttons.

Figure 8: Color temperature adjustment.
6.4. Night Light Function
The remote control includes a night light function, providing a very low level of illumination suitable for use during sleep or for navigating in the dark without disturbing others.
6.5. Group Management
You can assign individual lights or multiple lights to one of four groups (1-4) using the remote control. This allows for independent control of different lighting zones in your space. Refer to the remote control's specific pairing instructions for detailed steps on assigning lights to groups.
7. Maintenance
7.1. Cleaning
Always disconnect power before cleaning. Use a soft, dry cloth to wipe the fixture and bulb. Do not use abrasive cleaners, solvents, or harsh chemicals, as these may damage the finish or electrical components.
7.2. Bulb Replacement
Ensure the power is off and the bulb has completely cooled before attempting to replace it. Unscrew the old E26 bulb counter-clockwise and screw in a new E26 LED bulb. Ensure the replacement bulb does not exceed 150W and its weight does not exceed 200g.
8. Troubleshooting
If you encounter any issues with your LVWIT pendant lights, please refer to the following common troubleshooting steps:
- Light does not turn on:
- Check if the main power supply is connected and turned ON.
- Ensure the fixture is correctly installed on the duct rail and has clicked securely into place.
- Verify that the LED bulb is screwed in properly and making good contact with the socket.
- Check the remote control batteries. Ensure they are inserted correctly and have sufficient charge.
- Dimming or Color Tuning not working:
- Confirm that the remote control batteries are functional.
- Ensure the remote control is pointed towards the lights and there are no obstructions.
- If controlling specific groups, ensure the correct group button is pressed.
- If the issue persists, try re-pairing the remote control with the lights (refer to the remote's specific instructions if available, or try turning the light off and on at the main switch, then immediately pressing the desired group button on the remote).
- Cord is bent or not hanging straight:
- As mentioned in Section 5.5, you can gently warm the cord with a hairdryer (below 50°C) to help it straighten.
- The cord will naturally straighten over time due to gravity.
If these steps do not resolve the issue, please contact customer support for further assistance.
9. Warranty & Support
This LVWIT product is covered by a 3-year warranty from the date of purchase. This warranty covers defects in materials and workmanship under normal use.
If you experience any problems or have questions regarding the use, installation, or performance of your pendant lights, please do not hesitate to contact our customer support team. We are committed to providing assistance and ensuring your satisfaction.
Please retain your proof of purchase for warranty claims.