
SunFounder Zeus Car
SunFounder Smart Robot Car Kit (Zeus Car) Instruction Manual
Model: Zeus Car | Brand: SunFounder
1. Introduction
This manual provides detailed instructions for the assembly, operation, and maintenance of your SunFounder Smart Robot Car Kit, also known as the Zeus Car. This kit is designed for educational purposes, offering hands-on experience with robotics, programming, and electronics. It features 4WD omnidirectional movement, First Person View (FPV), app-based remote control, and various sensors for interactive functions.
2. What's in the Box
The SunFounder Smart Robot Car Kit includes the following components:
- ESP32 CAM module
- Battery
- Obstacle avoidance modules
- Ultrasonic module
- Main board compatible with Arduino Uno R3
- 4WD omnidirectional movement components
- IR remote control
- Various sensors for line tracking, face detection, gesture and voice recognition
- Sturdy metal structure components
- Cables and connectors
- Assembly tools (e.g., screwdriver)

Image: Overview of the SunFounder Zeus Car Kit components, including the main board, sensors, wheels, and chassis parts.
3. Setup and Assembly
Follow these steps to assemble your Smart Robot Car. Detailed online tutorials and videos are available for step-by-step guidance.
- Chassis Assembly: Begin by assembling the metal chassis. Secure the motor mounts and attach the motors.
- Sensor Installation: Install the ultrasonic module at the front of the chassis. Connect the line-following sensors to their designated positions.
- Main Board Mounting: Mount the Arduino Uno R3 compatible main board onto the chassis using the provided standoffs and screws.
- ESP32 CAM Integration: Carefully attach the ESP32 CAM module to its connector on the main board. Ensure it is securely fastened for FPV functionality.
- Wiring: Connect all sensors, motors, and the ESP32 CAM to the main board according to the wiring diagrams provided in the online documentation. Ensure all connections are firm.
- Battery Installation: Secure the battery within the chassis. Connect the battery to the main board's power input.
- Wheel Attachment: Attach the 4WD omnidirectional wheels to the motor shafts. Ensure they are properly aligned for smooth movement.

Image: Detailed view of the Zeus Car's hardware, highlighting the 18650 batteries, Robot Hat, ESP32 CAM, Line-Following Sensor, and Ultrasonic Sensor.

Image: The Zeus Car showcasing its sturdy metal structure and vibrant RGB lighting, which can be programmed for various effects.
Video: An official SunFounder video demonstrating the assembly process of the Robot Car Kit, showing how various components are put together.
4. Operating Instructions
The Zeus Car offers multiple operating modes and control methods:
4.1. App Remote Control and FPV
Utilize the dedicated mobile application to control the robot car and access the First Person View (FPV) camera feed. This allows for real-time navigation and interaction.
- Download the SunFounder Zeus Car app from your device's app store.
- Connect your mobile device to the robot car's Wi-Fi network (ESP32).
- Open the app to view the FPV feed and use the on-screen controls for movement and function activation.

Image: A user operating the Zeus Car via a tablet, demonstrating the FPV (First Person View) and app remote control capabilities.
4.2. IR Remote Control
The kit includes an IR remote control for basic movement and function activation without the need for a mobile app.
- Ensure the IR receiver on the robot car is unobstructed.
- Use the directional buttons on the IR remote to control the car's movement (forward, backward, left, right).
- Specific buttons may be programmed for other functions like RGB lighting control or mode switching.
4.3. Omnidirectional Movement
The 4WD omnidirectional wheels allow the car to move in any direction, including sideways and diagonally, providing enhanced maneuverability.

Image: A diagram explaining the 4WD omnidirectional movement capabilities of the Zeus Car, showing how it can move in various directions.
4.4. Advanced Functions
The Zeus Car supports various advanced functions through programming:
- Obstacle Avoidance: Using ultrasonic sensors to detect obstacles and navigate around them.
- Line Tracking: Following a designated line path using line-following sensors.
- Target Following: Programming the car to follow a specific object.
- Face Detection, Gesture, and Voice Recognition: Advanced features enabled by the ESP32 CAM and programming.

Image: The Zeus Car demonstrating its various operational modes, including line tracking, IR remote control, target following, and obstacle avoidance.
5. Maintenance
To ensure the longevity and optimal performance of your robot car, follow these maintenance guidelines:
- Cleaning: Regularly clean the chassis and wheels to prevent dust and debris buildup, which can affect movement and sensor accuracy. Use a soft, dry cloth.
- Battery Care:
- Charge the battery fully before first use.
- Do not overcharge or completely discharge the battery.
- Store the battery in a cool, dry place when not in use.
- Connections: Periodically check all wire connections to ensure they are secure. Loose connections can lead to erratic behavior or component failure.
- Software Updates: Check the official SunFounder website or community forum for any available firmware or software updates for the Arduino and ESP32 CAM modules.
6. Troubleshooting
If you encounter issues with your robot car, refer to the following common problems and solutions:
| Problem | Possible Cause | Solution |
|---|---|---|
| Robot does not power on. | Low or uncharged battery; loose power connection. | Charge the battery. Check all power connections to the main board. |
| Motors not responding. | Incorrect wiring; motor driver issue; code error. | Verify motor wiring. Check motor driver connections. Review your code for motor control logic. |
| FPV camera not working. | ESP32 CAM not properly connected; Wi-Fi connection issue; app error. | Ensure ESP32 CAM is securely attached. Reconnect to the robot's Wi-Fi. Restart the app. |
| Sensors (ultrasonic, line-following) are inaccurate. | Obstruction; incorrect calibration; environmental interference. | Clear any obstructions. Recalibrate sensors if applicable. Test in a different environment. |
| IR remote control not working. | Remote battery low; IR receiver obstructed; incorrect code. | Replace remote battery. Ensure IR receiver is clear. Verify IR code implementation. |
For further assistance, please visit the SunFounder Store or refer to the technical support section.
7. Specifications
| Feature | Detail |
|---|---|
| Main Board | SunFounder R3 Board compatible with Arduino Uno R3, Expansion Board |
| Programming Software | Arduino IDE/C++ |
| Input Modules | ESP32 CAM, Grayscale Module, Ultrasonic Module, Obstacle Avoidance Module |
| Output Modules | 4WD Motors, WS2812 RGB Boards |
| Battery Life | Approximately 90 minutes |
| Battery Charge Time | Approximately 130 minutes |
| Voltage | 6.0V~8.4V PH2.0-5P power input |
| Drive Mode | 4 x TT Motors with 60mm Mecanum Wheel |
| Functions | Remote Control, APP Control, Drift, Move in All Directions, Face/Pose Detection, Obstacle Avoidance, Object Following, Line Track, Cliff Detection, Speech Control |
| Dimensions (LxWxH, Assembled) | 6.65" x 6.50" x 3.70" (10"L x 7.48"W x 3.74"H) |
| Weight | 1.08 Kilograms |
| Material | Aluminum (Metal) |
| Age Range | Youth (Manufacturer Minimum Age: 15 years) |
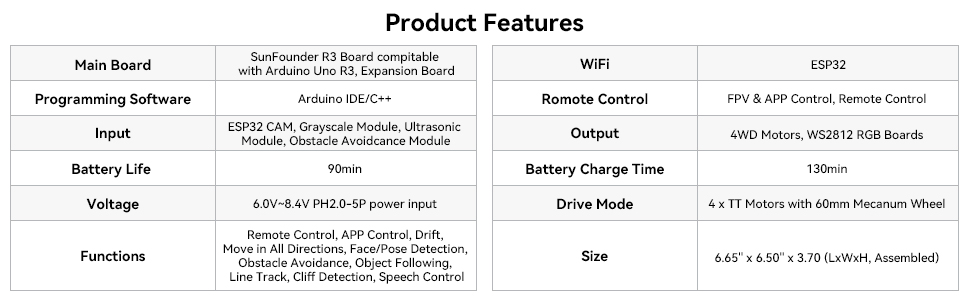
Image: A table summarizing the key product features and technical specifications of the SunFounder Zeus Car.
8. Warranty Information
The SunFounder Smart Robot Car Kit comes with a 1-Year Guarantee from the date of purchase. This warranty covers manufacturing defects and issues arising from normal use. Please retain your proof of purchase for warranty claims.
For warranty service, please contact SunFounder customer support through the official website or the platform where the product was purchased.
9. Technical Support and Resources
SunFounder is committed to providing continuous support for its product users. You can find additional resources and assistance through the following channels:
- Online Tutorials and Documentation: Access step-by-step online tutorials and videos for assembly and coding. These resources are available in multiple languages including EN, ES, DE, FR, IT, and JA.
- Community Forum: Join the SunFounder community forum to share ideas, ask questions, and interact with other users and experts.
- Direct Technical Assistance: For specific technical issues, timely assistance is available through SunFounder's customer service channels.
- Official SunFounder Store: Visit the SunFounder Store on Amazon for product information and support links.

Image: A user assembling the robot car, with a laptop displaying online instructions, emphasizing the ease of build and available technical support.
Related documentsZeus Car


Ask a question about this manual
Ask about setup, troubleshooting, compatibility, parts, safety, or missing instructions. Manuals+ will review the question and use this page’s manual context to help answer it.