1. Product Overview
The BRIKSMAX LED Lighting Kit is designed to illuminate your LEGO Technic Peugeot 9X8 24H Le Mans Hybrid Hypercar (LEGO Model 42156). This kit enhances the visual appeal of your model by adding realistic lighting effects to various components, bringing your display piece to life.

Image 1.1: Comparison showing the LEGO Technic Peugeot 9X8 24H Le Mans Hybrid Hypercar model unlit (right) and illuminated with the BRIKSMAX LED lighting kit (left).
This kit includes various LED lights, connecting cables, and power components specifically tailored for the LEGO 42156 model. The installation process is designed to integrate seamlessly with the existing LEGO structure.
2. What's Included
Before beginning installation, please verify that all components listed below are present in your BRIKSMAX LED Lighting Kit package.

Image 2.1: An illustration detailing the various components included in the BRIKSMAX LED Lighting Kit, such as LED strips, dot lights, connecting cables, expansion boards, USB power cable, battery box, and tools.
- 6 x 15cm White Dot Lights
- 2 x Adhesive Light Strip Warm White
- 4 x Red Strip Lights
- 4 x Green Strip Lights (30cm)
- 2 x 1x2 Ice Blue Strip Lights
- 1 x 6-port RGB Expansion Board
- 2 x 12-port RGB Expansion Boards
- 1 x 30cm USB Power Cable
- 1 x Building Block Type Battery Box (AA battery not included)
- 5 x 30cm Connecting Cables
- 4 x 20cm Connecting Cables
- 1 x Adhesive Squares
- 1 x Tweezers
- User Guide
- Service Card
3. Setup and Installation
Careful installation is crucial for optimal performance and to avoid damage to the lighting kit or your LEGO model. It is recommended to work in a well-lit area and follow the steps precisely.
General Guidelines:
- Ensure your LEGO model is fully assembled before installing the lighting kit.
- Handle LED components and wires gently to prevent damage.
- Refer to the included user guide for detailed, step-by-step instructions specific to the LEGO 42156 model.
- Use the provided tweezers for precise placement of small components and routing of wires.
Installation Steps (General):
- Prepare the Model: Carefully disassemble small sections of your LEGO model as indicated in the specific instruction guide to access areas for light placement.
- Install Lights: Place the various LED lights (dot lights, strip lights) into their designated positions. Ensure they are securely attached, often using adhesive squares where necessary.
- Route Wires: Carefully route the connecting cables between the lights and the expansion boards. Hide wires as much as possible within the LEGO bricks to maintain the model's aesthetic. Avoid pinching or sharply bending wires.
- Connect to Expansion Boards: Connect the wires from the lights to the appropriate ports on the 6-port and 12-port RGB Expansion Boards. Ensure connections are firm.
- Connect Power: Connect the expansion boards to the Building Block Type Battery Box or the USB Power Cable.
- Test Lights: Before fully reassembling the LEGO model, test all lights to ensure they function correctly.
- Reassemble Model: Carefully reassemble the LEGO sections, ensuring no wires are exposed or damaged during the process.
Video 3.1: An official BRIKSMAX video demonstrating the illuminated LEGO Technic Peugeot 9X8 24H Le Mans Hybrid Hypercar model, showcasing various lighting effects and providing visual cues for light placement and wire routing.
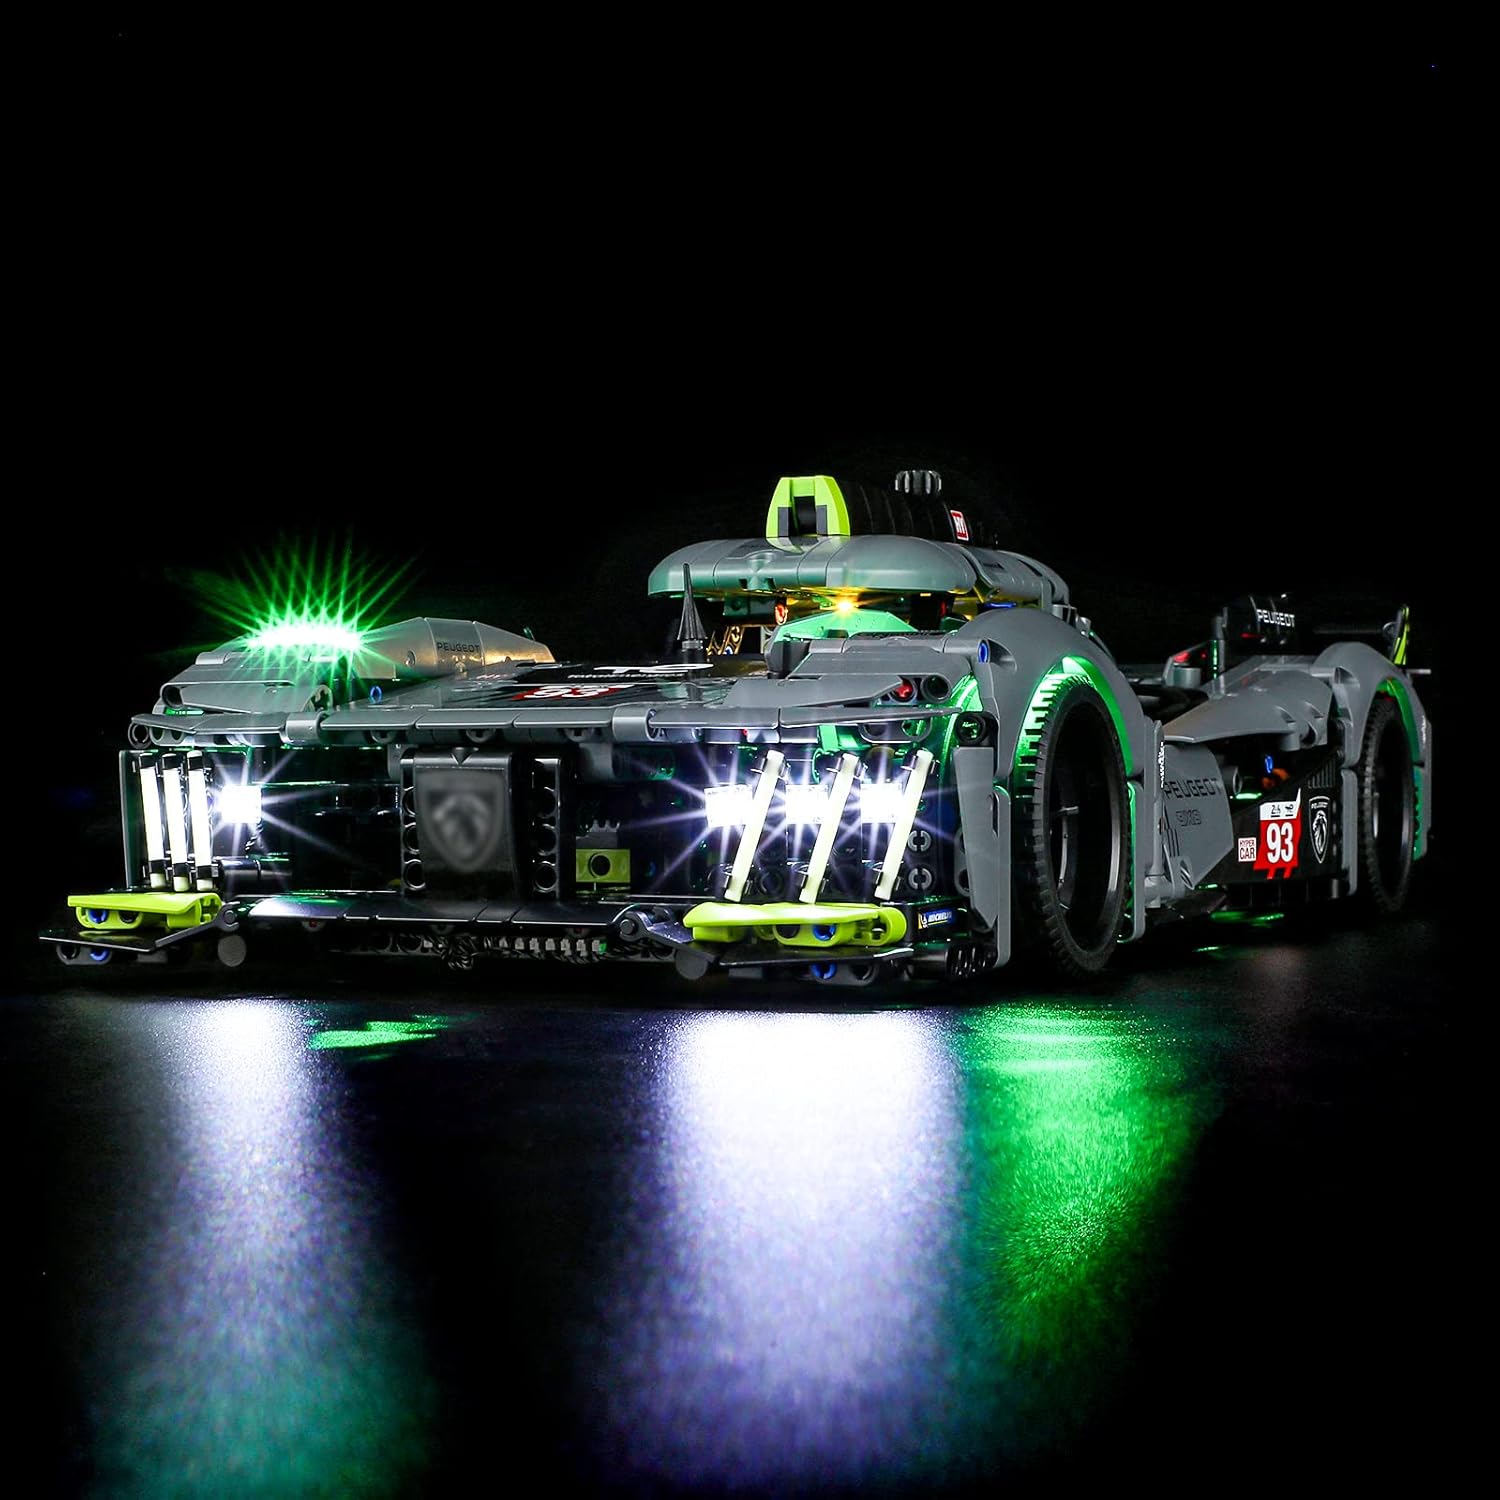
Image 3.2: Front view of the LEGO Technic Peugeot 9X8 24H Le Mans Hybrid Hypercar model, showcasing the bright white headlights and green accent lighting from the BRIKSMAX LED kit.
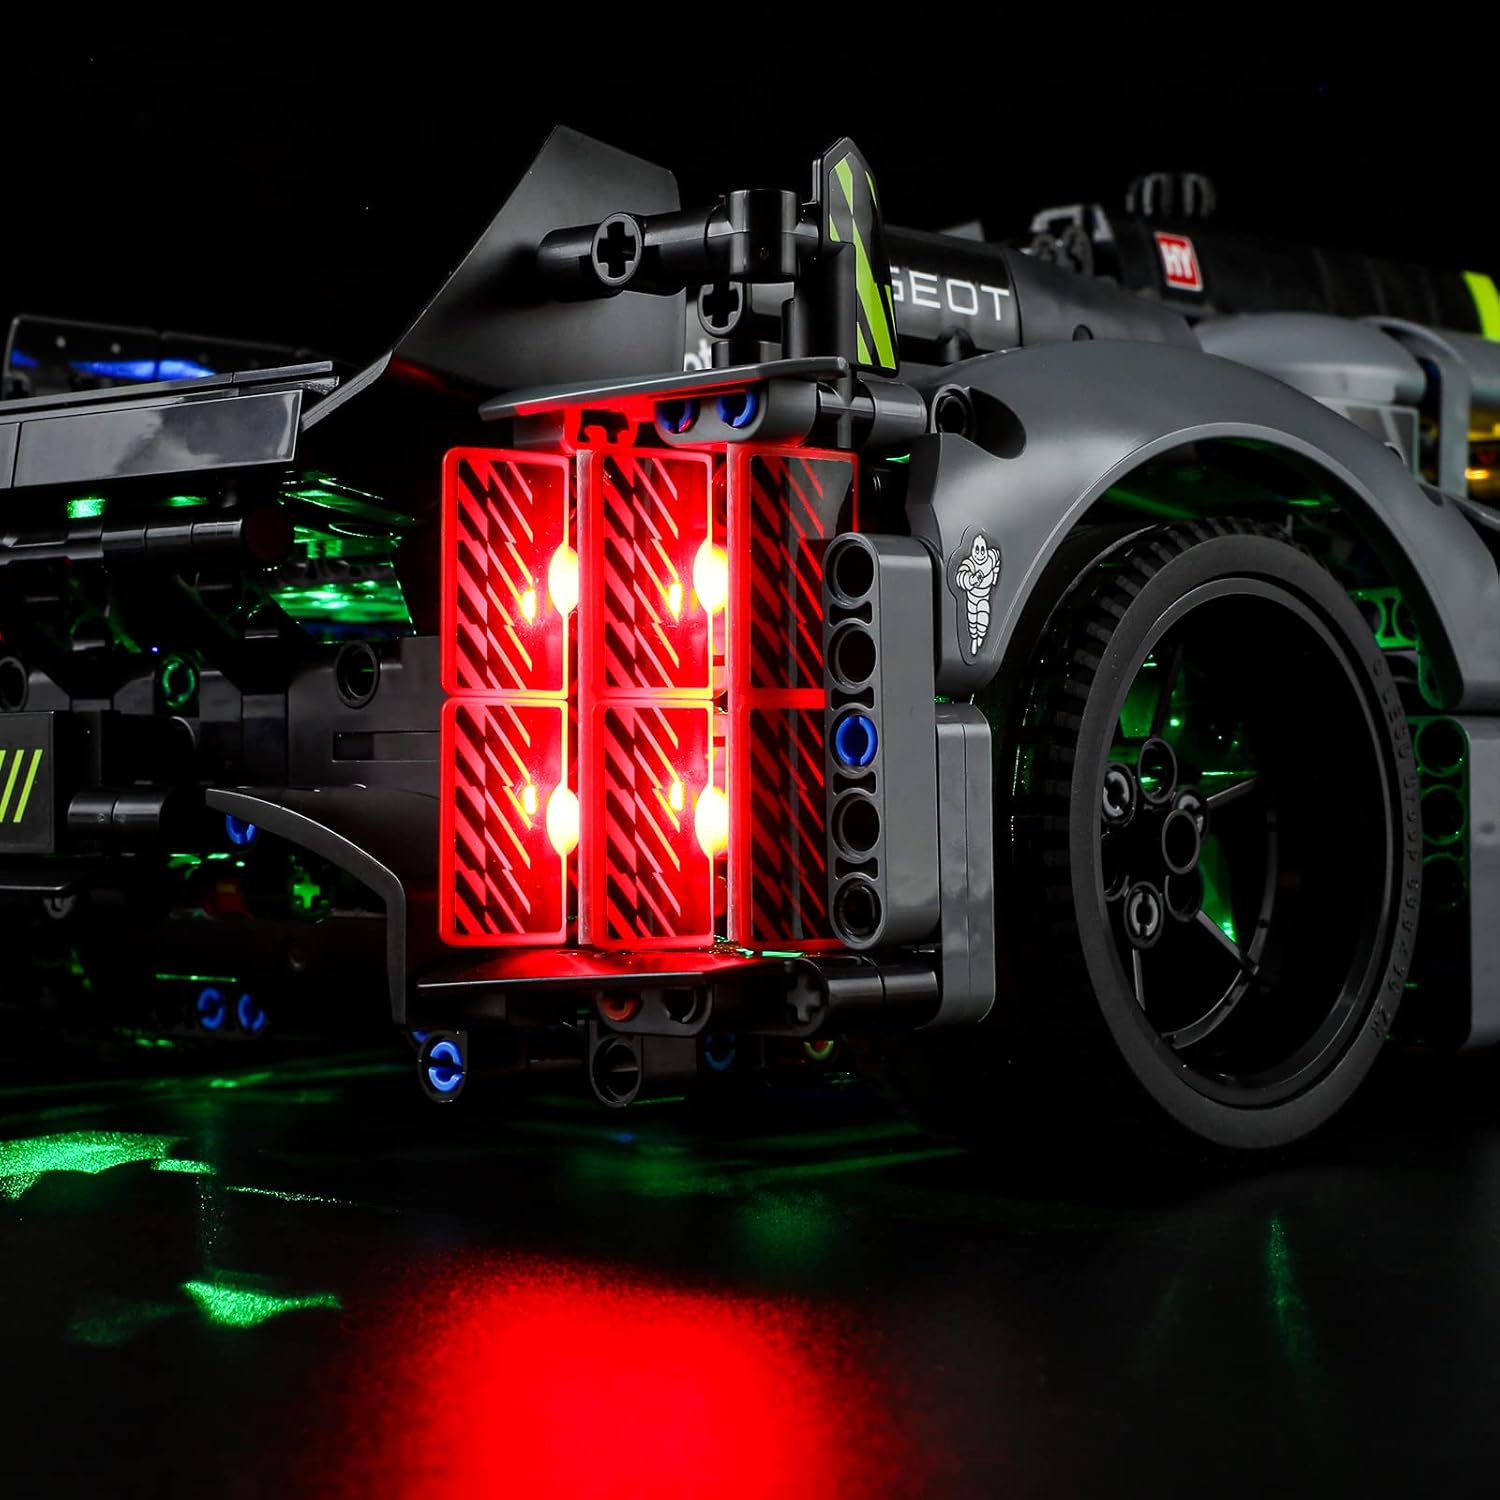
Image 3.3: Rear view of the LEGO Technic Peugeot 9X8 24H Le Mans Hybrid Hypercar model, displaying the red taillights and additional green lighting provided by the BRIKSMAX LED kit.
4. Operating Instructions
Once the BRIKSMAX LED Lighting Kit is fully installed, operating the lights is straightforward.
Powering the Lights:
- Battery Box: Insert 3 AA batteries (not included) into the Building Block Type Battery Box. Ensure correct polarity. Use the switch on the battery box to turn the lights on or off.
- USB Power Cable: Connect the provided USB Power Cable to a 5V USB power source (e.g., a USB wall adapter, power bank, or computer USB port). The lights will turn on automatically when power is supplied. Disconnect to turn off.
The lighting kit is designed for continuous illumination. There are no complex controls for light patterns or brightness adjustments unless specified in the detailed product manual.
5. Maintenance
Proper maintenance ensures the longevity and optimal performance of your BRIKSMAX LED Lighting Kit.
- Cleaning: Gently dust the LED components and wires with a soft, dry cloth. Avoid using liquid cleaners directly on the lights or electrical connections.
- Battery Replacement: If using the battery box, replace all AA batteries simultaneously when lights dim or stop working. Do not mix old and new batteries.
- Wire Care: Periodically inspect wires for any signs of wear or damage. Ensure wires remain securely tucked within the LEGO model to prevent accidental snagging or breakage.
- Storage: If storing the model for an extended period, remove batteries from the battery box to prevent leakage.
6. Troubleshooting
If you encounter issues with your lighting kit, please refer to the following common troubleshooting steps:
| Problem | Possible Cause | Solution |
|---|---|---|
| Lights do not turn on. | No power, loose connection, or faulty component. | Check battery box for fresh batteries and correct polarity, or ensure USB cable is securely connected to a working power source. Verify all wire connections to expansion boards and lights are firm. |
| Some lights are flickering or dim. | Low battery power or loose connection. | Replace batteries if using battery box. Check connections for the affected lights and ensure wires are not pinched. |
| Lights are not evenly distributed. | Incorrect placement during installation. | Refer to the detailed installation guide and images to verify light placement. Adjust as necessary. |
| Wires are visible. | Improper wire routing. | Carefully re-route wires to conceal them within the LEGO bricks and structure. |
If these steps do not resolve the issue, please contact BRIKSMAX customer support for further assistance.
7. Specifications
- Model Number: 42156 (for compatible LEGO set)
- Color: Warm White (main lighting), Red, Green, Ice Blue (accent lighting)
- Material: Plastic
- Light Source Type: Light Emitting Diode (LED)
- Power Source: Battery Powered (3x AA, not included) or USB Powered (5V)
- Number of Light Sources: Varies by kit, includes dot lights and strip lights.
- Product Dimensions: Kit components are designed to fit LEGO 42156 model. Packaging dimensions: 6.5 x 4.72 x 1.57 inches.
- Item Weight: Approximately 8.6 ounces (244 Grams)
- Manufacturer Recommended Age: 8 months and up (referring to the LEGO set, lighting kit typically for older users due to small parts and installation complexity)
8. Warranty and Support
BRIKSMAX is committed to providing high-quality products and excellent customer service. While specific warranty details are provided with the product, general support is available for any difficulties you may encounter.
If you have questions regarding installation, operation, or any other product-related concerns, please contact BRIKSMAX customer support. Refer to the included Service Card for contact information or visit the official BRIKSMAX website.
Note: The LEGO set itself is not included with this lighting kit.


