
1. Introduction
The Lehwey Dash Cam Camera Front and Rear is designed to provide comprehensive recording of your driving environment. Equipped with a 4K front camera and a 1080P HD waterproof rear camera, it captures high-quality video footage. Key features include built-in WiFi and GPS for easy data management and location tracking, advanced night vision capabilities, G-sensor for accident detection, loop recording, and a parking monitor function for continuous surveillance.

Overview of the Lehwey 4K Ultra-HD Car Dash Cam highlighting its dual camera system and core functionalities.
2. What's in the Box
Please verify that all items listed below are included in your package:
- 1 x 4K Front Dash Cam
- 1 x 1080P Rear Camera
- 1 x Rear Camera with 19.6ft Extension Cable
- 1 x Car Charger with 9.8ft Cable
- 1 x GPS Module
- 1 x 64GB Micro SD Card
- 1 x User Manual

All components included in the Lehwey Dash Cam package.
3. Setup and Installation
3.1 Inserting the Micro SD Card
Insert the provided 64GB Micro SD card into the dash cam's TF card slot. Ensure the card is inserted correctly until it clicks into place. The dash cam supports up to a 256GB Micro SD card.

The dash cam with the included 64GB Micro SD card, ready for insertion.
3.2 Front Camera Installation
Mount the front dash cam on your car's windshield, ideally behind the rearview mirror, to ensure it does not obstruct your view. Use the provided adhesive mount or suction cup mount. Connect the car charger cable to the dash cam and route the cable along the windshield edge and down to the car's cigarette lighter socket.
3.3 Rear Camera Installation
Install the rear camera on the rear windshield of your vehicle. Connect the rear camera to the main dash cam unit using the provided 19.6ft extension cable. Route this cable discreetly along the vehicle's interior trim to the front unit. Ensure the rear camera's angle provides a clear view of the road behind. Note that the rear camera mount may require adjustment or an alternative mounting method for optimal angle, as some users have reported the default angle pointing downwards.
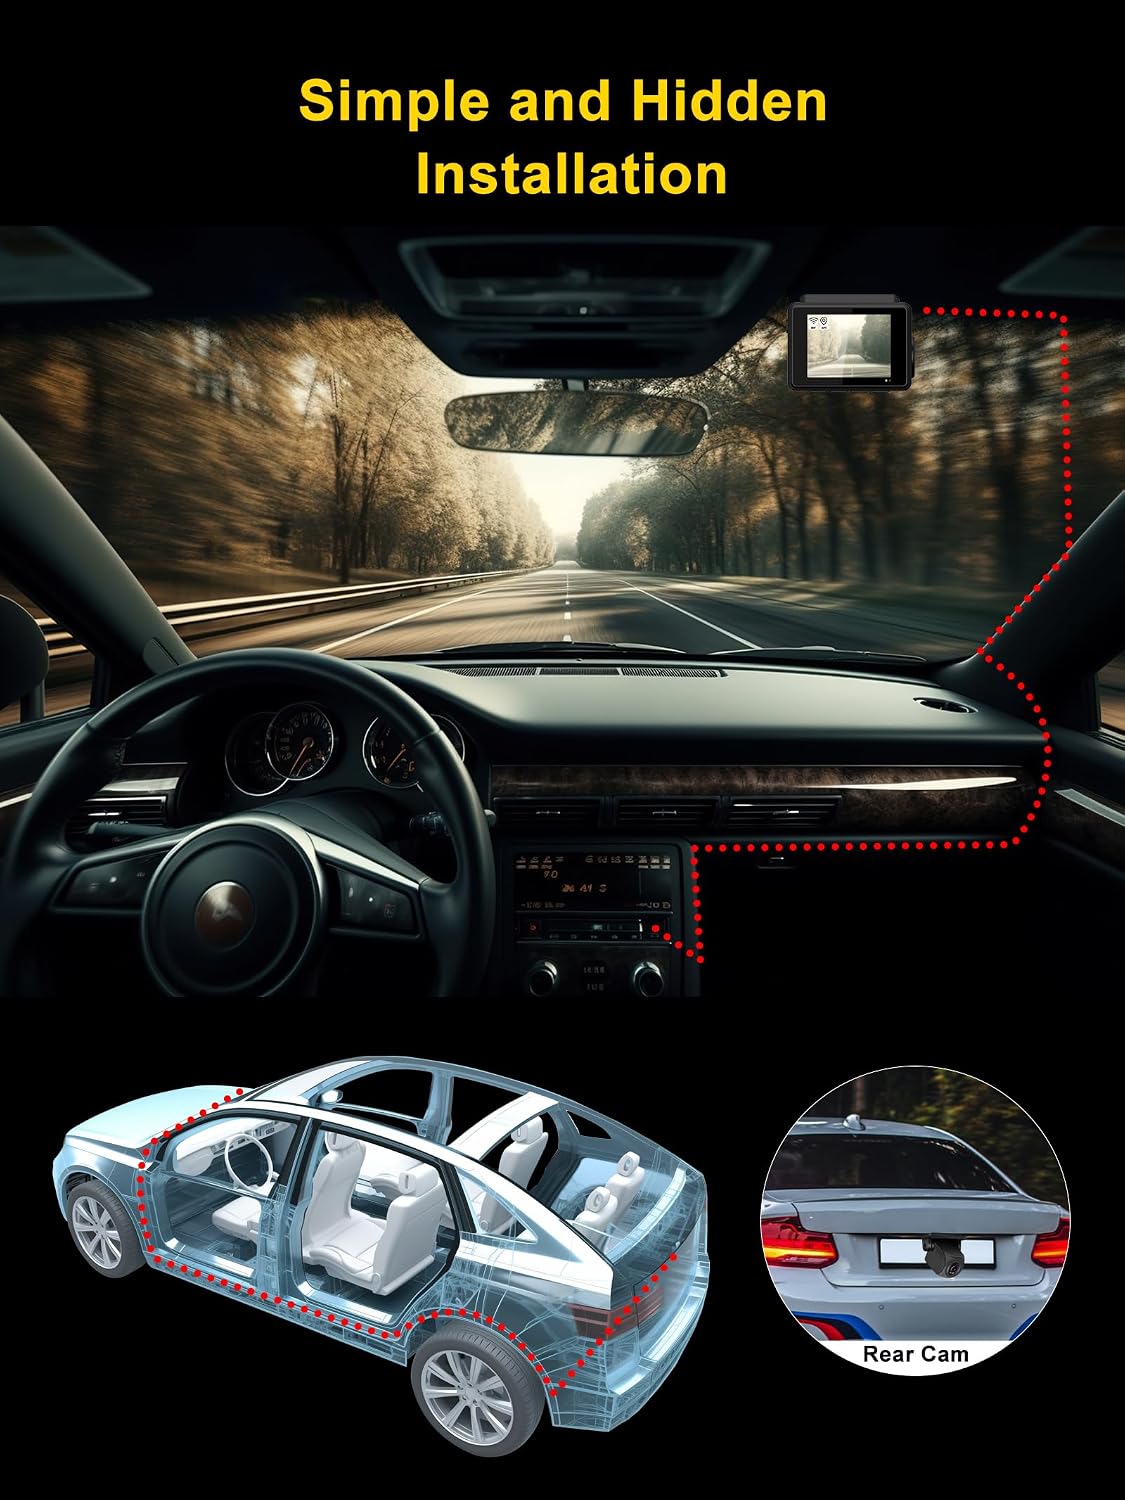
Illustration of the recommended cable routing for a neat and hidden installation of both front and rear cameras.
3.4 GPS Module Connection
Connect the external GPS module to the designated port on the dash cam. This module is essential for recording accurate location and speed data. The GPS functionality relies on this external module and the included power cable.
4. Operating Instructions
4.1 Power On/Off
The dash cam will automatically power on and begin recording when connected to your car's power supply and the engine starts. It will power off automatically when the engine is turned off.
4.2 Recording Modes and Features
- Loop Recording: The camera continuously records video in segments. When the memory card is full, the oldest unlocked files will be automatically overwritten to make space for new recordings.
- G-Sensor (Accident Lock): The built-in G-sensor detects sudden shakes or collisions. In the event of an impact, the current video footage will be automatically locked and saved to prevent it from being overwritten, serving as crucial evidence.
- Parking Monitor: This feature allows the dash cam to record automatically when a collision or human movement is detected while your car is parked. This function is off by default and needs to be manually enabled in the settings. For 24-hour continuous parking monitoring, a separate hardwire kit (not included) is required.

The dash cam's accident lock and motion detection features, crucial for recording incidents while driving or parked.
4.3 WiFi Connectivity and App Control
The dash cam features built-in WiFi for seamless connection to your smartphone. Download the "Road Cam" app from the App Store (iOS) or Google Play Store (Android). Turn on the WiFi on the dash cam and connect your phone to the dash cam's WiFi network. Through the app, you can:
- View live footage from both front and rear cameras.
- Play back recorded videos.
- Download videos and photos directly to your phone.
- Manage dash cam settings.
Note: You may need to manually connect to the dash cam's WiFi network via your phone's settings each time you wish to use the app.

Using the "Road Cam" app to control and view footage from the dash cam via WiFi.
4.4 GPS Functionality
With the external GPS module connected, the dash cam accurately records your driving track, speed, and geographical coordinates (latitude and longitude). This data can be viewed alongside your video footage through the "Road Cam" app or dedicated PC viewer software, providing a comprehensive record of your journeys.

GPS data, including speed and location, displayed on a smartphone and laptop, integrated with recorded video.
4.5 Super Night Vision
The Lehwey Dash Cam features F1.4 (front) and F1.8 (rear) aperture lenses with 6 layers of glass, combined with WDR (Wide Dynamic Range) and HDR (High Dynamic Range) technology. This ensures clear and bright recordings even in low-light conditions, such as at night or in tunnels, providing enhanced visibility compared to standard dash cameras.

Demonstration of Super Night Vision capabilities with WDR and HDR, showing clearer images in challenging light conditions.
4.6 Screen Protection and Fatigue Driving Reminder
- Screen Protection: You can set the dash cam screen to turn off automatically after a set period (default 1 minute) to prevent driver distraction. The camera will continue recording in the background. Press any button to wake up the screen.
- Fatigue Driving Reminder: This feature can be set to remind you to take a break after 1, 2, or 4 hours of continuous driving. This function is off by default and can be enabled in the settings.
5. Maintenance
5.1 Micro SD Card Management
It is recommended to format the Micro SD card regularly (e.g., once a month) within the dash cam's settings to ensure optimal performance and prevent data corruption. This will erase all data on the card, so back up any important footage before formatting.
5.2 Cleaning the Device
Use a soft, dry cloth to clean the dash cam's lens and screen. Avoid using abrasive cleaners or solvents that could damage the device.
6. Troubleshooting
| Problem | Possible Solution |
|---|---|
| Dash cam does not automatically connect to phone WiFi. | Ensure WiFi is enabled on the dash cam. Manually connect to the dash cam's WiFi network from your phone's WiFi settings each time you wish to use the app. |
| Rear camera angle points downwards. | The rear camera mount may require adjustment. Consider using an alternative side of the camera body with double-sided tape directly on the glass for an improved angle if the bracket does not provide sufficient adjustment. The software does not support flipping the image if the camera is mounted upside down. |
| GPS not working or inaccurate. | Ensure the external GPS module is securely connected to the dash cam. The GPS functionality relies on this module and the included power cable. If using a hardwire adapter, ensure it supports the GPS module's power requirements. |
| Time/date settings reset frequently. | Ensure the dash cam is receiving consistent power. Check the car charger connection. If the internal battery is low or faulty, it may not retain settings. |
| Recordings are randomly saved between "Movie" and "Parking" folders. | This behavior may indicate a setting conflict or a sensitivity issue with the G-sensor or parking monitor. Review and adjust the sensitivity settings for both features in the dash cam menu. Ensure the parking monitor is only enabled when intended. |
| Dash cam not holding a charge. | The dash cam is primarily powered by the car's electrical system. The internal battery is typically for emergency power-off or short parking monitoring. Ensure the car charger is functioning correctly and providing continuous power. |
7. Specifications
| Feature | Detail |
|---|---|
| Model Name | JLY-2 |
| Product Dimensions | 1.5 x 0.6 x 0.7 inches |
| Item Weight | 1.5 pounds |
| Front Camera Resolution | 4K (2160p) |
| Rear Camera Resolution | 1080P HD |
| Front Camera Angle | 170° Wide Angle |
| Rear Camera Angle | 140° Wide Angle |
| Connectivity | Built-in Wi-Fi, GPS (external module) |
| Special Features | Built-In Display, Microphone, Loop Recording, HDR, WDR, Super Night Vision, G-Sensor, Motion Detection, Accident Lock, Screen Protection, Fatigue Driving Reminder |
| Storage | Supports up to 256GB Micro SD card (64GB included) |
| Power Source | Car Charger (9.8ft cable included) |
| Battery | 1 Lithium Ion battery (included) |
| Mounting Type | Windshield Mount |
| Manufacturer | Lehwey |
8. Warranty and Support
For any questions, technical assistance, or warranty claims regarding your Lehwey Dash Cam, please contact Lehwey customer support. Refer to the contact information provided in the packaging or on the official Lehwey website for the most up-to-date support channels.