1. Introduction
Thank you for choosing the M-Wave SP110-ADJ Adjustable Seatpost. This manual provides essential information for the proper installation, operation, and maintenance of your new seatpost. Designed for convenience and performance, this aluminum seatpost features a remote lever for quick height adjustments, offering three distinct positions to optimize your riding experience. Please read this manual thoroughly before installation and use to ensure safe and effective operation.
2. Safety Information
Always prioritize safety when working with bicycle components. Improper installation or use can lead to serious injury or damage to your bicycle.
- Professional Installation Recommended: If you are unsure about any step, seek assistance from a qualified bicycle mechanic.
- Minimum Insertion: Ensure the seatpost is inserted into the bicycle frame beyond the minimum insertion line marked on the post. Failure to do so can result in frame or seatpost damage and serious injury.
- Torque Specifications: Always use a torque wrench to tighten bolts to the manufacturer's specified torque settings. Overtightening can strip threads or damage components; undertightening can lead to parts loosening during riding.
- Regular Inspection: Before each ride, check that the seatpost is securely fastened and operating correctly. Inspect for any signs of damage or wear.
- Cleanliness: Keep the seatpost and seat tube clean and free of dirt or debris to ensure smooth operation and prevent wear.
3. Product Overview
The M-Wave SP110-ADJ is a robust, height-adjustable seatpost designed for various bicycle types, particularly city bikes. It allows riders to quickly change saddle height on the go using a handlebar-mounted remote lever.

Figure 3.1: M-Wave SP110-ADJ Adjustable Seatpost (Ø 27.2 mm model shown).
This image displays the complete M-Wave SP110-ADJ adjustable seatpost, featuring its black aluminum construction, the corrugated dust cover, and the cable extending from the lower part of the post, ready for connection to the remote lever.
Key Features:
- Material: Durable Aluminum construction.
- Diameter: Ø 27.2 mm (also available in Ø 31.6 mm).
- Length: 445 mm.
- Adjustable Height: Quick height adjustment during riding via a handlebar-mounted lever.
- Height Levels: Offers 3 distinct height positions: 0 mm (fully extended), 45 mm (mid-position), and 110 mm (fully dropped).
- Measurement Scale: Integrated scale for precise height setting and minimum insertion guidance.
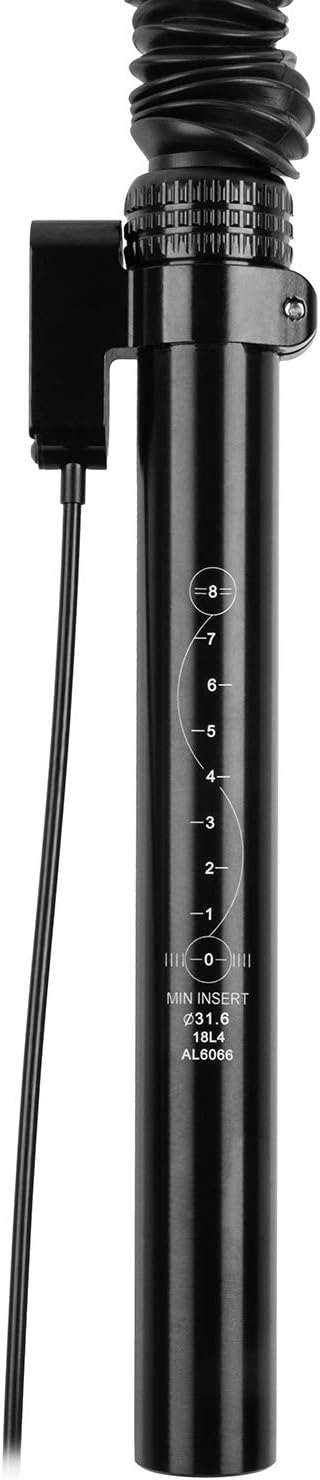
Figure 3.2: Seatpost with integrated measurement scale.
A close-up view of the lower section of the seatpost, highlighting the engraved measurement scale and the "MIN INSERT" line, crucial for safe installation.

Figure 3.3: Handlebar-mounted remote lever.
This image shows the black remote lever with its mounting clamp and the attached cable, designed for easy handlebar installation and quick seatpost height adjustment.
4. Setup and Installation
Proper installation is crucial for the performance and safety of your adjustable seatpost.
4.1 Tools Required:
- Hex/Allen Keys (various sizes, typically 4mm, 5mm, 6mm)
- Torque Wrench
- Grease (for seatpost and saddle rail clamps)
- Cable Cutters (for remote cable)
- Measuring Tape
4.2 Installation Steps:
- Prepare the Seat Tube: Clean the inside of your bicycle's seat tube thoroughly. Apply a thin layer of grease to the inside of the seat tube and the outside of the seatpost for easier insertion and to prevent seizing.
- Insert the Seatpost: Carefully slide the M-Wave SP110-ADJ seatpost into the bicycle's seat tube. Ensure the seatpost is inserted beyond the "MIN INSERT" line marked on the post. This is critical for structural integrity and safety.
- Secure the Seatpost: Tighten your bicycle's seatpost clamp bolt to the manufacturer's specified torque. Use a torque wrench to avoid overtightening or undertightening.
- Install the Remote Lever: Mount the remote lever (Figure 3.3) on your handlebar in a comfortable and accessible position. Typically, this is on the left side, near the grip. Tighten the clamp bolt to the specified torque.
- Route the Cable: Route the cable from the seatpost to the remote lever. Ensure the cable routing does not interfere with steering, braking, or other bicycle functions. Avoid sharp bends in the cable housing.
- Connect the Cable: Connect the cable to both the seatpost mechanism and the remote lever according to the instructions provided with the cable kit. Ensure proper tension for smooth operation. Trim any excess cable and install end caps.
- Install Saddle: Attach your bicycle saddle to the seatpost head. Adjust the saddle angle and fore/aft position to your preference. Tighten the saddle rail clamp bolts to the manufacturer's specified torque.
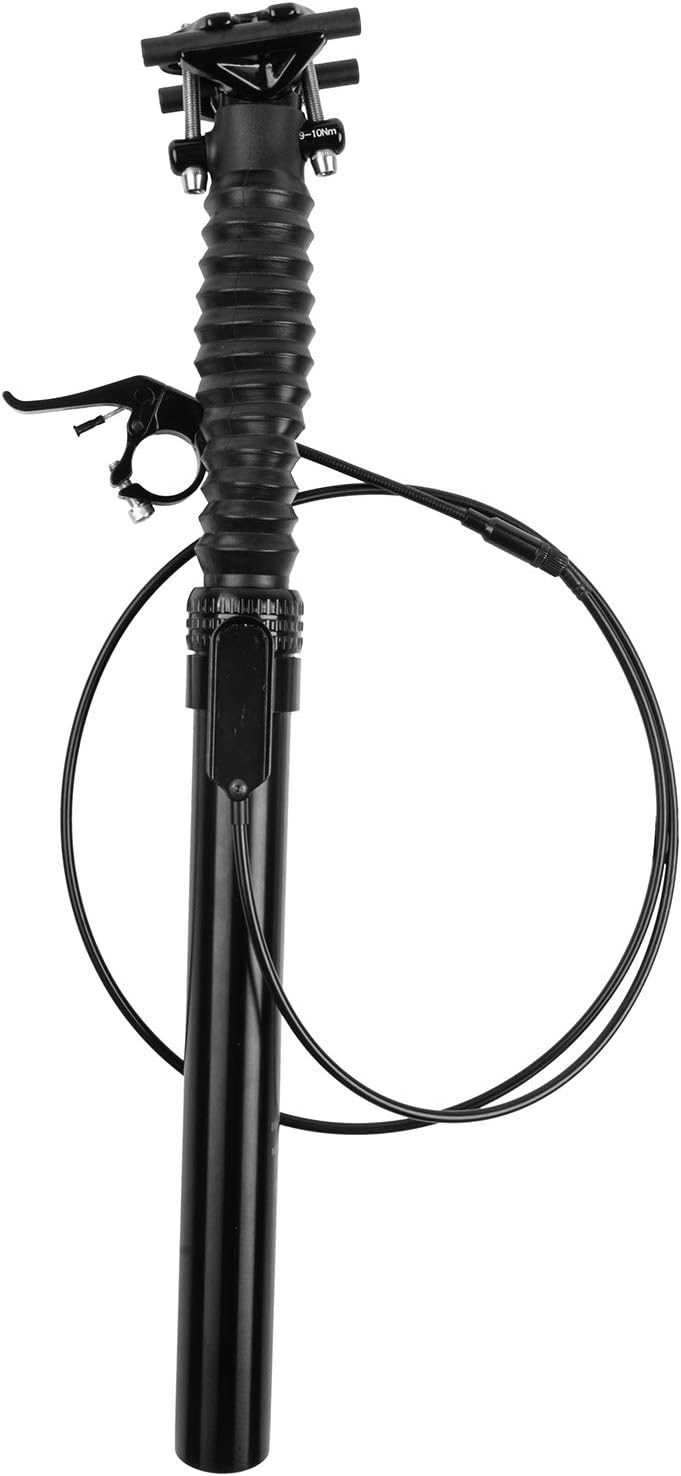
Figure 4.1: M-Wave SP110-ADJ Seatpost with cable attached.
This image shows the M-Wave SP110-ADJ seatpost with its remote lever and the full length of the control cable, illustrating how the components are connected before installation on the bicycle.
5. Operating Instructions
The M-Wave SP110-ADJ seatpost offers three distinct height positions for optimal riding comfort and efficiency.
5.1 Adjusting Seatpost Height:
- To Lower the Seatpost: While seated on the saddle, press and hold the remote lever on your handlebar. The seatpost will drop to the next available lower position (from 0mm to 45mm, or 45mm to 110mm). Release the lever once the desired height is reached.
- To Raise the Seatpost: Unweight the saddle (stand up slightly or lift your weight off the saddle), then press and hold the remote lever. The seatpost will extend upwards to the next available higher position (from 110mm to 45mm, or 45mm to 0mm). Release the lever once the desired height is reached.
The three height levels are:
- 0 mm: Fully extended position, ideal for efficient pedaling on flat terrain or uphill climbs.
- 45 mm: Mid-position, offering a slight drop for varied terrain or light descents.
- 110 mm: Fully dropped position, providing maximum clearance for steep descents or technical riding.
Important: Do not force the seatpost beyond its intended travel limits. Always ensure the seatpost is fully extended or fully dropped into one of the three positions before applying full weight to the saddle.
6. Maintenance
Regular maintenance will prolong the life and ensure the smooth operation of your M-Wave SP110-ADJ seatpost.
- Cleaning: Keep the exposed shaft of the seatpost clean from dirt and debris. Wipe it down with a clean cloth after each ride, especially in dusty or muddy conditions.
- Lubrication: Periodically apply a small amount of silicone-based lubricant to the exposed shaft and the dust seal to maintain smooth operation. Avoid petroleum-based lubricants as they can damage seals.
- Cable Inspection: Check the remote cable and housing regularly for fraying, kinks, or damage. Replace damaged cables or housing promptly to ensure reliable operation.
- Bolt Torque Check: Periodically check the torque of the seatpost clamp bolt and saddle rail clamp bolts to ensure they are tightened to specifications.
- Function Check: Test the seatpost's full range of motion regularly to ensure it extends and retracts smoothly through all three positions.
7. Troubleshooting
If you encounter issues with your M-Wave SP110-ADJ seatpost, refer to the following common problems and solutions.
| Problem | Possible Cause | Solution |
|---|---|---|
| Seatpost does not extend or retract smoothly. |
|
|
| Remote lever feels stiff or unresponsive. |
|
|
| Seatpost slips down when weighted. |
|
|
For issues not covered here, or if troubleshooting steps do not resolve the problem, please contact M-Wave customer support or a certified bicycle mechanic.
8. Specifications
| Brand | M-Wave |
| Model Name | SP110-ADJ |
| Model Number | 252147 |
| UPC | 887539030896 |
| Diameter | Ø 27.2 mm |
| Length | 445 mm |
| Height Adjustment Levels | 3 (0 mm, 45 mm, 110 mm drop) |
| Material | Aluminum |
| Included Components | 1 Adjustable Seatpost, 1 Remote Lever, 1 Control Cable |
9. Warranty and Support
For specific warranty terms and conditions, please refer to the warranty information provided at the time of purchase or visit the official M-Wave website. Keep your proof of purchase for any warranty claims.
For technical support or further assistance, please contact M-Wave customer service through their official channels.
- M-Wave Official Website: www.m-wave.com (Please note: This is a placeholder URL as no specific support URL was provided in the input. Users should verify the correct URL.)
- Contact Information: Refer to the M-Wave website for current contact details, including email and phone support.