
1. Introduction
This manual provides detailed instructions for the operation and maintenance of your Landtek Dual-Channel K/J Type Digital Thermocouple Thermometer (Model MILA34300N). This precision instrument is designed for accurate temperature measurement in various industrial, HVAC, and laboratory applications. Please read this manual thoroughly before use to ensure safe and efficient operation.
2. Safety Information
WARNING: Failure to follow these safety instructions may result in injury or damage to the device.
- Do not exceed the maximum input voltage of 60V DC or 24V AC between the thermocouple inputs or between any input and ground.
- Ensure probes are correctly connected before taking measurements.
- Avoid using the device in environments with high humidity or extreme temperatures outside its operating range.
- Do not attempt to repair or modify the device. Refer all servicing to qualified personnel.
- Remove batteries if the device will not be used for an extended period to prevent leakage.
3. Package Contents
Verify that all items listed below are present and undamaged upon opening the package:
- 1 x Landtek Dual-Channel K/J Type Digital Thermocouple Thermometer (Model MILA34300N)
- 2 x Stainless Steel K-Type Probes
- 2 x Bead-Type K-Type Thermocouple Probes (Blue)
- 1 x Carrying Pouch
- 3 x AAA Batteries (pre-installed or included separately)
- 1 x User Manual

Image: The complete package contents, including the thermometer, four probes (two stainless steel, two bead-type), a carrying pouch, and batteries.
4. Product Overview
4.1. Device Components

Image: A detailed diagram labeling the key components of the thermometer, including the LCD display, T1/T2 channels, power button, data hold/unit switch button, Max/Min/Avg/backlight button, Hi/Low limit setting buttons, and the probe cover.
- LCD Display: Shows temperature readings, units, and various function indicators.
- T1/T2 Channels: Input ports for connecting K or J type thermocouple probes.
- Power Button (Red): Turns the device ON/OFF.
- HOLD/UNIT/TYPE Button: Short press for Data Hold, long press to switch temperature units (°C/°F), or long press with Power button to switch K/J type.
- MAX/MIN/AVG/Backlight Button: Cycles through Maximum, Minimum, Average readings, and activates/deactivates backlight.
- HI Button: Sets the upper temperature alarm limit.
- ADJ Button: Adjusts temperature compensation value.
- LOW Button: Sets the lower temperature alarm limit.
- T1-T2 / T2-T1 Button: Displays differential temperature between channels.
- Probe Ports (T1, T2): Connectors for thermocouple probes.
4.2. Display Indicators
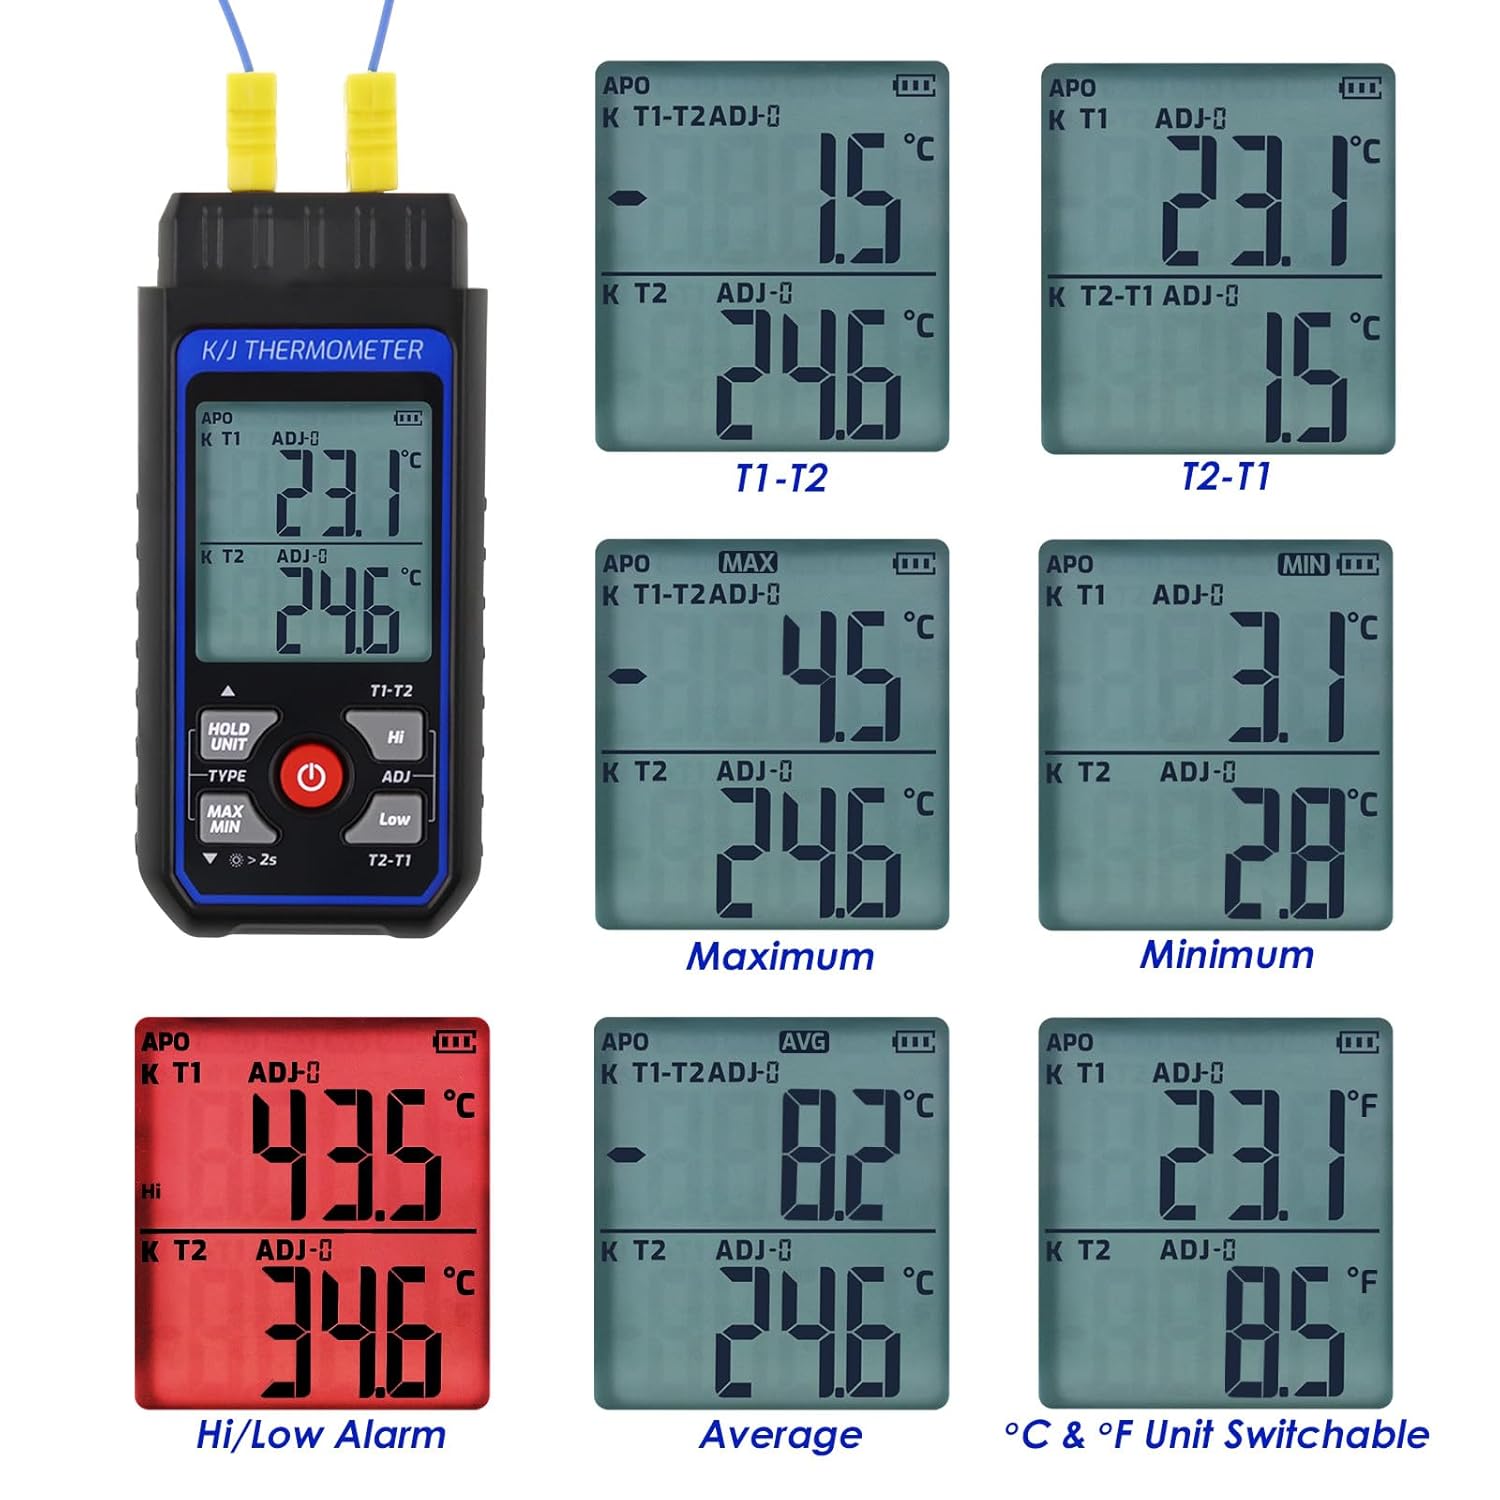
Image: The thermometer's LCD screen displaying different measurement modes, including differential temperature (T1-T2), maximum, minimum, and average readings, as well as the high/low alarm state and temperature unit selection.
- T1/T2: Temperature readings for Channel 1 and Channel 2.
- °C/°F: Indicates the selected temperature unit.
- MAX/MIN/AVG: Shows maximum, minimum, or average temperature recorded.
- HOLD: Data hold function is active.
- HI/LOW: High or low alarm is triggered.
- ADJ: Indicates temperature compensation is active.
- Battery Icon: Displays current battery level.
5. Setup
5.1. Battery Installation
- Locate the battery compartment on the back of the device.
- Open the battery cover.
- Insert 3 AAA batteries, ensuring correct polarity (+/-).
- Close the battery cover securely.
5.2. Probe Connection

Image: A close-up view of the T1 and T2 input ports on the top of the thermometer, showing how K-type thermocouple probes are inserted.
- Identify the T1 and T2 input ports at the top of the thermometer.
- Connect the K/J type thermocouple probes into the desired ports (T1 or T2). Ensure a firm connection.
- The device supports both K and J type thermocouples. The type can be selected in the settings.
6. Operating Instructions
6.1. Power On/Off
- Press the red Power button to turn the thermometer ON.
- Press and hold the red Power button for approximately 2 seconds to turn the thermometer OFF.
- The device features an auto power-off function (default 10 minutes) to conserve battery. This can be disabled in settings.
6.2. Temperature Unit Selection (°C/°F)
- With the device ON, press and hold the HOLD/UNIT button for approximately 2 seconds to switch between Celsius (°C) and Fahrenheit (°F).
6.3. K/J Type Selection
- To switch between K-type and J-type thermocouple measurement, press and hold the HOLD/UNIT button while simultaneously pressing the Power button.
6.4. MAX/MIN/AVG Measurement
- Press the MAX/MIN button repeatedly to cycle through Maximum (MAX), Minimum (MIN), and Average (AVG) temperature readings.
- The display will show the corresponding indicator (MAX, MIN, AVG).
- Press the button again to return to real-time measurement.
6.5. Data Hold
- Short press the HOLD/UNIT button to freeze the current temperature readings on the display. The "HOLD" indicator will appear.
- Short press the HOLD/UNIT button again to release the data hold and resume real-time measurement.
6.6. High/Low Temperature Alarm Setting

Image: The thermometer's display with a red backlight, indicating that a high or low temperature alarm threshold has been exceeded. The "Hi" indicator is visible.
- Setting High Alarm: Press the HI button. The "HI" indicator will flash. Use the MAX/MIN and ADJ buttons to adjust the desired high limit. Press HI again to confirm.
- Setting Low Alarm: Press the LOW button. The "LOW" indicator will flash. Use the MAX/MIN and ADJ buttons to adjust the desired low limit. Press LOW again to confirm.
- When an alarm is triggered, the screen backlight will turn red, and an audible alarm may sound (if enabled).
6.7. ADJ Compensation (Calibration)
- To adjust the ADJ compensation value (for calibration), press and hold the HI and LOW buttons simultaneously.
- The ADJ value (range -9 to 9°C / 15.8 to 48.2°F) can then be adjusted using the MAX/MIN buttons.
- Press ADJ to confirm and exit.
6.8. Differential Temperature Measurement (T1-T2 / T2-T1)
- Press the T1-T2 / T2-T1 button to display the temperature difference between Channel 1 and Channel 2.
- Press again to switch the order of subtraction (T2-T1).
- Press a third time to return to individual channel readings.
7. Applications
The Landtek Dual-Channel K/J Type Digital Thermocouple Thermometer is suitable for a wide range of applications, including but not limited to:
- HVAC system diagnostics and maintenance.
- Industrial process temperature monitoring (e.g., furnaces, machinery).
- Laboratory research and experiments.
- Refrigeration equipment performance testing.
- Food processing and storage temperature checks.
- Aquarium temperature monitoring.

Image: The thermometer being used to measure the temperature of liquids in two separate beakers, demonstrating its dual-channel capability.
8. Product Videos
8.1. K Type Thermocouple Thermometer Overview
Video: An overview of a 2-channel K/J thermocouple thermometer, highlighting its wide measurement range, K-type and bead-type thermocouples, HD display, temperature unit switching, K/J switchable modes, Max/Min/Average tracking, data hold, auto power-off, differential temperature measurement, high/low flash alarm, and ADJ compensation.
8.2. K/J Thermocouple Thermometer Features
Video: A demonstration of the K/J Thermocouple Thermometer's features, including dual-channel support, Max/Min/Avg display, backlight control, data hold, temperature unit switching, high/low limit alarms, and temperature difference display (T1-T2, T2-T1), and thermocouple temperature compensation.
9. Specifications
| Feature | Description |
|---|---|
| Model Name | Dual Channels K/J Type Thermometer |
| Model Number | MILA34300N |
| Measurement Range (Main Unit) | -200 to 1372°C (-328 to 2501°F) |
| Measurement Range (Stainless Steel K-Type Probe) | -50 to 700°C (-58 to 1292°F) |
| Measurement Range (Bead-Type K-Type Probe) | -20 to 200°C (-4 to 392°F) |
| Accuracy | ±0.2% + 0.7°C |
| Resolution | 0.1°C/°F (for -99.9° to 999.9°), 1°C/°F (for other ranges) |
| Display Type | Digital LCD with Backlight |
| Response Time | 0.5 seconds |
| Power Source | 3 x AAA batteries |
| Special Features | High/Low Alarm, ADJ Compensation, Data Hold, Max/Min/Avg, Auto Power-Off |
| Dimensions | 152mm (5.98") Length x 55mm (2.16") Width x 33mm (1.29") Depth |
| Weight | 290g (0.64 lbs) |
| Outer Material | Stainless Steel (probes) |
| Product Care Instructions | Wipe Clean |

Image: The thermometer with its physical dimensions (length, width, depth) indicated in both millimeters and inches, along with its weight in grams.
10. Maintenance
10.1. Cleaning
- Wipe the device casing with a soft, damp cloth. Do not use abrasive cleaners or solvents.
- Clean thermocouple probes with appropriate cleaning agents depending on the substance they contacted. Ensure probes are dry before storage.
10.2. Storage
- Store the thermometer and probes in the provided carrying pouch when not in use.
- Keep the device in a cool, dry place, away from direct sunlight and extreme temperatures.
- Remove batteries if storing for extended periods to prevent battery leakage and damage to the device.
11. Troubleshooting
| Problem | Possible Cause | Solution |
|---|---|---|
| Device does not power on. | Dead or incorrectly installed batteries. | Replace batteries with new AAA batteries, ensuring correct polarity. |
| Inaccurate temperature readings. | Incorrect thermocouple type selected (K vs. J). Damaged probe. Needs calibration. | Verify correct thermocouple type. Check probe for damage and replace if necessary. Perform ADJ compensation as per section 6.7. |
| "OL" or "---" displayed. | Temperature is outside the probe's or device's measurement range. Open circuit in probe. | Ensure the measured temperature is within the specified range. Check probe connection and integrity. |
| Alarm not functioning. | Alarm limits not set correctly. Alarm function disabled. | Review and set high/low alarm limits (Section 6.6). Check device settings for alarm activation. |
12. Warranty and Support
This Landtek product is covered by a standard manufacturer's warranty. For specific warranty terms and conditions, please refer to the warranty card included in your package or visit the official Landtek website.
For technical support, troubleshooting assistance, or to inquire about replacement parts, please contact Landtek customer service through their official channels. Keep your purchase receipt and model number (MILA34300N) handy when contacting support.
Manufacturer: Landtek
Country of Origin: China