
Introduction
This manual provides detailed instructions for the installation, adjustment, and maintenance of your maXpeedingrods Coilovers. These coilovers are designed to enhance your vehicle's handling and allow for ride height and damping force adjustments. Please read this manual thoroughly before attempting any installation or adjustment.
Safety Warning: Installation of suspension components should only be performed by qualified professionals. Improper installation can lead to serious injury or vehicle damage. Always use appropriate safety equipment and follow all vehicle manufacturer guidelines.
Vehicle Compatibility
These coilovers are designed to fit the following vehicle models:
- Subaru Impreza WRX sedan/hatchback 2008-2014
- Subaru Impreza WRX Limited sedan/hatchback 2008-2014
- Subaru Impreza WRX Premium sedan/hatchback 2008-2014
Product Features and Components
The maXpeedingrods Coilovers are engineered with several key features for performance and durability:
- 24-Level Rebound Damping Force Adjustment: Allows fine-tuning of suspension stiffness.
- Adjustable Camber Plates: Made of 6061-T6 Aluminum for precise alignment adjustments.
- High Tensile Coil Springs: Constructed from 55CrSi steel for durability and consistent performance.
- Twin-tube Structure: Provides a longer stroke and higher height adjustability for a comfortable ride.
- Full-Length Dust Boot: Protects the piston shaft from dirt and debris.
- Anodized Shock Body: Features an anti-corrosion coating for extended lifespan.
- Powder-Coated Lower Mount: Offers excellent rust and corrosion resistance.
- High Rigid Piston Rod: Steel construction with high-frequency heat treatment for strength and toughness.
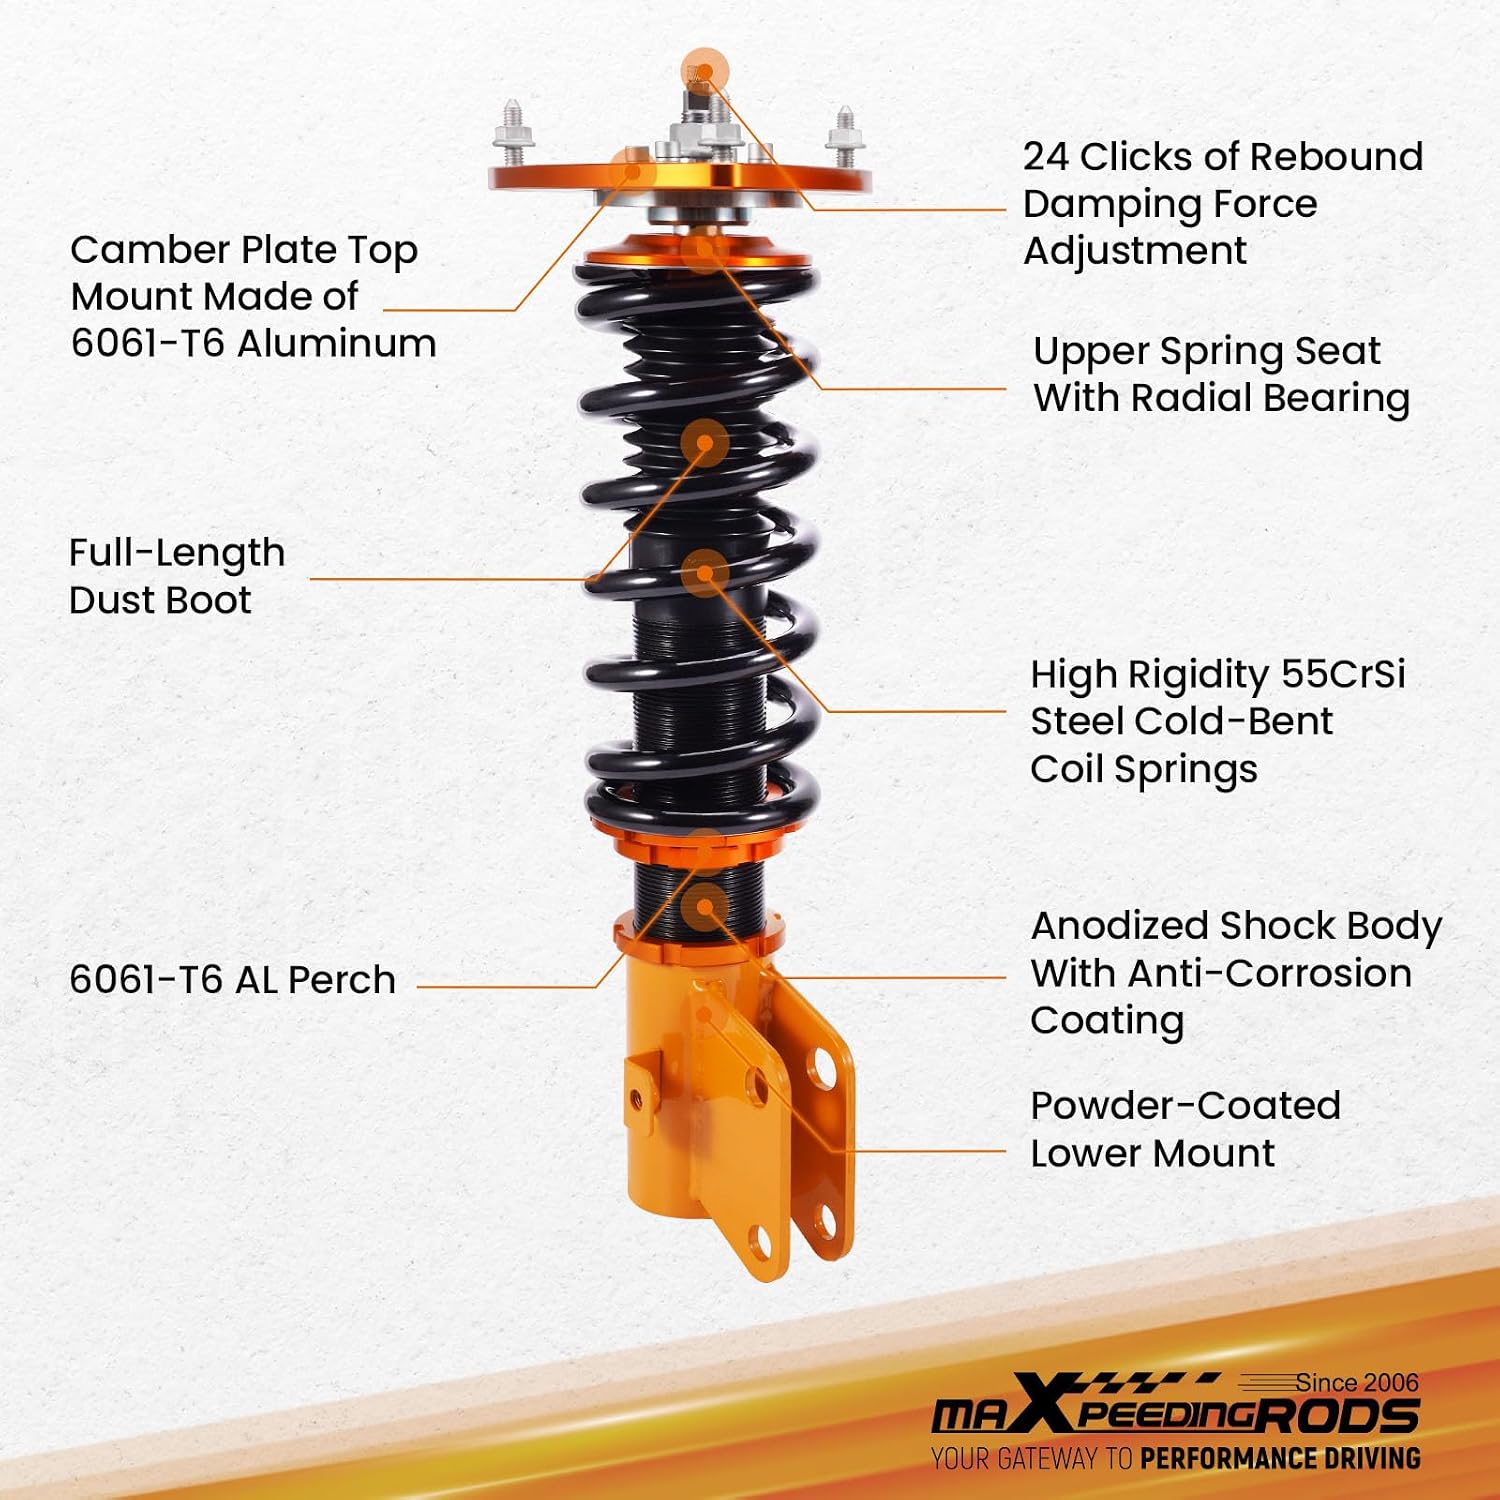
Image: Detailed view of coilover components, including camber plate, spring, dust boot, and lower mount.

Image: Forged T6061 Aluminum Top Mount and 55CrSi Steel Springs.

Image: Durable TPV Full Length Dust Boots and Powder-Coated Lower Mount.
Setup and Installation
Installation of coilovers requires specialized tools and knowledge. It is highly recommended that installation be performed by a certified automotive technician. Incorrect installation can compromise vehicle safety and performance.
General Installation Overview:
- Safely lift and support the vehicle. Remove the wheels.
- Remove the original suspension components (struts, springs).
- Install the new maXpeedingrods coilovers, ensuring all bolts are torqued to vehicle manufacturer specifications.
- Adjust ride height and damping settings as desired (refer to the 'Adjustments' section).
- Reinstall wheels and lower the vehicle.
- Perform a wheel alignment after installation to ensure proper vehicle handling and tire wear.
Included Tools:
- 1x Allen wrench
- 2x C spanners (for height adjustment)

Image: Packaging List, showing 2x Front coil-overs, 2x Rear coil-overs, 1x Allen wrench, and 2x C spanners.
Adjustments
1. Ride Height Adjustment
The coilovers allow for a height adjustment range of 1-3 inches, enabling a more aggressive stance. This adjustment is independent of spring preload.
- Loosen the lower mount (A) and locking ring (B) using the provided C spanners.
- Rotate the coilover body to increase or decrease the threaded distance to change the ride height.
- Once the desired height is achieved, tighten the lower mount (A) and locking ring (B) securely.
Note: These coilovers are designed for lowering and will NOT maintain original ride height.

Image: How to Adjust the Height, showing lower mount (A), locking ring for height adjustable (B), locking ring for preload adjustment (C), and distance (D).

Image: Height Adjustable feature, illustrating independent ride height and spring tension settings.
2. Damping Force Adjustment
The coilovers feature 24 levels of rebound damping force adjustment, allowing you to tailor the suspension response to your driving style and road conditions. The adjustment knob is typically located at the top of the coilover shaft.
- Level 0-8: Suggested for street use, providing a comfortable ride.
- Level 9-16: Suggested for mountain roads or spirited driving, offering improved control.
- Level 17-24: Suggested for race tracks, providing maximum stiffness and responsiveness.
Turn the adjustment knob clockwise for stiffer damping and counter-clockwise for softer damping. Ensure both front and rear coilovers are set to the same damping level for balanced handling.

Image: 24-Level Basic Damping Force Adjustment and Thread-Type Ride Height Adjustment.
Specifications
| Feature | Specification |
|---|---|
| Model Number | EJ71US |
| Front Spring Rate | 8 kg/mm (448 lbs/in) |
| Rear Spring Rate | 7 kg/mm (392 lbs/in) |
| Front Spring Length | 230mm |
| Rear Spring Length | 180mm |
| Front Coilover Overall Length | 450mm-520mm |
| Rear Coilover Overall Length | 460mm-500mm |
| Damping Levels | 24 Rebound Force Levels |
| Height Adjustment Range | 1-3 inches lowering |
| Top Mount Material | 6061-T6 Aluminum |
| Spring Material | 55CrSi Steel |
| Shock Body Finish | Anodized with Anti-Corrosion Coating |
| Lower Mount Finish | Powder-Coated |
| Item Weight | 25860 g (total package) |

Image: Dimension Details for Front and Rear Coilovers, showing spring lengths and rates.
Maintenance
Regular maintenance helps ensure the longevity and optimal performance of your coilovers.
- Regular Inspection: Periodically inspect coilovers for any signs of damage, leaks, or loose components. Check dust boots for tears.
- Cleaning: Keep the coilover bodies and threads clean, especially after driving in harsh conditions (e.g., snow, salt, dirt). Use mild soap and water, then rinse thoroughly.
- Lubrication: Apply a thin layer of anti-seize lubricant to the threads of the coilover body and locking rings during installation and periodic adjustments to prevent seizing.
- Torque Check: Re-check all mounting bolts and nuts after the first 500 miles and periodically thereafter to ensure they remain properly torqued.
Troubleshooting
If you encounter issues with your coilovers, consider the following common problems and solutions:
| Problem | Possible Cause | Solution |
|---|---|---|
| Unusual Noises (clunking, squeaking) | Loose mounting bolts, worn bushings, spring coil bind, improper installation. | Check all mounting points for proper torque. Inspect bushings for wear. Ensure springs are seated correctly and not binding. Re-evaluate installation. |
| Uneven Ride Height | Incorrect height adjustment, uneven spring preload. | Re-measure and adjust ride height on all four corners. Ensure spring preload is consistent if applicable. |
| Poor Handling / Unstable Ride | Incorrect damping settings, improper alignment, loose components, damaged coilover. | Adjust damping settings (ensure front/rear match). Get a professional wheel alignment. Inspect for loose or damaged components. |
| Fluid Leaks from Shock Body | Damaged seal, internal component failure. | This indicates a fault. Contact customer support for assistance. Do not continue to use a leaking shock. |
If troubleshooting steps do not resolve the issue, please contact maXpeedingrods customer support.
Warranty and Support
maXpeedingrods offers a 30-day easy return policy for this product. For any technical assistance, warranty claims, or customer support inquiries, please contact maXpeedingrods directly. Their engineering team and customer service are available to provide expert assistance.
Please refer to the official maXpeedingrods website or your purchase documentation for the most current warranty terms and contact information.