
Introduction
The ENJOYWOOD Pocket Hole Jig Kit XK-4S is a professional woodworking tool designed for creating strong and precise pocket hole joints. Its durable aluminum alloy construction ensures stability and longevity for various carpentry projects. This manual provides detailed instructions for the proper use, maintenance, and troubleshooting of your pocket hole jig.
- Durable Aluminum Body: Features a well-balanced aluminum frame for a reliable support base in woodworking.
- Easy to Use: Includes various accessories and a user guide to accelerate drilling and help create perfect holes with ease.
- Removable Guide: The jig can be mounted or used as a portable tool with a removable drill guide, convenient for on-the-go projects.
- Dust Port System: An efficient dust nozzle connector captures loose debris, particles, and sawdust, ensuring a dust-free drilling environment and reducing airborne allergens.
- Adjustable Pocket Tools: Easily adjusts to wood thickness from 1.27 cm (1/2 inch) to 4.5 cm (1-3/4 inches) with an adjustable unit, including a quick-release lever clamp.
Components Overview
Familiarize yourself with the main components of your ENJOYWOOD Pocket Hole Jig Kit XK-4S.

Image: Overview of the ENJOYWOOD Pocket Hole Jig Kit XK-4S, highlighting its adjustable depth design, quick setting features, and various components.

Image: Close-up view of the jig's 3-hole design, indicating spacing for precise drilling.

Image: Detail of the quick-release lever clamp, designed for fast and secure workpiece fixation.
Setup and Adjustment
Proper setup is crucial for accurate pocket holes. Follow these steps to prepare your jig for use.
- Mounting the Jig: Secure the pocket hole jig onto a stable work surface. It can be mounted directly or clamped in a vise for better support.
- Measuring Workpiece Thickness: Accurately measure the thickness of your wood material. This measurement is essential for setting the correct drill depth and screw length.
- Adjusting Drill Depth: Use the adjustable depth knob on the jig to set the appropriate drill depth. The jig features markings for common wood thicknesses (e.g., 1/2 inch to 1-3/4 inches). Ensure the drill bit collar is set correctly according to the workpiece thickness.
- Setting the Quick-Release Clamp: Adjust the quick-release lever clamp to firmly hold your workpiece. The clamp should be tight enough to prevent movement during drilling but not so tight as to damage the wood.

Image: The adjustable depth design with a drill depth knob and quick limit setting, ensuring high precision and compatibility for various wood thicknesses.
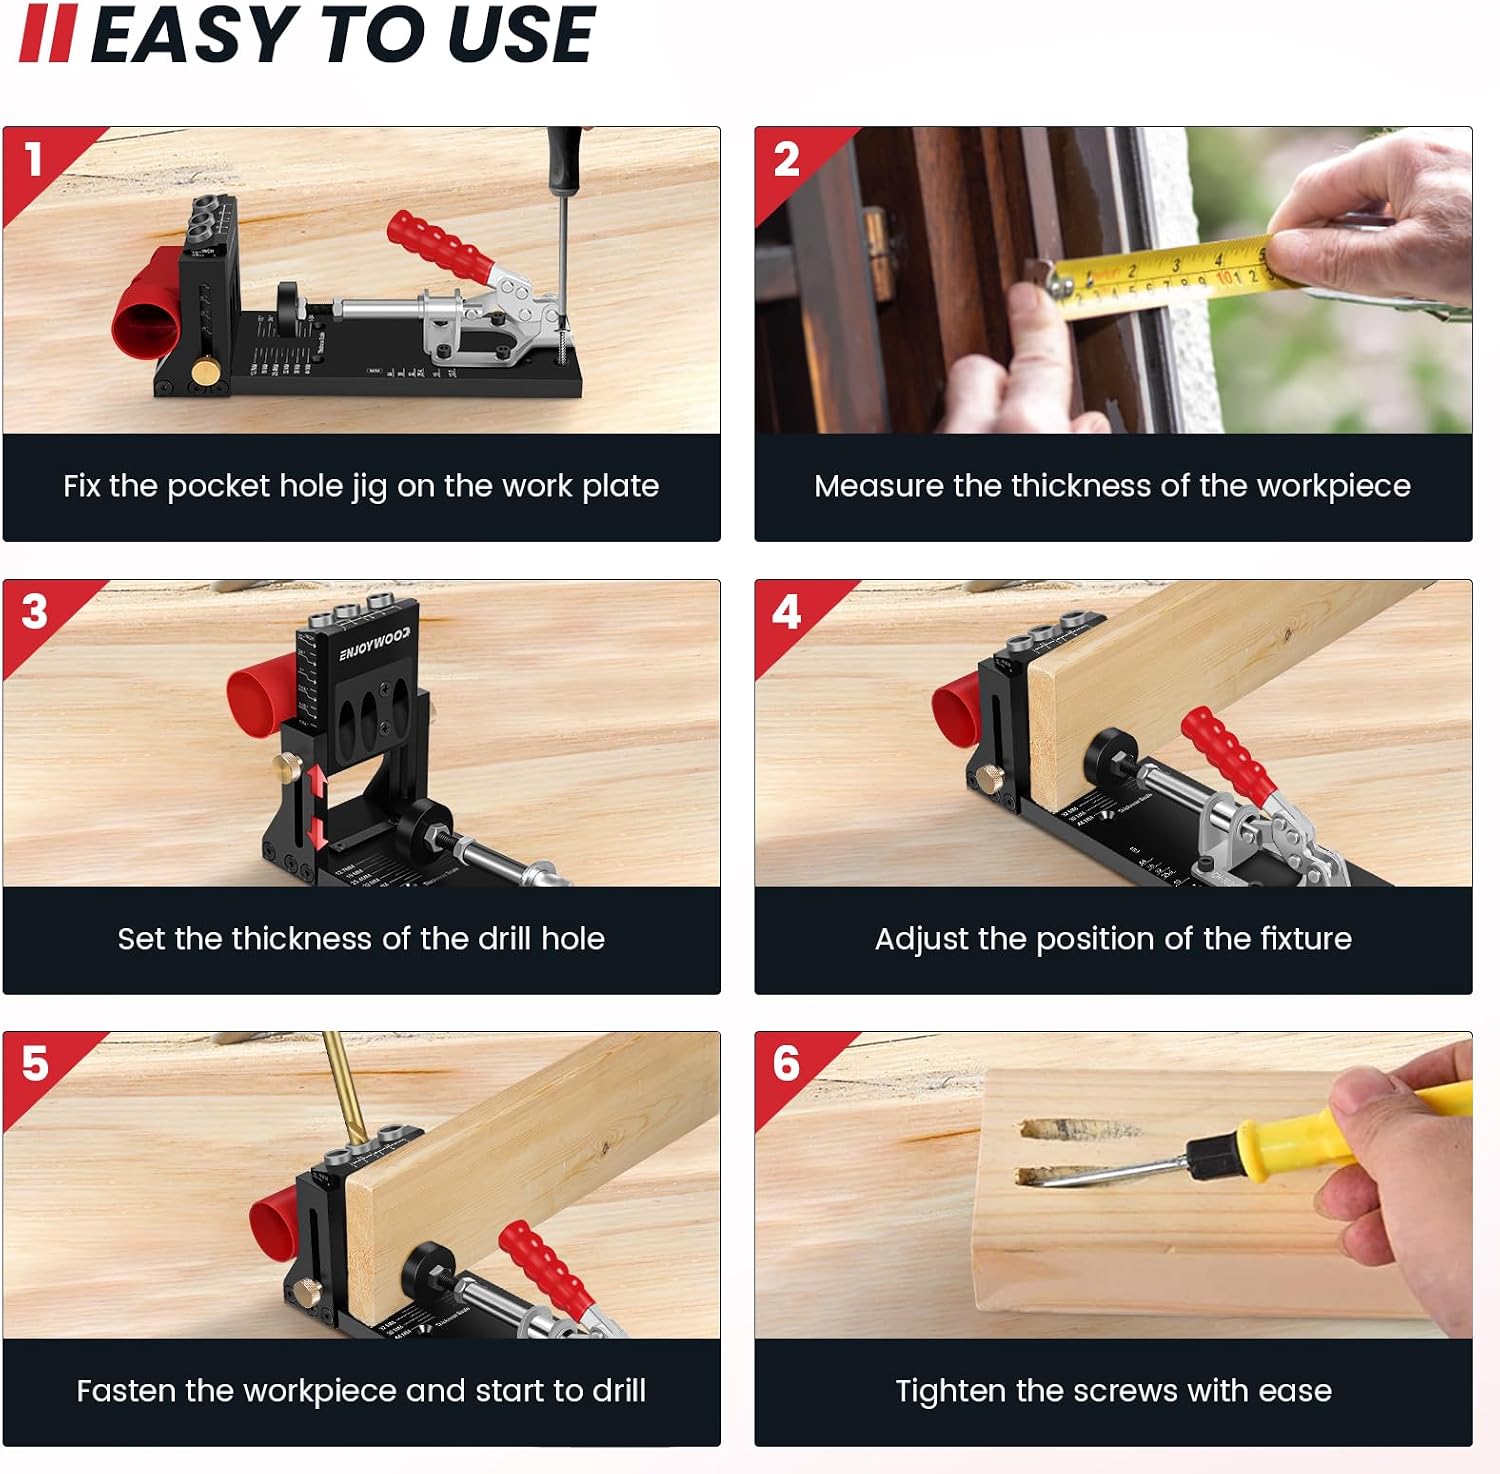
Image: Demonstrates two methods of using the jig: mounted on a workbench for standard use and with the removable guide for larger or longer boards, offering flexibility for materials thicker than 1.7 inches (43mm).
Operating Instructions
Follow these steps for drilling precise pocket holes.
- Fix the Jig: Secure the pocket hole jig on your work surface or use its portable configuration.
- Measure Thickness: Measure the thickness of the workpiece to be drilled.
- Set Drill Hole Thickness: Adjust the jig's settings and the drill bit collar according to the measured workpiece thickness.
- Adjust Fixture Position: Position the workpiece against the jig's stop and adjust the clamp for a snug fit.
- Fasten and Drill: Secure the workpiece with the quick-release clamp and begin drilling. Ensure the dust collection port is connected to a vacuum system for a cleaner workspace.
- Tighten Screws: After drilling, use appropriate pocket hole screws to join the workpieces. Avoid using impact drivers for final tightening to prevent misalignment; a regular drill or hand screwdriver is recommended for the last turns.

Image: A visual guide demonstrating the six easy steps for using the pocket hole jig, from fixing the jig to tightening screws.
Screw Length Selection Guide
Refer to the table below for recommended screw lengths based on material thickness.

Image: A table providing guidance on selecting the correct screw length and slider setting based on the material thickness for optimal pocket hole joints.
| Material Thickness | Screw Length | Slider Setting |
|---|---|---|
| 13mm (1/2") | 25mm (1") | 13mm (1/2") |
| 16mm (5/8") | 25mm (1") | 16mm (5/8") |
| 19mm (3/4") | 32mm (1-1/4") | 19mm (3/4") |
| 22mm (7/8") | 38mm (1-1/2") | 22mm (7/8") |
| 25mm (1") | 38mm (1-1/2") | 25mm (1") |
| 29mm (1-1/8") | 38mm (1-1/2") | 29mm (1-1/8") |
| 32mm (1-1/4") | 51mm (2") | 32mm (1-1/4") |
| 35mm (1-3/8") | 51mm (2") | 35mm (1-3/8") |
| 38mm (1-1/2") | 64mm (2-1/2") | 38mm (1-1/2") |
Maintenance
Regular maintenance ensures the longevity and optimal performance of your pocket hole jig.
- Cleaning: After each use, clear all sawdust and wood chips from the jig, especially from the drill guides and clamping mechanism. The integrated dust port system helps, but manual cleaning may still be necessary.
- Lubrication: Periodically apply a light lubricant to the moving parts of the clamp and adjustment mechanisms to ensure smooth operation.
- Drill Bit Care: Inspect drill bits for sharpness and damage. Replace dull or damaged bits to maintain drilling accuracy and prevent excessive wear on the jig's guides.
- Storage: Store the jig in a clean, dry environment to prevent rust and damage.
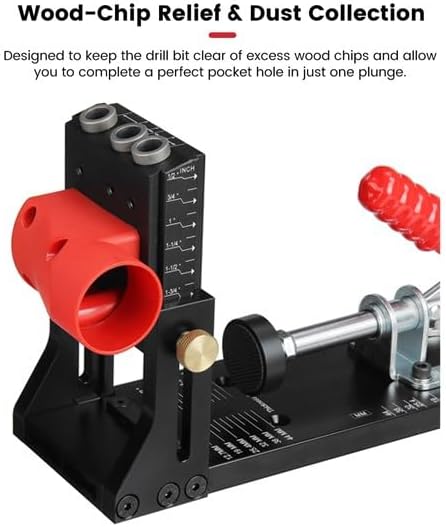
Image: The jig's design for wood-chip relief and dust collection, showing the red dust port designed to keep the drill bit clear and facilitate perfect pocket holes.
Troubleshooting
If you encounter issues while using your pocket hole jig, refer to the following common problems and solutions.
| Problem | Possible Cause | Solution |
|---|---|---|
| Drill bit wobbles or makes contact with the guide. | Loose drill bit in chuck; incorrect drill bit size; worn guide. | Ensure drill bit is securely tightened in the drill chuck. Use the correct size drill bit for the jig. Inspect and replace worn guides if necessary. |
| Metal tube guides come loose. | Manufacturing defect or excessive force during drilling. | Contact customer support for replacement parts or warranty service. Ensure proper drilling technique to avoid undue stress on the guides. |
| Workpiece shifts during drilling. | Clamp not tight enough; incorrect clamp adjustment for workpiece thickness. | Adjust the quick-release clamp to ensure a firm grip on the workpiece. Verify the clamp is set for the correct material thickness. Consider using additional clamps to secure the jig to the workbench. |
| Burrs or rough edges on pocket holes. | Dull drill bit; incorrect drilling speed; metal burrs inside jig holes. | Replace dull drill bits with sharp ones. Use appropriate drilling speed for the material. Inspect jig holes for internal burrs and carefully remove them if present. |
| Dust collection is ineffective. | Dust port not connected or clogged; vacuum system insufficient. | Ensure the dust port is properly connected to a suitable vacuum or dust extractor. Clear any blockages in the dust port or hose. |
Specifications
Detailed technical specifications for the ENJOYWOOD Pocket Hole Jig Kit XK-4S.
| Feature | Detail |
|---|---|
| Manufacturer | TANGERINEE |
| Brand | ENJOYWOOD |
| Model | XK-4S |
| Material | Aluminum Alloy |
| Color | Black and Red |
| Shape | Rectangular |
| Number of Holes | 3 |
| Specific Product Uses | Wood Drilling |
| Included Components | 1 pocket hole jig |
| Batteries Included? | No |
| Battery Operated? | No |
| Product Dimensions (L x W x H) | 31.5 x 14.22 x 14.99 cm (12.4 x 5.6 x 5.9 inches) |
| Item Weight | 1.96 kilograms |
| ASIN | B0C4TQMQJL |
| Available for Purchase Since | May 10, 2023 |
Warranty and Support
For warranty information or technical support, please refer to the documentation included with your purchase or contact the manufacturer directly. Keep your proof of purchase for any warranty claims.
Manufacturer: TANGERINEE
Brand: ENJOYWOOD
For further assistance, please visit the official ENJOYWOOD website or contact their customer service department.