Product Overview
The mooas Wooden Frame LED Silent Wall Clock is a versatile digital clock designed for various living spaces. It integrates time display, a backlit nightlight, and alarm functions, all controllable via a remote. Its modern design features a wooden frame and an LED display that adjusts brightness automatically.

Image: Front view of the mooas Wooden Frame LED Silent Wall Clock, showing the digital time, date, and day of the week, with a subtle backlight glow.
Package Contents
Before setup, ensure all components are present:
- mooas Wooden Frame LED Silent Wall Clock
- Remote Control
- USB Cable
- US (110V) Power Adapter
- Wooden Stand
- Wall Mount Pins (3)
- Art Wall Hooks (3)
- Cable Clips (5)
- Screw Anchors (3)
- Wall Mount Screws (3)
- User Manual (this document)

Image: All items included in the product package, laid out neatly, showing the clock, remote, power adapter, cables, wooden stand, and various wall mounting accessories.
Setup and Installation
Power Connection
The clock is powered by the included adapter only. The built-in CR2032 battery is for time memory feature only and is not a power source.
- Connect the USB cable to the clock's power input port.
- Plug the USB cable into the provided US (110V) power adapter.
- Insert the power adapter into a standard wall outlet.
Mounting Options
The clock offers two primary mounting methods: wall hanging and desk standing.

Image: Two clocks demonstrating the two types of standing: one placed on a desk using the included wooden stand, and another hanging on a wall.
Wall Hanging Mode
A hanging hole is located on the back side of the clock for easy wall mounting. Use the provided wall mount pins, art wall hooks, or screws and anchors depending on your wall type.
- Identify the desired location on the wall.
- Mark the position for the hanging mechanism.
- Install the appropriate wall mount hardware (pin, hook, or screw/anchor).
- Carefully hang the clock onto the installed hardware.
- Use the included cable clips to neatly route the power cable along the wall for a cordless appearance.

Image: Close-up of the wall clock accessories, including wall mount pins, art wall hooks, cable clips, screw anchors, and wall mount screws.
Desk Standing Mode
The included wooden stand supports the clock to remain stable on a flat surface.
- Insert the bottom edge of the clock into the groove of the wooden stand.
- Ensure the clock is securely seated in the stand.
- Place the assembled clock and stand on a stable desk or shelf.
Operating Instructions
Basic Display Modes
The clock has three main display modes:
- Clock Mode: Displays time, calendar, and day.
- Nightlight Mode: Only the backlight is active, providing ambient lighting.
- Nightlight & Clock Mode: Both the digital display and backlight are active.
These modes can be toggled using the remote control or buttons on the clock.

Image: Three clocks illustrating the different display modes: Clock (digital display only), Nightlight (backlight only), and Nightlight+Clock (both digital display and backlight active).
Nightlight Features
The backlit nightlight offers three color options to suit your preference:
- Warm White (2700K)
- Daylight (4000K)
- Cool White (5500K)
Use the remote control to cycle through these colors.

Image: Three clocks demonstrating the three available nightlight colors: Warm white (yellowish glow), Daylight (neutral white glow), and Cool white (bluish-white glow).
Brightness Adjustment
The clock features both manual and automatic brightness control for the LED display and nightlight.
- Manual Adjustment: Use the brightness buttons on the remote control or the backside buttons on the clock to select from 5 levels of brightness (LV.1 to LV.4, and OFF).
- Auto Brightness Adjustment: The illuminance sensor automatically adjusts the display brightness based on environmental light. The display will be brighter during the day and dim at night. To activate this function, long-press the display brightness button until the display blinks twice. The default setting for auto brightness control is OFF.
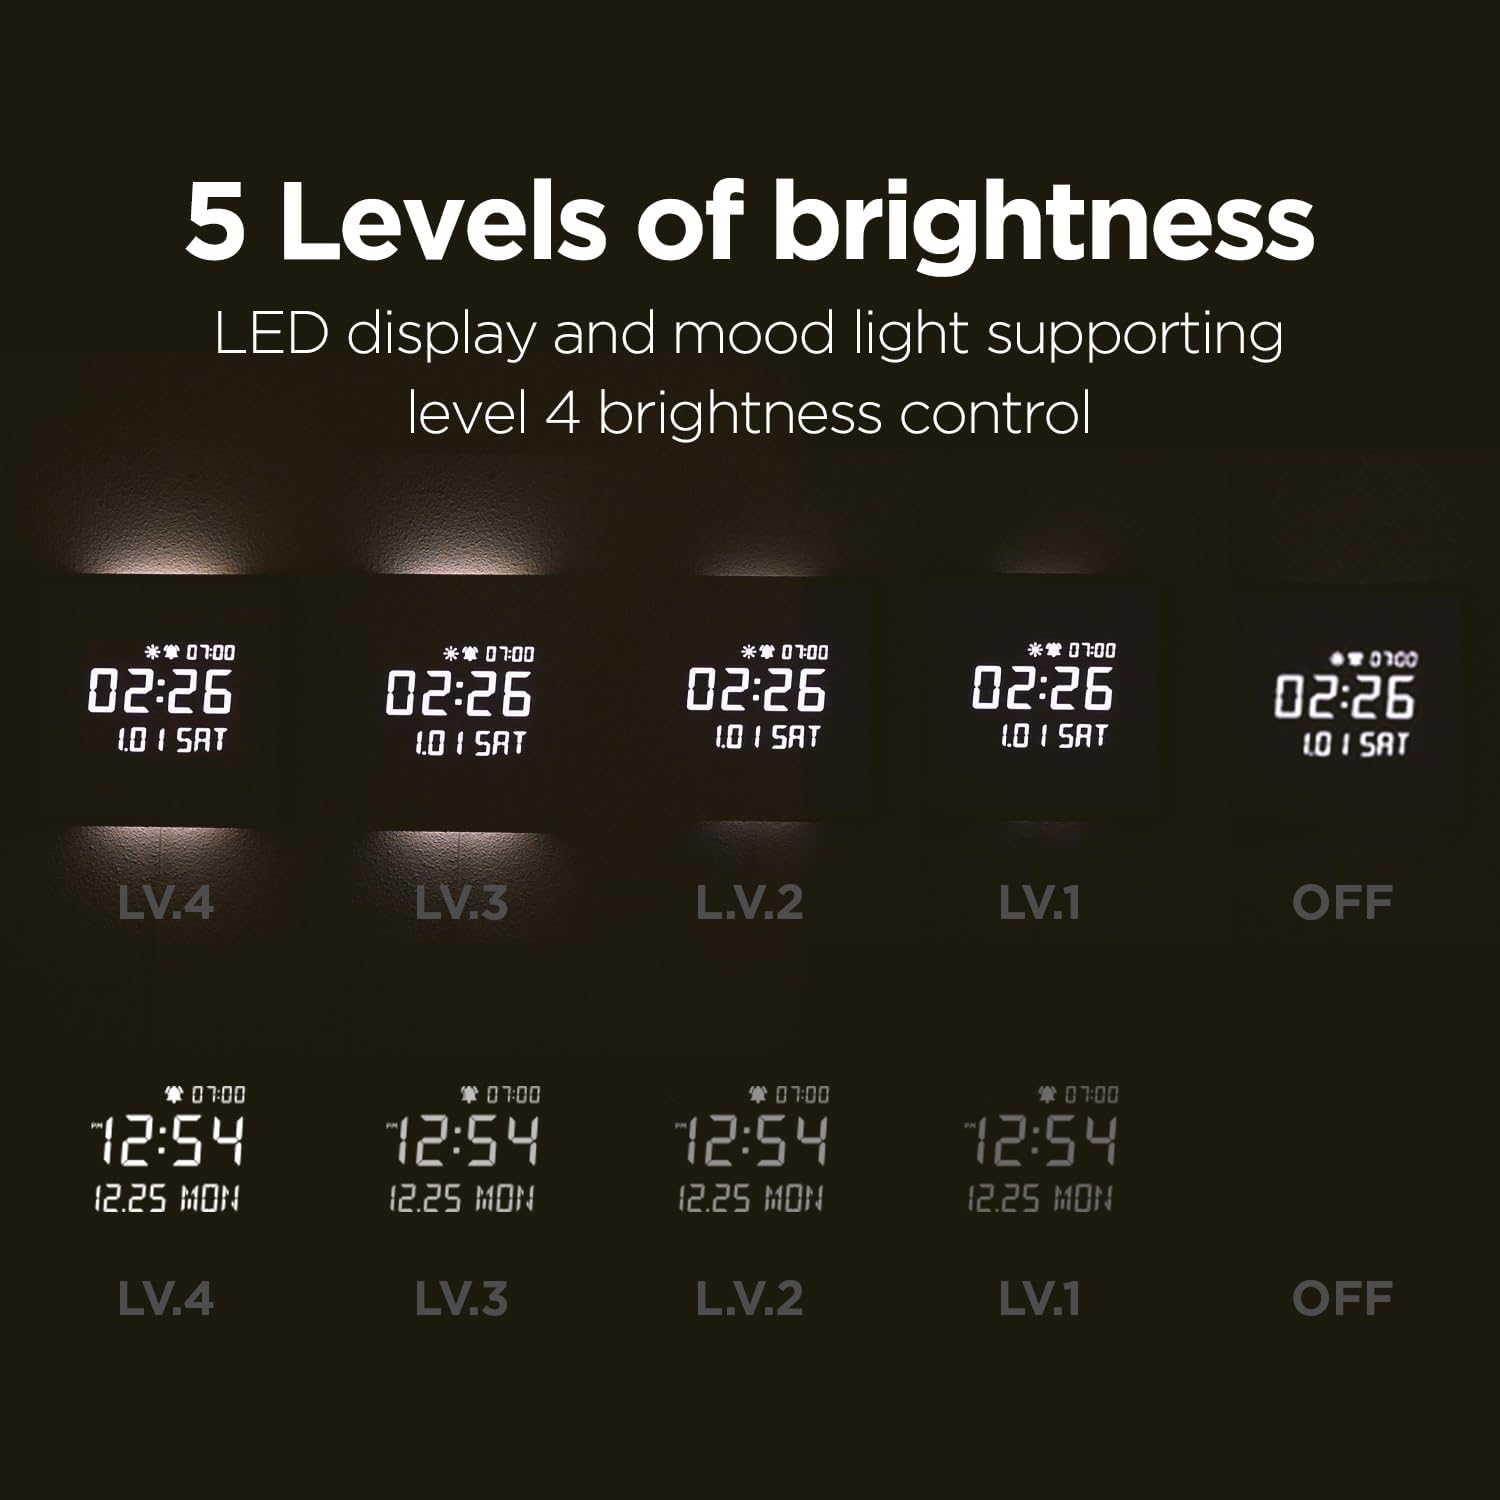
Image: A grid showing the clock display at five different brightness levels (LV.4, LV.3, LV.2, LV.1, and OFF) for both the digital time and the nightlight.
Alarm and Timer Functions
- Alarm Setting: Set alarms for specific times. You can choose to set weekday alarms only for your rest days.
- Melody Options: The alarm offers 5 melodies, including bird sounds, rain sounds, and a standard beep.
- Sunrise Mode: Set a 10/20/30 minute sunrise mode. The backlight will slowly brighten up as the alarm time approaches, simulating a natural sunrise.
- Nightlight Timer: Set a timer for the nightlight to automatically turn off. The maximum setting is 120 minutes, with a default of 30 minutes. This prevents the nightlight from interrupting your sleep.
- Alarm Volume Control: Adjust the alarm volume to high (03), mid (02), low (01), or OFF. The sequence for adjustment is high (03) → OFF → low (01) → mid (02).

Image: The clock displaying an alarm time (07:00) with musical notes floating around, indicating the melody alarm feature.
Remote Control Usage
The remote control provides convenient access to all clock functions. Ensure the protective film on the remote control is removed before use.
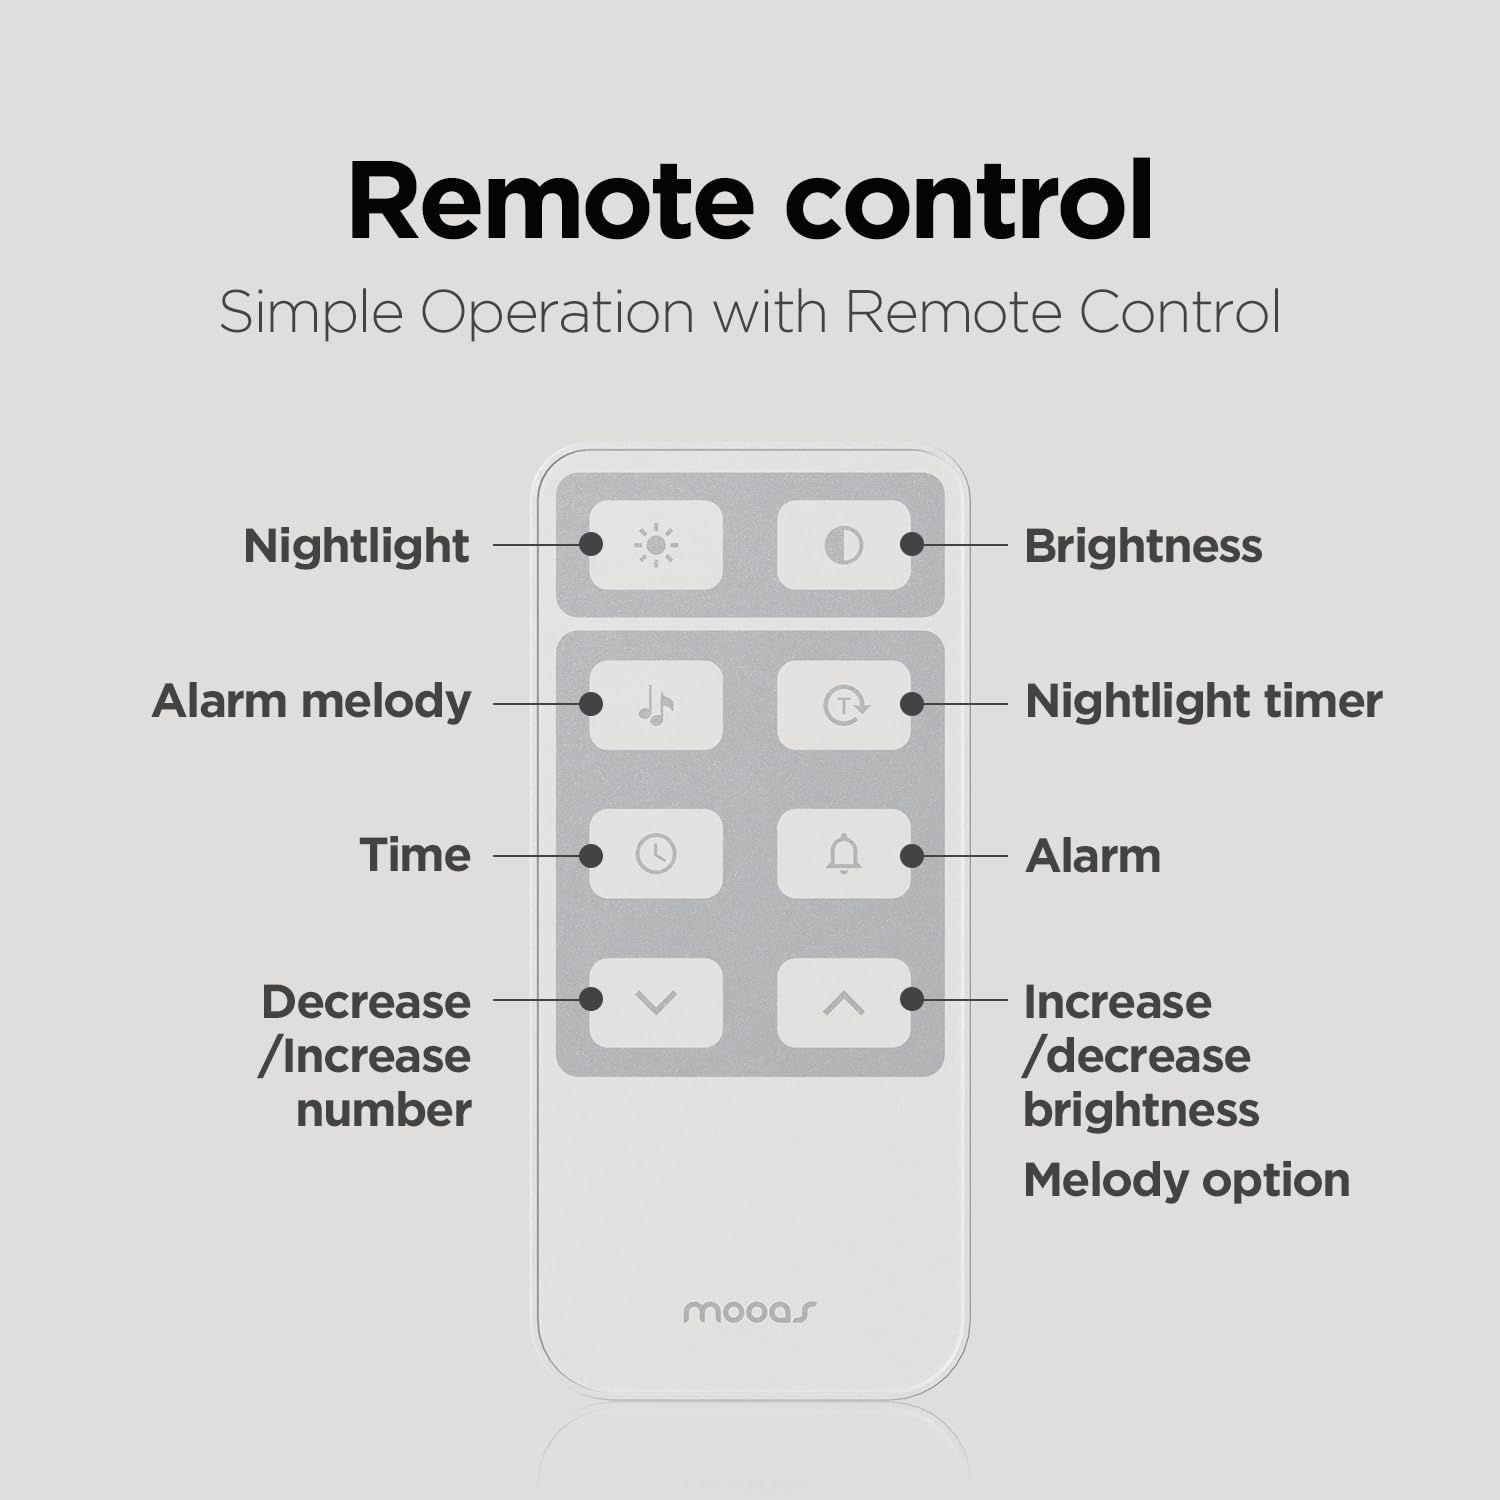
Image: A diagram of the remote control, with labels pointing to buttons for Nightlight, Brightness, Alarm melody, Nightlight timer, Time, Alarm, Decrease/Increase number, and Increase/decrease brightness/Melody option.
Key remote functions:
- Nightlight Button: Toggles nightlight on/off.
- Brightness Button: Adjusts display and nightlight brightness levels. Long press for auto brightness.
- Alarm Melody Button: Cycles through alarm melodies.
- Nightlight Timer Button: Sets the nightlight auto-off timer.
- Time Button: Enters time setting mode.
- Alarm Button: Enters alarm setting mode.
- Up/Down Arrows: Navigate menus, adjust values, or change temperature unit (short press UP button to change between Celsius and Fahrenheit).
Maintenance
Cleaning
To clean the clock, gently wipe the surfaces with a soft, dry cloth. Avoid using abrasive cleaners or solvents that may damage the finish or display.
Battery for Time Memory
The clock contains a CR2032 battery for time memory during power outages. This battery is not a power source for the clock's operation.
Remote Control Battery
The remote control uses a CR2025 battery. If the remote is not working properly, ensure the battery is correctly inserted and has sufficient charge. If issues persist, try replacing the battery with a new CR2025 or CR2032 (which is the same 3V and size).
Troubleshooting
- Clock not turning on: Ensure the power adapter is securely connected to both the clock and a working power outlet. The built-in CR2032 battery is for memory only, not operation.
- Remote control not working:
- Remove the protective film from the remote control.
- Check the CR2025 battery in the remote. Replace if necessary.
- If issues persist, separate both the battery and cable from the clock and remote control. This will reset the time. Reconnect and set the time again, then insert the battery into the clock.
- Alarm not sounding:
- Verify that the alarm is enabled and set to the correct time.
- Check the alarm volume setting. Ensure it is not set to OFF.
- Display too bright/dim:
- Adjust the brightness manually using the remote or backside buttons.
- If auto brightness is enabled, ensure the illuminance sensor is not obstructed.
- Temperature unit (C/F) change: Short press the "UP" button on the remote control to toggle between Celsius and Fahrenheit.
Specifications
| Feature | Detail |
|---|---|
| Brand | mooas |
| Model Number | MC-L8 |
| Color | Wooden Frame Dark Brown |
| Display Type | Digital LED |
| Product Dimensions | 11.4"W x 11.4"H |
| Item Weight | 2.31 pounds |
| Power Source | Corded Electric (5V 2A adapter included) |
| Cable Length | 5m |
| Battery (Time Memory) | 1 x CR2032 (included, for memory only) |
| Battery (Remote) | 1 x CR2025 (included) |
| Nightlight Colors | Warm White (2700K), Daylight (4000K), Cool White (5500K) |
| Brightness Levels | 5 levels (including OFF) with auto-brightness option |
| Alarm Melodies | 5 options (including bird, rain, beep) |
| Nightlight Timer | Up to 120 minutes (default 30 minutes) |
| Sunrise Mode | 10/20/30 minutes options |
| Mounting Type | Wall Mount / Desk Stand |
| Material | Wood (frame), PVC, MDF, ABS, PS |
Official Product Video
Video: An official product video from Mooas Official demonstrating the features and appearance of the mooas wooden frame LED clock, including its use as a desk clock and wall clock, and the nightlight function.
Warranty and Support
For warranty information and customer support, please refer to the contact details provided with your purchase or visit the official mooas website. Keep your purchase receipt for warranty claims.
For additional assistance, you may also refer to the User Manual (PDF) available online.


