1. Introduction
Thank you for choosing the KETOTEK CO2 Meter. This device is designed to provide real-time monitoring of indoor air quality by detecting carbon dioxide (CO2) concentration, ambient temperature, and humidity. Please read this manual thoroughly before using the product to ensure proper operation and to maintain its accuracy and longevity.
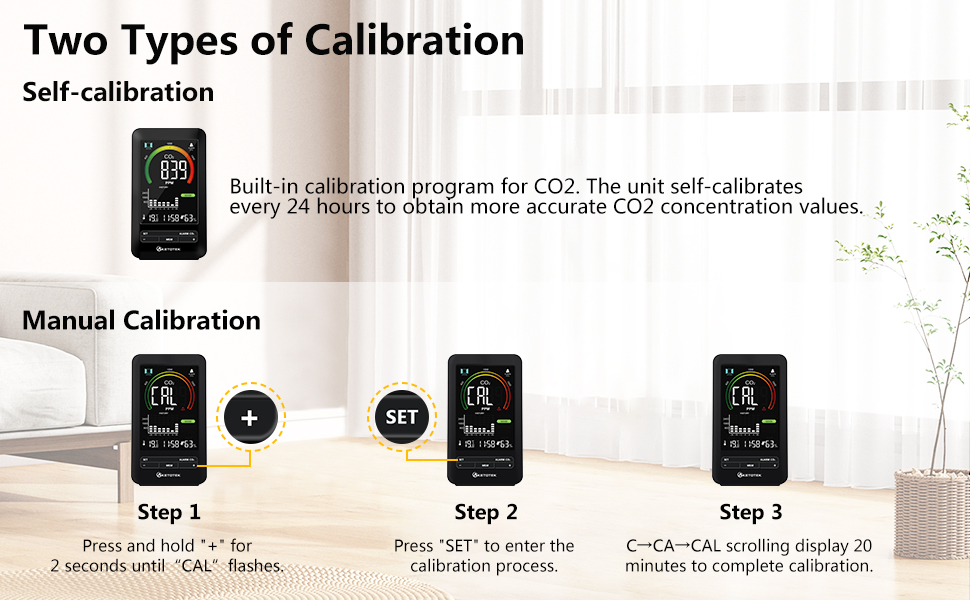
Image 1.1: KETOTEK CO2 Meter with its key features highlighted.
2. Product Overview
2.1 Key Features
- 3-in-1 Detection: Accurately measures CO2 concentration, ambient temperature, and humidity in real-time.
- Audible Alarm: Alerts when CO2 concentration exceeds a preset safety level. The alarm can be silenced by pressing any button.
- Clear Display: High-end VA LCD screen with a wide viewing angle and adjustable backlight brightness.
- Air Quality Indicator: A 4-level colored health indicator provides an immediate visual assessment of air quality.
- Wide Detection Range: CO2: 400-5000 PPM; Temperature: -9.9℃~50℃; Humidity: 1-99% RH.
- Advanced Sensor: Utilizes advanced Swiss Sensirion sensors for accurate and reliable measurements.
- Calibration: Features a built-in CO2 calibration program, supporting both automatic and manual calibration.
- Clock Function: Functions as a daily clock and alarm.
2.2 Package Contents
The package includes the following items:
- 1 x KETOTEK CO2 Detector
- 1 x Power Adapter
- 1 x USB Cable
- 1 x User Manual (this document)

Image 2.1: Package contents of the KETOTEK CO2 Meter.
3. Setup
3.1 Powering the Device
The CO2 detection function requires the device to be connected to a power supply for accurate measurements. Alkaline batteries (not included) can be used to store parameter settings and prevent data loss during power outages, but they do not power the CO2 sensor for continuous operation.
- Connect the provided USB cable to the CO2 detector.
- Connect the other end of the USB cable to the power adapter.
- Plug the power adapter into a standard electrical outlet.

Image 3.1: Connecting the CO2 Meter to power.
3.2 Battery Installation (Optional for Settings Memory)
To retain time and alarm settings during a power outage, install 3 AAA alkaline batteries (not included) into the battery compartment on the back of the device.

Image 3.2: Battery compartment for settings memory.
3.3 Initial Calibration
After power-on, the device will perform an automatic calibration for 60 seconds. During this period, ensure the device is in a well-ventilated area. The device is ready for operation once this initial calibration is complete.
4. Operation
4.1 Display Overview
The VA LCD screen provides a comprehensive overview of air quality data. Refer to the image below for an explanation of each display element.
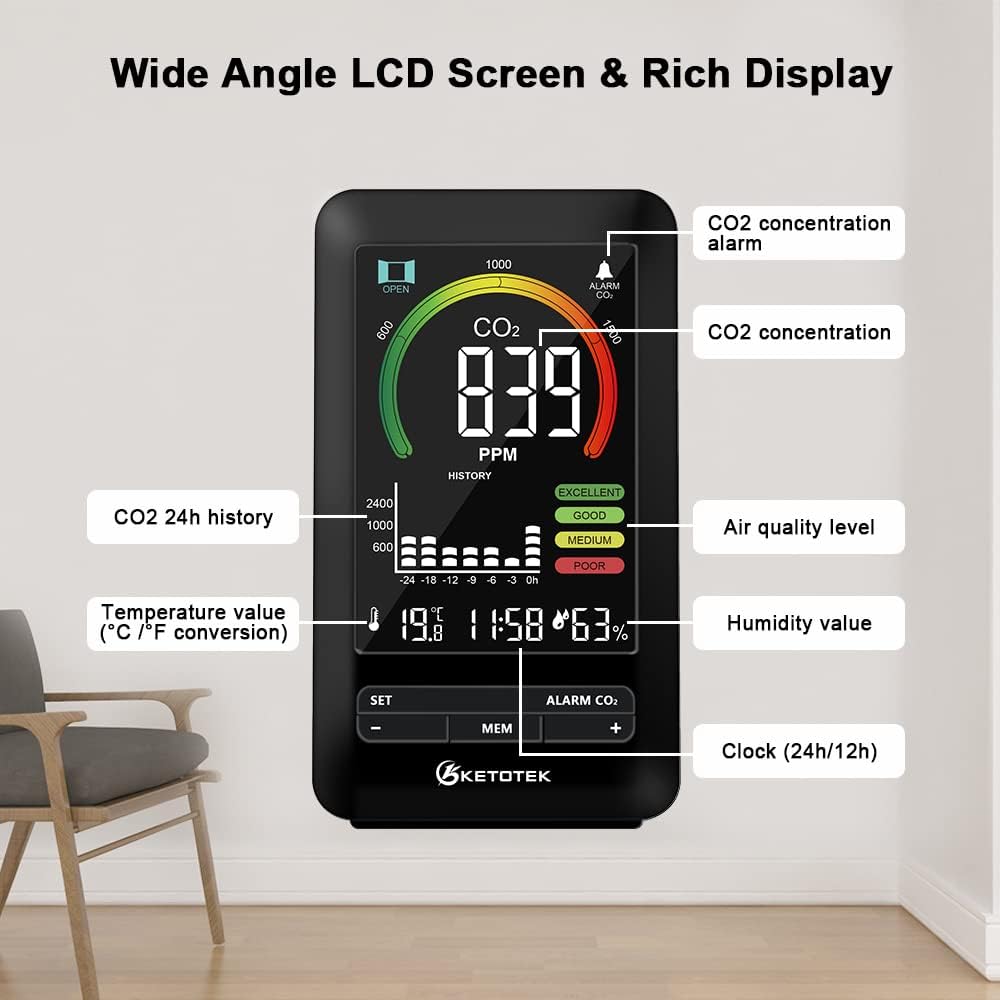
Image 4.1: Detailed view of the CO2 Meter's display elements.
4.2 Adjusting Backlight Brightness
The backlight brightness is adjustable. Gently touch the top panel of the device to cycle through different brightness levels (High, Medium, Low, Off).

Image 4.2: Backlight brightness adjustment.
4.3 CO2 Alarm Function
The device features an audible alarm that activates when the CO2 concentration exceeds a user-defined threshold. To silence the alarm, press any button on the device.

Image 4.3: CO2 alarm indicator.
To adjust the alarm threshold or other settings, refer to the "Settings" section (if available on the device, typically accessed via the 'SET' button).
5. Calibration
The KETOTEK CO2 Meter supports both automatic and manual calibration to ensure measurement accuracy.
5.1 Automatic Calibration
The unit has a built-in calibration program for CO2. It self-calibrates every 24 hours to obtain more precise CO2 concentration values. No user intervention is required for automatic calibration.
5.2 Manual Calibration
Manual calibration can be performed if you suspect the readings are inaccurate or after prolonged use. Ensure the device is in a fresh air environment (e.g., outdoors) during manual calibration.
- Press and hold the "+" button for 2 seconds until "CAL" flashes on the display.
- Press the "SET" button to enter the calibration process.
- The display will show "C→CA→CAL" and count down for 20 minutes to complete the calibration.

Image 5.1: Manual calibration steps.
6. Maintenance
- Keep the device clean by wiping it with a soft, dry cloth. Do not use abrasive cleaners or solvents.
- Avoid exposing the device to extreme temperatures, direct sunlight, or high humidity.
- Do not block the ventilation openings on the device, as this can affect sensor accuracy.
- If storing the device for an extended period, remove the batteries to prevent leakage.
7. Troubleshooting
- Q: The screen displays correct temperature and humidity values, but no CO2 measurement.
- A: Please ensure the device is connected to a power outlet. The CO2 detection function only operates when the device is powered via the mains. If it is connected and still not displaying CO2 values, the adapter might be faulty. Try replacing it with another adapter to identify the cause.
- Q: The backlight brightness cannot be adjusted.
- A: The backlight adjustment function requires the device to be connected to a power outlet.
- Q: The CO2 concentration is low and the measurement remains unchanged.
- A: The indoor air quality might genuinely be very good. Try exhaling towards the device and observe if the carbon dioxide concentration changes. If it does, the sensor is likely functioning correctly.
8. Specifications
| Feature | Specification |
|---|---|
| Brand | KETOTEK |
| Model Number | E0171 |
| Style | Compact |
| Color | Black |
| CO2 Detection Range | 400-5000 PPM |
| Temperature Detection Range | -9.9℃~50℃ |
| Humidity Detection Range | 1-99% RH |
| Sensor Type | Non-dispersive Infrared (NDIR) |
| Power Source | Mains powered (USB cable + adapter), Battery (for settings memory) |
| Alarm | Audible |
| Country of Origin | China |

Image 8.1: Device dimensions and regulatory information.
9. Safety Information
- Do not disassemble or modify the device. This may cause damage or malfunction.
- Keep the device away from water and other liquids to prevent electric shock or damage.
- Use only the provided power adapter and USB cable.
- This device is intended for indoor use only.
- Keep out of reach of children.
10. Application Scenarios
The KETOTEK CO2 Meter is suitable for a wide range of indoor environments where air quality monitoring is beneficial:
- Homes and Bedrooms
- Kitchens
- Offices and Workspaces
- Schools and Classrooms
- Hotels
- Hospitals
- Cars
- Grow Rooms

Image 10.1: Examples of suitable application environments.
11. Product Demonstration Video
Watch this video for a visual guide on unboxing, setup, and basic operation of the KETOTEK CO2 Meter.
Video 11.1: Unboxing and demonstration of the KETOTEK CO2 Meter.
12. Warranty and Support
KETOTEK products are designed for reliability and performance. For warranty information, technical support, or service inquiries, please refer to the contact details provided on the product packaging or the official KETOTEK website. Please retain your proof of purchase for warranty claims.


