1. Introduction
This manual provides detailed instructions for the setup, operation, maintenance, and troubleshooting of your Beelink SER5 MAX Mini PC. Please read this manual thoroughly before using the device to ensure optimal performance and longevity.

Image: Front view of the Beelink SER5 MAX Mini PC, showcasing its compact design and mesh top panel.
2. Safety Information
- Do not connect to a network or Wi-Fi until the operating system is fully running.
- When setting up the operating system, skip any email registration steps to proceed with normal machine use.
- Ensure the power supply voltage is within the specified range (100-240V AC, 50/60Hz).
- Avoid exposing the device to extreme temperatures, humidity, or direct sunlight.
- Do not attempt to open or repair the device yourself. Refer to qualified service personnel.
3. What's in the Box
Upon unboxing your Beelink SER5 MAX Mini PC, please verify that all the following items are included:
- 1 x Beelink SER5 MAX Mini PC
- 1 x HDMI Cable
- 1 x Power Adapter
- 1 x User Manual
- 1 x VESA-mounted bracket with screws

Image: Illustration of the Beelink SER5 MAX Mini PC and its included accessories: user manual, VESA mount, HDMI cables, and power adapter.
4. Product Overview
4.1. Ports and Connectors
The Beelink SER5 MAX Mini PC offers a variety of ports for comprehensive connectivity:

Image: Detailed diagram showing the front and rear ports of the Beelink SER5 MAX Mini PC. Front ports include USB 3.2 Gen2 (10Gbps), USB 2.0, Headphone Jack, Type-C (Data & Video output), RTC Key, and Power button. Rear ports include LAN (1000Mbps), USB 3.2 Gen2 (10Gbps), USB 2.0 (480Mbps), DP 1.4 (4K 144Hz), HDMI 2.0 (4K 60Hz), and DC-in.
- Front Ports:
- 2 x USB 3.2 Gen2 (10Gbps)
- 1 x USB 2.0
- 1 x Headphone Jack (HP&MIC)
- 1 x Type-C port (Data & Video output)
- 1 x RTC Key (CLR CMOS)
- 1 x Power Button
- Rear Ports:
- 1 x Gigabit Ethernet LAN (RJ-45, 1000Mbps)
- 1 x USB 3.2 Gen2 (10Gbps)
- 1 x USB 2.0 (480Mbps)
- 1 x DP 1.4 port (4K@144Hz)
- 1 x HDMI 2.0 port (4K@60Hz)
- 1 x DC Jack (Power Input)
4.2. Internal Components (Exploded View)
Understanding the internal layout can be helpful for maintenance or upgrades.

Image: Exploded view showing the internal components of the Beelink SER5 MAX Mini PC, including the ABS plastic casing, silent fan, CPU, motherboard, M.2 2280 PCIe4.0 SSDs, SSD heatsink, and metal bottom panel.
5. Setup Instructions
5.1. Connecting Peripherals
- Connect your monitor(s) to the HDMI 2.0 and/or DP 1.4 ports using the provided HDMI cable or a compatible DisplayPort cable.
- Connect your keyboard and mouse to the available USB ports.
- For wired internet, connect an Ethernet cable to the LAN port. For wireless, ensure your Wi-Fi network is available.
- Connect the power adapter to the DC-in jack on the Mini PC, then plug the adapter into a power outlet.
5.2. Initial Power On
- Press the power button on the front of the Mini PC.
- Follow the on-screen instructions to complete the Windows 11 Pro setup. Remember to skip email registration if prompted.
- Once the operating system is fully loaded, you can connect to your Wi-Fi network if not using a wired connection.
5.3. VESA Mount Installation
The Mini PC can be mounted to the back of a compatible monitor using the included VESA bracket.

Image: Step-by-step guide for installing the Beelink SER5 MAX Mini PC using the VESA mount. It shows attaching the bracket to the Mini PC and then to the back of a monitor.
- Attach the VESA bracket to the Mini PC using the provided screws.
- Securely fix the bracket to the VESA mounting points on the back of your monitor using the appropriate screws.
6. Operating Instructions
6.1. Power Management
- Power On: Press the power button on the front panel.
- Shut Down: Use the standard Windows shutdown procedure (Start Menu > Power > Shut down).
- Restart: Use the standard Windows restart procedure (Start Menu > Power > Restart).
- Sleep: Use the standard Windows sleep procedure (Start Menu > Power > Sleep).
6.2. Display Configuration
The Beelink SER5 MAX supports triple display output at 4K@60Hz via its HDMI and DP ports, and a Type-C port that also supports video output.

Image: Visual comparison demonstrating 4K video output quality, highlighting the clarity and detail compared to lower resolutions.
To configure multiple displays:
- Connect your monitors to the available HDMI, DisplayPort, and/or Type-C video output ports.
- In Windows, right-click on the desktop and select "Display settings".
- From here, you can detect, arrange, and extend or duplicate your displays as needed.
6.3. Wireless Connectivity
The Mini PC features Wi-Fi 6 and Bluetooth 5.2 for fast and stable wireless connections.
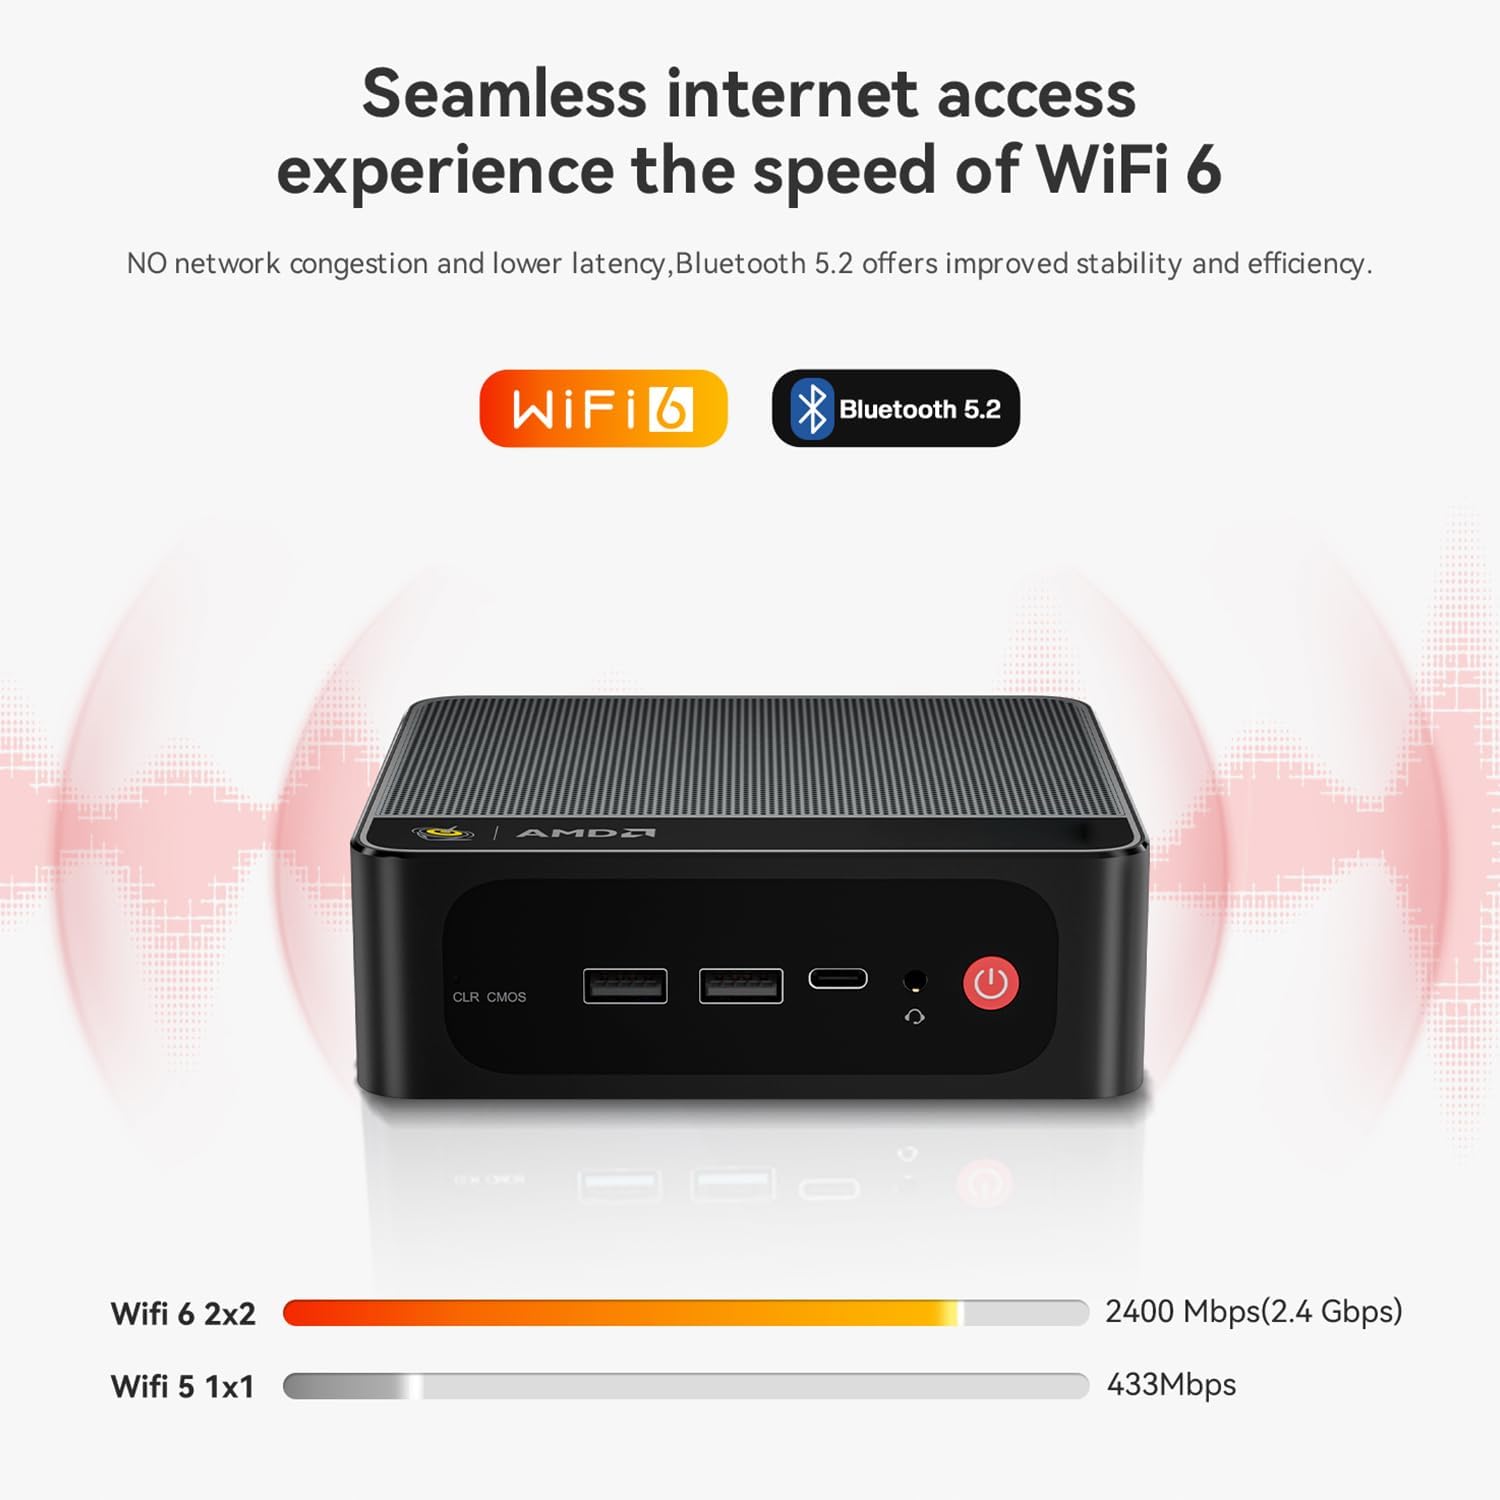
Image: Graphic illustrating the benefits of WiFi 6 and Bluetooth 5.2, emphasizing seamless internet access and improved stability.
- Wi-Fi: Access Wi-Fi settings via the Windows taskbar network icon or through "Settings > Network & Internet > Wi-Fi" to connect to your preferred network.
- Bluetooth: Enable Bluetooth via "Settings > Devices > Bluetooth & other devices" to pair with compatible devices like keyboards, mice, or headphones.
7. Storage and Memory Expansion
7.1. Memory (RAM)
The Beelink SER5 MAX comes with 32GB LPDDR5 6300MHz memory, providing high performance for multitasking.

Image: Close-up view of an LPDDR5 memory module, highlighting its advanced technology for high-frequency operation.
While the system is equipped with ample memory, advanced users may consider checking BIOS settings for UMA Frame Buffer allocation if experiencing specific performance needs, as the integrated graphics may reserve a portion of system RAM.
7.2. Storage (SSD)
The Mini PC includes a 1TB M.2 2280 PCIe4.0 x4 NVMe SSD. It supports dual M.2 PCIe4.0 SSDs for expanded storage capacity.

Image: Internal view showing two M.2 2280 PCIe4.0 SSDs installed, illustrating the dual storage expansion capability.
To expand storage, you can install an additional M.2 PCIe4.0 SSD (up to 4TB) in the available slot. Refer to the exploded view in Section 4.2 for component location. It is recommended to consult a professional for hardware upgrades.
8. Maintenance
- Cleaning: Use a soft, dry cloth to clean the exterior of the Mini PC. For dust accumulation in vents, use compressed air. Ensure the device is powered off and unplugged before cleaning.
- Software Updates: Regularly check for and install Windows updates and driver updates for optimal performance and security.
- Ventilation: Ensure the Mini PC has adequate airflow around it. Do not block the ventilation openings.
- Storage: If storing the device for an extended period, power it off, unplug it, and store it in a cool, dry place.
9. Troubleshooting
| Problem | Possible Cause | Solution |
|---|---|---|
| No power / Device won't turn on | Power adapter not connected or faulty; power outlet issue. | Ensure power adapter is securely connected to both the PC and a working power outlet. Try a different outlet. |
| No display on monitor | Monitor not connected; incorrect input source selected on monitor; faulty cable. | Check display cable connections. Ensure monitor is on and set to the correct input source (HDMI/DP). Try a different cable or monitor. |
| Wi-Fi connection issues | Incorrect Wi-Fi password; router issue; driver problem. | Verify Wi-Fi password. Restart router. Check Windows Device Manager for Wi-Fi adapter status and update drivers if necessary. |
| Slow performance | Too many applications running; insufficient RAM; overheating. | Close unnecessary applications. Check Task Manager for resource usage. Ensure proper ventilation. Consider upgrading RAM if frequently experiencing slowdowns. |
| Bluetooth device not pairing | Bluetooth disabled; device out of range; device not in pairing mode. | Ensure Bluetooth is enabled in Windows settings. Move device closer to the PC. Put the Bluetooth device into pairing mode. |
For further assistance, please contact Beelink customer support.
10. Specifications
| Feature | Detail |
|---|---|
| Processor | AMD Ryzen 7 6800H (8 Cores/16 Threads, up to 4.7GHz) |
| Graphics | AMD Radeon Graphics 12core 2200 MHz (Integrated) |
| RAM | 32GB LPDDR5 6300MHz |
| Storage | 1TB M.2 2280 PCIe4.0 x4 NVMe SSD (Supports dual M.2 PCIe4.0 SSDs) |
| Operating System | Windows 11 Pro |
| Video Output | HDMI 2.0 (4K@60Hz), DP 1.4 (4K@144Hz), Type-C (Data & Video) - Triple Display Support |
| Wireless Connectivity | Wi-Fi 6 (802.11ax), Bluetooth 5.2 |
| Wired Connectivity | Gigabit Ethernet LAN (RJ-45) |
| USB Ports | 3 x USB 3.2 Gen2, 2 x USB 2.0, 1 x Type-C (Data & Video) |
| Audio | 1 x Audio Jack (HP&MIC) |
| Power Input | 100-240V AC, 50/60Hz |
| Dimensions | Approximately 8.82 x 5.47 x 2.36 inches |
| Weight | Approximately 1.98 pounds |
11. Warranty and Support
Beelink provides comprehensive support for its products:
- Warranty: 1-Year free warranty.
- Technical Support: Lifetime technical support.
- After-Sales Service: 24/7 after-sales service.
- Certifications: All products have obtained FCC, RoHS, and CE Certifications.
If you encounter any issues or have questions, please do not hesitate to contact Beelink customer service. We are committed to resolving your problems.
For more information, visit the official Beelink store: Beelink Store on Amazon