
RedThunder K20
RedThunder K20 Wireless Keyboard and Mouse Combo User Manual
Model: K20
Brand: RedThunder
1. Introduction
Thank you for choosing the RedThunder K20 Wireless Keyboard and Mouse Combo. This high-performance 2.4G wireless set is designed to enhance both your work and gaming experience. It features a full-size anti-ghosting keyboard with multimedia keys and a 7D optical mouse with adjustable DPI. This manual provides detailed instructions to help you get started and make the most of your new device.

Image 1.1: RedThunder K20 Wireless Keyboard and Mouse Combo.

Image 1.2: The keyboard features an ergonomic design with a small slope for comfortable use.
2. Setup Guide
The RedThunder K20 combo offers a simple plug-and-play setup. Both the keyboard and mouse share a single USB receiver, which is conveniently stored at the bottom of the mouse.
2.1 Initial Setup
- Locate the USB receiver: The USB receiver is stored in a compartment on the bottom of the mouse. Gently pull it out.
- Insert the receiver: Plug the USB receiver into an available USB port on your computer (PC, laptop, Mac, Xbox, etc.).
- Power on the devices: Turn on the keyboard and mouse using their respective On/Off switches. The keyboard switch is located on the top edge, and the mouse switch is on the bottom.
- Automatic connection: The devices are pre-paired from the factory and should connect automatically. If the connection is lost, refer to the Troubleshooting section for re-pairing instructions.

Image 2.1: The 2-in-1 USB receiver is stored in the mouse's bottom compartment.
3. Operating Instructions
3.1 Keyboard Functions
The K20 keyboard features a full QWERTY US 104-key layout with 10 dedicated multimedia keys for convenient control of media playback and other functions.
Multimedia Keys:
- Dedicated keys for media control (play/pause, volume up/down, mute, etc.) are located above the function keys.
RGB Backlight Control:
The keyboard features 4 sets of dynamic backlight effects, 4 breathing speeds, 4 brightness levels, 7 RGB monochrome lights, and 1 RGB rainbow light. The glowing design of letters, logos, gaps, and lines enhances visibility and aesthetics.
- Turn On/Off Backlight: Press the dedicated ON/OFF button (often combined with FN key, refer to keyboard markings).
- Switch Light Modes: Use FN + "% 5" to cycle through 7 RGB backlight colors and 1 rainbow backlight.
- Switch to Gradient Mode: Use FN + "$ 4".
- Switch to Breathing Mode: Use FN + "# 3".
- Switch to Cool Mode: Use FN + "@ 2".
- Switch to Streaming Mode: Use FN + "! 1".
- Adjust Brightness: Use FN + Page Up (PgUp) to increase brightness and FN + Page Down (PgDn) to decrease brightness.
- Adjust Speed: Use FN + "-" to slow down RGB light speed and FN + "+" to speed up RGB light speed.
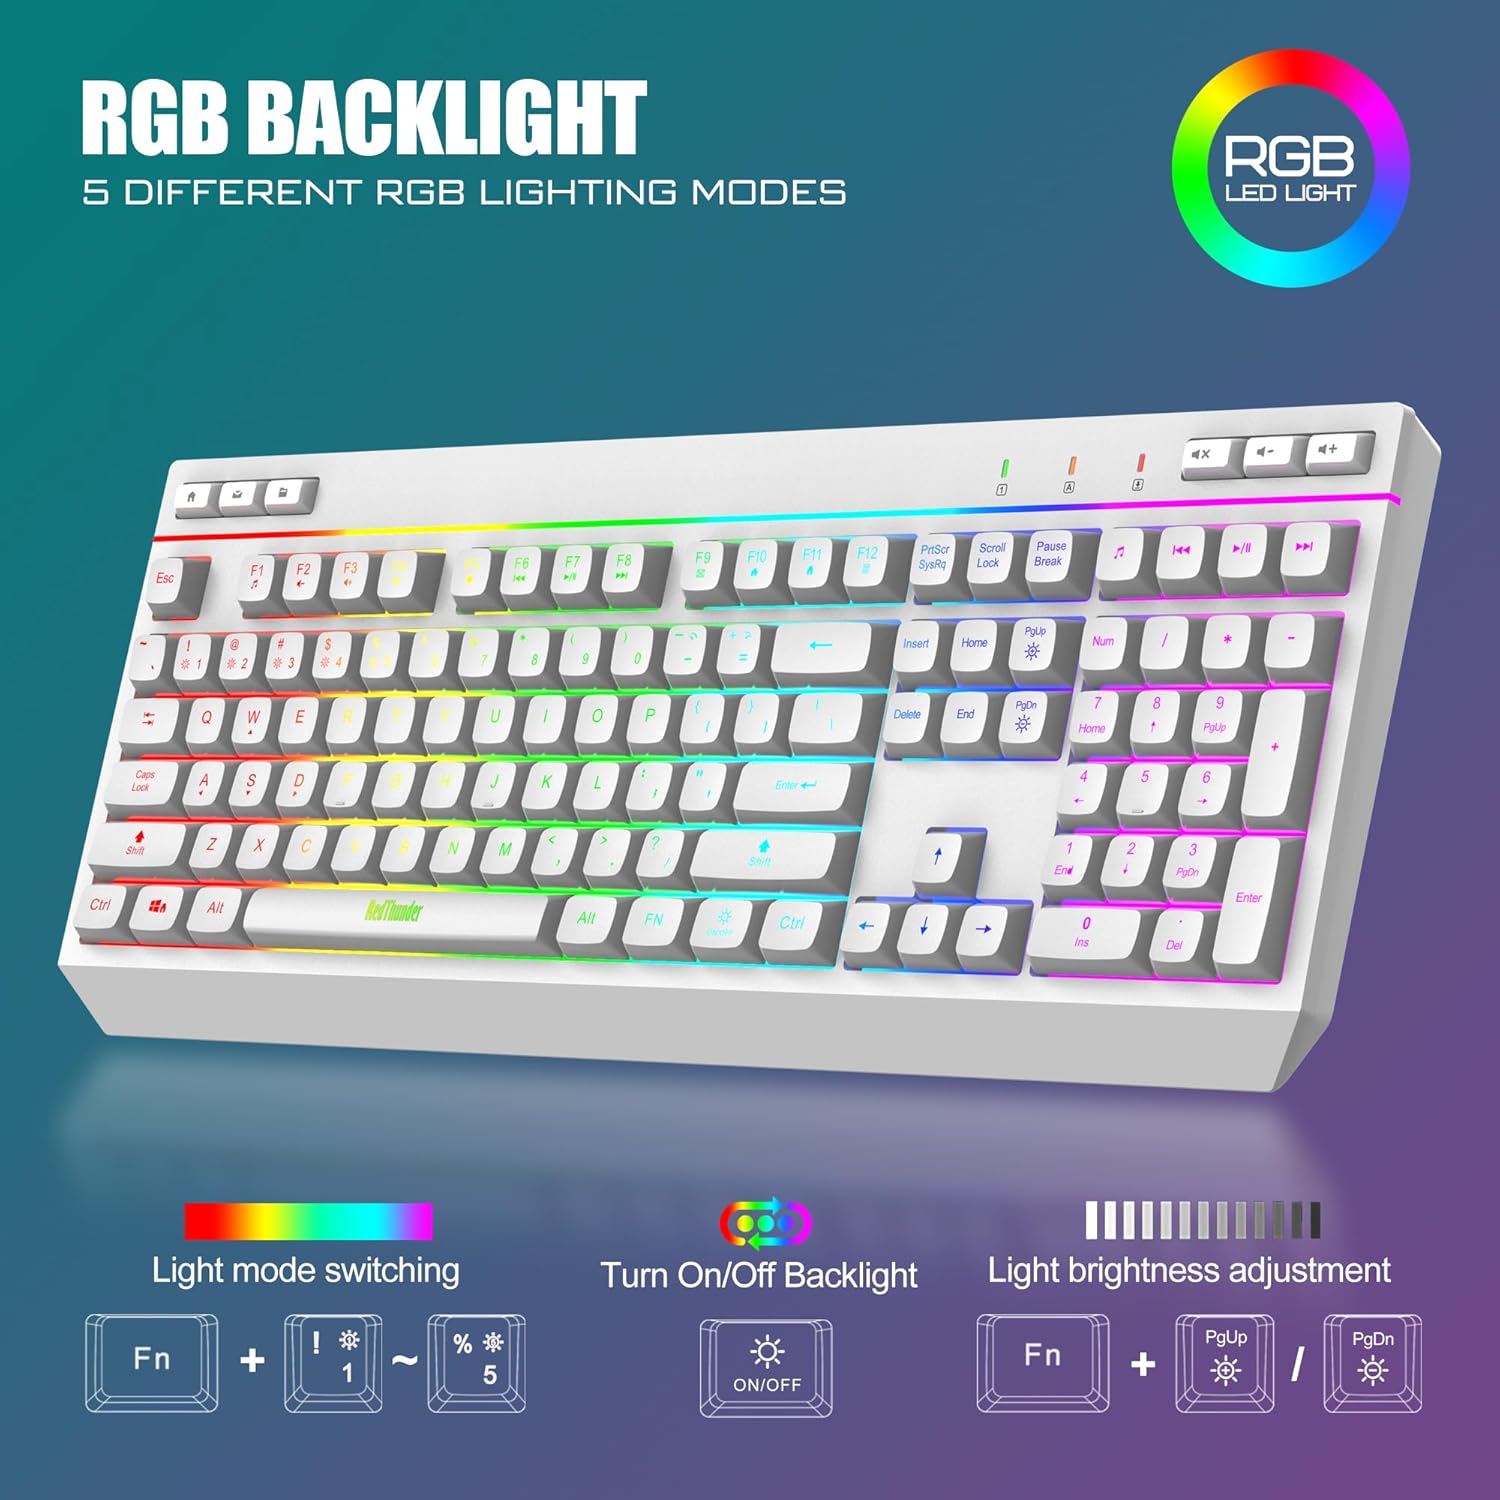
Image 3.1: Keyboard RGB backlight controls and modes.
Video 3.1: Official demonstration of RedThunder K20 RGB Adjustment, showing various lighting modes and controls.
3.2 Mouse Functions
The 7D optical mouse offers precise tracking and customizable RGB lighting.
DPI Adjustment:
The mouse has 5 levels of DPI adjustment (400-800-1600-2400-4800 DPI) to suit different tasks and preferences. Use the DPI button located near the scroll wheel to cycle through the settings.
RGB Backlight Control:
The mouse features 11 gorgeous backlight modes. Use the dedicated light button (often marked with a sun icon) to switch between modes or turn off the lighting to conserve battery.

Image 3.2: Mouse DPI adjustment and light mode switching buttons.
4. Charging and Battery Life
The K20 combo is equipped with long-life rechargeable batteries, allowing for continuous use. Both devices feature smart energy-saving functions.
4.1 Charging Instructions
- Charging Ports: The keyboard and mouse have separate Type-C charging ports.
- Charging Cable: Use the provided USB-C charging cable to connect the devices to a power source (e.g., computer USB port, USB wall adapter).
- Charging Indicator: When the key response is slow or the light is flashing, please charge the devices.
- Mouse during charging: Note that the mouse operates in wired mode when it is charging.

Image 4.1: Keyboard and mouse charging via Type-C interface.
4.2 Energy Saving Mode
If there is no operation within 1-3 minutes, both the keyboard and mouse will automatically enter sleep mode to conserve battery. Press any key on the keyboard or click any button on the mouse to wake them up.
5. Maintenance
To ensure the longevity and optimal performance of your RedThunder K20 combo, follow these maintenance guidelines:
- Cleaning: Use a soft, dry cloth to wipe down the keyboard and mouse. For stubborn dirt, a slightly damp cloth with mild soap can be used, but ensure no liquid enters the device. Avoid harsh chemicals or abrasive materials.
- Storage: Store the devices in a cool, dry place away from direct sunlight and extreme temperatures.
- USB Receiver: When not in use, store the USB receiver in its designated compartment at the bottom of the mouse to prevent loss.
- Avoid Drops: Handle the devices with care to prevent damage from accidental drops or impacts.
6. Troubleshooting
If you encounter any issues with your RedThunder K20 Wireless Keyboard and Mouse Combo, please refer to the following common solutions:
- No Connection/Lag:
- Ensure the USB receiver is securely plugged into a working USB port.
- Verify that both the keyboard and mouse are turned on.
- Check battery levels. If low, charge the devices.
- Try plugging the USB receiver into a different USB port on your computer.
- Re-pairing: If the connection is lost for any reason, you may need to reset the code pairing. While specific steps are not provided in the product details, generally, this involves turning off both devices, unplugging the receiver, then plugging the receiver back in and turning on the devices while holding a specific key combination (often FN + ESC or similar, check product packaging for exact instructions if needed).
- Slow Key Response/Flashing Light: This indicates a low battery. Please charge the keyboard and mouse immediately.
- RGB Lights Not Working:
- Ensure the RGB lights are turned on using the dedicated ON/OFF button or FN key combination.
- Check battery level; low battery can affect lighting performance.
- Mouse Tracking Issues:
- Ensure the mouse sensor is clean and free from dust or debris.
- Use the mouse on a suitable surface (e.g., a mouse pad).
- Adjust the DPI setting to a level that suits your usage.
For further assistance, please contact RedThunder customer support.
7. Specifications
| Feature | Detail |
|---|---|
| Product Dimensions | 17.32 x 9.45 x 1.57 inches |
| Item Weight | 1.98 pounds |
| Manufacturer | RedThunder |
| Model Number | K20 |
| Connectivity Technology | 2.4G Wireless |
| Keyboard Type | Full Size, Anti-Ghosting, Multimedia Keys |
| Mouse Type | 7D Optical Mouse |
| DPI Levels (Mouse) | 5 levels (400-800-1600-2400-4800) |
| Backlight | RGB (Keyboard: 4 dynamic effects, 4 breathing speeds, 4 brightness levels, 7 monochrome, 1 rainbow; Mouse: 11 modes) |
| Battery | Rechargeable Lithium Ion (1 included) |
| Compatibility | Windows 2000/XP/7/8/10/11, Vista, Raspberry Pi 3/4, Limited MacOS support |
| Key Lifespan | 10,000,000 keystrokes |
8. Warranty and Support
RedThunder is committed to providing high-quality products and customer satisfaction. While specific warranty details are not provided in this manual, for any product-related inquiries, technical support, or warranty claims, please contact the seller directly through your purchase platform. They will be able to provide the most accurate and up-to-date information regarding your product's warranty and support options.
Ask a question about this manual
Ask about setup, troubleshooting, compatibility, parts, safety, or missing instructions. Manuals+ will review the question and use this page’s manual context to help answer it.