1. Introduction and Product Overview
The Holley 319-910 Hydraulic Clutch Conversion Kit is designed to upgrade 1967-1969 Chevrolet Camaro and Pontiac Firebird models from a mechanical clutch linkage to a modern hydraulic clutch system. This conversion provides improved drivability, smoother and more precise clutch engagement, and reduced maintenance requirements compared to traditional mechanical systems. The kit is engineered for a straightforward installation, optimizing pedal feel and ensuring full clutch system engagement. It supports various modern transmissions including T56, TR6060, Magnum, TKX, TKO, and classic 4-Speeds.
Key Features:
- Clutch Master Cylinder and pedal ratio based on 4th Gen F-body design.
- Compatibility with a wide range of transmissions: T-56, TR6060, Magnum, TKX, TKO, and most 4-Speeds.
- Includes all necessary components for chassis-side installation.
- Provides smoother and more precise clutch engagement.
- Contributes to improved drivability and reduced wear on clutch components.

Figure 1.1: Overview of the Holley 319-910 Hydraulic Clutch Conversion Kit components.
2. Components Included
The Holley 319-910 kit includes the following essential components for converting your vehicle's clutch system:
- Clutch Master Cylinder (based on 4th Gen F-Body design)
- Clutch Pedal with Pad
- Clutch Rod Assembly
- Master Cylinder Mount and Reinforcement Plate
- Master Cylinder Reservoir Kit
- All required mounting hardware (bolts, washers, clips)
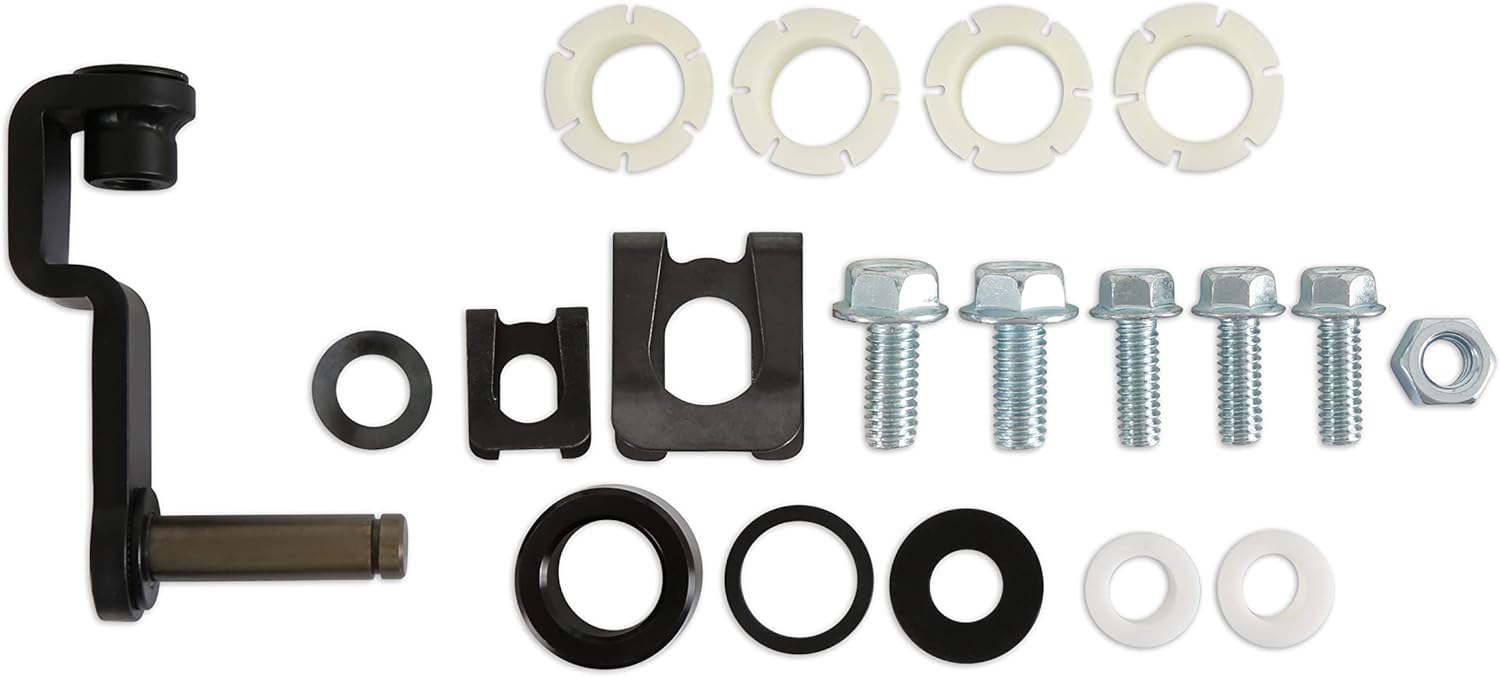
Figure 2.1: Detailed view of the mounting hardware and smaller components included in the kit.

Figure 2.2: The translucent master cylinder reservoir, designed to hold hydraulic fluid.

Figure 2.3: The clutch master cylinder, responsible for converting pedal force into hydraulic pressure.

Figure 2.4: The clutch pedal assembly, optimized for proper pedal feel.
3. Installation Instructions
The Holley 319-910 kit is designed for installation on the chassis side of your 1967-1969 Chevrolet Camaro or Pontiac Firebird. While the system utilizes the OEM firewall passage, some modification to the firewall will be required for proper installation.
General Installation Steps (Consult a professional if unsure):
- Preparation: Ensure the vehicle is safely supported and the battery is disconnected. Remove the existing mechanical clutch linkage components.
- Firewall Modification: Carefully cut the firewall as necessary to accommodate the new hydraulic master cylinder and its mounting. Refer to the detailed instructions provided with the physical kit for precise cutting templates and dimensions.
- Master Cylinder and Pedal Installation: Install the new clutch pedal and master cylinder assembly. Secure the master cylinder mount and reinforcement plate to the firewall using the provided hardware.
- Clutch Rod Assembly: Connect the clutch rod assembly between the clutch pedal and the master cylinder.
- Reservoir Kit Installation: Mount the master cylinder reservoir in an accessible location and connect it to the master cylinder using the provided hose.
- Hydraulic Line Connection: Connect the hydraulic lines (not included in this kit, as selection depends on transmission and release bearing) from the master cylinder to your chosen release bearing/slave cylinder.
- Bleeding the System: Once all connections are secure, bleed the hydraulic clutch system to remove any air. Follow standard automotive bleeding procedures.
- Final Checks: Verify proper pedal feel and full clutch engagement before operating the vehicle.
Important Notes:
- Firewall Cutting: Although this system is designed to utilize the OEM firewall passage, cutting of the firewall will be required for proper installation. Proceed with caution and precision.
- Fluid Usage: DO NOT use fluid that has been bled from a hydraulic clutch system to fill the clutch master cylinder reservoir. This is due to the possibility of contaminants or air being reintroduced into the system. Always use fresh, clean, and appropriate hydraulic fluid.
- Release Bearing & Hydraulic Lines: This kit does not include the release (or throw-out) bearing and hydraulic lines. These components must be selected by the installer based on the specific engine and transmission combination being used.

Figure 3.1: The master cylinder mount, designed for secure attachment to the firewall.

Figure 3.2: The master cylinder reservoir kit, including the reservoir and connecting hose.
4. Operation
Once properly installed and bled, the Holley hydraulic clutch system operates by converting the mechanical force from the clutch pedal into hydraulic pressure. When the clutch pedal is depressed, the master cylinder pushes hydraulic fluid through the lines to the slave cylinder (or release bearing). This pressure then disengages the clutch, allowing for gear changes. Releasing the pedal reverses the process, re-engaging the clutch. The optimized pedal ratios ensure a consistent and comfortable pedal feel, providing smooth and precise clutch engagement.
5. Maintenance
One of the benefits of a hydraulic clutch system is reduced maintenance compared to mechanical linkages. However, regular checks are still recommended to ensure optimal performance and longevity.
Maintenance Guidelines:
- Fluid Level Check: Periodically check the fluid level in the master cylinder reservoir. Ensure it is between the MIN and MAX marks. Low fluid levels can indicate a leak or worn components.
- Fluid Condition: Inspect the hydraulic fluid for discoloration or contamination. If the fluid appears dark or murky, it may be time for a fluid flush and replacement. Consult your vehicle's service manual or a qualified mechanic for recommended fluid types and service intervals.
- Leak Inspection: Regularly inspect all hydraulic lines, connections, and the master/slave cylinders for any signs of leaks. Address any leaks immediately to prevent system failure.
- Pedal Feel: Pay attention to any changes in clutch pedal feel, such as sponginess, excessive stiffness, or a change in engagement point. These could indicate air in the system, a failing component, or a need for adjustment.
- Component Wear: While the hydraulic system reduces wear on clutch components, it is still advisable to inspect the clutch pedal, rod assembly, and mounting points for any signs of wear or looseness during routine vehicle maintenance.
6. Troubleshooting
This section provides general troubleshooting tips for common issues that may arise with a hydraulic clutch system. For complex problems, it is recommended to consult a certified automotive technician.
Common Issues and Solutions:
| Problem | Possible Cause | Solution |
|---|---|---|
| Spongy Clutch Pedal | Air in the hydraulic system; low fluid level; failing master or slave cylinder. | Bleed the hydraulic system thoroughly; check and top off fluid; inspect and replace faulty cylinders. |
| Clutch Not Disengaging Fully | Air in the system; insufficient fluid; worn master/slave cylinder; improper pedal adjustment. | Bleed system; check fluid; inspect cylinders; verify pedal adjustment and rod length. |
| Fluid Leaks | Loose connections; damaged lines; worn seals in master/slave cylinder. | Tighten all connections; inspect and replace damaged lines; replace leaking cylinders. |
| Hard Clutch Pedal | Obstruction in hydraulic line; seized master/slave cylinder; incorrect pedal ratio (unlikely with this kit if installed correctly). | Inspect lines for kinks/blockages; check cylinders for smooth operation; re-verify installation. |
7. Specifications
| Attribute | Value |
|---|---|
| Brand | Holley |
| Model Number | 319-910 |
| Item Weight | 6.57 pounds |
| Product Dimensions | 20.2 x 12.5 x 10.6 inches |
| Compatible Vehicles | 1967-1969 Chevrolet Camaro, 1967-1969 Pontiac Firebird |
| Clutch Master Cylinder Design | Based on 4th Gen F-Body |
| Included Components | Clutch master cylinder, clutch pedal with pad, clutch rod assembly, master cylinder mount and reinforcement plate, master cylinder reservoir kit, mounting hardware. |
8. Warranty Information
Holley products are manufactured to high standards. For specific warranty terms and conditions applicable to the 319-910 Hydraulic Clutch Conversion Kit, please refer to the official warranty documentation included with your purchase or visit the official Holley website. Warranty coverage typically addresses defects in materials and workmanship under normal use.
9. Support
Should you require technical assistance, have questions regarding installation, or need to report a product issue, please contact Holley customer support.
- Online Resources: Visit the official Holley website for FAQs, technical articles, and additional product information.
- Contact Information: Refer to the Holley website or the packaging for the most current customer service contact details, including phone numbers and email addresses.


