1. Introduction
This manual provides detailed instructions for the setup, operation, and maintenance of your KingnovyPC S600 Mini PC. Please read this manual thoroughly before using the device to ensure proper functionality and to maximize your user experience. The S600 is a compact, high-performance mini computer designed for a wide range of applications, from home entertainment to professional tasks.

Figure 1: Front view of the KingnovyPC S600 Mini PC, showcasing its compact design and front ports.
2. Product Overview
The KingnovyPC S600 Mini PC is equipped with advanced hardware for robust performance in a small form factor.
Key Features:
- Processor: Intel 12th Gen Core i9-12900H (14 Cores, 20 Threads, up to 5.0 GHz)
- Operating System: Pre-installed Windows 11 Pro
- Graphics: Intel UHD Graphics for 12th Gen Processors (Intel Iris Xe Graphics G7 Max 1.45 GHz)
- Memory: 64GB DDR4 RAM (expandable via 2 SO-DIMM slots, 3200 MHz support)
- Storage: 1TB PCIe4.0 NVMe SSD (supports 1x M.2 2280 NVME/PCIE4.0x4, 1x M.2 2280 NVME/PCIE3.0x1, plus 2.5-inch HDD/SSD support)
- Connectivity: Dual Gigabit Ethernet LAN, WiFi 6E (802.11ax), Bluetooth 5.2
- Display Output: Supports 4K/8K resolution and triple display output via HDMI 2.0, DisplayPort 1.4, and Type-C.
- Cooling: Ultra-mute fan with pure copper radiator for efficient heat dissipation.
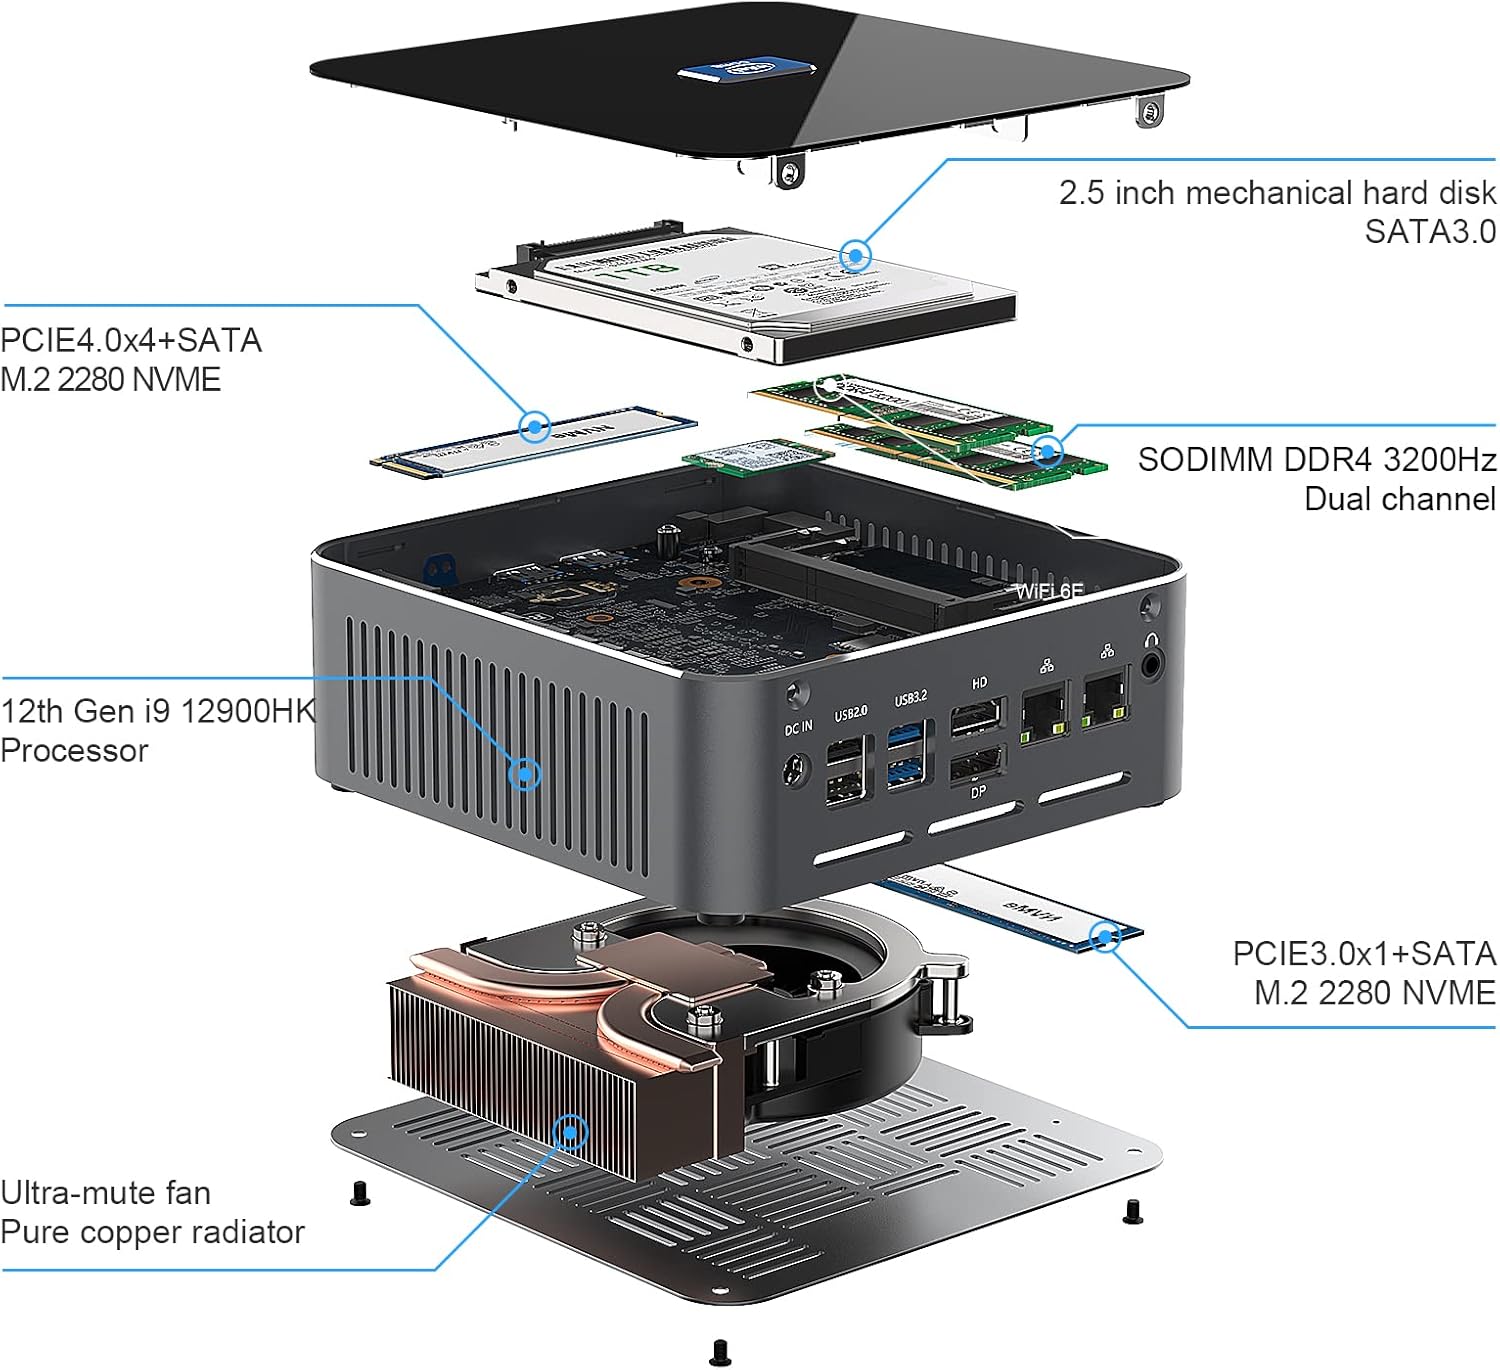
Figure 2: Exploded view illustrating the internal components, including the 12th Gen i9-12900HK Processor, SODIMM DDR4, M.2 NVME SSDs, and cooling system.
3. Setup Guide
Follow these steps to set up your KingnovyPC S600 Mini PC:
- Connect Display: Connect your monitor(s) to the Mini PC using an HDMI, DisplayPort, or Type-C cable. The device supports up to three displays simultaneously.
- Connect Peripherals: Plug in your keyboard, mouse, and any other USB devices into the available USB 3.2 or USB 2.0 ports.
- Connect Network (Optional): For a wired internet connection, connect an Ethernet cable to one of the Gigabit LAN ports. For wireless, ensure your WiFi network is available.
- Connect Power: Connect the power adapter to the DC IN port on the Mini PC, then plug the adapter into a power outlet.
- Power On: Press the power button located on the front of the Mini PC. The system will boot into Windows 11 Pro.
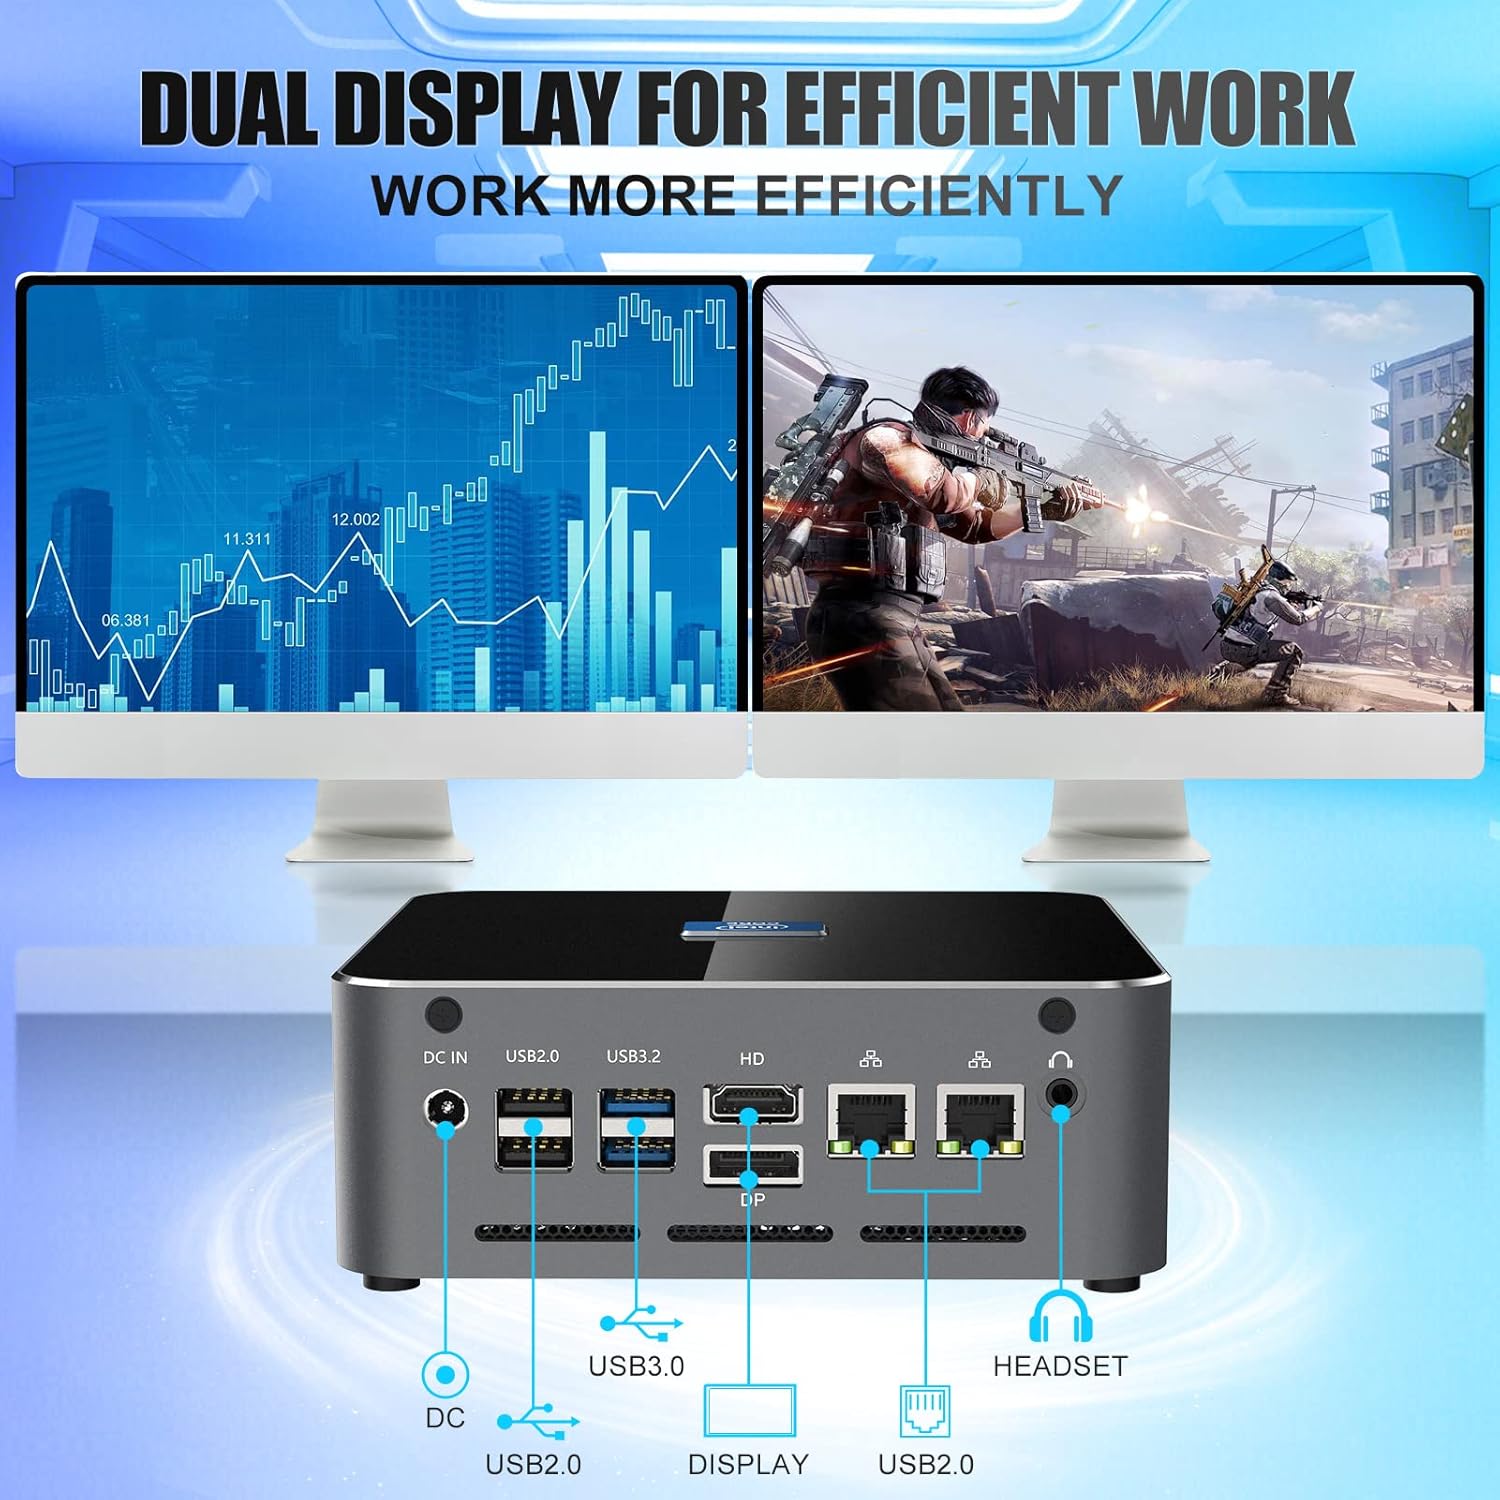
Figure 3: Rear view of the Mini PC showing various ports including DC IN, USB, HDMI, DP, LAN, and Headset jack, configured for a dual display setup.
4. Operating Instructions
Power On/Off:
- To Power On: Press the power button once.
- To Shut Down: Click the Windows Start button, then select Power > Shut down.
- To Restart: Click the Windows Start button, then select Power > Restart.
- To Sleep: Click the Windows Start button, then select Power > Sleep.
Windows 11 Pro:
Your Mini PC comes with Windows 11 Pro pre-installed. Familiarize yourself with the Windows 11 interface for optimal use. Updates will be managed automatically or can be manually checked via Windows Settings.
5. Storage and Memory Expansion
The KingnovyPC S600 offers flexible options for memory and storage upgrades.
Memory (RAM):
- The device features two SO-DIMM DDR4 slots.
- It supports DDR4 memory modules running at 3200 MHz.
- Maximum supported RAM capacity is 64GB (2x 32GB modules).
Storage:
- M.2 NVMe SSD: Supports one M.2 2280 NVME/PCIE4.0x4 SSD (read speed: 5000-7000MB/s) and one M.2 2280 NVME/PCIE3.0x1 SSD.
- 2.5-inch Drive: An additional slot is available for a 2.5-inch SATA HDD or SSD (7mm thickness).
To access the memory and storage slots for upgrades, refer to the detailed instructions provided in the packaging or consult a qualified technician. Ensure the device is powered off and unplugged before performing any internal modifications.

Figure 4: Diagram showing the dual DDR4 memory slots and PCIe 4.0 + PCIe 3.0 M.2 NVMe storage options.
6. Display Configuration
The S600 Mini PC supports multiple display configurations for enhanced productivity or immersive entertainment.
- Ports: The device includes 1x HDMI 2.0, 1x DisplayPort 1.4, and 1x Type-C port.
- Resolution: Supports up to 4K UHD resolution on individual displays and can output to 8K displays.
- Triple Display: You can connect up to three independent displays simultaneously using a combination of the available ports.
After connecting your displays, you may need to configure display settings in Windows 11 (Right-click on desktop > Display settings) to extend or duplicate your desktop.
7. Connectivity
The KingnovyPC S600 offers versatile connectivity options:
- Wired Network: Two Gigabit Ethernet (RJ-45) ports provide stable and high-speed wired network connections.
- Wireless Network: Integrated WiFi 6E (802.11ax) supports dual-band 2.4G/5G for fast and reliable wireless internet access.
- Bluetooth: Built-in Bluetooth 5.2 allows for wireless connection to compatible peripherals such as keyboards, mice, and audio devices.
To configure wireless settings, navigate to Windows Settings > Network & internet > Wi-Fi or Bluetooth & devices.

Figure 5: The Mini PC demonstrating its connectivity features with an 8K Smart TV, emphasizing Bluetooth 5.2 and WiFi 6E capabilities.
8. Specifications
| Component | Detail |
|---|---|
| Brand | KingnovyPC |
| Model Number | S600 |
| Processor | Intel 12th Gen Core i9-12900H (14 Cores, 20 Threads, Max Turbo 5.0 GHz, 24M Intel Smart Cache) |
| Operating System | Windows 11 Pro |
| RAM | 64GB DDR4 (2x SO-DIMM slots, 3200 MHz support) |
| Storage | 1TB PCIe4.0 NVMe SSD (1x M.2 2280 NVME/PCIE4.0x4, 1x M.2 2280 NVME/PCIE3.0x1), 2.5-inch HDD/SSD support |
| Graphics | Intel UHD Graphics for 12th Gen Processors (Intel Iris Xe Graphics G7 Max 1.45 GHz) |
| Video Output | 1x HDMI 2.0, 1x DisplayPort 1.4, 1x Type-C (supports 4K/8K, triple display) |
| USB Ports | 3x USB 3.2, 3x USB 2.0, 1x Type-C |
| Network | Dual Gigabit Ethernet (RJ-45), WiFi 6E (802.11ax), Bluetooth 5.2 |
| Audio | 1x Audio Jack (HP&MIC) |
| Dimensions (L x W x H) | 14.9 x 14.5 x 5.5 cm (approx. 5.87 x 5.7 x 2.2 inches) |

Figure 6: Performance overview of the 12th Gen i9-12900H processor, highlighting its core count, thread count, and max turbo frequency.
9. Troubleshooting
This section addresses common issues you might encounter with your Mini PC.
- No Power:
- Ensure the power adapter is securely connected to both the Mini PC and a working power outlet.
- Verify the power outlet is functional by plugging in another device.
- No Display:
- Check that the display cable (HDMI, DP, or Type-C) is firmly connected to both the Mini PC and the monitor.
- Ensure the monitor is powered on and set to the correct input source.
- Try a different display cable or monitor if available.
- No Internet Connection (Wired):
- Verify the Ethernet cable is properly connected to both the Mini PC and your router/modem.
- Check your router/modem for internet connectivity.
- Ensure network drivers are installed and updated in Windows Device Manager.
- No Internet Connection (Wireless):
- Ensure Wi-Fi is enabled in Windows Settings.
- Verify you are connected to the correct Wi-Fi network and have entered the password correctly.
- Restart your router/modem and the Mini PC.
- Bluetooth Device Not Connecting:
- Ensure Bluetooth is enabled on both the Mini PC and the device you are trying to connect.
- Put the Bluetooth device into pairing mode.
- Remove and re-add the device in Windows Bluetooth settings.
10. Maintenance
Proper maintenance helps extend the lifespan of your Mini PC:
- Cleaning: Use a soft, dry cloth to clean the exterior of the Mini PC. For dust accumulation in vents, use compressed air. Do not use liquid cleaners directly on the device.
- Ventilation: Ensure the Mini PC is placed in a well-ventilated area. Do not block the air vents.
- Software Updates: Regularly update Windows and drivers to ensure optimal performance and security.
- Temperature: Operate the device within recommended temperature ranges. Avoid extreme heat or cold.
11. Safety Information
Observe the following safety precautions:
- Do not expose the device to water, moisture, or extreme temperatures.
- Avoid dropping or subjecting the device to severe impacts.
- Use only the provided power adapter or a compatible replacement.
- Do not attempt to open or repair the device yourself, as this may void the warranty and cause damage. Refer to qualified service personnel.
- Keep the device away from strong magnetic fields.
12. Warranty and Support
For warranty information and technical support, please refer to the documentation included with your purchase or visit the official KingnovyPC website. Specific warranty details and support contacts are typically provided by the seller or manufacturer.
Note: Information regarding specific warranty periods or support contact details was not available in the provided product data.


