1. Introduction
Thank you for purchasing the Endeavour Fires Rosedale 3D Wall-Mounted Electric Fireplace. This manual provides essential information for the safe installation, operation, and maintenance of your new electric fireplace. Please read all instructions carefully before installation and use, and retain this manual for future reference.

Image 1.1: The Endeavour Fires Rosedale 3D Wall-Mounted Electric Fireplace, showcasing its modern design and vibrant flame effects.
2. Important Safety Information
Always observe the following safety precautions to reduce the risk of fire, electric shock, or injury:
- Read all instructions before using this appliance.
- This appliance is hot when in use. To avoid burns, do not let bare skin touch hot surfaces. Keep combustible materials, such as furniture, pillows, bedding, papers, clothes, and curtains, at least 1 meter (3 feet) from the front of the heater.
- Extreme caution is necessary when any heater is used by or near children or invalids and whenever the heater is left operating and unattended.
- Do not operate any heater with a damaged cord or plug or after the heater malfunctions, has been dropped, or damaged in any manner.
- Do not use outdoors.
- Never locate heater where it may fall into a bathtub or other water container.
- Do not run cord under carpeting. Do not cover cord with throw rugs, runners, or similar coverings. Arrange cord away from traffic area and where it will not be tripped over.
- To disconnect heater, turn controls to off, then remove plug from outlet.
- Do not insert or allow foreign objects to enter any ventilation or exhaust opening as this may cause an electric shock or fire, or damage the heater.
- To prevent a possible fire, do not block air intakes or exhaust in any manner. Do not use on soft surfaces, like a bed, where openings may become blocked.
- This appliance is for indoor use only.
3. Package Contents
Carefully unpack all components and check against the list below. Ensure all items are present and undamaged before proceeding with installation.
- Electric Fireplace Unit (Model E151R)
- Multi-function LCD Remote Control (requires 2 AA batteries, included)
- Realistic Log Set
- Crystal Media Set
- Installation Hardware (screws, brackets, etc.)
- Glass Panels for 1, 2, or 3-sided configuration
- Instruction Manual
4. Installation
4.1 Mounting Options
The Rosedale electric fireplace offers versatile installation options to suit your design preferences. It can be configured as a 1-sided (front aspect), 2-sided (corner aspect), or 3-sided (panoramic aspect) unit.
- Front Aspect (Default): The fireplace is installed with only the front glass panel visible.
- Corner Aspect: One side panel is removed to expose a side view, ideal for corner installations.
- Panoramic Aspect: Both side panels are removed for a full three-sided view, offering maximum visual impact.

Image 4.1: Visual representation of the three available installation aspects: Front, Corner, and Panoramic.
4.2 Dimensions and Placement
Ensure the chosen installation location can accommodate the fireplace dimensions and provides adequate clearance for ventilation. The unit is designed for integration into a wall structure.

Image 4.2: Detailed dimensions diagram for the electric fireplace unit.
| Dimension | Measurement (mm) |
|---|---|
| Height (H) | 495 |
| Width (L) | 1230 |
| Depth (P) | 310 |
The fireplace is designed to be integrated into a media wall or similar structure. Ensure the wall opening is precisely measured to fit the unit. Maintain proper clearance around the unit for air circulation, especially for the heat outlet.

Image 4.3: Example of the fireplace installed in a wall unit, demonstrating a corner aspect.
5. Initial Setup
5.1 Fuel Bed Installation
The Rosedale fireplace comes with both realistic log and crystal media sets. You can choose to use either or combine them to create your desired aesthetic.
- Carefully remove the front glass panel if necessary, following the instructions in the installation guide.
- Place the chosen fuel bed media (logs, crystals, or both) onto the designated fuel bed area within the fireplace unit. Arrange them to achieve a natural and appealing look.
- Re-secure the front glass panel if it was removed.
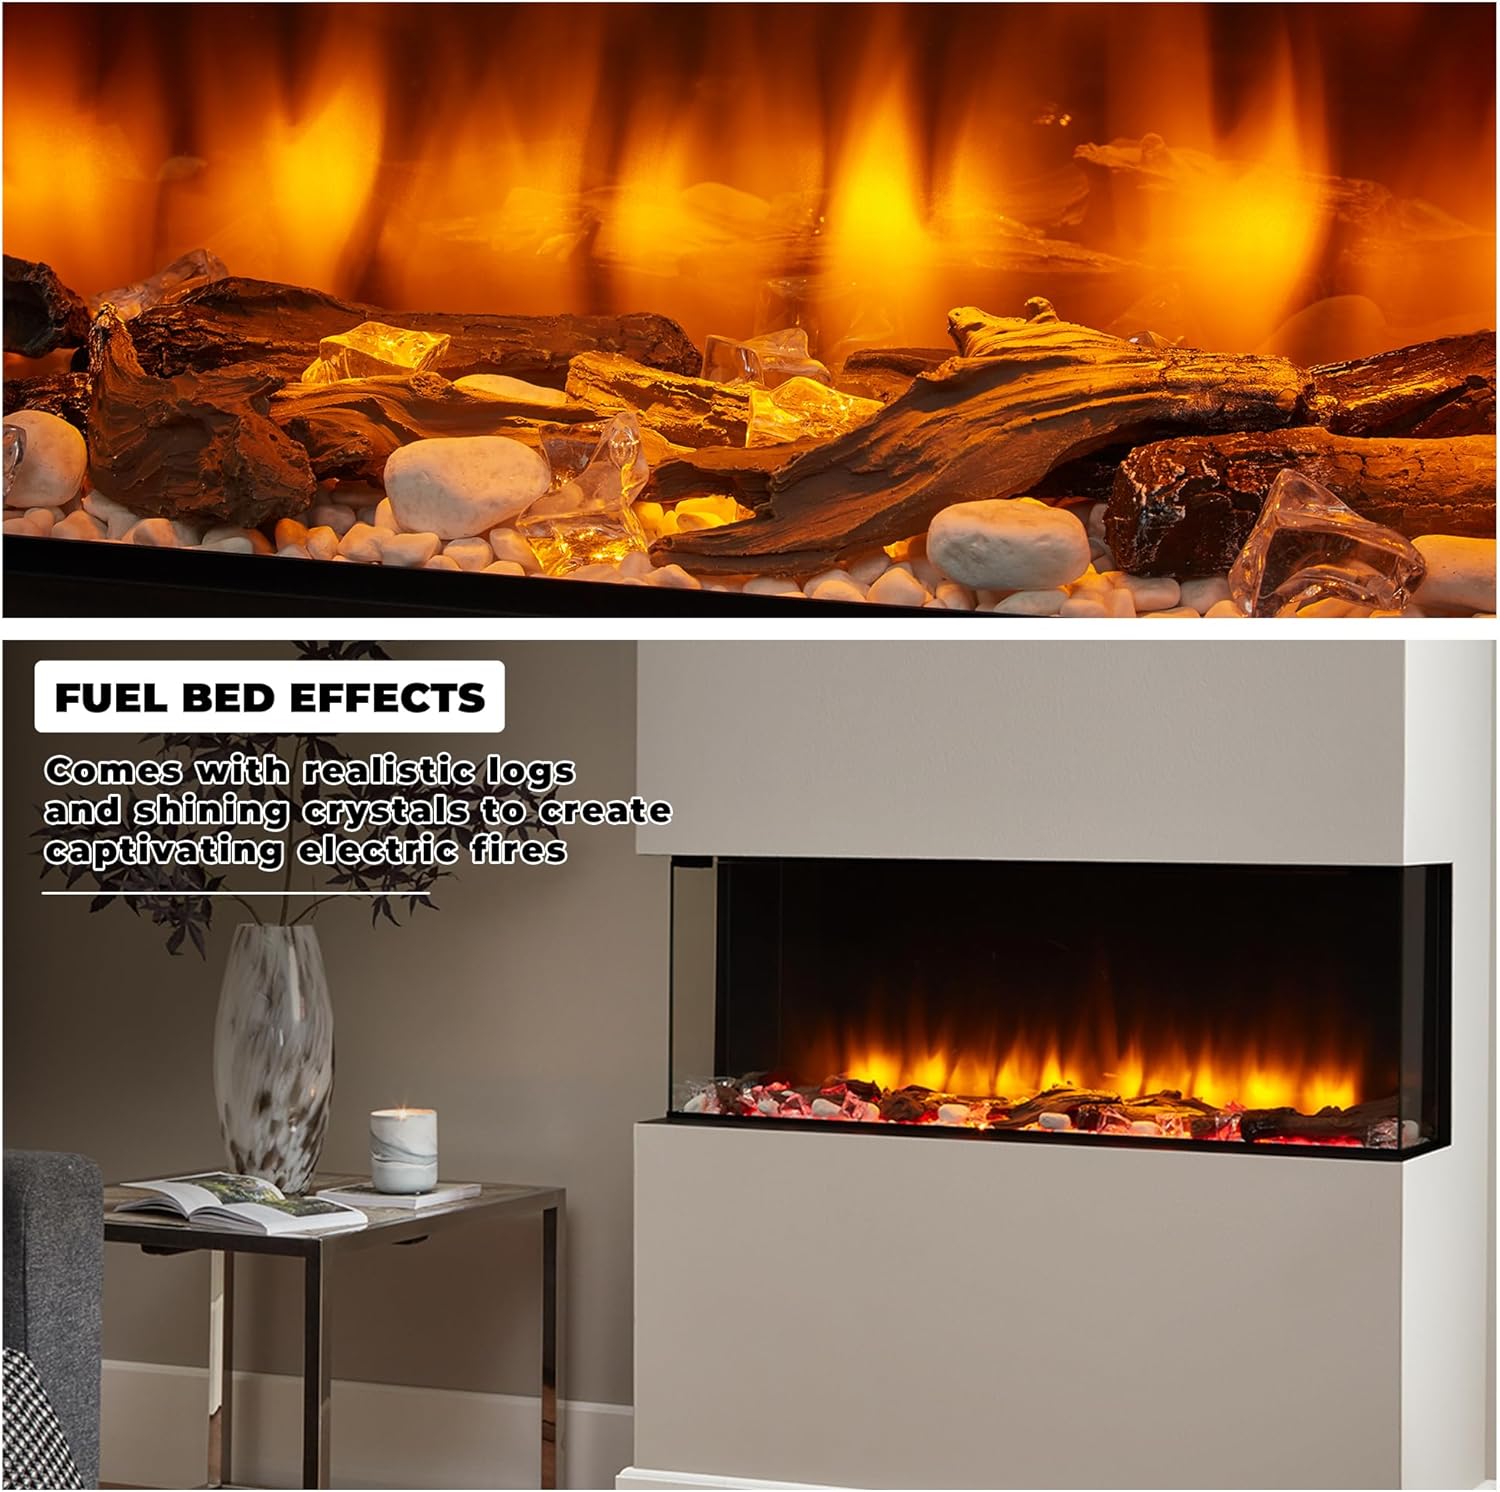
Image 5.1: Close-up view of the fuel bed with realistic logs and shining crystals, enhancing the flame effect.
5.2 Power Connection
Once the unit is securely installed in its desired location and the fuel bed is arranged, connect the power cord.
- Ensure the main power switch on the fireplace unit is in the 'OFF' position.
- Plug the power cord into a standard 220-240V AC grounded electrical outlet. Do not use extension cords or power strips.
- Ensure the power cord is not pinched or routed in a way that could cause damage.

Image 5.2: Rear view of the fireplace unit, illustrating the power cord connection.
6. Operation
The Rosedale fireplace can be operated using either the manual control panel on the unit or the included multi-function remote control.
6.1 Manual Control Panel
The manual control panel is located on the unit, typically behind a discreet cover. It provides basic control over the fireplace functions.

Image 6.1: Overview of the manual control panel and the remote control.
- Main Power ON/OFF Switch: Turns the entire unit on or off.
- Light ON/OFF Button: Activates or deactivates the flame effect and fuel bed lighting.
- Flame Setting Button: Cycles through different flame brightness or color options.
- Fuel Bed Setting Button: Cycles through different fuel bed lighting colors.
- Heater Running Indicator: Illuminates when the heating function is active.
- Reset Button for Remote Control: Used to re-pair the remote control if needed.
6.2 Remote Control
The multi-function LCD remote control provides comprehensive control over all features, including a programmable 7-day timer and thermostat.
- Power Button: Turns the fireplace on or off.
- Mode Button: Cycles through different operating modes (e.g., timer, manual).
- Heating/Advance Buttons: Adjusts heat settings (1000W/2000W) and advances timer settings.
- Flame Effect Button: Changes flame intensity and color.
- Fuel Bed Button: Cycles through 13 different fuel bed colors.
- Mood Light Button: Controls ambient mood lighting (if applicable).
- Temperature Sensor Convection: Built-in thermostat for maintaining desired room temperature.
- Timer Function: Allows programming of heating schedules for up to 7 days.
6.3 Flame Effects
The Rosedale fireplace features realistic 3D flame effects with adjustable intensity and multiple color options. Use the 'Flame Effect' button on the remote or manual panel to cycle through available settings.

Image 6.2: Examples of various flame and fuel bed color combinations, including Amber, Blue, and Amber with Blue.
6.4 Fuel Bed Lighting
The luminous fuel bed offers 13 different colors to complement the flame effect or your room's ambiance. Use the 'Fuel Bed' button on the remote or manual panel to select your preferred color.
6.5 Heating Function
The fireplace provides efficient heating with two power modes: 1000W and 2000W. The heating function can be operated independently of the flame effect, allowing you to enjoy the visual ambiance without heat, or vice-versa.

Image 6.3: Diagram showing the air inlet and front air outlet for the heating system. Hot air is released from the front, keeping the wall behind cool.
Use the 'Heating/Advance' buttons on the remote to select the desired heat output. The integrated thermostat allows you to set and maintain a comfortable room temperature.
7. Maintenance
Regular maintenance ensures the longevity and optimal performance of your electric fireplace.
- Cleaning: Always disconnect power before cleaning. Use a soft, damp cloth to clean the exterior surfaces. Do not use abrasive cleaners or sprays. For glass panels, use a glass cleaner and a soft cloth.
- Ventilation Openings: Keep the air inlet and outlet openings clear of dust and debris to ensure proper heat dissipation and prevent overheating.
- Light Source: The flame and fuel bed effects use LED technology, which typically does not require replacement. If an issue occurs, contact customer support.
- Storage: If storing the fireplace for an extended period, ensure it is clean, dry, and stored in a safe location away from moisture and extreme temperatures.
8. Troubleshooting
Refer to the table below for common issues and their potential solutions.
| Problem | Possible Cause | Solution |
|---|---|---|
| No power to the unit | Power cord unplugged, circuit breaker tripped, main switch off. | Check power cord connection, reset circuit breaker, ensure main power switch is ON. |
| Flame effect not working | Light function off, LED malfunction. | Press the 'Light ON/OFF' or 'Flame Effect' button. If issue persists, contact support. |
| No heat output | Heater function off, thermostat set too low, air vents blocked. | Activate heater function via remote/panel, increase thermostat setting, clear air vents. |
| Remote control not working | Batteries dead, remote not paired, obstruction. | Replace batteries (2 AA). Ensure no obstruction between remote and unit. Re-pair remote using the reset button on the manual panel. |
| Unusual noise or smell | Dust accumulation, internal component issue. | Turn off and unplug the unit immediately. Contact customer support. |
9. Technical Specifications
| Feature | Specification |
|---|---|
| Brand | Endeavour Fires |
| Model Number | E151R |
| Dimensions (L x W x H) | 1230 x 310 x 495 mm |
| Weight | 45 Kilograms |
| Heat Output | 1000W / 2000W (2 Kilowatts Max) |
| Power Source | Corded Electric |
| Special Features | Automatic Rotation Heating, Flame Effect, LED Flame, Multi-color Flame, Adjustable Flame |
| Fuel Bed Options | Realistic Logs, Shining Crystals |
| Control | Manual Control Panel, Multi-function LCD Remote Control |
| Timer | 7-day Programmable Timer |
| Thermostat | Integrated Thermostat |
| Compliance | Ecodesign 2018 Standard |
| Batteries | 2 AA (included for remote) |
10. Warranty and Support
For warranty information, technical support, or replacement parts, please contact Endeavour Fires customer service. Keep your purchase receipt as proof of purchase.


