1. Introduction
Thank you for choosing the iiyama XUB3293UHSN-B5 4K IPS Monitor. This 32-inch monitor features a 4K UHD (3840 x 2160) IPS panel, offering natural, high-precision colors and wide viewing angles. It is equipped with a KVM switch, allowing control of multiple computers with a single set of peripherals (monitor, keyboard, mouse). The integrated USB-C dock provides simultaneous power, data, video, and audio transfer via a single cable, simplifying your workspace. This manual provides essential information for the safe and efficient use of your monitor.

Figure 1: Front view of the iiyama XUB3293UHSN-B5 monitor, showcasing its slim bezels and stand.
2. Safety Instructions
Please read these safety instructions carefully before operating the monitor to prevent damage or injury. Keep this manual for future reference.
- Power Source: Use only the power cord and adapter supplied with the monitor. Ensure the power outlet is properly grounded.
- Placement: Place the monitor on a stable, level surface. Avoid direct sunlight, heat sources, and areas with excessive dust or humidity. Ensure adequate ventilation around the monitor.
- Cleaning: Disconnect the power cord before cleaning. Use a soft, dry cloth. Do not use liquid cleaners or aerosol sprays.
- Ventilation: Do not block ventilation openings. Overheating can cause damage.
- Liquid and Foreign Objects: Never spill any liquid into the monitor. Do not insert any objects into the monitor's openings.
- Servicing: Do not attempt to service the monitor yourself. Refer all servicing to qualified service personnel.
3. Package Contents
Verify that all items are present in your package:
- iiyama XUB3293UHSN-B5 Monitor
- Monitor Stand (Base and Neck)
- Power Cable
- HDMI Cable
- DisplayPort Cable
- USB-C Cable
- USB Upstream Cable
- Quick Start Guide / Safety Manual
4. Setup
4.1 Assembling the Stand
- Carefully place the monitor face down on a soft, clean surface to prevent scratches.
- Attach the stand neck to the back of the monitor. Ensure it clicks securely into place or is fastened with screws if provided.
- Attach the stand base to the bottom of the stand neck. Tighten the thumb screw or screws to secure it.

Figure 2: Rear view of the monitor, showing the stand attachment area and VESA mounting holes.
4.2 Connecting Cables
Connect the necessary cables to the corresponding ports on the monitor and your computer(s).

Figure 3: Detailed view of the monitor's input/output ports on the rear panel.
- Power Connection: Connect the power cable to the monitor's power input and then to a wall outlet.
- Video Input:
- HDMI: Connect an HDMI cable from your computer's HDMI output to an HDMI input on the monitor.
- DisplayPort (DP): Connect a DisplayPort cable from your computer's DP output to the DP input on the monitor.
- USB-C: For compatible devices, connect a USB-C cable from your device to the USB-C port on the monitor. This single connection can provide video, data, and power delivery (up to 65W).
- USB Upstream (for KVM/Hub): Connect the USB upstream cable (USB-B to USB-A) from the monitor to your primary computer's USB port. This enables the integrated USB hub and KVM functionality.
- LAN Connection: If using the monitor's LAN pass-through feature, connect an Ethernet cable from your network router/switch to the LAN input on the monitor.
- Audio: Connect headphones or external speakers to the 3.5mm headphone jack if desired.
4.3 Initial Power-On
After connecting all necessary cables, press the power button on the monitor. The monitor should power on and display an image from the connected source. If no image appears, ensure the correct input source is selected (see Section 5.3).
5. Operating Instructions
5.1 Power On/Off
Press the power button located on the monitor's bottom bezel to turn the monitor on or off.
5.2 OSD Menu Navigation
The On-Screen Display (OSD) menu allows you to adjust various monitor settings. Use the control buttons (typically located on the bottom or rear of the monitor) to navigate the menu:
- Press a button to open the OSD menu.
- Use the directional buttons to move through menu options.
- Press the 'Enter' or 'OK' button to select an option.
- Use the 'Exit' or 'Back' button to return to the previous menu or exit the OSD.
5.3 Input Source Selection
To switch between connected video sources (HDMI, DisplayPort, USB-C):
- Access the OSD menu.
- Navigate to the 'Input' or 'Source' menu.
- Select the desired input (e.g., HDMI1, DisplayPort, USB-C).
5.4 KVM Switch Functionality
The integrated KVM switch allows you to control multiple computers (connected via video inputs and USB upstream) using a single keyboard and mouse connected to the monitor's USB downstream ports.
- Connect your keyboard and mouse to the USB 3.0 downstream ports on the side of the monitor.
- Connect the USB upstream cable from the monitor to your primary computer.
- For a second computer, connect its video output (e.g., DisplayPort) and a separate USB upstream cable (if available, or use USB-C for combined video/data) to the monitor.
- Switching between computers is typically done by changing the video input source via the OSD menu. The KVM automatically switches the USB peripherals to the active video input.

Figure 4: Side view of the monitor, highlighting the conveniently located USB 3.0 downstream ports.
5.5 USB-C Dock Features
The USB-C port on the monitor functions as a dock, providing:
- Video Signal: Transmits video from your USB-C compatible device to the monitor.
- Data Transfer: Allows connected USB devices (keyboard, mouse, USB drives) to communicate with your USB-C connected device.
- Power Delivery: Charges your connected laptop or device (up to 65W) via the USB-C cable.
- LAN Pass-through: If the monitor is connected to a LAN cable, your USB-C connected notebook will automatically gain network access.
5.6 Picture Adjustments
Access the OSD menu to adjust display settings:
- Brightness/Contrast: Adjust the overall luminance and difference between light and dark areas.
- Color Settings: Modify color temperature, gamma, and individual RGB levels.
- i-Style Color: Select from various preset picture modes optimized for different content (e.g., Text, Game, Movie).
- Blue Light Filter: Reduce blue light emission to minimize eye strain, especially during prolonged use.
5.7 Ergonomic Adjustments
The monitor stand allows for ergonomic adjustments:
- Height Adjustment: Raise or lower the monitor to achieve a comfortable viewing height.
- Tilt: Adjust the screen's vertical angle (forward/backward).
- Swivel: Rotate the screen horizontally left or right.
6. Maintenance
6.1 Cleaning the Monitor
To clean the monitor:
- Turn off the monitor and disconnect the power cord.
- Use a soft, lint-free cloth lightly dampened with water or a non-abrasive screen cleaner.
- Gently wipe the screen and exterior surfaces. Avoid applying excessive pressure.
- Do not use alcohol, benzene, thinners, or other harsh chemicals, as they may damage the surface.
6.2 Storage
If storing the monitor for an extended period, ensure it is clean, powered off, and disconnected from all cables. Store it in a cool, dry place, preferably in its original packaging to protect it from dust and physical damage.
7. Troubleshooting
If you encounter issues with your monitor, refer to the following common problems and solutions:
| Problem | Possible Cause | Solution |
|---|---|---|
| No power | Power cable not connected; Power outlet faulty; Monitor power button off. | Ensure power cable is securely connected. Test the outlet with another device. Press the monitor power button. |
| No signal / Blank screen | Video cable not connected; Incorrect input source selected; Computer not outputting signal. | Check video cable connections (HDMI, DP, USB-C). Select the correct input source via OSD. Restart your computer. |
| Flickering or distorted image | Loose video cable; Incorrect resolution/refresh rate; Graphics driver issue. | Reconnect video cable. Set computer's display resolution to 3840x2160 and refresh rate to 60Hz. Update graphics drivers. |
| KVM/USB devices not working | USB upstream cable not connected; Incorrect input source selected; Driver issue. | Ensure USB upstream cable is connected from monitor to computer. Select the correct video input. Check USB drivers on your computer. |
| LAN connection not working via monitor | Ethernet cable not connected to monitor; USB-C device not compatible; Network settings. | Ensure Ethernet cable is connected to the monitor's LAN port. Verify your USB-C device supports LAN pass-through. Check network settings on your computer. |
If the problem persists after trying these solutions, please contact iiyama customer support.
8. Technical Specifications
| Feature | Specification |
|---|---|
| Model Number | XUB3293UHSN-B5 |
| Screen Size | 31.5 Inches (80 cm) |
| Panel Type | IPS LED |
| Resolution | 4K UHD (3840 x 2160) |
| Aspect Ratio | 16:9 |
| Response Time | 4ms (GTG) |
| Brightness | 350 cd/m² |
| Contrast Ratio | 1,000:1 (Typical), 80,000,000:1 (ACR) |
| Viewing Angle | 178°/178° (Horizontal/Vertical) |
| Video Inputs | HDMI, DisplayPort, USB-C |
| USB Ports | 2 x USB 3.0 (downstream), USB-C (upstream/dock) |
| Audio | 2 x 3W Speakers, Headphone Jack |
| Special Features | KVM Switch, USB-C Dock (65W PD), LAN Port, Flicker-Free, Blue Light Filter, i-Style Color |
| Ergonomics | Height Adjustable (150 mm), Tilt, Swivel |
| VESA Compatibility | Yes |
| Product Dimensions (W x H x D) | Approx. 27.95 x 17.72 x 9.45 inches (with stand) |
| Item Weight | 21.8 pounds |
| Power Consumption (SDR) | 32.9 W (Typical) |
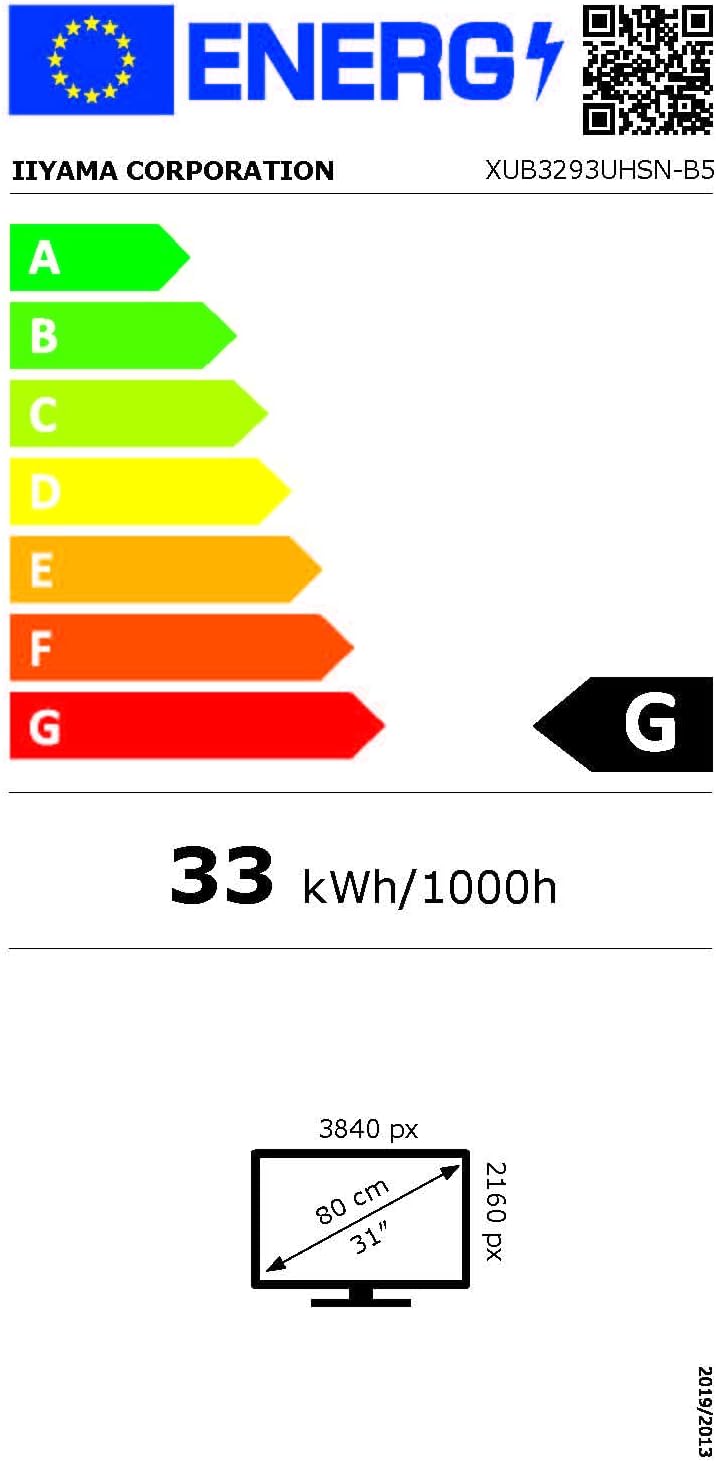
Figure 5: Energy label for the XUB3293UHSN-B5 monitor, indicating its energy efficiency class and consumption. For more details, visit EPREL Database.

Figure 6: Excerpt from the EU regulatory document providing detailed technical parameters for the monitor.
9. Warranty and Support
Your iiyama XUB3293UHSN-B5 monitor is covered by a manufacturer's warranty. Please refer to the warranty card included in your package or visit the official iiyama website for detailed warranty terms and conditions specific to your region.
For technical support, service inquiries, or further assistance, please contact iiyama customer support through their official website or the contact information provided in your product documentation.
10. Environmental Information
Disposal of Old Electrical & Electronic Equipment (Applicable in the European Union and other European countries with separate collection systems):
This symbol on the product or on its packaging indicates that this product shall not be treated as household waste. Instead, it shall be handed over to the applicable collection point for the recycling of electrical and electronic equipment. By ensuring this product is disposed of correctly, you will help prevent potential negative consequences for the environment and human health, which could otherwise be caused by inappropriate waste handling of this product. The recycling of materials will help to conserve natural resources. For more detailed information about recycling of this product, please contact your local City Office, your household waste disposal service or the shop where you purchased the product.


