1. Important Safety Instructions
When using electrical appliances, basic safety precautions should always be followed to reduce the risk of fire, electric shock, and/or injury to persons, including the following:
- Read all instructions before operating the bread maker.
- Do not touch hot surfaces. Use handles or knobs.
- To protect against electric shock, do not immerse cord, plugs, or appliance in water or other liquid.
- Close supervision is necessary when any appliance is used by or near children.
- Unplug from outlet when not in use and before cleaning. Allow to cool before putting on or taking off parts.
- Do not operate any appliance with a damaged cord or plug or after the appliance malfunctions or has been damaged in any manner.
- The use of accessory attachments not recommended by the appliance manufacturer may cause injuries.
- Do not use outdoors.
- Do not let cord hang over edge of table or counter or touch hot surfaces.
- Do not place on or near a hot gas or electric burner, or in a heated oven.
- Extreme caution must be used when moving an appliance containing hot oil or other hot liquids.
- To disconnect, turn any control to 'off', then remove plug from wall outlet.
- Do not use appliance for other than intended use.
- Avoid contact with moving parts.
- This appliance has a polarized plug (one blade is wider than the other). To reduce the risk of electric shock, this plug is intended to fit into a polarized outlet only one way. If the plug does not fit fully into the outlet, reverse the plug. If it still does not fit, contact a qualified electrician. Do not attempt to modify the plug in any way.
2. Product Overview
The Involly 15-in-1 Bread Maker is a versatile kitchen appliance designed for automatic bread making, dough preparation, and other functions like jam and yogurt. It features a durable stainless steel exterior and a user-friendly interface.

Figure 2.1: Front view of the Involly 15-in-1 Bread Maker, showcasing its stainless steel finish and control panel.
Key Components:
- Main Unit: Houses the motor, heating elements, and control panel.
- Bread Pan: Non-stick baking pan where ingredients are mixed and baked.
- Kneading Paddle: Detachable paddle for mixing and kneading dough.
- Automatic Fruit & Nut Dispenser: Automatically releases ingredients at the optimal time during the baking cycle.
- Viewing Window: Allows monitoring of the baking process without opening the lid.
- Control Panel: Digital display and buttons for program selection, time, and crust settings.

Figure 2.2: Design features of the bread maker, including the stainless steel body, anti-heat handle, and large glass viewing window.
Advanced Features:
- 360° Even Heating: Improved double heating tubes ensure faster and more uniform baking.
- Low Noise Motor: Upgraded 35W brushless motor for stable and quiet operation (55 dB).
- Palm-Shaped Kneading Paddle: Designed to mimic manual kneading for consistent mixing and vigorous dough development.
- 15-Hour Delay Timer: Allows for delayed start to enjoy freshly baked bread at a desired time.
- 1-Hour Keep Warm Function: Automatically keeps bread warm after baking is complete.
- 10-Minute Power-Off Recovery: Resumes operation after a brief power interruption.
3. Setup and Initial Use
Before using your Involly Bread Maker for the first time, follow these steps:
- Unpacking: Carefully remove the bread maker and all accessories from the packaging. Retain packaging for future storage or transport.
- Cleaning: Wash the bread pan, kneading paddle, and fruit/nut dispenser with warm, soapy water. Rinse thoroughly and dry all parts completely. Wipe the exterior of the bread maker with a damp cloth. Do not immerse the main unit in water.
- Placement: Place the bread maker on a stable, flat, heat-resistant surface, away from direct sunlight and heat sources. Ensure adequate ventilation around the appliance.
- First Bake Cycle (Empty): It is recommended to run an empty bake cycle to burn off any manufacturing residues. Plug in the bread maker, select the 'Bake' program (Program 13), and let it run for about 10 minutes. A slight odor or smoke may be present; this is normal. Ensure the area is well-ventilated. Unplug and allow to cool completely.

Figure 3.1: Included accessories: bread pan, kneader, nut and fruit dispenser, measuring cup, tablespoon/teaspoon, hook, instruction manual, recipes, and quick guide stickers.
4. Operating Instructions
4.1 Control Panel
The control panel features an LCD display and intuitive controls for selecting programs, loaf size, crust color, and setting the delay timer.

Figure 4.1: The control panel with LCD display, program list, and 2-in-1 dial control for menu, color, and weight selection.
4.2 Program Selection
The bread maker offers 15 preset programs. Use the 'MENU/COLOR/WEIGHT' dial to cycle through the programs displayed on the LCD screen.

Figure 4.2: A visual representation of the 15 available programs, including various bread types, doughs, jams, and yogurt.
4.3 Loaf Size and Crust Color Selection
After selecting a program, you can choose the desired loaf size and crust color using the 'MENU/COLOR/WEIGHT' dial.
- Loaf Sizes: 1.0 lb (500g), 1.5 lb (750g), 2.0 lb (1000g).
- Crust Colors: Light, Medium, Dark.
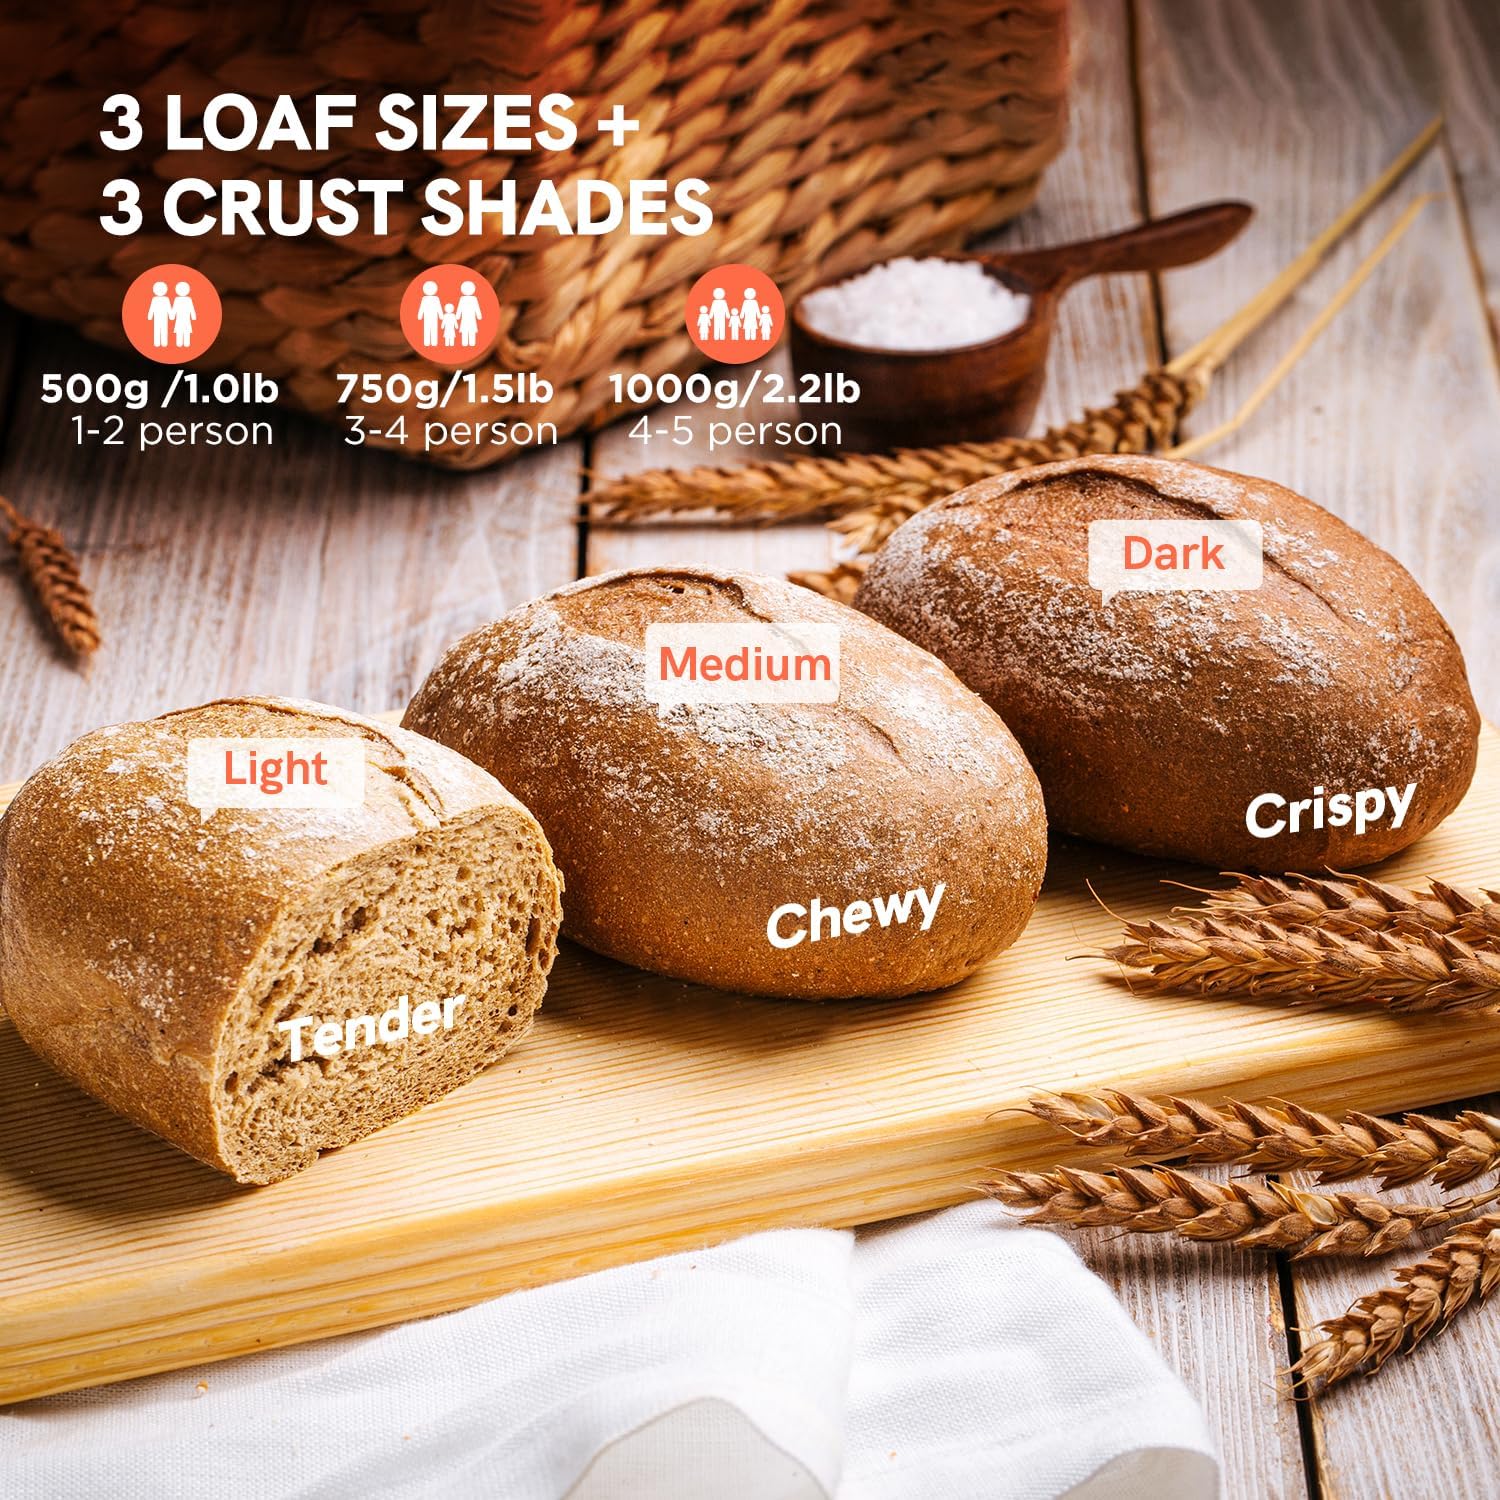
Figure 4.3: Examples of bread with light (tender), medium (chewy), and dark (crispy) crusts, along with recommended serving sizes for 1.0lb, 1.5lb, and 2.2lb loaves.
4.4 Delay Timer and Keep Warm Function
- Delay Timer (up to 15 hours): Press the 'DELAY' button to set the desired delay time. This includes the baking time. For example, if you want bread ready in 8 hours, and the program takes 3 hours, set the delay for 8 hours.
- Keep Warm (1 hour): After the baking cycle is complete, the bread maker automatically enters a 1-hour 'Keep Warm' phase to maintain the bread's temperature.
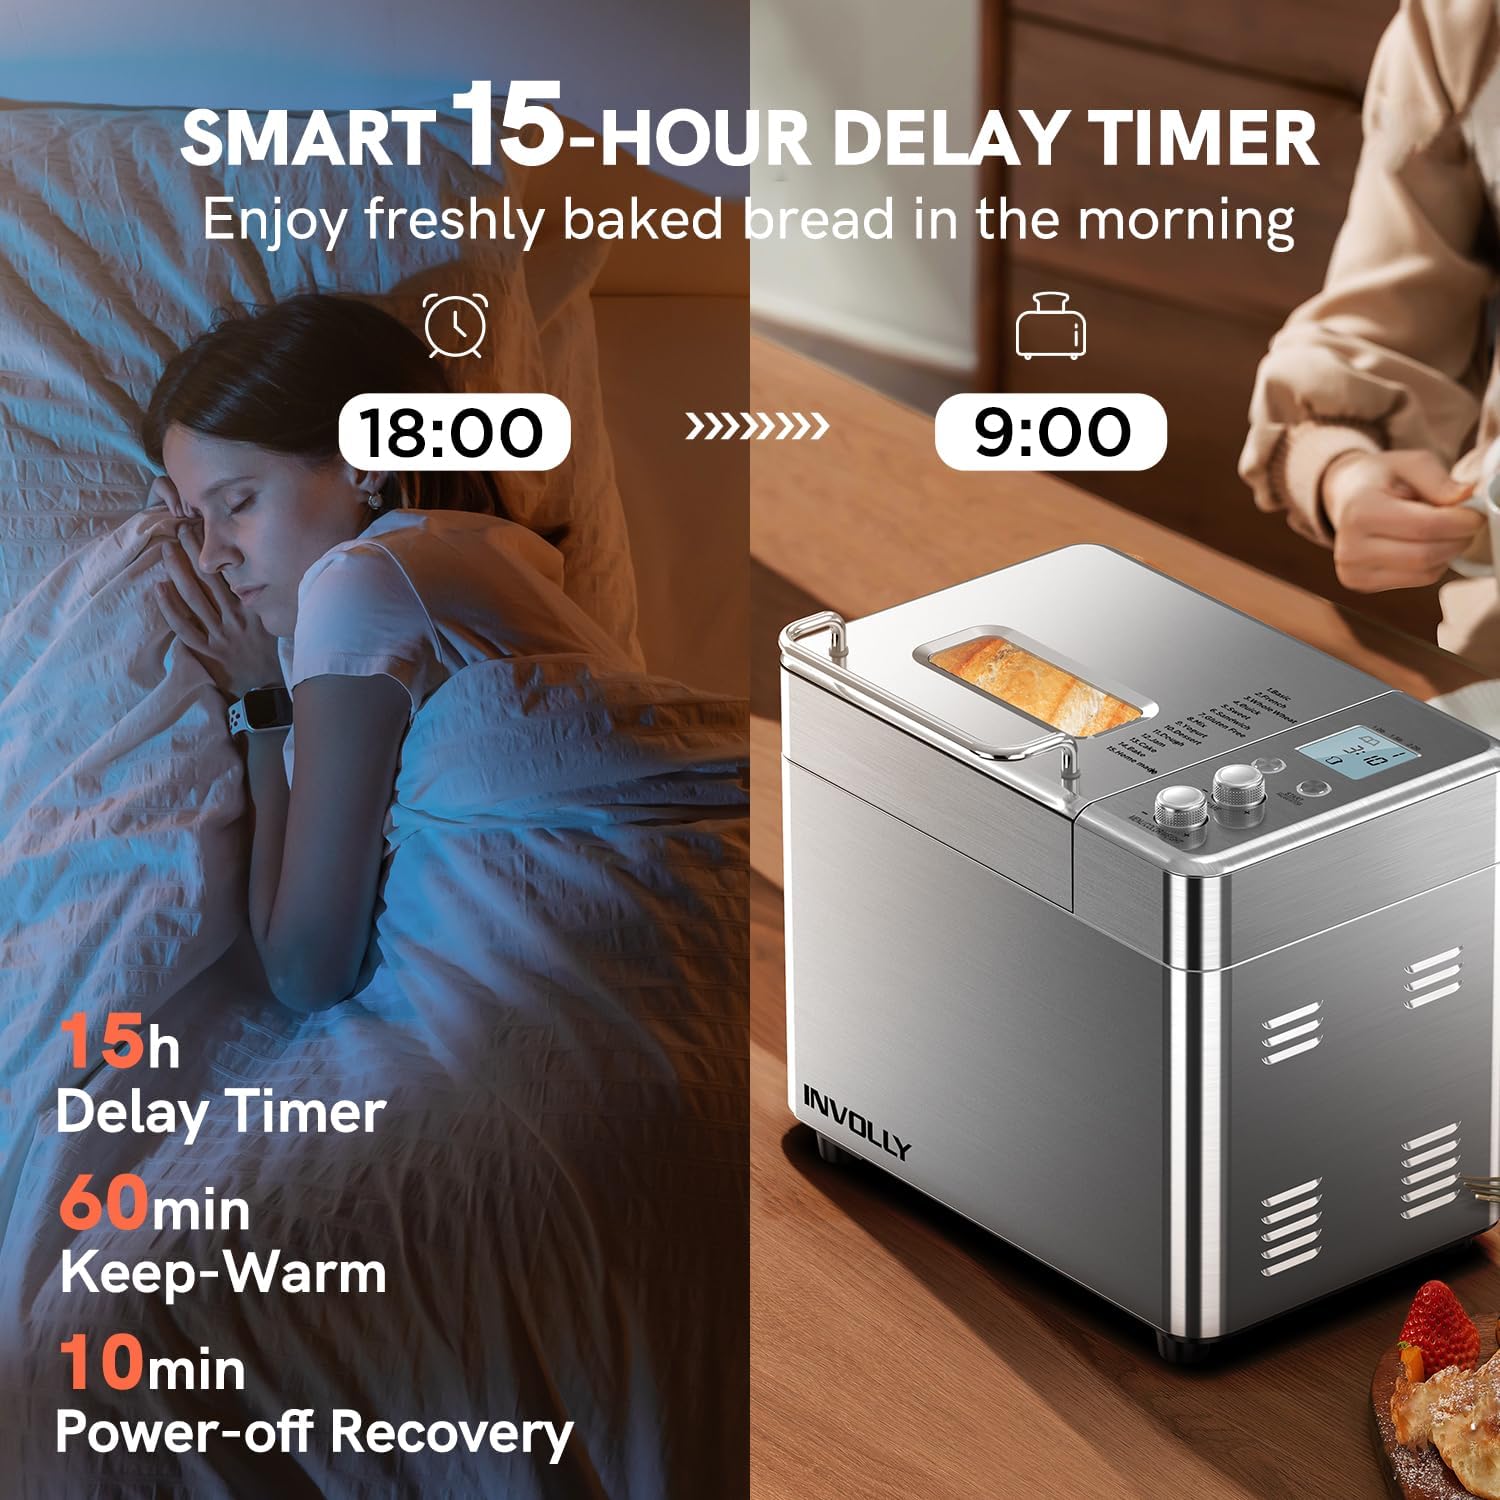
Figure 4.4: The smart 15-hour delay timer allows users to schedule baking to have fresh bread ready at a specific time, such as in the morning.
4.5 Automatic Fruit and Nut Dispenser
The integrated dispenser automatically adds fruits, nuts, or other mix-ins at the optimal time during the kneading cycle, ensuring even distribution throughout the loaf.
- Open the dispenser lid and add your desired ingredients (e.g., raisins, chocolate chips, nuts).
- The dispenser will open automatically during the kneading phase to release the ingredients.
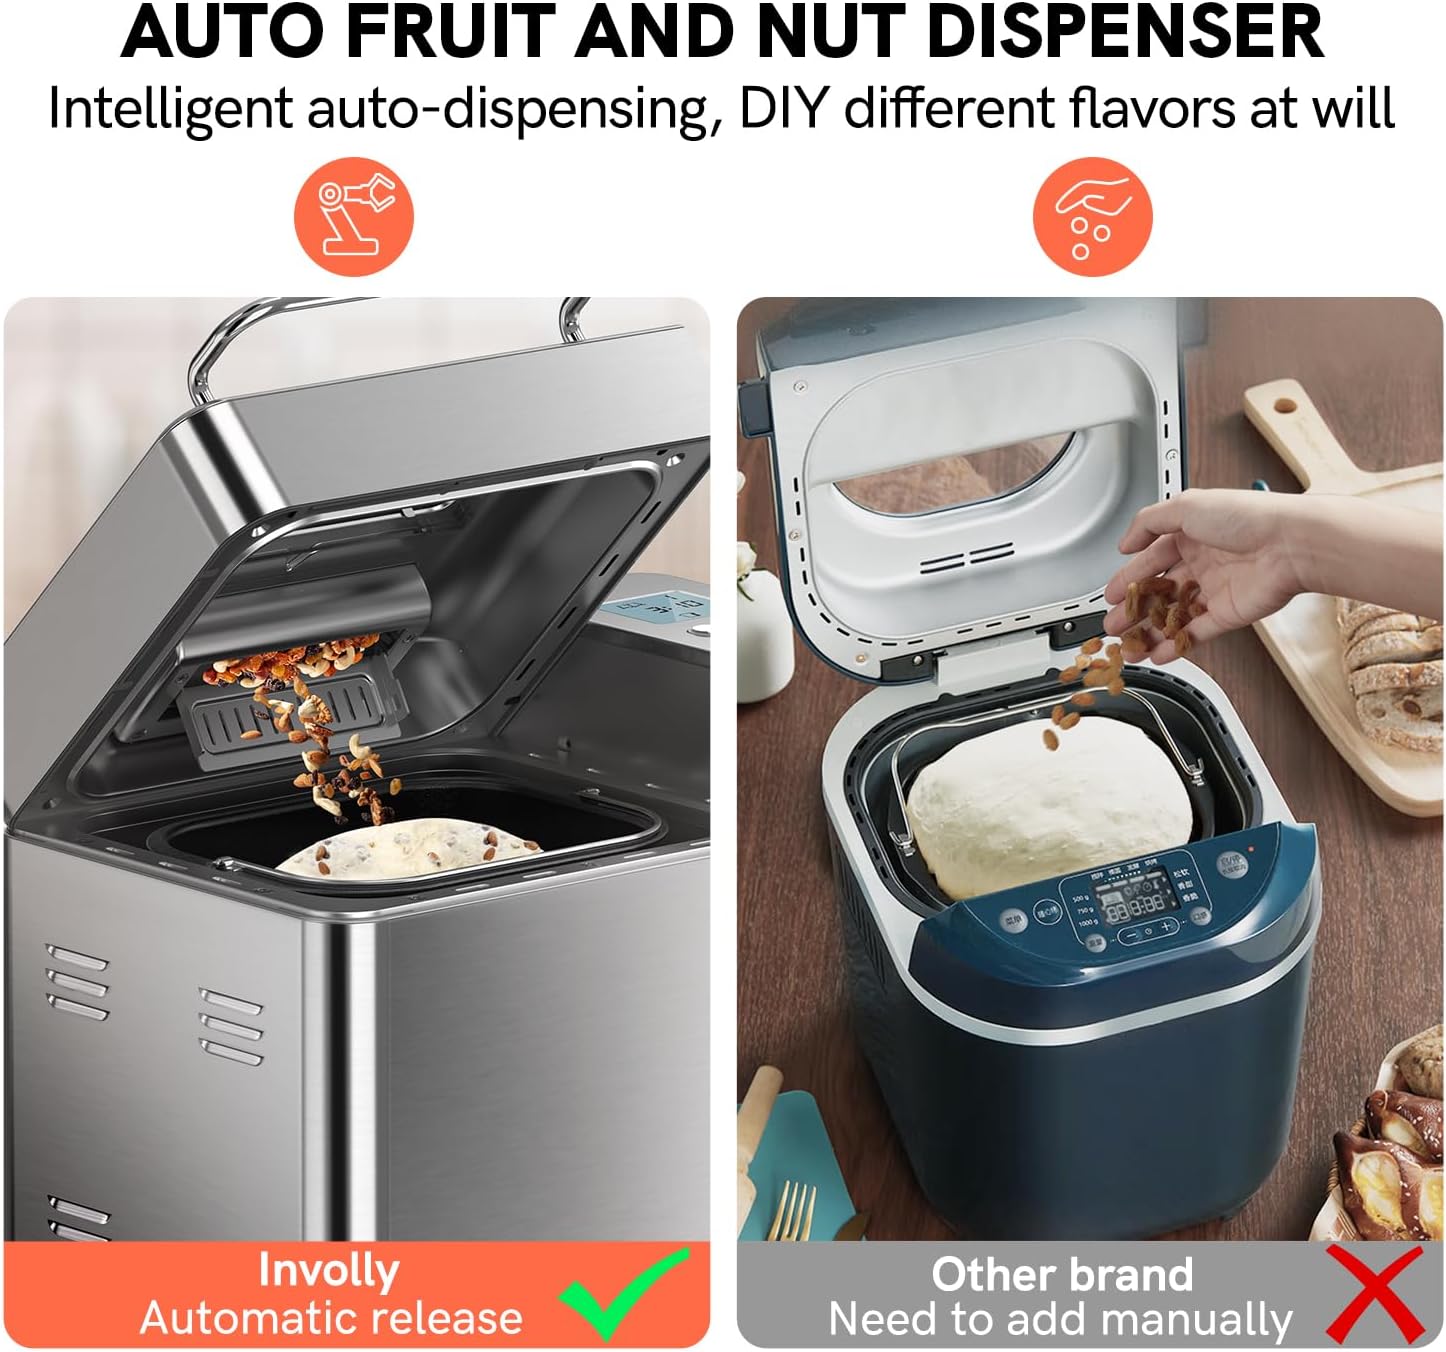
Figure 4.5: The automatic fruit and nut dispenser ensures intelligent, timely, and even distribution of ingredients without manual intervention.
4.6 Basic Operation Steps
- Add Ingredients: Place the kneading paddle into the bread pan. Add liquid ingredients first, followed by dry ingredients. Ensure yeast is added last, separate from liquids and salt.
- Place Pan: Insert the bread pan into the bread maker, ensuring it clicks securely into place. Close the lid.
- Select Program: Plug in the bread maker. Use the 'MENU/COLOR/WEIGHT' dial to select your desired program (e.g., Basic, Whole Wheat).
- Select Loaf Size & Crust Color: Adjust the loaf size (1.0lb, 1.5lb, 2.0lb) and crust color (Light, Medium, Dark) using the 'MENU/COLOR/WEIGHT' dial.
- Set Delay (Optional): If you wish to delay the start, press the 'DELAY' button and adjust the time.
- Start Baking: Press the 'START/STOP' button to begin the program. The bread maker will automatically proceed through kneading, rising, and baking cycles.
- Remove Bread: Once the program is complete and the 'Keep Warm' cycle finishes, unplug the appliance. Use oven mitts to carefully remove the bread pan. Invert the pan to release the bread onto a wire rack to cool. If the kneading paddle remains in the bread, use the hook tool to remove it.

Figure 4.6: Simplified steps for daily bread making: 1. Add ingredients, 2. Select mode, loaf size, and crust, 3. Machine works automatically, 4. Freshly baked bread is done.
5. Maintenance and Cleaning
Regular cleaning ensures the longevity and optimal performance of your bread maker.
- Before Cleaning: Always unplug the bread maker and allow it to cool completely before cleaning.
- Bread Pan and Kneading Paddle: Remove the bread pan and kneading paddle. Fill the pan with warm, soapy water and let it soak for 10-15 minutes to loosen any stuck-on dough. Clean with a soft sponge or cloth. The bread pan is dishwasher safe.
- Automatic Fruit & Nut Dispenser: Detach the dispenser and clean it with warm, soapy water. Ensure no food particles are left to prevent clogging.
- Main Unit: Wipe the exterior of the bread maker with a damp cloth. Do not use abrasive cleaners or immerse the main unit in water. Clean the interior of the baking chamber with a soft, damp cloth.
- Storage: Ensure all parts are completely dry before reassembling and storing the bread maker in a cool, dry place.
6. Troubleshooting
Refer to the table below for common issues and their solutions.
7. Specifications
8. Warranty and Support
For warranty information and customer support, please refer to the documentation included with your purchase or contact INVOLLY customer service directly. Keep your purchase receipt as proof of purchase for warranty claims.


