1. Introduction
This manual provides detailed instructions for the installation, configuration, and maintenance of the MikroTik RB5009UPr+S+OUT Outdoor PoE Router. Please read this manual thoroughly before operating the device to ensure proper functionality and safety.
2. Package Contents
Verify that all items listed below are included in your package:
- Hose clamp (1)
- K-72 fastening set
- K-41 fastening set

Figure 2.1: The MikroTik RB5009UPr+S+OUT Outdoor PoE Router.

Figure 2.2: Components of the K-41 fastening set, including mounting brackets and screws.
3. Key Features
- Versatile Power Options: Features 9 total powering methods, including PoE-in and PoE-out on 8 Ethernet ports and a 2-pin terminal input. Automatic voltage selection ensures seamless failover and redundancy.
- Heavy-Duty Outdoor PoE Router: Engineered for reliability in extreme conditions with a rugged IP66 waterproof enclosure, making it suitable for outdoor network tower setups and harsh environments.
- Powerful Performance with RouterOS v7: Equipped with a Quad-core ARM CPU, 1 GB RAM, and advanced software features including MPLS, VPLS, PPPoE, and hardware bridging for advanced ISP-grade networking.
- High-Speed Connectivity: Includes 7x Gigabit Ethernet ports, 1x 2.5 Gigabit Ethernet port, 1x 10G SFP+ port, and a USB 3.0 port. Supports both low-voltage and 802.3af/at PoE-out with a total power output of up to 120W.
4. Setup and Installation
4.1 Physical Installation
The RB5009UPr+S+OUT is designed for outdoor use and can be mounted on a pole or wall. Ensure the mounting location is secure and provides adequate access for cabling.
4.1.1 Pole Mounting
Use the provided hose clamps and fastening sets (K-72, K-41) to secure the device to a pole. Ensure the device is mounted vertically with the ports facing downwards to maintain its IP66 rating and prevent water ingress.

Figure 4.1: The MikroTik RB5009UPr+S+OUT router mounted on a pole using hose clamps, demonstrating its outdoor installation capability.
4.1.2 Wall Mounting
For wall mounting, utilize the K-41 fastening set and appropriate screws/anchors suitable for your wall material. Ensure the mounting surface is sturdy enough to support the device's weight and withstand environmental conditions.
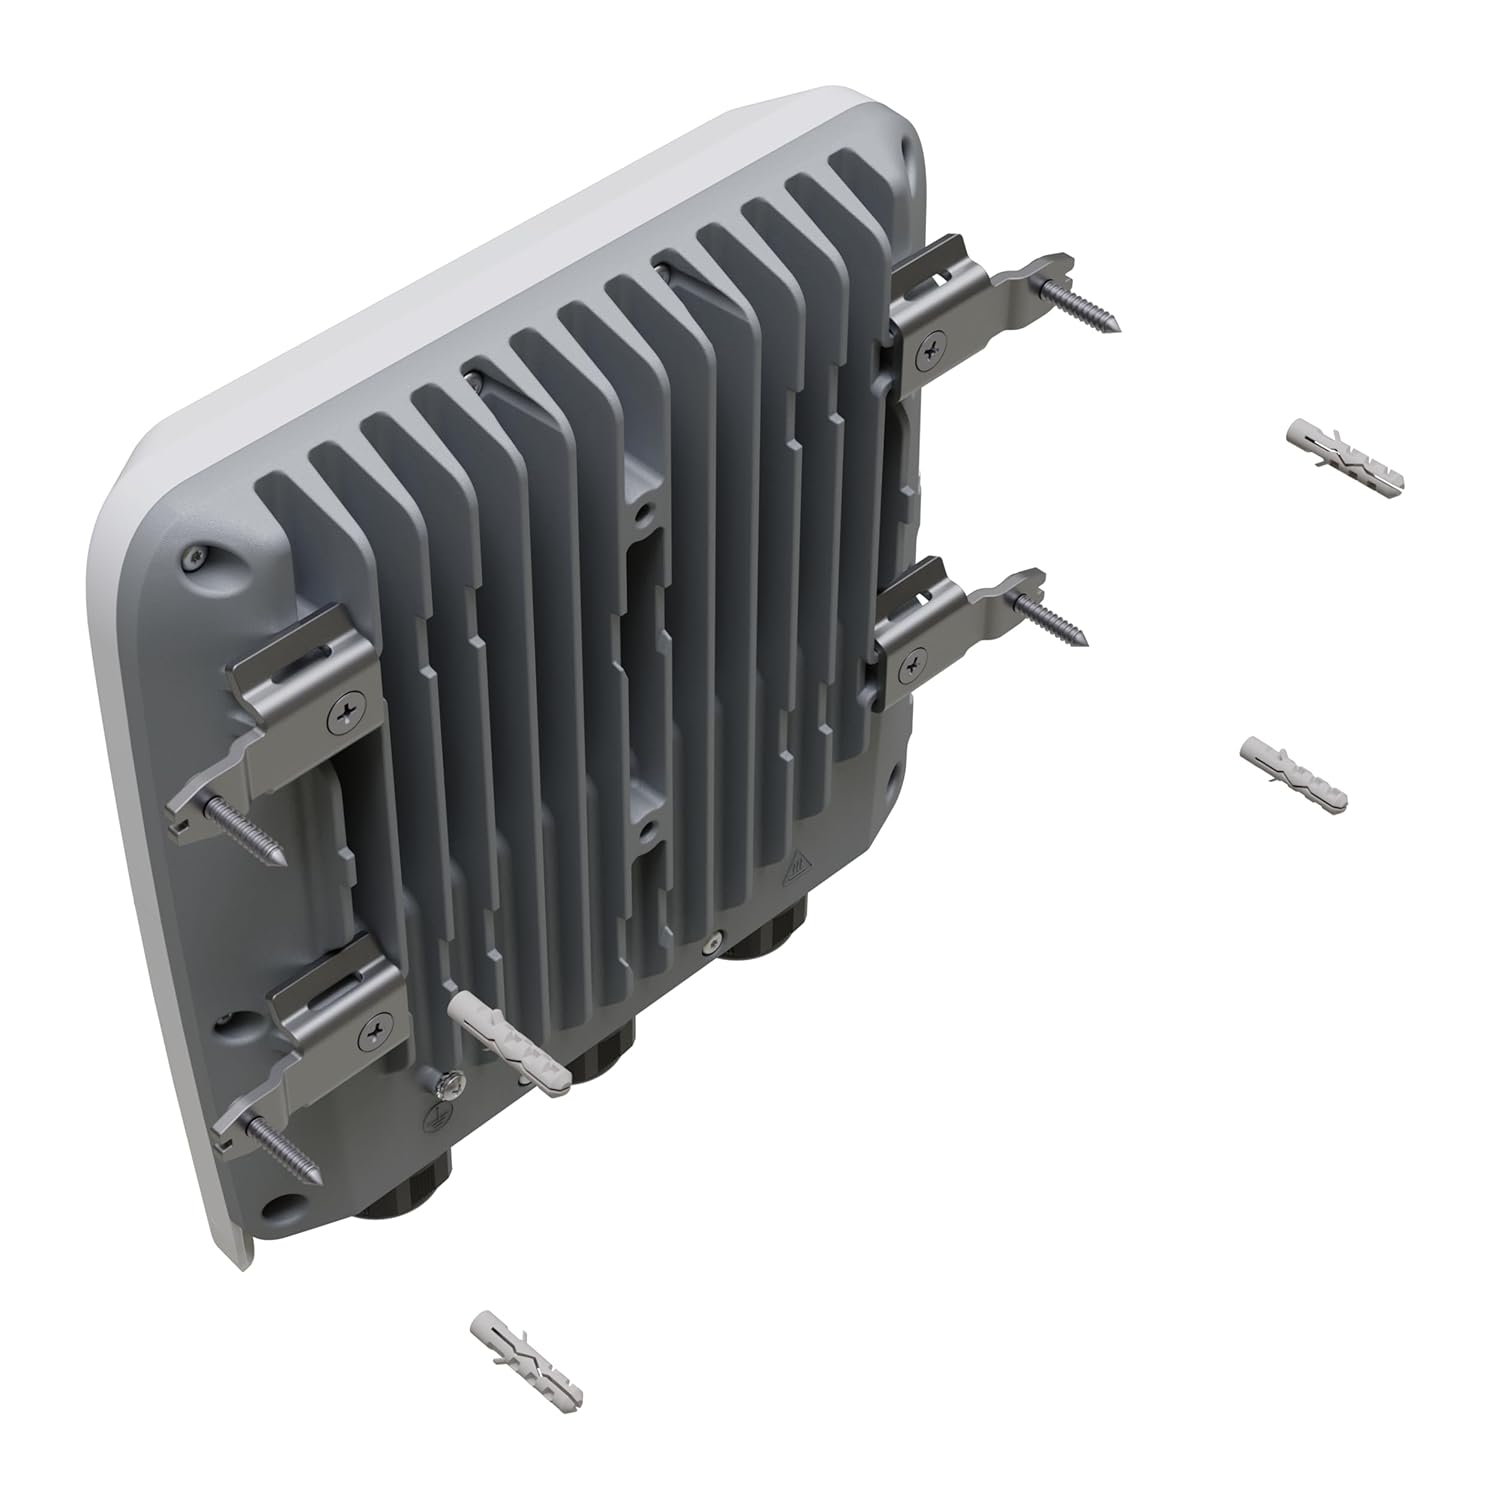
Figure 4.2: The MikroTik RB5009UPr+S+OUT router with the K-41 fastening set attached, illustrating its readiness for wall mounting alongside screws and wall anchors.
4.2 Port Overview
The device features a variety of ports for network connectivity and power. Open the protective cover to access the ports.

Figure 4.3: A close-up view of the MikroTik RB5009UPr+S+OUT router with its protective cover open, revealing the Ethernet ports, SFP+ port, USB port, and DC input terminal.
- 7x Gigabit Ethernet ports: Standard network connections.
- 1x 2.5 Gigabit Ethernet port: High-speed network connection.
- 1x 10G SFP+ port: For fiber optic or high-speed copper modules.
- 1x USB 3.0 Type-A port: For external storage or other USB devices.
- 2-pin DC input terminal (24-57V): Primary power input.
- Reset button: For device reset and mode selection.
4.3 Powering the Device
The RB5009UPr+S+OUT supports multiple powering methods:
- 2-pin DC Input: Connect a 24-57V DC power source to the terminal block.
- PoE-in: Power can be supplied via Ethernet port 1 (Passive PoE or 802.3af/at).
The device also supports PoE-out on all 8 Ethernet ports, providing up to 25W per port and a total of 130W, when powered via the 2-pin connector. This allows for powering other PoE-compatible devices directly from the router.
4.4 Initial Configuration
- Connect an Ethernet cable from your computer to any of the Ethernet ports on the RB5009UPr+S+OUT.
- Access the device's web interface via a web browser by navigating to its default IP address (commonly
192.168.88.1). - Log in using the default credentials. Refer to the sticker on the device or the quick start guide for specific details.
- It is highly recommended to update RouterOS to the latest version and change the default password immediately after initial access for security purposes.
5. Operation
5.1 RouterOS v7
The device runs MikroTik's RouterOS v7, offering extensive networking features and configuration options. For detailed configuration and advanced functionalities, refer to the official MikroTik documentation and Wiki.
Key functionalities supported by RouterOS v7 on this device include:
- PPPoE Termination
- DHCP Server for customer management
- Local Queuing for traffic management
- MPLS Push/Pop/Swap and MPLS Forwarding
- VPLS/VXLAN Termination
- Hardware Bridging
Video 5.1: An official video demonstrating the features and capabilities of the MikroTik RB5009UPr+S+OUT outdoor PoE router, including its weatherproofing and port configuration.
6. Maintenance
6.1 Software Updates
Regularly update RouterOS to ensure optimal performance, security, and access to new features. Updates can be performed via the web interface (WinBox) or command line interface. Always back up your configuration before performing a software update.
6.2 Cleaning
Periodically inspect the device for dust or debris, especially around the cooling fins on the rear. Clean the exterior with a soft, dry cloth. Do not use liquid cleaners or abrasive materials, as this may damage the enclosure or compromise its weatherproofing.
6.3 Environmental Considerations
Ensure the device's IP66 rating is maintained by properly sealing all cable glands and the enclosure cover after installation or maintenance. Avoid exposing the device to extreme temperatures outside its specified operating range or direct, prolonged submersion in water.

Figure 6.1: The MikroTik RB5009UPr+S+OUT router with water droplets on its surface, illustrating its IP66 weatherproofing.
7. Troubleshooting
7.1 No Power
- Verify the power source connection and ensure the voltage is within the specified 24-57V DC range.
- Check all power cables for any signs of damage or loose connections.
- If using PoE-in, ensure the PoE injector or switch is functioning correctly and providing adequate power to Ethernet port 1.
7.2 No Network Connectivity
- Check all Ethernet cable connections at both ends.
- Verify the status LEDs on the Ethernet ports for link activity and speed.
- Ensure correct IP configuration on your connected device (e.g., computer, server).
- If configuration issues are suspected, consider resetting the device to factory defaults (refer to the reset button instructions in the quick start guide).
7.3 Device Unresponsive
- Perform a hard reset by disconnecting and then reconnecting the power supply.
- If the device remains unresponsive, use the reset button to restore factory defaults. Be aware that this action will erase all current configurations.
8. Specifications
| Feature | Detail |
|---|---|
| Model Number | RB5009UPr+S+OUT |
| Manufacturer | MikroTik |
| Product Dimensions | 9 x 9 x 2 inches |
| Item Weight | 3.3 pounds |
| Connectivity | 7x Gigabit Ethernet, 1x 2.5G Ethernet, 1x 10G SFP+, 1x USB 3.0 |
| Power Input | 24-57V DC (2-pin terminal), PoE-in (Ethernet port 1) |
| PoE-out | 8x Ethernet ports (up to 25W per port, 130W total) |
| CPU | Quad-core ARMv8 |
| RAM | 1 GB |
| Storage | 1 GB NAND |
| Operating System | RouterOS v7 |
| IP Rating | IP66 |
| Date First Available | June 14, 2023 |
9. Warranty and Support
For detailed warranty information, technical support, and additional resources, please visit the official MikroTik website or contact your authorized distributor. Keep your purchase receipt for warranty claims.
Online resources:


