1. Introduction
The QSFPTEK S5300-48T6X is a high-performance Layer 3 aggregation Ethernet switch designed for demanding network environments. It features 48x GE RJ45 ports and 6x 10GE SFP+ uplinks, providing robust connectivity and high data throughput. This switch supports advanced features such as stacking, comprehensive Layer 3 functions, and various management options, making it suitable for next-generation IP metropolitan area networks, large-scale campus networks, and enterprise networks.

Figure 1: QSFPTEK S5300-48T6X Network Switch Overview
This image displays the QSFPTEK S5300-48T6X network switch from a front-top perspective, showcasing its compact metal housing and the arrangement of its numerous network ports.
2. Key Features
- High Port Density: Equipped with 48x GE RJ45 Ports and 6x 10GE SFP+ uplink ports for versatile connectivity.
- High Performance: Features a forwarding rate of 162 Mpps, ensuring higher data throughput for demanding applications.
- Advanced Security: Supports IEEE 802.1x, Radius, BDTacacs+, and other security protocols for robust network protection.
- High Reliability: Incorporates LACP, BFD, MSTP, ERPS, VRRP, and ISSU for enhanced network reliability and uptime.
- Comprehensive Management: Supports ACL, QinQ, QoS, ISSU, IPv6, VLAN, LACP, and can be managed via CLI, WEB, Telnet, SSH, SSL, and SNMP.
- Carrier-Grade Resilience: Industry-level EAPS and ERPS provide a 50ms recovery time for critical network operations.
- Redundant Power: Features 1+1 redundancy with AC 220V power supplies for continuous operation.
- Durable Design: Constructed with a durable metal housing, double-sided cooling holes, low-power, and smart fan design for efficient heat dissipation and left-to-right airflow.
3. Package Contents
Verify that all items are present in the package:
- QSFPTEK S5300-48T6X Network Switch
- Power Adapter
- Console Cable
- Mount Kit (for rack installation)

Figure 2: Included Accessories
This image shows the accessories included with the switch: a power cable, a console cable, and mounting brackets with screws.
4. Physical Overview
4.1 Front Panel

Figure 3: Front Panel Layout
The front panel features 48 Gigabit Ethernet RJ45 ports, 6 10-Gigabit SFP+ uplink ports, and LED indicators for system status (SYS), power (PWR), and console (CON).
- GE RJ45 Ports (1-48): Standard Gigabit Ethernet ports for connecting network devices.
- 10GE SFP+ Uplink Ports (49-54): High-speed ports for fiber optic connections to core network devices or other switches.
- LED Indicators:
- SYS: System status indicator.
- PWR: Power status indicator.
- CON: Console port status indicator.
- Console Port: RJ45 port for local management via a console cable.
4.2 Rear Panel
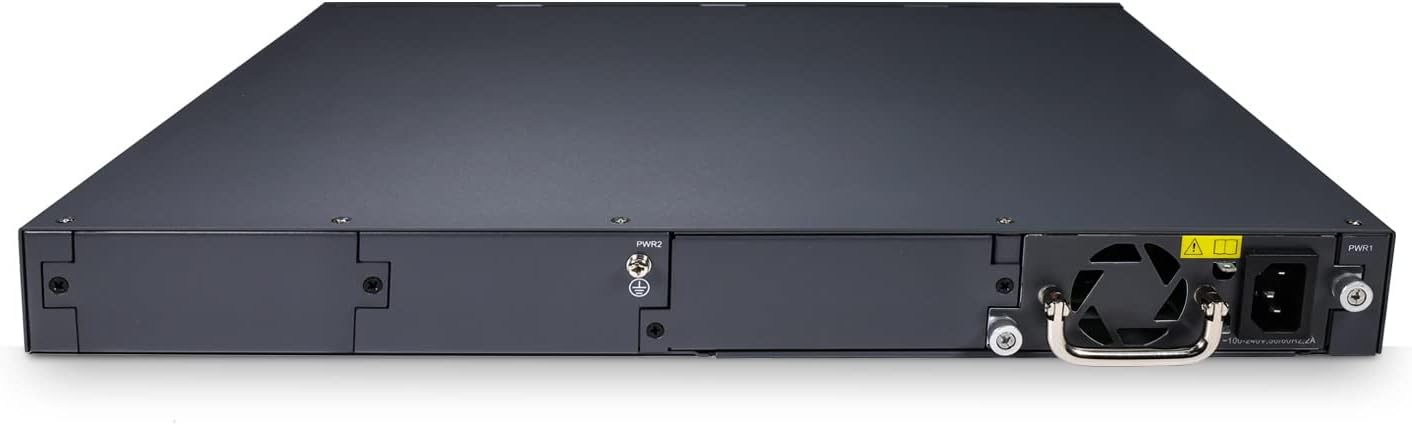
Figure 4: Rear Panel Layout
The rear panel includes two hot-swappable power supply bays (PWR1, PWR2) and cooling fan vents, designed for efficient heat dissipation and power redundancy.
- Power Supply Bays (PWR1, PWR2): Supports 1+1 redundant hot-swappable AC 220V power supplies.
- Cooling Vents: Designed for efficient airflow and heat management.
5. Setup Instructions
5.1 Before You Begin
- Ensure the installation environment is clean, dry, and well-ventilated.
- Maintain proper grounding for the switch to prevent electrical hazards.
- Verify that the power source matches the switch's voltage requirements (AC 220V).
- Keep the switch away from direct sunlight, heat sources, and strong electromagnetic interference.
5.2 Installation
The S5300-48T6X switch can be installed in a standard 19-inch equipment rack using the provided mount kit.
- Attach the mounting brackets to the sides of the switch using the screws provided in the mount kit.
- Align the switch with the rack rails and secure it using appropriate rack screws.
- Ensure there is adequate space around the switch for proper airflow and cable management.
5.3 Connecting the Switch
- Power Connection:
- Connect the power cable to the power supply unit(s) at the rear of the switch.
- Plug the other end of the power cable into a grounded AC 220V power outlet.
- If using redundant power supplies, connect both to separate power sources for maximum reliability.
- Network Connections:
- Connect your network devices (servers, workstations, other switches) to the GE RJ45 ports using standard Ethernet cables.
- For high-speed uplinks or fiber connections, insert compatible SFP+ transceivers into the 10GE SFP+ ports and connect fiber optic cables.
- Console Connection (Optional):
- To access the switch via CLI, connect the provided console cable from the switch's console port to a serial port on your computer.
- Configure your terminal emulation software (e.g., PuTTY, Tera Term) with the correct serial port settings (typically 9600 baud, 8 data bits, no parity, 1 stop bit, no flow control).
6. Operating the Switch
6.1 Initial Power On
Once the power cables are connected, the switch will automatically power on. Observe the LED indicators on the front panel:
- PWR LED: Should illuminate steadily, indicating the switch is receiving power.
- SYS LED: Will blink during boot-up and then illuminate steadily once the system is operational.
- Port LEDs: Will indicate link status and activity for connected ports.
6.2 Management Access
The S5300-48T6X offers multiple management interfaces:
- Command Line Interface (CLI): Accessible via the console port or Telnet/SSH. Provides full control over switch configurations.
- Web-Based Management (WEB): Access the graphical user interface (GUI) via a web browser. This provides an intuitive way to configure and monitor the switch. The default IP address for management is typically 192.168.1.1 (please refer to the quick start guide or default settings for exact details).
- SNMP: For network management systems (NMS) integration, allowing centralized monitoring and management.
6.3 Basic Configuration
After initial setup, you may need to configure basic network parameters:
- IP Address: Assign a static IP address to the switch for network accessibility.
- VLANs: Create and configure Virtual Local Area Networks to segment your network and improve security and performance.
- Link Aggregation (LACP): Combine multiple physical links into a single logical link for increased bandwidth and redundancy.
- Quality of Service (QoS): Prioritize critical network traffic to ensure optimal performance for applications like VoIP or video conferencing.
- Security Settings: Configure 802.1x, ACLs, and other security features to protect your network from unauthorized access.
Refer to the comprehensive CLI Command Reference Guide or Web Management User Guide for detailed configuration instructions.
7. Maintenance
Regular maintenance ensures the longevity and optimal performance of your QSFPTEK S5300-48T6X switch.
- Cleaning: Periodically clean the exterior of the switch with a soft, dry cloth. Ensure ventilation openings are free from dust and debris. Do not use liquid cleaners.
- Firmware Updates: Check the QSFPTEK official website regularly for firmware updates. Applying updates can improve performance, add new features, and fix bugs.
- Fan Inspection: Ensure the cooling fans are operating correctly and are not obstructed. Listen for unusual noises from the fans.
- Cable Management: Keep network and power cables neatly organized to prevent accidental disconnections and improve airflow.
- Environmental Monitoring: Monitor the temperature and humidity of the operating environment to ensure it stays within recommended ranges.
8. Troubleshooting
This section provides solutions to common issues you might encounter with your switch.
| Problem | Possible Cause | Solution |
|---|---|---|
| Switch does not power on. | No power, faulty power cable, faulty power supply. | Check power cable connection. Verify power outlet. Test with a different power cable or power supply (if redundant). |
| Port LED is off, no link. | Incorrect cable, faulty cable, incorrect port, device off. | Ensure correct cable type (Ethernet for RJ45, fiber for SFP+). Check cable integrity. Verify connected device is powered on and functioning. Try a different port. |
| Cannot access web management interface. | Incorrect IP address, network configuration issue, firewall. | Verify the switch's IP address. Ensure your computer is on the same subnet. Check firewall settings on your computer. Try accessing via console/CLI. |
| Slow network performance. | Network congestion, duplex mismatch, faulty cable, high CPU usage. | Check network traffic. Verify duplex settings on switch and connected devices. Inspect cables. Monitor switch CPU/memory usage. Consider QoS configuration. |
If the problem persists after attempting these solutions, please contact QSFPTEK technical support for further assistance.
9. Technical Specifications
| Attribute | Specification |
|---|---|
| Model Number | 48T6X |
| Brand | QSFPTEK |
| Number of Ports | 48x GE RJ45, 6x 10GE SFP+ Uplink |
| Data Transfer Rate | 184 Gigabits Per Second (Switching Capacity) |
| Forwarding Rate | 162 Mpps |
| Interface Type | RJ45, SFP+ |
| Voltage | 220 Volts AC |
| Case Material | Metal |
| Product Dimensions | 17.32 x 13.78 x 1.73 inches |
| Item Weight | 11.66 pounds |
| Included Components | Adapter, Console Cable, Mount Kit |
| UPC | 772123356967 |
10. Warranty and Support
QSFPTEK products are designed for reliability and performance. For information regarding the product warranty, please refer to the warranty policy available on the official QSFPTEK website or contact your local distributor.
For technical support, troubleshooting assistance, or further inquiries, please visit the official QSFPTEK support page or contact their customer service team. When contacting support, please have your product model number (S5300-48T6X) and serial number ready.
QSFPTEK Store: Visit the QSFPTEK Store on Amazon


