
Aramox 361 87322 0
Contents
Impeller Kit Impeller Repair Kit 361 87322 0 User Manual
Brand: Aramox
1. Introduction
This manual provides detailed instructions for the installation, maintenance, and troubleshooting of the Aramox Impeller Kit Impeller Repair Kit, model 361 87322 0. This kit is designed as a direct replacement for specific Tohatsu and NS 2-stroke outboard models, ensuring optimal water pump performance and engine cooling.

Image 1.1: Complete Impeller Repair Kit components.
2. Product Overview and Components
The Impeller Repair Kit is essential for maintaining the cooling system of your outboard engine. It includes all necessary components for a complete water pump impeller replacement.
2.1 Kit Contents
- Impeller: The primary component responsible for circulating water.
- Gaskets: Various gaskets to ensure a watertight seal for the water pump housing.
- Bolts: Fasteners for securing the water pump assembly.
- Washers: Used with bolts for proper tightening and load distribution.
- Key: A small key that secures the impeller to the driveshaft.

Image 2.1: Detailed view of kit components.
3. Specifications
| Attribute | Detail |
|---|---|
| Part Number | 361 87322 0 |
| Material | Stainless Steel, Rubber |
| Item Weight | 4.6 ounces |
| Package Dimensions | 4.02 x 3.98 x 2.68 inches |
| Manufacturer | Aramox |
4. Compatibility and Fitment
This impeller repair kit is a direct replacement for the following Tohatsu and NS 2-stroke outboard models:
- Tohatsu M40C 2 Stroke ASSEMBLY KITS 2004
- Tohatsu M25C3 2 Stroke ASSEMBLY KIT 2002, 2003, 2005
- Tohatsu M30A3 2 Stroke ASSEMBLY KIT 1996
- Tohatsu M30A4 2 Stroke ASSEMBLY KIT 2002, 2003
- Tohatsu M40C 2 Stroke ASSEMBLY KIT 1996
- Tohatsu M35C 2 stroke ASSEMBLY KIT 2002
- Tohatsu M25C2 2 Stroke ASSEMBLY KIT 1996
- NS40C 2 Stroke ASSEMBLY KITS 2004
- NS25C3 2 Stroke ASSEMBLY KIT 2003, 2005
- NS30A3 2 stroke ASSEMBLY KIT 2002
- NS40C2 2 stroke ASSEMBLY KIT 2002
- NS25C2 2 stroke ASSEMBLY KIT 2002
- NS35C 2 stroke ASSEMBLY KIT 2002
Always verify your outboard model and part number before purchasing to ensure correct fitment.
5. Setup and Installation
Replacing the impeller requires mechanical aptitude and specific tools. If you are unsure about any step, it is highly recommended to seek professional assistance to avoid damage to your outboard engine.
5.1 Tools and Materials Required
- Socket wrench set
- Screwdrivers
- Pliers
- Marine grease
- Clean rags
- New Impeller Repair Kit (this product)
5.2 Installation Steps
- Prepare the Outboard: Ensure the engine is off and cooled down. Disconnect the battery for safety. Place the outboard in a stable position.
- Remove Lower Unit: Locate and remove the bolts securing the lower unit to the midsection of the outboard. Carefully lower the unit, ensuring the shift rod disengages.
- Access Water Pump Housing: Once the lower unit is removed, you will see the water pump housing at the top of the lower unit. Remove the bolts securing the water pump housing cover.
- Remove Old Impeller: Carefully lift the water pump housing cover and remove the old impeller. Note the orientation of the impeller blades before removal. Remove any old gaskets and clean the housing thoroughly.
- Install New Impeller: Apply a thin coat of marine grease to the inside of the water pump housing and the new impeller. Align the keyway on the driveshaft with the slot on the new impeller and slide it down. Rotate the driveshaft clockwise while pushing the impeller down to bend the blades into the correct orientation.
- Install New Gaskets and Housing: Place the new gaskets in their correct positions on the water pump housing and cover. Reinstall the water pump housing cover, ensuring all bolts are tightened securely and evenly.
- Reattach Lower Unit: Carefully lift the lower unit back into position, ensuring the shift rod aligns and engages correctly. Reinstall all lower unit bolts and tighten them to the manufacturer's specifications.
- Test: After reassembly, connect the battery. Before starting the engine, ensure the outboard is in water or connected to a flush muffs with a water supply. Start the engine and check for a steady stream of cooling water from the tell-tale (pee hole).
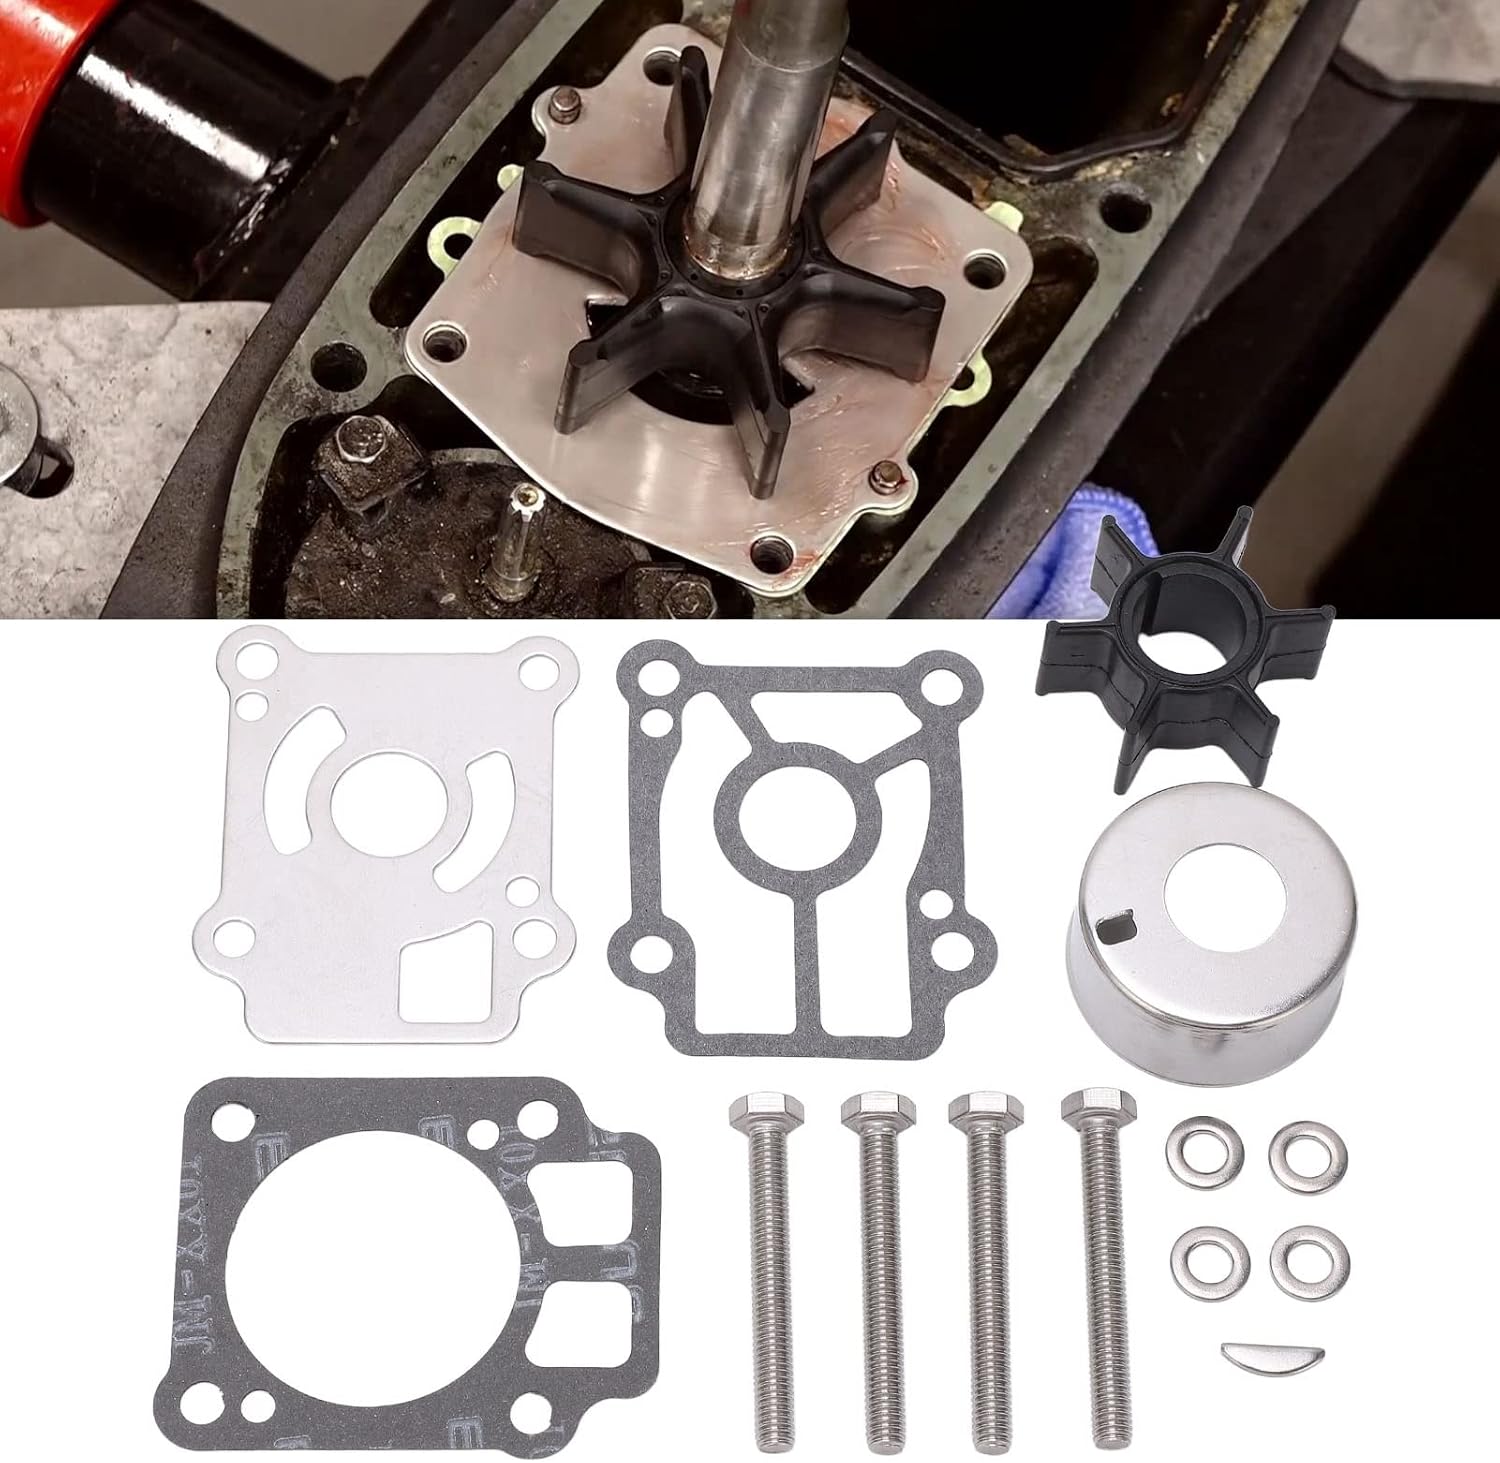
Image 5.1: Impeller installation process.
6. Operating Principles
The impeller is a critical component of your outboard's water pump, which is responsible for circulating cooling water through the engine. As the driveshaft rotates, the impeller's flexible rubber blades draw water from the surrounding environment (lake, ocean) into the water pump housing. This water is then pressurized and directed through the engine's cooling passages, absorbing heat and preventing overheating. The heated water is then expelled back into the environment, typically through the exhaust or a dedicated tell-tale outlet.
A properly functioning impeller ensures consistent water flow, which is vital for maintaining optimal engine temperature and preventing severe damage from overheating.
7. Maintenance
Regular inspection and replacement of the impeller are crucial for the longevity of your outboard engine. The impeller is a wear item and its rubber blades can harden, crack, or break over time, especially with exposure to heat, saltwater, and lack of use.
7.1 Recommended Maintenance Schedule
- Annual Inspection: Inspect the water pump's tell-tale stream before each use. If the stream is weak, intermittent, or absent, inspect the impeller.
- Every 100 Hours or Annually (whichever comes first): It is generally recommended to replace the impeller and water pump gaskets. Even if the tell-tale stream appears strong, the impeller's efficiency can degrade over time.
- After Running Aground or in Shallow/Muddy Water: Immediately inspect the impeller for damage from debris.
7.2 Post-Use Care
- Freshwater Flush: Always flush your outboard with fresh water after use in saltwater or brackish water to prevent corrosion and salt buildup in the cooling system.
- Winterization: Follow your outboard manufacturer's winterization procedures, which often include draining the cooling system to prevent freezing damage.
8. Troubleshooting
Common issues related to the water pump and impeller are usually indicative of a failing cooling system. Address these issues promptly to prevent engine damage.
| Problem | Possible Cause | Solution |
|---|---|---|
| No water or weak stream from tell-tale | Clogged tell-tale, worn impeller, blocked water intake, air leak in water pump. | Clear tell-tale with wire. Inspect/replace impeller. Check water intakes for blockage. Inspect water pump housing for cracks/leaks. |
| Engine Overheating Alarm | Insufficient cooling water flow, thermostat issue, clogged cooling passages. | Immediately shut down engine. Check tell-tale stream. Replace impeller if worn. Inspect thermostat. Flush cooling passages. |
| Water pump housing leaking | Damaged gaskets, cracked housing, loose bolts. | Replace gaskets. Inspect housing for damage. Tighten bolts to specification. |
If troubleshooting steps do not resolve the issue, consult a certified marine mechanic.
9. Warranty and Support
For specific warranty information regarding your Aramox Impeller Kit, please refer to the product packaging or contact Aramox customer support directly. Keep your proof of purchase for any warranty claims.
For technical support or further assistance with installation and troubleshooting, please contact Aramox customer service through their official channels.
Documents and downloads
Ask a question about this manual
Ask about setup, troubleshooting, compatibility, parts, safety, or missing instructions. Manuals+ will review the question and use this page’s manual context to help answer it.