Introduction
Thank you for choosing the Paruu P10 Wearable Breast Pump. This hands-free electric breast pump is designed for convenience and efficiency, offering strong suction up to 338mmHg, low noise operation, and multiple modes to support your breastfeeding journey. Please read this manual thoroughly before first use to ensure proper operation and maintenance.
Product Components
The Paruu P10 Wearable Breast Pump package includes the following items:
- P10 Pump Motor Unit
- Milk Collector Cup (150ml/5oz capacity)
- Flange (28mm)
- Flange Inserts (19mm, 21mm, 24mm)
- Silicone Diaphragm
- Valve
- USB Charging Cable
- User Manual

Image: Overview of the Paruu P10 Wearable Breast Pump and its included accessories.
Setup and Assembly
Before first use, sterilize all parts that come into contact with breast milk (milk collector, flange, inserts, diaphragm, valve). The main pump unit should not be washed or sterilized.
1. Choosing the Correct Flange Size
Selecting the correct flange size is crucial for comfort and efficient milk expression. Use the provided measure card to determine your nipple diameter. The pump comes with a 28mm flange and inserts for 19mm, 21mm, and 24mm.

Image: Visual guide for measuring nipple diameter to select the appropriate flange size.
2. Assembling the Pump
- Gently push the valve into the collector without gaps.
- Gently push the flange (or chosen insert) into the collector without gaps.
- Attach the silicone diaphragm to the collector and ensure it seals well.
- Assemble the pump motor onto the milk collector, ensuring no gaps.

Image: Illustrated steps for correctly installing the breast pump components.
Operating Instructions
1. Charging the Pump
The pump features an 1100mAh battery and charges fully in 2 hours, providing 120 minutes (4-5 sessions) of usage. Use the provided USB charging cable and a 5V 1A adapter. Keep the charging port clean.

Image: The pump unit connected to a USB charger, highlighting its battery capacity and charging time.
2. Understanding Modes and Levels
The P10 offers 4 modes and 9 suction levels, mimicking a baby's natural feeding. The LED screen displays the current mode, suction level, and battery status.
- Stimulation Mode: Helps initiate milk flow.
- Expression Mode: Provides strong and deep suction for milk removal.
- Two-in-One Mode: Promotes efficient milk production in a shorter time.
- Dual-Frequency Mode: Specifically designed to help with inverted or flat nipples for smoother pumping.

Image: Visual representation of the four distinct pumping modes and their functions.
3. Pumping Sessions
Place the assembled pump unit securely in your nursing bra. Press the power button to turn on the pump. Select your desired mode and adjust the suction level using the '+' and '-' buttons. The pump has a 30-minute auto-shutdown function.
4. Pouring Breast Milk
After your pumping session, carefully remove the pump from your breast. You can pour the milk directly into a storage bag or bottle by removing the pump motor gently and tilting the collector.
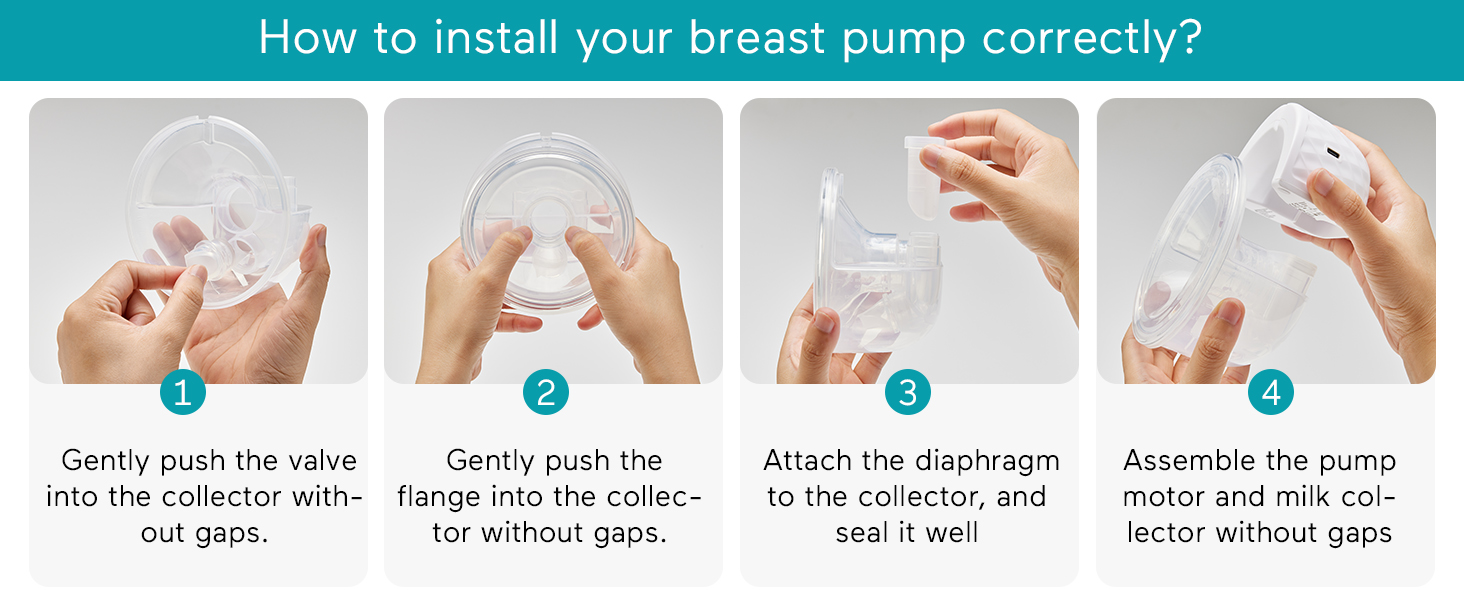
Image: Step-by-step guide on how to safely pour collected breast milk from the pump into a storage container.
Maintenance and Cleaning
Regular cleaning and maintenance are essential for hygiene and optimal pump performance.
1. Disassembly for Cleaning
Disassemble all parts that came into contact with breast milk: milk collector, flange, inserts, diaphragm, and valve. The main pump unit should not be submerged in water.
2. Cleaning Process
Wash all disassembled parts with warm water and mild, unscented soap. Rinse thoroughly to remove any soap residue. Air dry on a clean drying rack or towel.
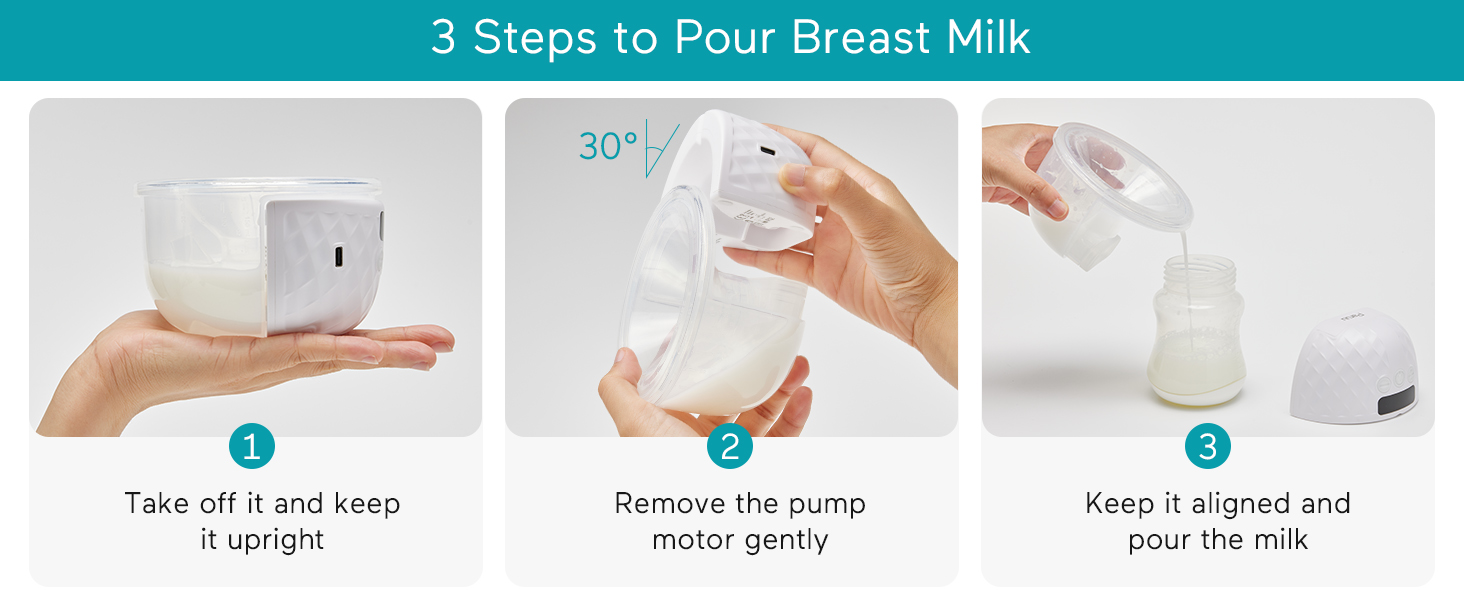
Image: A user cleaning the disassembled parts of the breast pump under running water.
3. Sterilization
For sterilization, you can boil the parts (excluding the motor unit) for 3-5 minutes, use a steam sterilizer, or a microwave sterilizer bag. Ensure parts are completely dry before reassembly.
Troubleshooting
| Problem | Possible Cause | Solution |
|---|---|---|
| No suction or weak suction | Improper assembly, damaged valve/diaphragm, low battery. | Ensure all parts are assembled correctly and tightly. Check valve and diaphragm for tears or damage and replace if necessary. Charge the pump fully. |
| Pump not turning on | Low or no battery, faulty charging cable/adapter. | Charge the pump. Try a different USB cable or adapter. |
| Milk leakage | Improper assembly, damaged silicone parts, overfilling. | Reassemble all parts carefully, ensuring no gaps. Check silicone parts for damage. Do not exceed the optimal collection volume of 120ml/4oz. |
| Uncomfortable pumping | Incorrect flange size, suction level too high. | Verify correct flange size using the measure card. Reduce suction level to your Maximum Comfort Vacuum. |
Specifications
- Model Number: HF918
- Brand: Paruu
- Max Suction Value: 338mmHg
- Modes: 4 (Stimulation, Expression, Two-in-One, Dual-Frequency)
- Suction Levels: 9
- Battery Capacity: 1100mAh
- Charging Time: Approx. 2 hours
- Usage Time: 120 minutes (4-5 sessions)
- Material: BPA-free food-grade silicone
- Optimal Collection Volume: 120ml / 4oz
- Product Weight: 240g
- Auto-Shutdown: 30 minutes
Warranty and Support
For warranty information and customer support, please refer to the contact details provided on the product packaging or visit the official Paruu website. Keep your purchase receipt for warranty claims.
Online Resources:


