
1. Introduction
Thank you for choosing the Mumgaroo Portable Bottle Warmer. This device is designed to warm breastmilk or formula to a precise temperature, offering convenience for parents on the go. Its compact design and rechargeable battery make it ideal for travel and daily use.

Image 1.1: Overview of the Mumgaroo Portable Bottle Warmer and its key features.

Image 1.2: The portable bottle warmer in different usage environments, highlighting its versatility.
2. Safety Information
- Read all instructions before use.
- Do not immerse the main unit in water or other liquids.
- Keep out of reach of children.
- Always check the milk temperature before feeding your baby.
- Use only the provided charging cable and a compatible 9V/2A power adapter.
- Ensure the sealing rings are properly installed to prevent leaks.
- Do not use if the device is damaged.
3. Product Overview
The Mumgaroo Portable Bottle Warmer consists of a main heating unit, various adapters, and sealing components.

Image 3.1: Internal components and materials of the bottle warmer.

Image 3.2: Detailed view of the materials used in the bottle warmer construction.
4. Setup and Charging
4.1 Initial Charging
Before first use, fully charge the bottle warmer. Connect the Type-C charging cable to the warmer and a 9V/2A power adapter. A full charge takes approximately 2.5 hours.
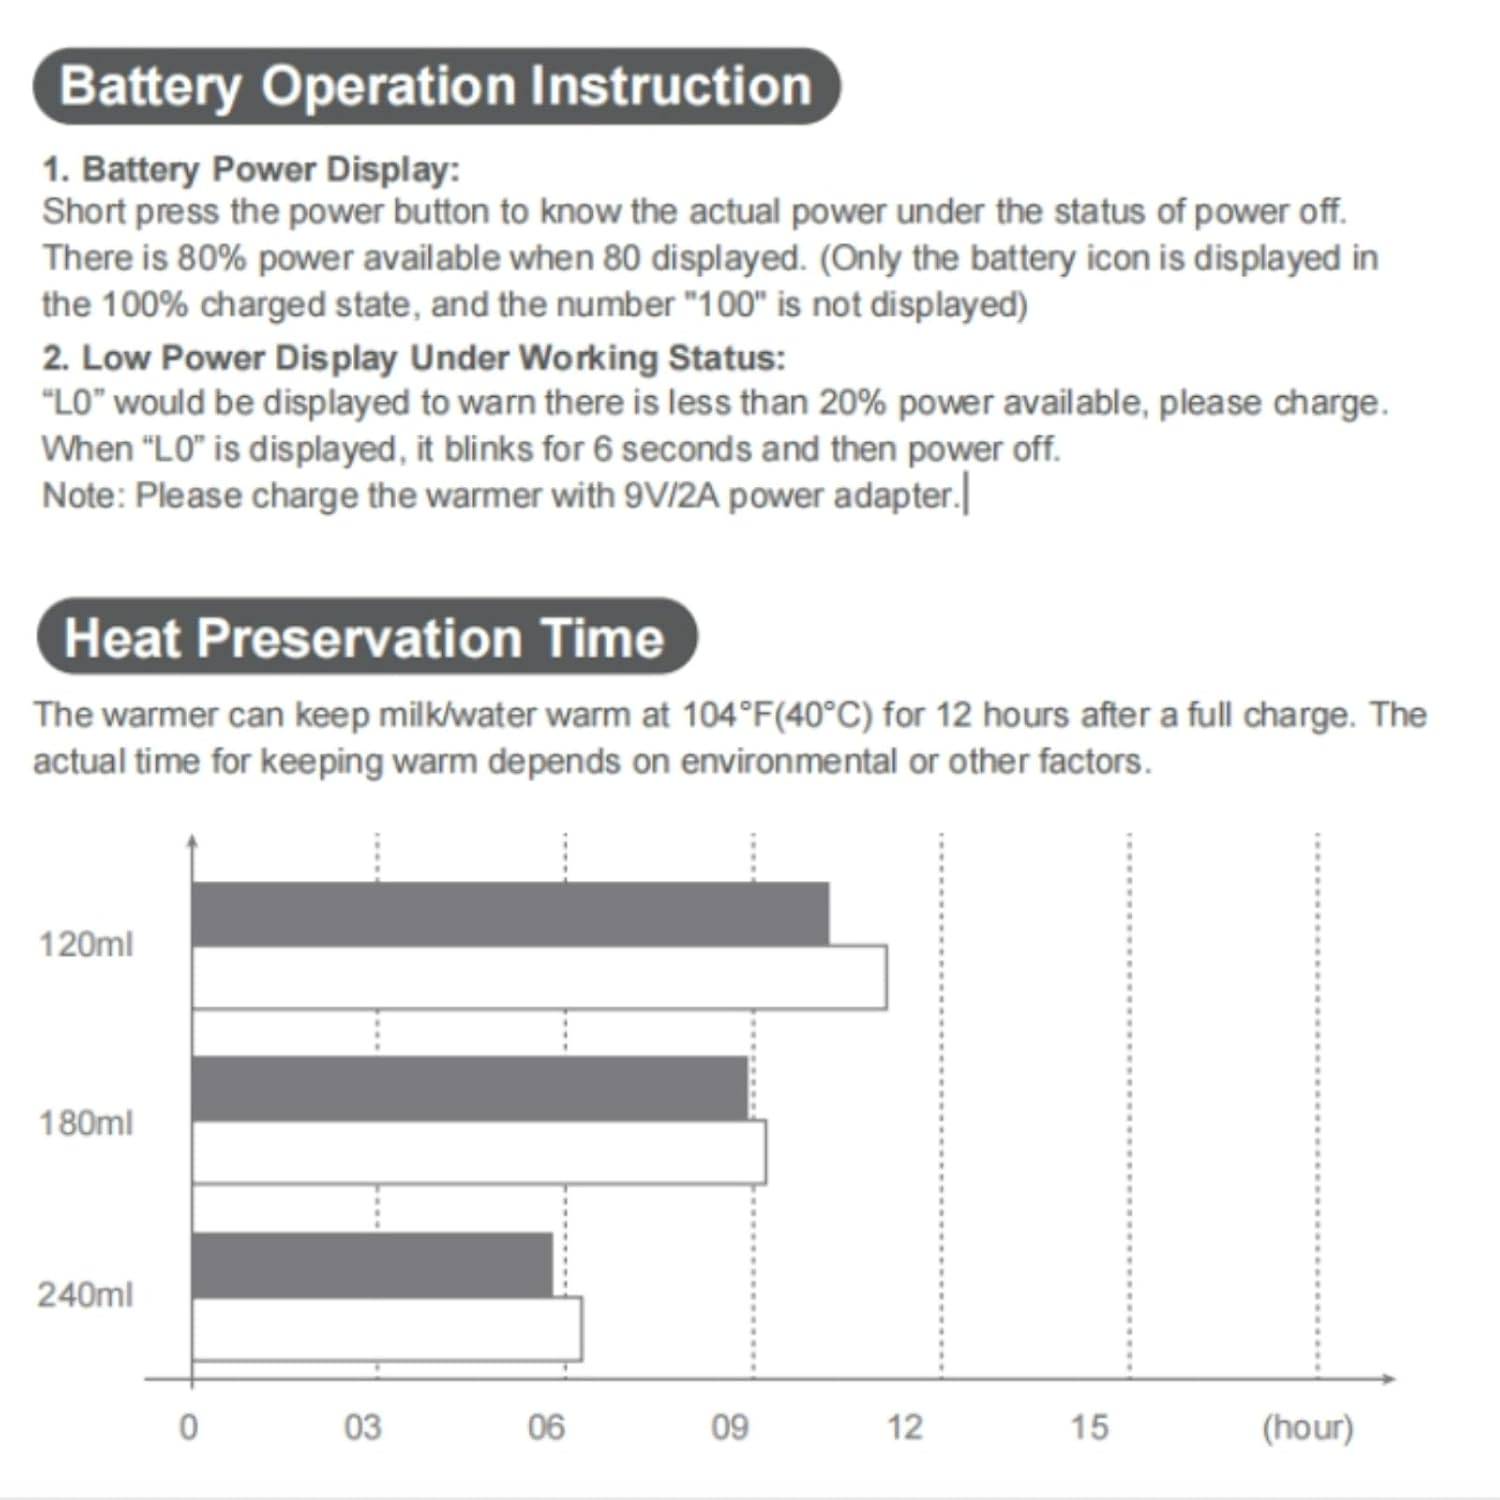
Image 4.1: The bottle warmer being charged via its Type-C port.

Image 4.2: Another view of the charging process.
4.2 Bottle Compatibility and Adapters
The warmer comes with 4 adapters to fit most bottle brands. Some bottles can be used directly without an adapter.
- Direct Use (without adapter): For AVENT, SpeCtra, Chicco bottles.
- 36mm Adapter: For Pigeon (Narrow Neck), Dr. Brown's (Narrow Neck), Nuk (Narrow Neck), Medela, Evenflo Classic, Parent's Choice, and other small neck bottles.
- 51mm Adapter: For Dr. Brown's (Wide Neck) bottles.
- 56mm Adapter: For Tommee Tippee bottles.
- 70mm Adapter: For Comotomo, Ola Baby, Boon Nursh bottles.
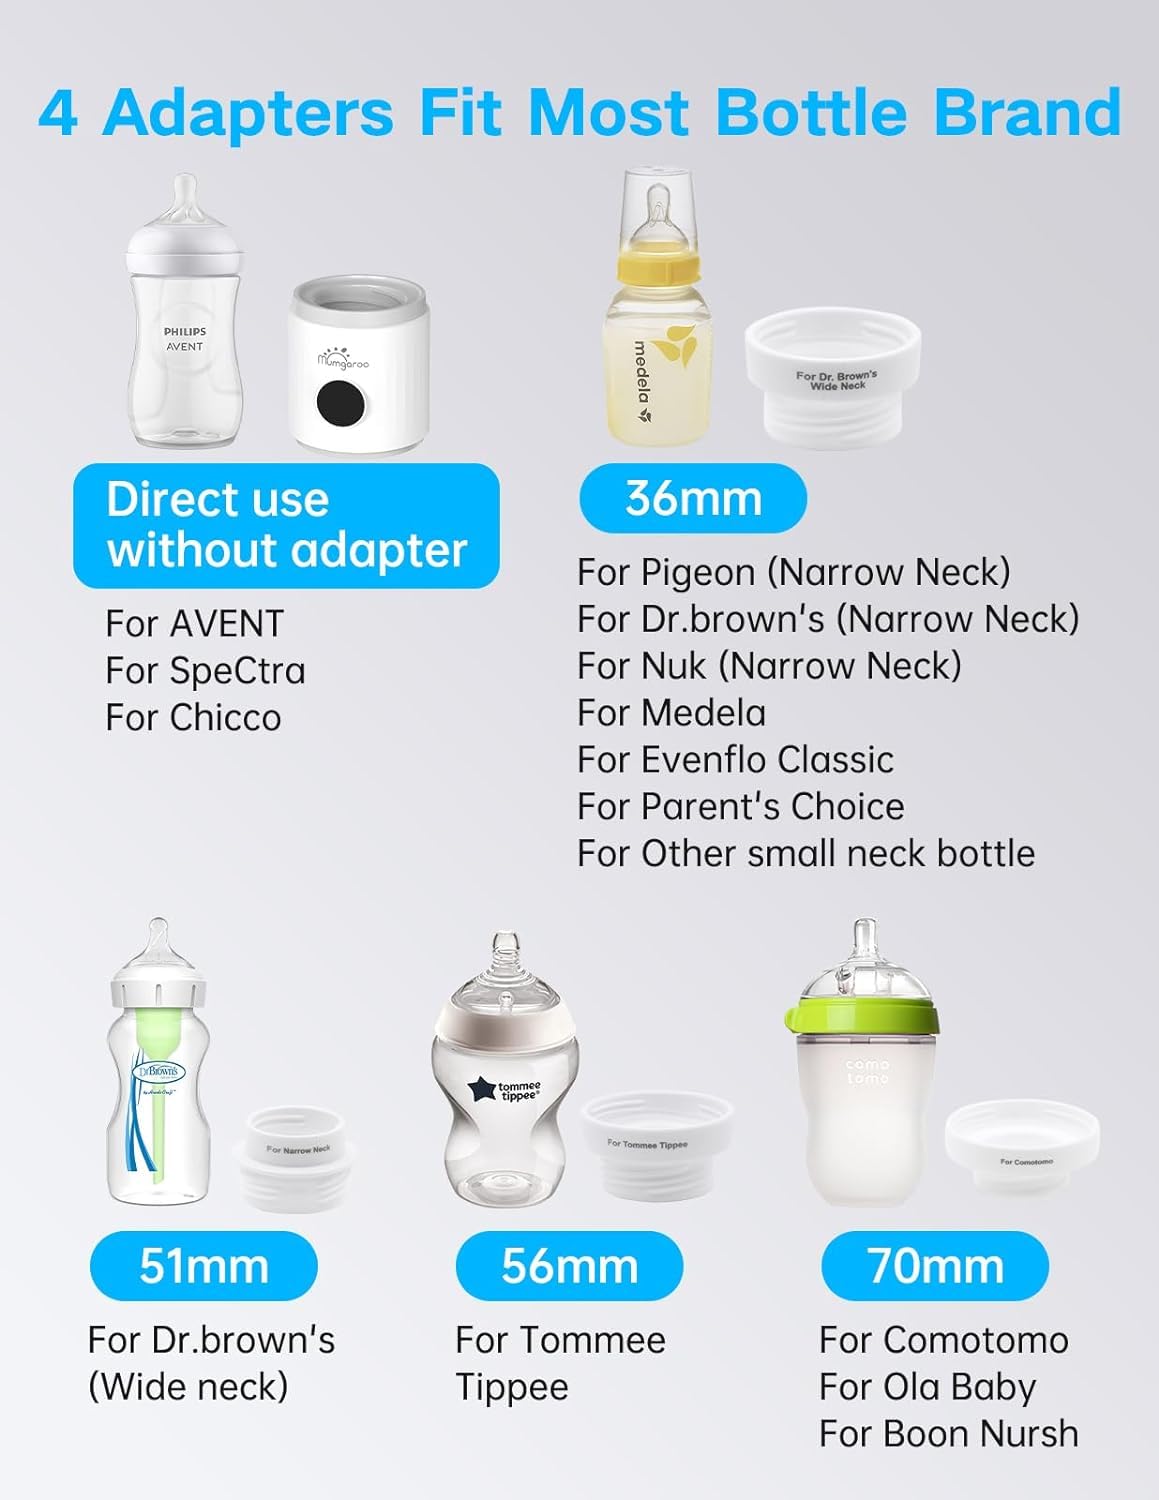
Image 4.3: Bottle compatibility chart with various adapters.
5. Operating Instructions
5.1 Powering On/Off and Temperature Setting
- Attach the appropriate adapter and bottle to the warmer, ensuring a secure fit to prevent leaks.
- Press and hold the power button on the LED touch screen to turn the device on. The current temperature will be displayed.
- Press the power button repeatedly to cycle through the available temperature settings: 98°F (37°C), 104°F (40°C), 113°F (45°C), and 122°F (50°C). Select your desired temperature.
- The warmer will begin heating and display the real-time temperature. Once the target temperature is reached, the warmer will maintain it.
- To turn off, press and hold the power button.

Image 5.1: LED display showing real-time temperature and battery status.
5.2 Warming Process
The warming time depends on the milk volume, initial temperature, and bottle material. For example, 4oz of milk can be warmed in approximately 4 minutes.

Image 5.2: Illustration of the warming process and available temperature settings.
5.3 Battery Operation Instruction
- Battery Power Display: Short press the power button when the device is off to check the current power level. For example, '80' indicates 80% power. The number '100' is not displayed; only the battery icon is shown when fully charged.
- Low Power Display: When the battery is below 20%, 'L0' will be displayed and blink for 6 seconds before the device powers off. Please charge the warmer with a 9V/2A power adapter.
Image 5.3: Battery display and low power warning details.
5.4 Heat Preservation Time
The warmer can maintain milk/water at 104°F (40°C) for up to 12 hours after a full charge. Actual heat preservation time may vary based on environmental conditions and other factors.
Image 5.4: Heat preservation duration based on liquid volume.
6. Cleaning and Maintenance
Regular cleaning ensures optimal performance and hygiene.
- Always ensure the device is turned off and unplugged before cleaning.
- Wipe the exterior of the warmer with a damp cloth. Do not immerse the main unit in water.
- The heating plate can be gently wiped with a damp cloth. For stubborn residue, use a soft brush.
- Remove and wash the adapters and silicone sealing rings with warm soapy water. Rinse thoroughly and allow to air dry completely before reassembling.
- Store the warmer in a clean, dry place when not in use.

Image 6.1: Cleaning the bottle warmer.
7. Troubleshooting
| Problem | Possible Cause | Solution |
|---|---|---|
| Warmer not turning on. | Battery is depleted. | Charge the warmer fully using the provided Type-C cable and a 9V/2A adapter. |
| Milk not warming or warming slowly. | Low battery; incorrect temperature setting; large volume of cold liquid. | Ensure the warmer is fully charged. Select a higher temperature if needed. Warming time varies with liquid volume and initial temperature. |
| Device leaks during use. | Adapter not securely attached; sealing ring improperly installed or damaged. | Ensure the correct adapter is used and tightened securely. Check that the silicone sealing rings are correctly placed and undamaged. Replace if necessary. |
| LED display is dim or incomplete. | Internal component issue. | Try restarting the device. If the problem persists, contact customer support. |
| Warmer shuts off unexpectedly. | Low battery ('L0' displayed). | Recharge the device. |
8. Specifications
- Model Number: MM009
- Product Dimensions: 3.15 x 3.15 x 3.54 inches
- Item Weight: 1.72 pounds
- Battery Capacity: 9000mAh
- Charging Input: 9V/2A (Type-C)
- Full Charge Time: Approximately 2.5 hours
- Temperature Settings: 98°F (37°C), 104°F (40°C), 113°F (45°C), 122°F (50°C)
- Materials: SUS316 Stainless Steel (Heater), Food Grade Silicone (Sealing Rings), PP5 (Adapters)
9. Warranty and Support
For warranty information or technical support, please refer to the product packaging or contact Mumgaroo customer service directly. Contact details are typically available on the official Mumgaroo website or through your purchase platform.