Introduction
This manual provides comprehensive instructions for the WSDCAM Bike Light Set, including the ultra-bright headlight, smart tail light with integrated horn, alarm, turn signals, and brake light, along with the wireless remote control. Please read this manual thoroughly before use to ensure proper installation, operation, and maintenance for optimal safety and performance.
What's in the Box
The WSDCAM Bike Light Set includes the following components:
- Bike Front Light & Bracket accessories
- Bike Tail Light & Bracket accessories
- Remote & Bracket accessories
- USB C cable
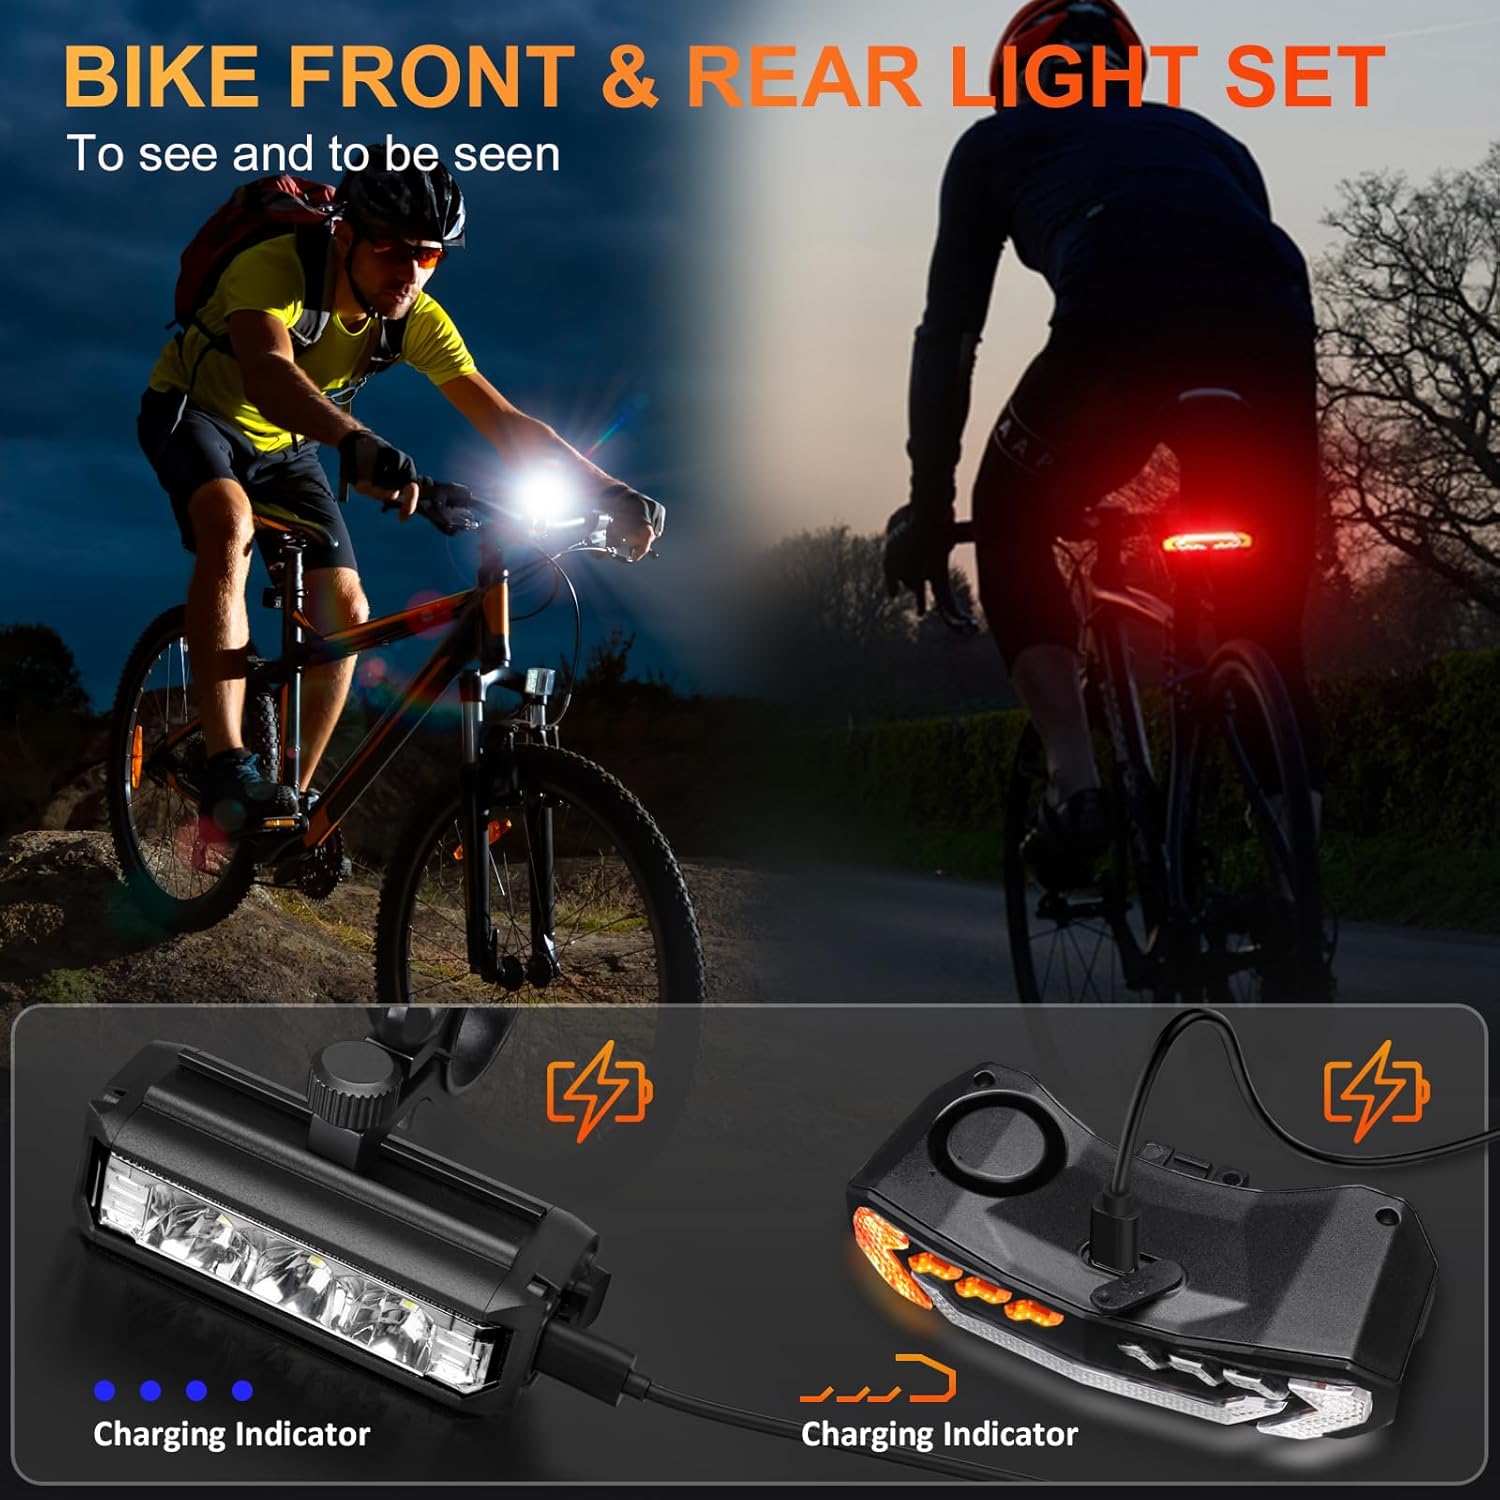
Image: All components of the WSDCAM Bike Light Set, laid out for inspection. This includes the front headlight, rear tail light, wireless remote, and various mounting brackets and a USB-C charging cable.
Product Features
- Ultra-Bright Bike Headlight: Features three powerful LEDs with a maximum output of 900 lumens, providing bright and wide illumination. Includes an anti-glare T-shaped beam.
- Super Bright Bicycle Rear Light: Equipped with 31 high-end LED lights, offering up to 160 lumens for enhanced visibility.
- 5-in-1 Smart Bike Tail Light: Integrates an electric bike horn, anti-theft vibration alarm, rear bike light, bike turn signals, and an auto bicycle brake light (built-in G-sensor).
- Bike Turn Signals: Activated by remote control, providing clear left/right indications with an audible click sound.
- Smart Bike Brake Light: Automatically highlights for 2 seconds upon braking to alert drivers behind you.
- Vibration Alarm: Anti-theft alarm with 7 adjustable sensitivity levels to deter theft.
- Bike Horn: Produces a 110-decibel sound with 3 selectable tones (electric car horn, standard horn, birdcall).
- Smart Auto ON/OFF: Tail light automatically turns off after 30 seconds of inactivity in dark environments and turns on when motion is detected. In bright environments, it turns off to save power (applies to Slow Flashing & Breathing modes).
- USB Rechargeable & Wireless Remote: Both front and tail lights have built-in 2000mAh lithium batteries. Headlight charges in approximately 3 hours, tail light in 6 hours. Wireless remote clamps to handlebars (0.78-0.94 inch diameter) with a strong range of 98-196ft.
- IP65 Waterproof: Both front light, tail light, and remote are IP65 rated for water resistance.
- Indicators: Charging level indicator and low battery indicator included.
Setup and Installation
1. Charging the Devices
Before initial use, fully charge both the front and tail lights using the provided USB-C cable. The charging indicator lights will show the charging status.

Image: The WSDCAM bike front and tail lights are shown connected to a power bank via USB-C cables, illustrating their rechargeable capability. This setup demonstrates how to power up the devices for extended use.
2. Installing the Headlight
Attach the headlight bracket to your bike's handlebar. The bracket is suitable for bars between 0.66" and 1.22" in diameter. Secure the headlight onto the bracket.

Image: A diagram illustrating the installation of the WSDCAM bike headlight onto a bicycle handlebar using its adjustable bracket. The image highlights the secure mounting mechanism.
3. Installing the Tail Light
Mount the tail light bracket to your bike's seat post. The bracket is suitable for bars between 0.98" and 1.38" in diameter. Slide the tail light onto the bracket until it clicks into place.

Image: A diagram showing the installation of the WSDCAM bike tail light onto a bicycle seat post. The tail light slides into a bracket, ensuring a secure fit for rear visibility.
4. Installing the Remote Control
Attach the remote control bracket to a convenient location on your handlebar, suitable for bars between 0.78" and 0.94" in diameter. Insert the remote control into its bracket.

Image: A diagram illustrating the installation of the WSDCAM remote control onto a bicycle handlebar. The remote is shown securely mounted within its bracket, positioned for easy access during riding.
Operating Instructions
1. Headlight Operation
The headlight features 6 modes. Press the headlight button to cycle through the modes:
- Low Beam
- High Beam
- Low & High Beam
- Flash
- Daytime Running Light (Press and hold the headlight button to select)
- Off
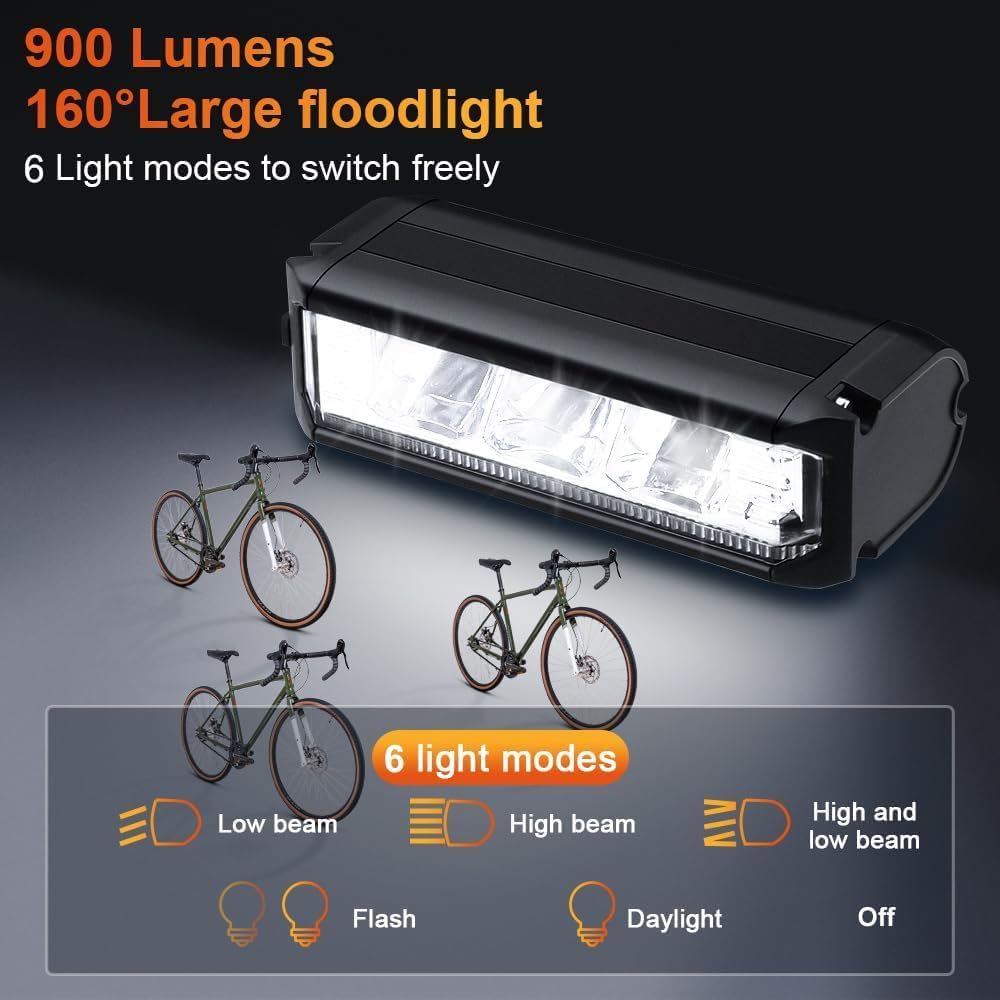
Image: The WSDCAM bike headlight is displayed with illustrations of its six distinct lighting modes, including Low Beam, High Beam, combined Low & High Beam, Flash, Daylight, and Off, demonstrating its versatility for various riding conditions.

Image: A close-up of a hand pressing the mode switch button on the WSDCAM bike headlight, with icons illustrating the six available light modes: Low Beam, Flash, High Beam, Low+High Beam, and Daytime Running Light.
2. Tail Light Operation (via Remote Control)
The tail light offers 6 modes, easily selected using the wireless remote control:
- Slow Flashing
- Breathing
- Fast Blinking
- Steady Light
- Emergency Light (Yellow Flashing)
- Off

Image: The WSDCAM bike tail light is shown with visual representations of its six different light modes: Slow Flashing, Breathing, Fast Blinking, Steady Light, Emergency Light (yellow flashing), and Off, highlighting its diverse visibility options.
3. Turn Signals
Press the R (Right) or L (Left) button on the remote control to activate the corresponding turn signal. The lights will flash with an audible click sound to alert others of your intended direction.

Image: The WSDCAM bike tail light is depicted showing its functionality as a left turn signal, a smart brake light that illuminates automatically, and a right turn signal, all with accompanying click sounds for enhanced safety.
4. Smart Brake Light
The tail light features a built-in G-sensor. When you brake, the rear light will automatically highlight for 2 seconds to warn vehicles behind you. This function is active in Slow Flashing, Breathing, Fast Blinking, and Steady Light modes.
5. Bike Horn
Press the horn button on the remote control to activate the 110-decibel bike horn. There are 3 horn sounds available for selection: electric car horn, standard horn, and birdcall sound.
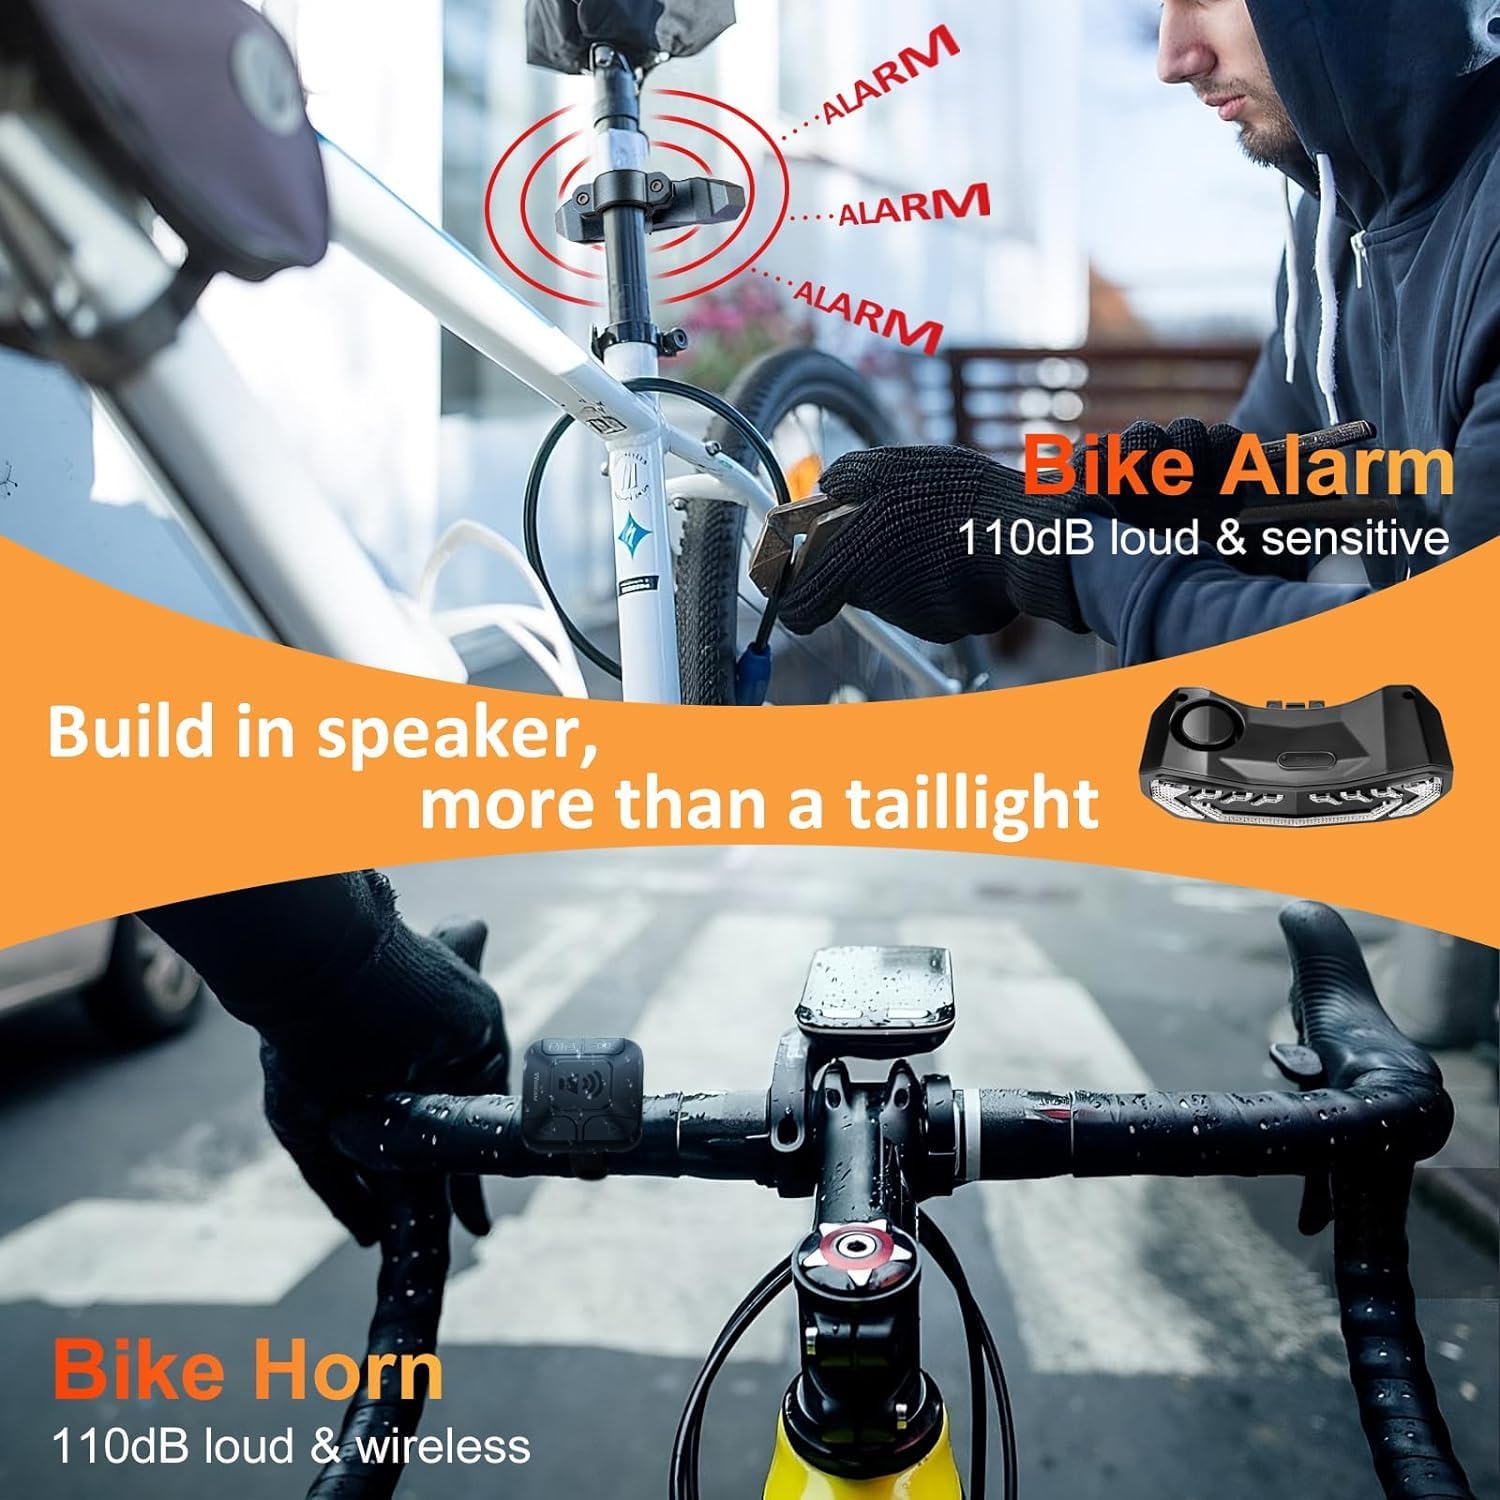
Image: The WSDCAM bike tail light is shown highlighting its integrated bike alarm, which is 110dB loud and sensitive, and its bike horn, also 110dB loud and wireless, emphasizing its multi-functional safety features.
6. Vibration Alarm
To arm the anti-theft alarm, press the lock button on the remote control. The alarm is triggered by vibration and has 7 adjustable sensitivity levels. To disarm, press the unlock button.
7. Smart Auto ON/OFF Function
In Slow Flashing and Breathing modes, the tail light automatically turns off after 30 seconds of inactivity in dark environments and turns on when motion is detected. In bright environments, it automatically turns off to conserve power. For daytime use, select Fast Blinking or Steady Light modes, as these do not have the smart auto ON/OFF function.

Image: A visual representation of the WSDCAM smart bike tail light's auto ON/OFF functionality. It shows the light turning off after 30 seconds of inactivity in dark conditions, turning on with motion, and turning off in bright environments to save power.
Charging Instructions
Both the bike front light and tail light are equipped with built-in 2000mAh lithium batteries and are USB-C rechargeable. Use the provided USB-C cable to charge the devices.
- The headlight takes approximately 3 hours for a full charge.
- The taillight takes approximately 6 hours for a full charge.
- A full charge allows the taillight to work up to 70 hours on fast blinking mode.
Image: The WSDCAM bike front and tail lights are shown connected to a power bank via USB-C cables, illustrating their rechargeable capability. This setup demonstrates how to power up the devices for extended use.
Maintenance and Care
- Water Resistance: The lights and remote are IP65 waterproof. This means they are protected against dust and low-pressure water jets from any direction. They are suitable for use in rain but should not be submerged in water.
- Cleaning: Wipe the devices with a soft, damp cloth. Do not use abrasive cleaners or solvents.
- Storage: Store the lights in a cool, dry place when not in use. Ensure they are fully charged before long-term storage to preserve battery life.
- Battery Life: Recharge the batteries regularly, even if not frequently used, to maintain optimal battery health.

Image: The WSDCAM bike headlight and tail light are shown in use during a rainstorm, highlighting their IP65 waterproof rating. This demonstrates their durability and functionality in various weather conditions, including rain, fog, and snow.
Troubleshooting
| Problem | Possible Cause | Solution |
|---|---|---|
| Lights not turning on. | Low battery or device is off. | Charge the device fully. Ensure the power button is pressed to turn it on. |
| Remote control not working. | Remote battery low or out of range. | Ensure the remote is within the 98-196ft range. Check remote battery. |
| Tail light auto ON/OFF not functioning. | Incorrect mode selected or bright environment. | Ensure Slow Flashing or Breathing mode is selected. The function is designed to save power in bright conditions. |
| Alarm sensitivity too high/low. | Alarm sensitivity setting needs adjustment. | Refer to the specific instructions for adjusting the 7 levels of alarm sensitivity. |
Specifications
| Feature | Detail |
|---|---|
| Brand | wsdcam |
| Model Name | W-6378 |
| Color | Black |
| Material | Polycarbonate |
| Power Source | Battery Powered (Rechargeable Lithium Battery) |
| Water Resistance Level | IP65 (Waterproof) |
| Mounting Type | Handlebar Mount (Front Light & Remote), Seat Post Mount (Tail Light) |
| Headlight Brightness | Max 900 Lumens |
| Tail Light Brightness | Max 160 Lumens |
| Horn Sound Level | 110 Decibels |
| Remote Wireless Range | 98-196 ft |
Warranty and Support
The WSDCAM Bike Light Set comes with a 1 Year Warranty.
For product support, troubleshooting assistance, or warranty claims, please contact WSDCAM customer service through the retailer where the product was purchased or visit the official WSDCAM store online.
Official WSDCAM Store: WSDCAM Amazon Store
Official Product Video
Video: An official product video from WSDCAM demonstrating the features and usage of the Bike Lights Front and Back for Night Riding. This video showcases the lights in action, highlighting their brightness, various modes, and overall functionality.


