1. Introduction
The SB Components micro:Touch Keyboard is an expansion board designed for the micro:bit, facilitating learning and experimentation with programming. It integrates a 16-key touch interface with RGB LEDs, a vibration motor, a buzzer, and various expansion ports for math games and automation control applications. This manual provides essential information for setup, operation, and maintenance of your micro:Touch Keyboard.
2. Key Features
- 16 programmable touch keys for versatile input.
- 16 integrated RGB LEDs for visual feedback.
- Built-in vibration motor and buzzer for haptic and auditory responses.
- Multiple expansion ports: 2 Motor Ports, 2 Servo Ports, 2 I2C, 1 UART, and 6 GPIO pins (P0, P1, P2, P8, P12, P16).
- Designed for both math game applications and automation control.
- Compatible with programming platforms like Mind+ and MakeCode.
3. Product Overview
This section provides a visual guide to the micro:Touch Keyboard components.

Figure 1: Top view of the micro:Touch Keyboard. This image shows the micro:bit inserted into its slot, the 16 touch-sensitive keys with numbers and symbols, and a finger interacting with one of the keys. The RGB LEDs are visible, and the power input and various ports are on the left side.
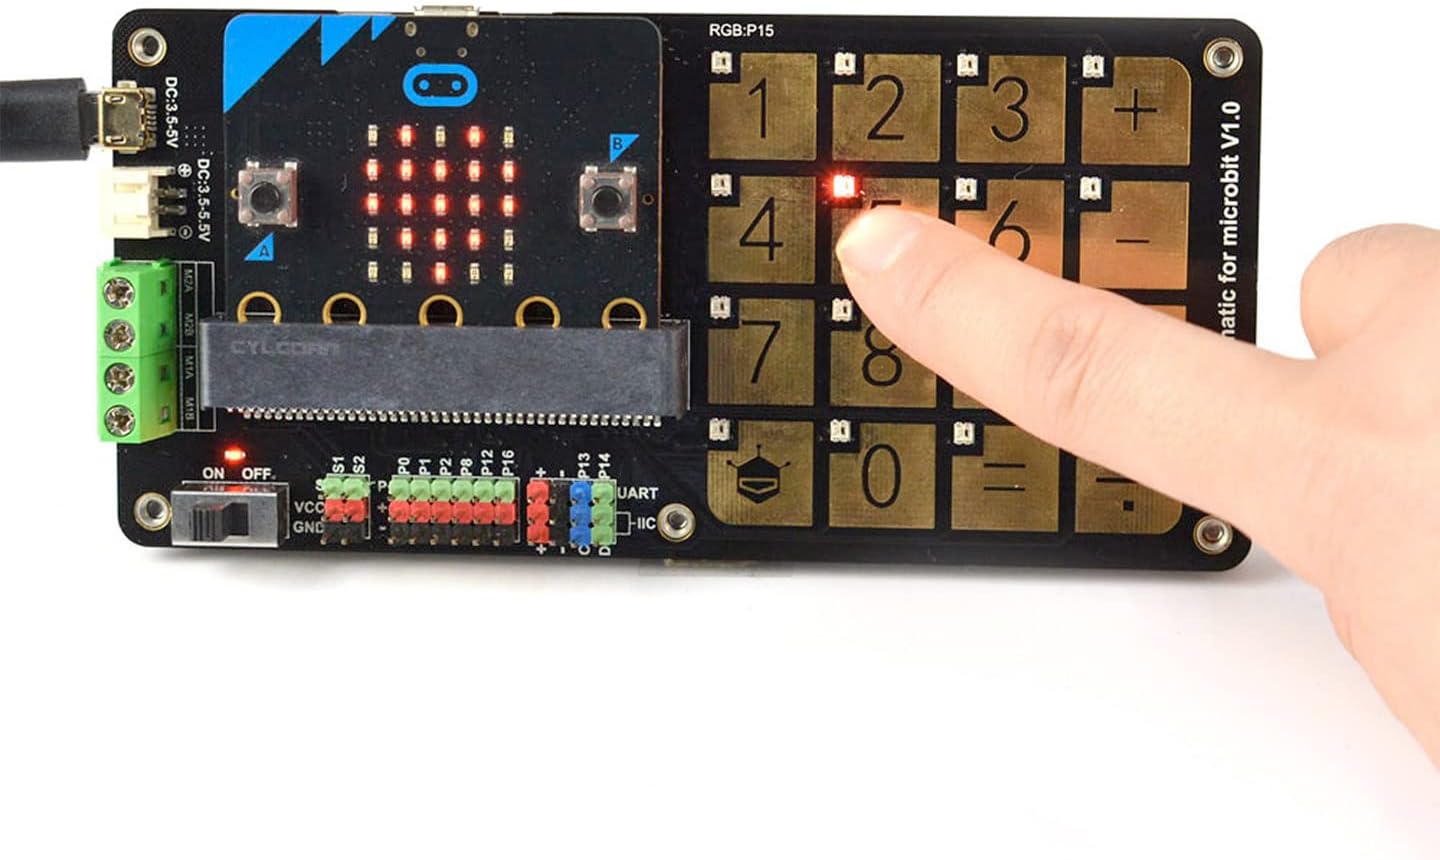
Figure 2: Angled view of the micro:Touch Keyboard. This image displays the underside of the main board, revealing the micro:bit connector and various pin headers. A detached battery holder is shown next to the board, illustrating how it connects for portable power.
4. Specifications
| Feature | Detail |
|---|---|
| Power Input | 3.5V ~ 5.5V DC |
| Touch Keys | 16 |
| RGB LEDs | 16 |
| Buzzer | 1 (with switch) |
| Motor Ports | 2 |
| Servo Ports | 2 |
| I2C Ports | 2 |
| UART Port | 1 |
| GPIO Pins | P0, P1, P2, P8, P12, P16 |
| Programming Platforms | Mind+, MakeCode |
| Dimensions | 136mm × 65mm (5.35" × 2.56") |
5. Setup Guide
- Insert micro:bit: Carefully slide your micro:bit into the dedicated slot on the micro:Touch Keyboard. Ensure it is seated correctly and securely.
- Power Connection:
- USB Power: Connect a 3.5V-5.5V DC power supply via the USB port on the micro:bit or the dedicated DC input on the micro:Touch Keyboard.
- Battery Power: If using a battery holder (as shown in Figure 2), connect it to the designated battery input pins. Ensure correct polarity.
- Buzzer Switch: Locate the buzzer switch and set it to the 'ON' position if you intend to use the buzzer functionality in your projects.
- Connect Peripherals (Optional): If your project requires motors, servos, or other I2C/UART/GPIO devices, connect them to the appropriate ports on the micro:Touch Keyboard. Refer to the pinout diagram for specific connections.
- Programming Environment: Open your preferred programming environment (e.g., Mind+, MakeCode) and connect your micro:bit to your computer via USB to upload your code.
6. Operating Instructions
The micro:Touch Keyboard functions as an input and output expansion board for the micro:bit. Its operation is primarily controlled by the code uploaded to the micro:bit.
- Touch Key Input: The 16 touch keys can be programmed to trigger specific actions or input values into your micro:bit program. When a key is touched, the corresponding signal is sent to the micro:bit.
- RGB LED Output: The 16 RGB LEDs can be individually controlled through your micro:bit code to provide visual feedback, display patterns, or indicate status.
- Vibration Motor: The vibration motor can be activated via code to provide haptic feedback for events or interactions.
- Buzzer: When the buzzer switch is ON, the buzzer can be programmed to emit sounds or melodies.
- External Device Control: Use the motor, servo, I2C, UART, and GPIO ports to connect and control external components as defined by your micro:bit program.
Refer to the documentation of your chosen programming platform (Mind+, MakeCode) for detailed examples and libraries on how to interact with the micro:Touch Keyboard's features.
7. Maintenance
- Cleaning: Use a soft, dry cloth to clean the surface of the keyboard. Avoid using liquid cleaners directly on the board.
- Storage: Store the micro:Touch Keyboard in a dry, dust-free environment when not in use.
- Handling: Handle the board by its edges to avoid touching sensitive components.
- Power Off: Always disconnect power before connecting or disconnecting any components to prevent damage.
8. Troubleshooting
- Q: The touch keys are not responding.
- A: Ensure the micro:bit is correctly inserted and powered. Verify your code is properly uploaded and configured to read touch inputs. Check for any physical obstructions or damage to the touch pads.
- Q: RGB LEDs are not lighting up.
- A: Confirm that your micro:bit code includes commands to control the RGB LEDs. Check power supply to ensure it is within the specified voltage range (3.5V-5.5V DC).
- Q: The buzzer is not making any sound.
- A: Ensure the buzzer switch on the board is in the 'ON' position. Verify that your micro:bit code is sending appropriate signals to activate the buzzer.
- Q: External motors/servos are not working.
- A: Check all wiring connections for correctness and security. Ensure the external devices have their own power supply if required, and that your micro:bit code is correctly controlling the respective ports.
9. Warranty and Support
For warranty information and technical support, please refer to the official SB Components website or contact their customer service directly. Keep your purchase receipt for warranty claims.
Website: www.sb-components.co.uk


