1. Introduction
This manual provides essential information for the safe and efficient operation of your JARXIOKE 500W Pure Sine Wave Power Inverter. This device is designed to convert 12V DC power from a battery into 110V/120V AC household power, making it suitable for various applications including home use, recreational vehicles (RVs), and off-grid solar systems.
The inverter delivers a true 500W of continuous power and can handle peak loads up to 1000W. Its pure sine wave output ensures compatibility with sensitive electronics, while its high conversion efficiency (>90%) minimizes energy loss.
2. Safety Information
Please read all safety warnings and instructions carefully before operating the inverter. Failure to follow these instructions may result in electric shock, fire, or serious injury.
- Ventilation: Ensure the inverter is placed in a well-ventilated area. Do not block the cooling fan or vents.
- Moisture: Do not expose the inverter to rain, moisture, or water.
- Heat: Keep the inverter away from direct sunlight, heat sources, and flammable materials.
- Connections: Always connect the inverter to a 12V DC power source. Ensure all connections are tight and secure to prevent overheating and arcing.
- Grounding: Properly ground the inverter as instructed in the setup section.
- Overload: Do not exceed the inverter's rated continuous power output (500W) or peak power (1000W). Overloading can damage the inverter and connected devices.
- Children: Keep the inverter out of reach of children.
- Maintenance: Do not attempt to open or service the inverter yourself. Refer all servicing to qualified personnel.
3. Package Contents
Verify that all items are present in your package:
- JARXIOKE 500W Pure Sine Wave Power Inverter
- Battery Cables (with alligator clips)
- Cigarette Lighter Plug Cable
- Remote Control
- User Manual
4. Product Overview
4.1 Key Features
- Advanced Pure Sine Wave Output: Provides stable and clean power suitable for sensitive electronics.
- High Efficiency: Conversion efficiency greater than 90% with low no-load loss.
- Dual Connection Modes: Connect via cigarette lighter for loads under 150W or directly to a battery with alligator clips for loads up to 500W.
- Comprehensive Protection: Includes over voltage, low voltage, overload, short circuit, overheat, reverse polarity (fuse), auto restart, and grounding leakage protection.
- Durable Construction: Features an isolated input/output design, soft-start technology, and a robust aluminum housing for enhanced durability and protection.
- Smart Cooling Fan: Automatically activates to reduce heat and prevent overheating.
- Intelligent LCD Display: Provides real-time monitoring of input voltage, output voltage, battery level, output frequency, protection status, fan status, and output power.
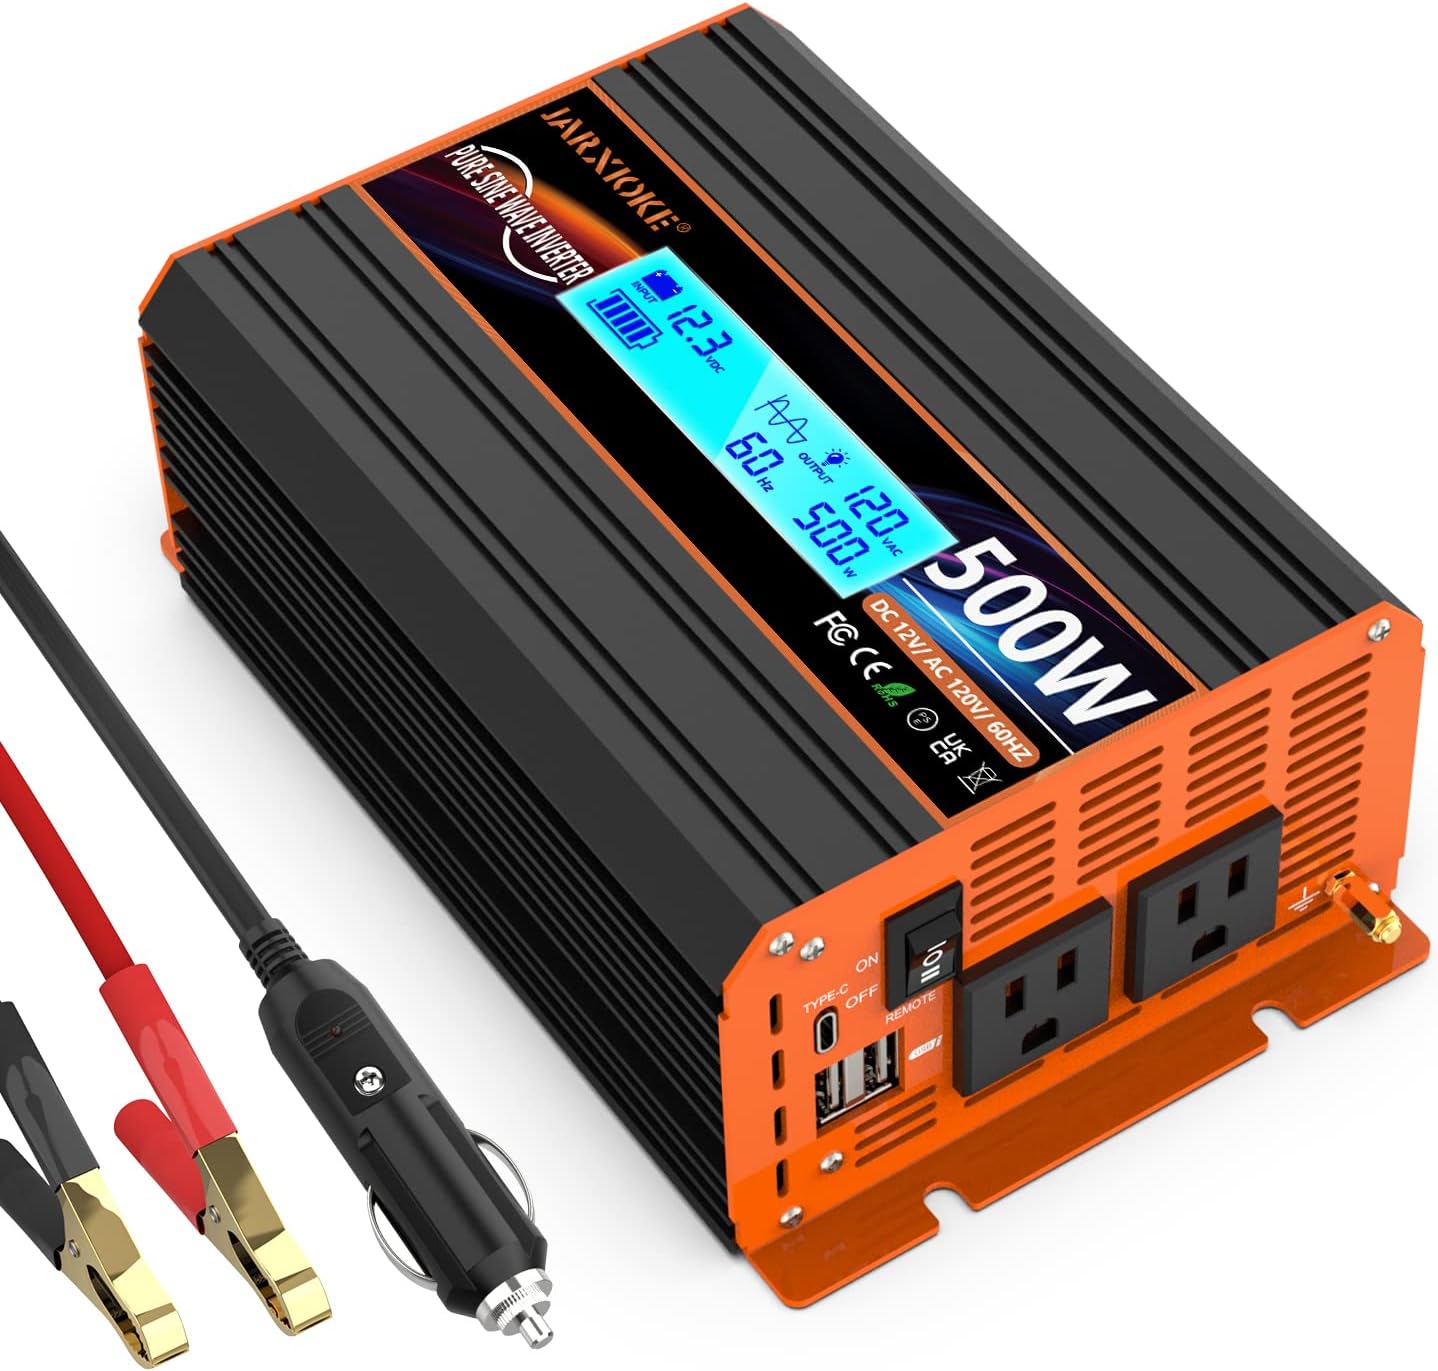
4.2 Component Identification
Refer to the diagram below for identification of the inverter's components and ports.

- LCD Display: Shows operational status and parameters.
- Power Switch: Turns the inverter on or off.
- Type-C Port: For charging compatible devices.
- USB Ports (2x): For charging USB-powered devices (up to 3.4A).
- 120V AC Sockets (2x): For connecting AC appliances.
- Grounding Terminal: For safety grounding connection.
- Negative Terminal (-): Connects to the negative terminal of the 12V battery.
- Positive Terminal (+): Connects to the positive terminal of the 12V battery.
- Smart Fan: Provides cooling for the inverter.
5. Setup Instructions
Proper setup is crucial for the safe and effective operation of your inverter.
5.1 Choosing a Location
- Place the inverter on a flat, stable surface.
- Ensure adequate ventilation around the inverter. Do not place it in an enclosed space or block the fan vents.
- Keep the inverter away from direct sunlight, heat, moisture, and flammable materials.
5.2 Grounding the Inverter
For safety, the inverter must be properly grounded.
- Locate the grounding terminal on the inverter (refer to Figure 1).
- Connect a grounding wire (not included) from the grounding terminal to a proper earth ground point. In a vehicle, this can be the chassis. In an RV or off-grid system, connect to the system's main grounding point.
5.3 Connecting to a 12V DC Power Source
The inverter offers two connection methods depending on the power requirements of your devices.
Method 1: Cigarette Lighter Plug (for loads under 150W)
- Ensure the inverter's power switch is in the 'OFF' position.
- Insert the cigarette lighter plug cable into the inverter's DC input port.
- Plug the other end of the cigarette lighter cable into your vehicle's 12V cigarette lighter socket.
- This method is suitable for low-power devices such as laptops, routers, cameras, and air pumps, provided their combined wattage does not exceed 150W.
Method 2: Battery Cables (for loads between 150W and 500W)
- Ensure the inverter's power switch is in the 'OFF' position.
- Connect the red battery cable to the inverter's positive (+) terminal and the black battery cable to the inverter's negative (-) terminal. Ensure connections are tight.
- Connect the other end of the red battery cable to the positive (+) terminal of your 12V battery.
- Connect the other end of the black battery cable to the negative (-) terminal of your 12V battery.
- Double-check all connections for polarity and tightness. Incorrect polarity can damage the inverter and battery.
6. Operating Instructions
6.1 Powering On the Inverter
- After ensuring all connections are secure and correct, switch the inverter's power switch to the 'ON' position.
- The LCD display will illuminate, showing various operational parameters.
- The smart cooling fan may activate briefly during startup or when a load is applied.
6.2 Understanding the LCD Display
The intelligent LCD display provides real-time information about the inverter's status.

- Input Voltage (VDC): Displays the current DC voltage from your battery.
- Output Voltage (VAC): Shows the AC output voltage (typically 110V/120V).
- Battery Level: Indicates the approximate charge level of the connected battery.
- Output Frequency (Hz): Displays the AC output frequency (typically 60Hz).
- Output Power (W): Shows the current wattage being drawn by connected AC devices.
- Protection Indication: Icons or messages may appear to indicate active protection modes (e.g., overload, low voltage).
- Fan Status: Indicates if the cooling fan is active.
6.3 Connecting AC and USB Devices
- With the inverter powered on, plug your AC appliances into the 120V AC sockets.
- Plug your USB-powered devices into the USB or Type-C ports for charging.
- Monitor the output power on the LCD display to ensure you do not exceed the inverter's 500W continuous rating.
- For optimal performance and to prevent battery drain, turn off the inverter when not in use.
7. Maintenance
Regular maintenance helps ensure the longevity and reliable operation of your inverter.
- Cleaning: Periodically clean the exterior of the inverter with a dry, soft cloth. Do not use liquid cleaners or solvents.
- Ventilation: Ensure the cooling vents and fan remain free of dust and debris. Use compressed air to clear any blockages if necessary.
- Connections: Regularly check all DC input connections (battery terminals, cigarette lighter plug) to ensure they are tight and free from corrosion. Loose connections can cause overheating.
- Storage: If storing the inverter for an extended period, disconnect it from the power source and store it in a cool, dry place.
8. Troubleshooting
This section addresses common issues you might encounter with your inverter.
| Problem | Possible Cause | Solution |
|---|---|---|
| No power output / Inverter does not turn on | Loose DC connections Low battery voltage Blown fuse Inverter switch off | Check and tighten all battery cable connections. Recharge or replace the 12V battery. Check internal fuses (consult qualified technician). Ensure power switch is ON. |
| Overload alarm / Inverter shuts down | Connected load exceeds 500W continuous or 1000W peak. Short circuit in connected appliance. | Reduce the total wattage of connected appliances. Disconnect all appliances and test them individually. |
| High temperature alarm / Inverter shuts down | Poor ventilation Ambient temperature too high Overload | Ensure clear airflow around the inverter. Clean vents. Move inverter to a cooler environment. Reduce connected load. |
| Low voltage alarm / Inverter shuts down | Battery voltage too low | Recharge the 12V battery. |
| Fan is noisy or constantly running | Normal operation under load Dust/debris in fan | The fan activates based on internal temperature or load. This is normal. Clean fan and vents. |
9. Specifications
| Parameter | Value |
|---|---|
| Brand | JARXIOKE |
| Model | PSW-500W |
| Continuous Power | 500W |
| Peak Power | 1000W |
| Input Voltage | 12V DC |
| Output Voltage | 110V/120V AC |
| Output Frequency | 60Hz |
| Output Waveform | Pure Sine Wave |
| Conversion Efficiency | >90% |
| Dimensions (L x W x H) | 6.69 x 4.92 x 2.68 inches |
| Weight | 3.08 pounds |
| AC Outlets | 2 |
| USB Ports | 2 (up to 3.4A) |
| Type-C Port | 1 |
10. Warranty and Support
Your JARXIOKE 500W Pure Sine Wave Power Inverter comes with a 24-month warranty from the date of purchase.
If you encounter any issues or have questions regarding your product, please contact JARXIOKE customer support via email. Our team is available to assist you with troubleshooting, warranty claims, and general inquiries.
For support, please refer to the contact information provided with your purchase documentation or visit the official JARXIOKE website.


