1. Introduction
Thank you for choosing the ADVWIN 2-in-1 Ice Maker Countertop with Water Dispenser. This appliance is designed to provide both ice cubes and cold water, offering convenience for various uses. Please read this manual thoroughly before operating the appliance to ensure safe and efficient use.
This unit produces bullet-shaped ice cubes and features a water dispensing function. It is suitable for home use, offices, and small gatherings.
2. Safety Instructions
To reduce the risk of fire, electric shock, or injury, always follow these basic safety precautions:
- Read all instructions before use.
- Ensure the voltage matches the rating label on the appliance.
- Do not immerse the power cord, plug, or any part of the appliance in water or other liquids.
- Unplug from the outlet when not in use and before cleaning.
- Do not operate any appliance with a damaged cord or plug, or after the appliance malfunctions or has been damaged in any manner.
- Do not use outdoors.
- Do not place on or near a hot gas or electric burner, or in a heated oven.
- Use only potable water for ice making and water dispensing.
- Keep the appliance away from heat sources and direct sunlight.
- Ensure proper ventilation around the appliance.
- This appliance is not intended for use by persons (including children) with reduced physical, sensory or mental capabilities, or lack of experience and knowledge, unless they have been given supervision or instruction concerning use of the appliance by a person responsible for their safety.
3. Product Components
Familiarize yourself with the main parts of your ADVWIN 2-in-1 Ice Maker:
- Control Panel (with indicator lights and buttons)
- Ice Dispensing Outlet
- Water Dispensing Outlet
- Water Reservoir (internal)
- Ice Basket (internal)
- Air Vent (side)
- Drain Plug (bottom)

Figure 1: Front view of the ADVWIN 2-in-1 Ice Maker, showing the ice and water dispensing outlets and the control panel.

Figure 2: Detailed view of the control panel with TIMER, SELECT, ON/OFF, and WATER buttons, along with various indicator icons.
4. Setup
- Unpacking: Carefully remove the appliance from its packaging. Remove all packing materials, including any tape or labels.
- Placement: Place the ice maker on a stable, level surface away from direct sunlight and other heat sources (e.g., stove, furnace, radiator). Ensure there is at least 15 cm (6 inches) of space around the back and sides for proper ventilation.
- Initial Cleaning: Before first use, clean the interior and exterior of the appliance. Refer to the "Maintenance and Cleaning" section for detailed instructions.
- First Use Delay: After moving the unit, allow it to stand upright for at least 2-4 hours before plugging it in. This allows the refrigerant to settle.
- Fill Water Reservoir: Open the top lid and fill the water reservoir with potable water up to the MAX fill line. Do not overfill.
- Power Connection: Plug the power cord into a grounded electrical outlet.

Figure 3: Dimensions of the ice maker: 25cm width, 39cm height, 36cm depth. Ensure adequate space for placement.
5. Operating Instructions
- Power On: Press the ON/OFF button on the control panel. The power indicator light will illuminate.
- Select Ice Size: Press the SELECT button to choose between small (S) or large (L) bullet-shaped ice cubes. The corresponding indicator light will illuminate.
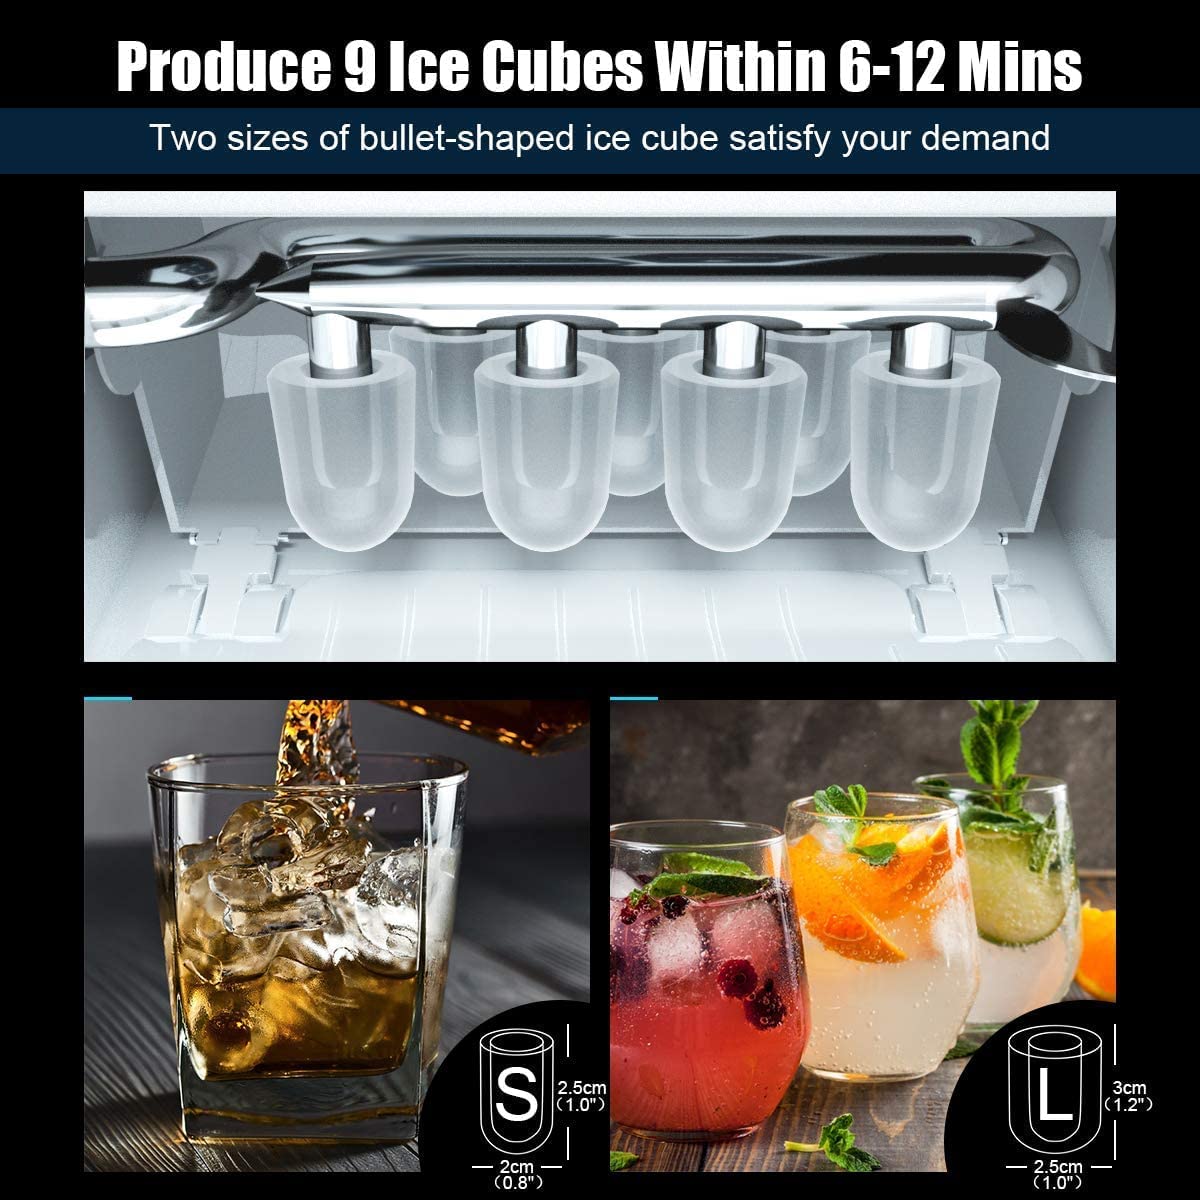
Figure 4: Illustration of small (S) and large (L) bullet-shaped ice cubes. Small cubes are approximately 2cm (0.8") diameter, large cubes are 2.5cm (1.0") diameter and 3cm (1.2") long.
- Ice Making Cycle: The ice maker will begin its cycle. It produces 9 ice cubes in approximately 6-12 minutes, depending on the selected size and ambient temperature.
- Ice Full Indicator: When the ice basket is full, the "ICE FULL" indicator light will illuminate, and the ice making process will pause. The unit will resume automatically once ice is removed.
- Add Water Indicator: If the water reservoir is low, the "ADD WATER" indicator light will illuminate. Add more potable water to the reservoir, and the ice making process will resume.
- Water Dispensing: To dispense cold water, place a cup under the water dispensing outlet and press the WATER button. Release the button to stop dispensing.
- Recycling Unused Ice: Any ice that melts in the ice basket will drain back into the water reservoir and be reused for subsequent ice making cycles, minimizing waste.
- Power Off: Press the ON/OFF button to turn off the appliance.
6. Maintenance and Cleaning
Regular cleaning and maintenance will ensure the longevity and optimal performance of your ice maker.
- Before Cleaning: Always unplug the appliance from the power outlet before cleaning.
- Interior Cleaning:
- Drain any remaining water by removing the drain plug located at the bottom of the unit.
- Clean the interior with a soft cloth dampened with a mild detergent solution. Rinse thoroughly with clean water.
- Ensure all parts are dry before reassembling and refilling with water.
- Exterior Cleaning: Wipe the exterior surface with a soft, damp cloth. Do not use abrasive cleaners or solvents.
- Air Vent Cleaning: Periodically clean the air vent on the side of the unit with a soft brush or vacuum cleaner to remove dust and ensure proper airflow.
- Storage: If storing the appliance for an extended period, drain all water, clean thoroughly, and ensure it is completely dry before storing in a cool, dry place.
7. Troubleshooting
| Problem | Possible Cause | Solution |
|---|---|---|
| Ice maker not working. | No power. | Check if the unit is plugged in and the outlet is functional. |
| "ADD WATER" indicator on. | Water reservoir is empty or low. | Fill the water reservoir with potable water. |
| "ICE FULL" indicator on. | Ice basket is full. | Remove ice from the basket. |
| Ice cubes are too small or clumpy. | Water temperature too high; ambient temperature too high. | Use colder water. Ensure the unit is in a cool, well-ventilated area. Select large ice size. |
| Water not dispensing. | Water reservoir empty; dispensing mechanism issue. | Check water level. If problem persists, contact support. |
If the problem persists after attempting these solutions, please contact customer support.
8. Specifications
- Model: Ice Cube Maker
- Power Rating: 150W
- Voltage: AC 220 - 240V / 50 Hz
- Water Tank Capacity: 2L
- Ice Making Capacity: Up to 12kg / 24hr
- Ice Bin Weight Capacity: 0.6kg
- Ice Shape: Bullet
- Cycle Time: 9 cubes / 6-12 minutes
- Refrigerant: R600a
- Overall Dimensions: 25cm (W) x 39cm (H) x 36cm (D)
- Product Weight: Approximately 10.34 kg
9. Warranty and Support
This ADVWIN Ice Maker comes with a 1-year warranty from the date of purchase. This warranty covers manufacturing defects under normal use.
The warranty does not cover damage caused by misuse, neglect, accident, alteration, or improper installation. Please retain your proof of purchase for warranty claims.
For technical support, warranty claims, or any questions regarding your product, please contact ADVWIN customer service through your retailer or the official ADVWIN support channels.


