1. Introduction
Welcome to your new LUXRITE 2-inch LED recessed lighting fixture. This manual provides detailed instructions for the safe installation, operation, and maintenance of your lighting product. Please read these instructions thoroughly before installation and retain them for future reference.

The LUXRITE 2-inch LED recessed light fixture, shown with its integrated junction box and white trim.
2. Important Safety Information
To reduce the risk of fire, electric shock, or injury to persons, please observe the following safety precautions:
- Always turn off the power supply at the circuit breaker before beginning installation or performing any maintenance.
- Consult a qualified electrician if you are unsure about the installation process.
- This product is suitable for wet locations and is IC rated, meaning it can be in direct contact with insulation.
- Ensure all electrical connections are made in accordance with local codes and ordinances.
- Do not alter or modify the fixture in any way.
- Verify that the supply voltage is 120V AC.
3. Package Contents
Carefully unpack your product and ensure all items are present and undamaged:
- LUXRITE 2 Inch LED Recessed Light Fixture
- Integrated Junction Box
- Interchangeable Trim (White, included)
4. Specifications
| Model Number | LR23415 |
| Wattage | 15W |
| Voltage | 120V |
| Brightness | 1000 Lumens |
| Color Temperature | 2700K, 3000K, 3500K, 4000K, 5000K Selectable |
| Lifetime | 50,000 hours |
| Beam Angle | 38° |
| Certifications | ETL Listed, Wet Location Rated, IC Rated |
| Product Dimensions | 3.13"L x 3.13"W x 4.96"H |
| Cutout Size | 2.88" |

Technical drawing displaying the dimensions of the 2-inch LED recessed light fixture and its accompanying junction box, including the required 2.88-inch cutout size.
5. Setup and Installation
5.1 Pre-Installation
- Ensure power is OFF at the circuit breaker.
- Gather necessary tools: measuring tape, drywall saw, wire strippers, screwdriver.
5.2 Installation Steps
- Cut Hole: Using a 2.88-inch hole saw or drywall saw, cut a circular opening in the desired ceiling location. Refer to the dimensions diagram for accuracy.
- Attach Trim: If using an alternative trim (not the pre-installed white trim), align the desired interchangeable trim with the fixture and twist to securely lock it into place.
- Wiring Connections: Open the integrated junction box. Connect the household electrical wires to the corresponding wires in the junction box (black to black, white to white, ground to ground) using wire nuts. Ensure all connections are secure.
- Insert Junction Box: Place the junction box into the ceiling opening.
- Insert Fixture: Squeeze the spring-loaded clips on the sides of the recessed light fixture and insert the fixture into the ceiling opening. Release the clips to secure the fixture flush against the ceiling.

An exploded view showing the light fixture, twist-lock interchangeable trim, and key design elements like durable material, light reflector, sleek design, and matte finish.
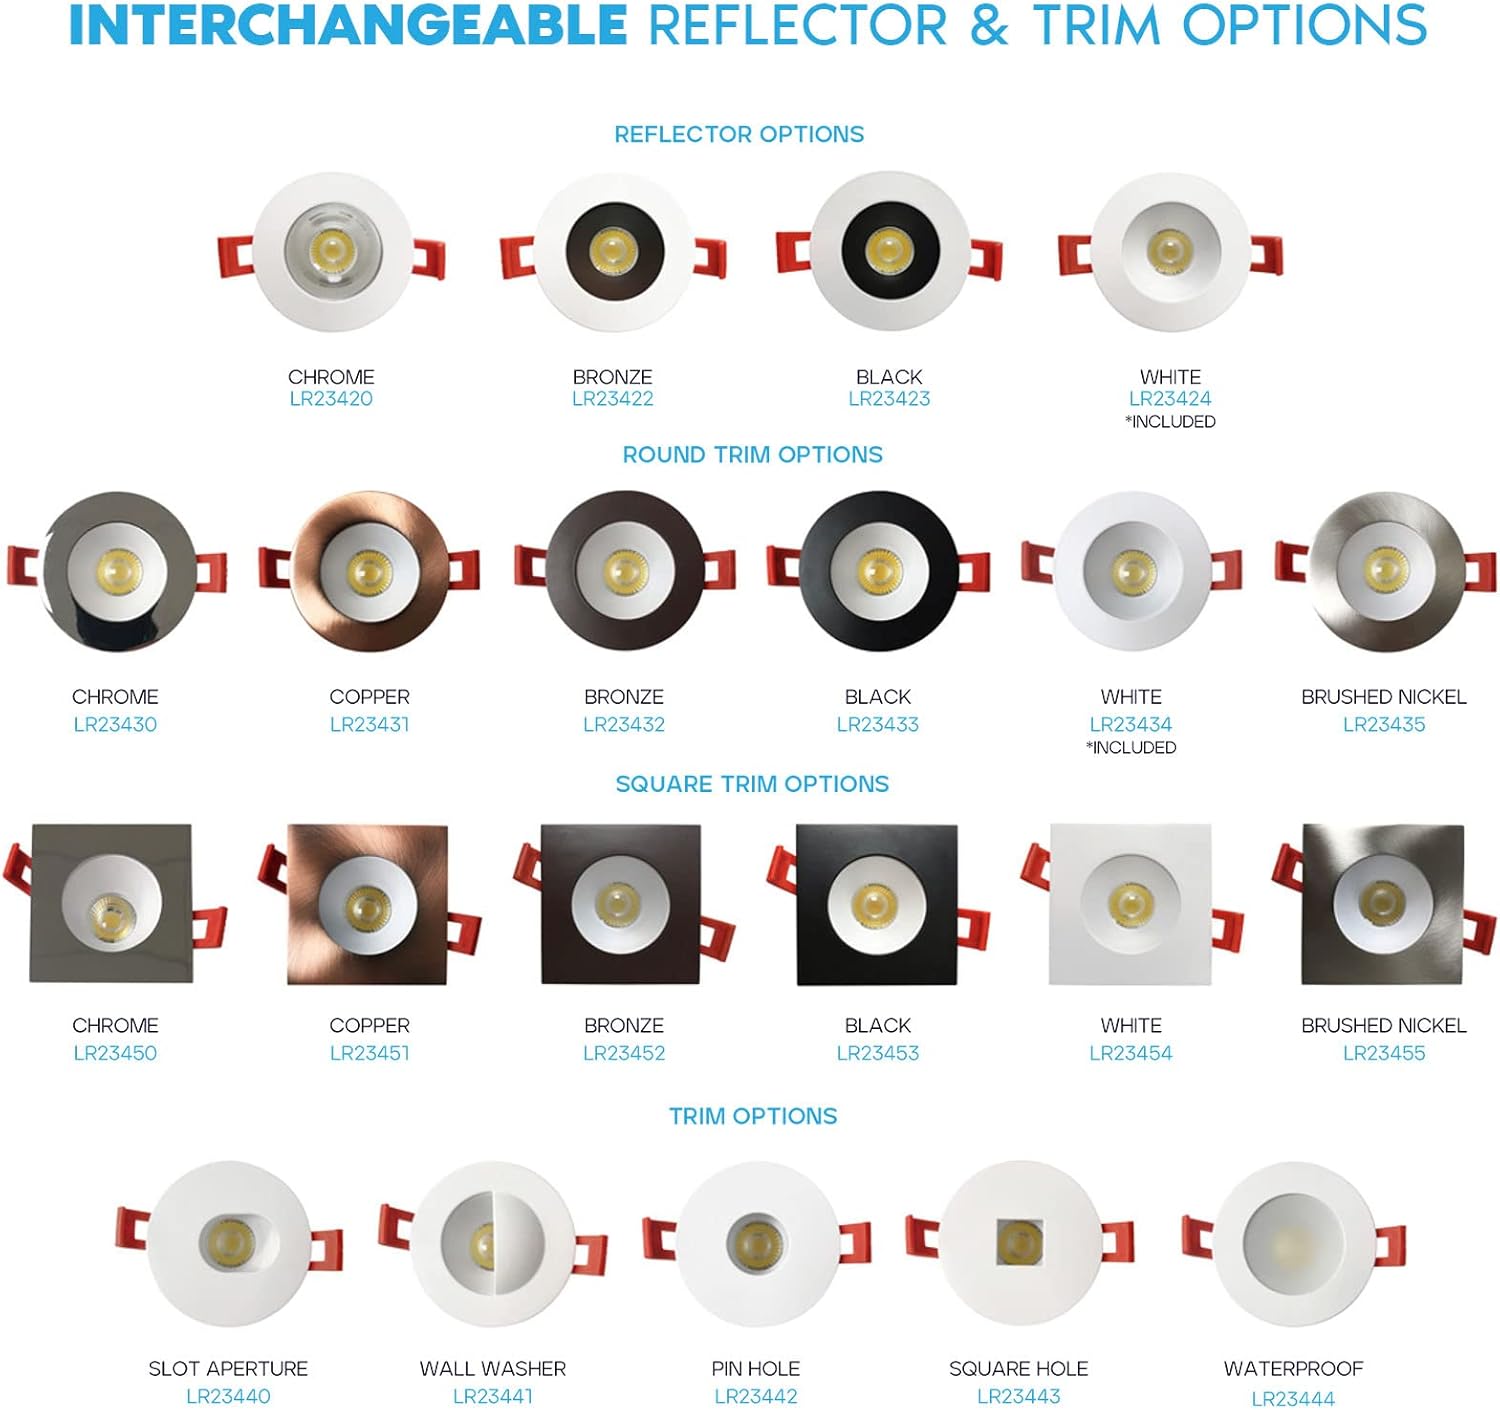
A display of various reflector and trim options available for the LUXRITE recessed light, including different finishes and shapes like round, square, slot aperture, wall washer, pin hole, and waterproof trims.
6. Operating Instructions
6.1 Color Temperature Selection
Your LUXRITE recessed light features a selectable color temperature switch located on the junction box. Before final installation into the ceiling, or by carefully accessing the junction box, you can choose from five color temperature options:
- 2700K: Warm White
- 3000K: Soft White
- 3500K: Natural White
- 4000K: Cool White
- 5000K: Bright White
Slide the switch to your desired color temperature setting. The selected setting will apply to the fixture once power is restored.

An illustration demonstrating the five selectable color temperatures (2700K, 3000K, 3500K, 4000K, 5000K) and the switch used to select them.
6.2 Dimming Functionality
This fixture is dimmable from 100% down to 10% output. For optimal performance, use with compatible LED dimmers. Refer to the list of compatible dimmers below.
6.3 Compatible Dimmers
The following dimmer brands and models are compatible with your LUXRITE recessed light:
- AYCL-153P
- DV-600PR
- DVCL-153P
- MACL-153MH
- MRF2-6CL
- D-600P
- NTELV-300P
- S-600P
- CT-600P
- CTCL-153P
- TG-600P
- TGCL-153P
- 6633
- 6674
- 6602
- IPL06
- ADTP703TU
- H703PTW
- 9540
- DAL06P

A visual list of compatible dimmer models from brands like Lutron, Leviton, Legrand, and Cooper, ensuring proper dimming functionality.
7. Maintenance
The LUXRITE LED recessed light fixture requires minimal maintenance. To clean the fixture:
- Ensure power is turned off at the circuit breaker before cleaning.
- Use a soft, dry, or slightly damp cloth to wipe the surface of the fixture.
- Do not use abrasive cleaners or solvents, as these may damage the finish or electrical components.
8. Troubleshooting
If you encounter issues with your LUXRITE recessed light, refer to the following common problems and solutions:
- Light does not turn on:
- Check if the power supply at the circuit breaker is on.
- Verify all wiring connections are secure and correct.
- Ensure the light switch is in the ON position.
- Light flickers:
- Confirm that the dimmer switch (if installed) is compatible with LED lighting.
- Check for loose wiring connections.
- Incorrect color temperature:
- Access the junction box and verify the 5-CCT switch is set to your desired color temperature.
If these steps do not resolve the issue, please contact customer support.
9. Warranty and Support
This LUXRITE LED recessed light fixture comes with a 3-year manufacturer's warranty from the date of purchase. This warranty covers defects in materials and workmanship under normal use.
For warranty claims, technical assistance, or any questions regarding your product, please refer to the contact information provided with your purchase documentation or visit the official LUXRITE website.


